I am still conceptualizing the structure of this little craftsman design, to see how it might work out. I sort of have the center eyebrow part of the roof imagined OK, but now it is time for the flanking parts.
Here it the shape of it, but you have to take away the bumpout on the R. Plain and without the bump, it has a 50′ width x 48′ deep footprint.
The “main” roof, out of which springs the eyebrow dormers, front and rear, has a 9:12 pitch, and the lower-pitched flareout (about a 4-1/4:12) covers front and rear bumps and porches.
That center span, the front-to-rear depth of the eyebrow bump, and the depth of the unbumped house below, is 32 feet, so for us at our location it is going to need trusses. They revised our state code to specify even higher GSLs (ground snow loads) at elevations above 1,000 feet, and per the new stuff, we need to design for 92 psf GSL.
I can only OK a span of about 13’5″ for 2×12 SPF (#2) sawn rafters at 16″ spacing with that kind of loading, and we need something that will do close to half of the 32. Trusses, son.
With the geometry of the roof thus mapped out at a 9:12 center, the 32′ span, the wing-out porch roofs, I get about 17 feet from ceiling to roof ridge top, so we’ll have to stack trusses.
To build it, the house would have its exterior walls stood, then the platform and beams and walls of the loft/vault center, and we are ready for the trusses and the crane. Here’s a sketch.
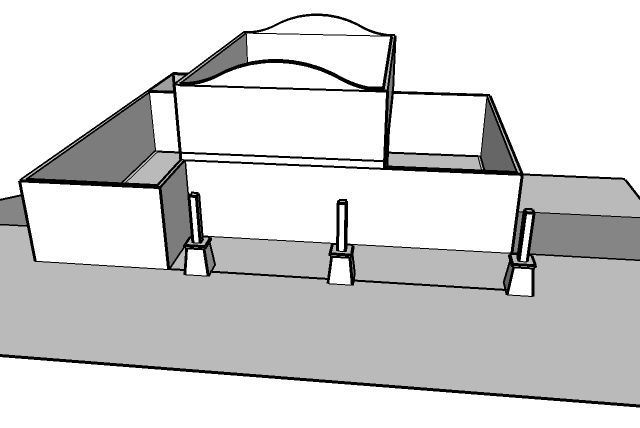
Now for the truss feasibility question, or better yet, is there a completely different way to do this. This pic shows a two-stack concept, with neither truss, the square-ish bottom or the triangle top, being over 9′ tall.
Does this make sense, Mr Truss Guy? Or is there a better way?
Edited 6/10/2008 5:42 pm ET by Gene_Davis


Replies
I think you could use attic trusses.
Go back and look at the numbers. You're missing the scale of things.
View Image
These things need to be trucked to the site over state highways.
View Image
"A stripe is just as real as a dadgummed flower."
Gene Davis 1920-1985
they can be delivered in sections, adding top hats or whatever you call them.
Piggies. Bob's next test date: 12/10/07
That works also!
We've done a number of spec houses of a similar design, minus the eyebrow. They have a 12:12 main roof, with a smaller full second story with a 4:12 dormer roof, contrived to appear to be an actual dormer. The trusses on this upper part are shaped like a witch's hat to give the appearance of a shed dormer dying into the 12:12 "main" roof. The trusses span 28', and the 12:12 commons have a heel height of around 24" to so that they are higher than the dormer trusses. so the total height is around 16'.
Like your drawing, they have a set of piggyback trusses stacked on top, though the piggybacks are much smaller than the ones in your drawing. They might be 48" tall. It seems to work out pretty well. One problem we have had is that the 12:12 peak of the dormer trusses tends to wind up higher than the main trusses. This is because they are designed based on theoretical heights, and when you stack floor system, plates, etc we tend to gain some height. It's not a problem as long as you catch it before you set all the trusses--we have added a shim to the lower walls.
The only other detail I see on ours is that the truss engineer requires a 6' scab from the top chord of the main truss to the top chord of the piggyback.
The way it would be trussed is going to depend on what the second floor/loft plan looks like.
How wide of a room are you looking for?
This should answer the q you raised. If you need more, say it.
Does MiCrazy work with Mitek software? I appreciate your input.
View Image
View Image
"A stripe is just as real as a dadgummed flower."
Gene Davis 1920-1985
The drawing you posted here doesn't give any info on whether you want an attic room in the roof areas adjacent to the center section.I looked this morning at my truss drawings and I will have 12'6 +/- tall trusses for the the lower half of the piggy backs which contain the attic room detail. 8'9" ceiling height in that room. These will be trucked over highways as well, either a wide or over tall permit required, depending on which way the plant ships them.
I did have a thought on a different way to frame this though.
think it might be possible to use the two gable ends as bearing as well as the two side walls of the eyebrow center section and purloin or ladder frame between those points.
Spans would be significantly reduced this way.
They can't get your Goat if you don't tell them where it is hidden.
Dovetail, you said:
I did have a thought on a different way to frame this though. think it might be possible to use the two gable ends as bearing as well as the two side walls of the eyebrow center section and purloin or ladder frame between those points. Spans would be significantly reduced this way.
I thought about that as well. A structural ridge, a structural intermediate beam to cut the rafter spans in half, and a pony atop the 9' house wall in front and back, and then the two side-third roofs can be framed in 2x10s or 2x12s.
Here's the prob, though. You still gotta frame for the ceilings below. The trusses handle that with their bottom chords.
View Image
"A stripe is just as real as a dadgummed flower."
Gene Davis 1920-1985
Why not frame the ceilings below as floors to pave the way for future expansion into the attic area?
Not sure you and I are on the same page, and then again I may be all wet here. Look at your drawing, Picture bearing points at the tall gable end walls at each end of the long dimension of the building and one at each side the two story walls of the eyebrow section. Your building is (guessing here I don't recall exact dimension) 50' long and you have a 24' wide two story section taken out of the middle of that . That leaves you roughly 24' divided into two spans, one each side of the two story eyebrow section.
Floor joists run from gable wall to eyebrow section walls, span is roughly 12'.
Attic ceiling joists do as well.
Roof purloins run the same way , parallel to the long dimension axis of your building.
Ledger to the two story walls of the eyebrow section and the gable end walls for the floor and ceiling joists bearing.
Bearing needs to be carried down through the first floor walls under the eyebrow walls section that run the short dimension (or front to back ) of the building as well as at the gable ends. You asked for ideas, you didn't specify they had to be good or workable ones .
;-)
They can't get your Goat if you don't tell them where it is hidden.
Edited 6/11/2008 1:15 pm by dovetail97128
Gene, Go back to your first post and look at the strapping or bracing you have drawn that lies perpendicular to the run of the trusses and between the piggy back sections.This is what I am proposing the joists run would be as well as the purloin or rafter run. Simply two main bearing points for that section of the roof, the gable end walls and the front to back walls of the eyebrow section.
They can't get your Goat if you don't tell them where it is hidden.
Ya, I use Mitek. I quoted one similair to this a while back, but it didn't go. Here's a few shots.
Edited 6/11/2008 12:07 pm by MiCrazy
Thanks a lot for the renders. What you did is a subtle variation on what you will see if you go here and look closely at the pics.
http://picasaweb.google.co.uk/diana17668/CampbellCreekRdNov2007
The one shown in the pics has no sets of girders and barrelvault cross-trusses, in doing the center eyebrow shed. It does that roof section with the eyebrows as a set of 32'-span trusses, bearing on the upslope-flat-downslope window headers. I have a feeling that your way is more expensive than the way they did it.
Your model, and the house shown in the pics at the Picasa site, vary from my thing in one big aspect. Mine has no upstairs space to either side of the center dormer.
Your model, and the house shown in the pics, uses some interesting trusses to do those spaces that flank the center. Whaddya call those?
As you can see from my pics in earlier threads, I have a big 17'-plus space, totally unused, from the ceilings at the ends of the house away from the two-story center, all the way up to the ridge.
How would you truss the side areas of my model?
View Image
"A stripe is just as real as a dadgummed flower."
Gene Davis 1920-1985
I see my or our problem now !! ""Your model, and the house shown in the pics at the Picasa site, vary from my thing in one big aspect. Mine has no upstairs space to either side of the center dormer."" I was trying to create both a second story space and attic space each side of the center dormer. DUH!! They can't get your Goat if you don't tell them where it is hidden.
Edited 6/11/2008 1:25 pm by dovetail97128
It shouldn't be trussed at all.
It should be timberframed.
Only if they have a very large budget!
ICF and SIPS
They can't get your Goat if you don't tell them where it is hidden.
Back when I quoted that, I didn't have any details as to what kind of bearing I had over those windows. If I remember right, the elevation was a faxed magazine page and it looked like the windows were arched to follow the barrel. If you've got the bearing like the one in your link, then you could do what they did.
The interesting trusses are parallel chord scissors, and in my version, they "flattened out" at 2nd story ceiling height.
If you don't have any living space on either side, you'll have a base truss and a piggytop. In Michigan, anything over 12' needs a permit to go down the road so I'd cut it off a little under 12' (height wise), maybe 11'-6" ish. The max height we can build is around 13'-10". If no permit was required I'd make it as tall as I could. So, you'll probably end up with a 5 or 6 ft tall piggytop.
Gene,
I am about to start ( I hope!) a project that has 53' trusses, 8/12 pitch , clear span trusses, 22' attic room . No eyebrow dormer but 5 gable dormers ( 2 front side, 3 back side) and a 23' mono truss to create a shed roof off the back with a 2/12 pitch. Much like yoru drawing of the porch roof.
Attic room maximum width is 22' , determined by the cost effectiveness of using the LVL bottom chords and not having to step up from 12" deep LVL to 14" deep LVL. I was told we could achieve at least 25' if we bumped to the 14" LVL
Basic roof will have 3-ply girders each side of dormers with ladder infill between and commons for the balance. All the 8/12 pitch trusses are piggyback style.
Roof loading is no where near as high as yours, 37psf snow load, 100 mph wind loads.
One thing I noticed is your likely to need a girder truss to the left of your 2 story section with the eyebrow dormer.
"I can only OK a span of about 13'5" for 2x12 SPF (#2) sawn rafters at 16" spacing with that kind of loading, and we need something that will do close to half of the 32. Trusses, son."
Out of curiousity do you know what a 2x12 Fir (SS) will span? Probably be close to the 15'6" that you need. My charts only go up to 70 psf ground snow load.
Edited 6/13/2008 12:22 pm ET by Doobz26