How would you frame this cornice return?
A question for you expert framers out there … I live in N. MA and am building a 2nd home in Boothbay Maine. Last week we ran all the trim along eaves and rakes. I used Koma trim board, mainly because with it being a 34′ house on a hillside, I don’t want to be back on a 40′ ladder painting trim every few years.
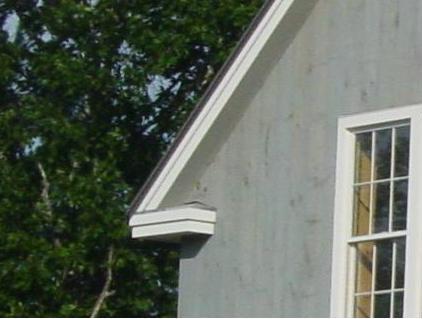
Last thing I need to do before the metal roof comes next week is to build the cornice returns, in time for the roofers to cap them with the roofing material. I don’t want the boxed return ends, so I’m thinking of doing the hip roof style returns. The picture is not my house, it’s just a style I want to copy.
My questions are: 1) I have a 12/12 roof with a 12″ overhang, and 4/12 roof on the bumpouts and porch. Would you replicate the 4/12 pitch on the cornice return roof? And 2) Do you typically make both of the little roof planes exactly the same pitch, or could you make the roof on the end of the return steeper? It’s hard to tell, but in the photo the end appears to be steeper.
If the answers to my question are too obvious or “it depends on what you like”, I apologize in advance. I just haven’t gotten the right angle (from above) to inspect many returns (and nearly crashed my truck a few times while trying while driving around)
Pete
Edited 2/28/2006 7:34 pm ET by shearwater


Replies
They are pretty much that exact return in the tauton siding and exterior trim book. It shows the framing and all the flashing, etc. A local library would have it if you don't want to buy.
http://www.taunton.com/store/pages/070741.asp
i'd do the 12/12 since that's the roof you are returning
i also like to extend the box so the rake lands on the box.. IE: if your overhang on the roof eave is 12", i'd make my rake ladder about 8" and the box-out will be 12" x 24" returning the same on the gable as the eave extends
View Image
Edited 2/28/2006 9:27 pm ET by MikeSmith
Edited 2/28/2006 9:28 pm ET by MikeSmith
Mike beat me to the answer I would have provided and he provided a pic. I do the same thing with the homes I build, given this situation
Mike's pic shows the sub-facia up off of the roof deck, which is correct detail. Leave the gable sub-facia, facia, soffit, 1 x 2 drip edge up off of the return roof about 1" to 1 1/2" for shingles, to allow drainage and the aforementiioned material ends to dry when wet.
We use the same pitch as the main roof for these returns, (as Mike says) our return is the same from the corner as the soffit is wide (12") and our gable soffit is 8" allowing the galbe to "die" into the return roof. Make sure you install wall flashing over the return roof.
Framed these for years,and now have my framers do them this way. Too old, too fat and too much other business to be climbing around on a scaffold or cutting, but I love it.
Edited 3/1/2006 1:00 am ET by txlandlord
txlandlord - thank you, and the only thing i'll change is to make my clearance a little smaller than you suggest, maybe 1/2", it being a metal roof and pvc trim.
pete
Mike,
Thanks for your suggestions and the pictures, which are just what I needed to see! I will take your tip on staying with the 12/12 pitch, and as for running the cornice past the rake, that looks real nice, but I've already run my fascia board and have left it only 2" long with miters precut. Also with my 12" rake overhand it may look a bit extreme.
Edited 3/1/2006 9:34 pm ET by shearwater
Pete, it does depend on what you like.
Around here we do mostly true hip returns. We call them "Queen Annes". I don't know why.
The question of pitch is also dependent on what look you are trying to achieve. I don't normally make design decisions and I normally just repliate what is drawn.
The front pitch affects the look in a significant way, so no one can really say what is best. it all has to fit together with the rest of the house details.
To achieve the look that the architect desires, I usually just scale the box and then create the overhang with the same pitches and projections that the plans show.
Here's series of pics where I screwed up. I started out building a queen anne ( I do them on auto pilot) and discovered that the plans actually wanted a hip return terminating with a gable.
The close up shows the frieze intersecting with the point on the hip return. This results in a clean installation and is preferable. What you don't want is for that hip point to intersect in the middle of that frieze, instead of the top or the bottom.
In any event, I ended up creating a small gable and adding some plywood to fill in the roof. You can see the seam on the flying gable picture. The close up picture shows me finding the cut line for the plumb cut of the gable. I'd like to see someone do that with the speed square.
The other close up shows me making the final cut to create a 3/4" gap above the osb for the shingles. I lay my saw flat on the shroud and it makes a perfect cut that perfectly mirrors the roof line. That is just one small benefit of removing that extended table.
The two standing gables show the hip returns that terminate with a gable. I'm not that fond of that style but I've seen some that had a better look.
Theres really quite a few different ways to do these terminations and I wish I had more pics. I lost quite a few in a crash. I thought I had a series showing the anatomy of a hip return but I can't seem to find it.
blue
blue,
Good point about lining up that hip point to fall on either end of the frieze board. I probably would have missed that on my own, thank you.
I'm a bit slow on your 3/4" gap in the OSB for the shingles. I assume you mean roof shingles, not siding. Does that give you a notch to tuck the last course in on the rake?
Nice save on the conversion.
Pete
Your right Shearwater, I meant shingles.
We leave a 3/4" gap to slide the flashing and shingles up under the trim. Because the trim is painted, and exposed, it also needs air to circulate to prevent rotting.
blue
Knocked together a prototype after dinner last night. Once I figured out to basically frame it just like a hip roof with cheek cuts & all, it made more sense. Tomorrow we'll check the fit under the roof.
View Image
I still like it better with the hipped return.
uh,...... isn't that a hip return?
I think I mistook your prototype for what is really going on at the roof/return corner. What you appear to be saying is that what you built is the actual return itself. I stand corrected . . . that is a hipped return, and a good-looking frame job.
Other responders in this thread have offered photos that showed cornices with returns that were shorn off flush, without hips, and that is what I thought I was seeing when I too-quickly looked at the pic of your prototype.
Show us the pic of the installation!
This isn't mine....it's shearwater's, the original poster....and an excellent looking prototype at that!!
Thanks for your comments and interest in how this turns out. Had a day and a half this weekend and got 3 of the 4 boxes built, installed and trimmed out. I had to stretch the prototype's box out a little after the test fit. Here is the south gable.
View Image
And here is a close up of one of the boxes. It's trimmed with Koma pvc trim board, those are 1x10's on the fascia, and 1x4 shadow board.
View Image
Just ignore the large file which was mistakenly attached - didn't know how to remove it.
I'm glad that I went with your suggestions of building the 12/12 queen ann type returns. Whaddya think, is it OK for amateur work?
Pete
Shearwater, I think they look fantastic, especially for a guy that was asking such basic questions!
I have some concern about the functionality, specifically the ability to flash and discharge water and the ability to dry out the connection between the soffit and the roof shingles.. I'd probably be thinking about laminating another layer of osb on the roof to make it plane better with the exterior of that fascia. The shingler can do it but if you are adding a metal drip edge, it will tend to distort when he nails it down. The same thing will happen with the shingles.
We always leave that soffit up off the roofline by 3/4". The shinglers can slide their shingles well back behind the soffit, or flash it with some metal.
I wouldn't worry too much about it unless you experience a lot of driving rains.
Details, details, details.
You chose a nice looking fascia detail too. You've also executed the design well. I noticed that you stepped back the gable trim to align the molding slithly different and that's a nice touch. I normally step back the gable overhang at least 4'' but I might have used your method if I was framing a similar style fascia detail.
I'll give you a very high passing grade if you don't live in a rain zone.
blue
What blue said, that looks awesome!To reinforce what blue said about the roof planing withthe fascia...take a short block of wood and lay it onyour decking returns and slide the block out to your fascia...you should be able to do this and just kiss the top of your 1x. From the close up pix it looks like the 1xis to high. Now is the time to fix this.Also listen to what blue is saying about flashing that thingThat return should have about a 3/4 reveal above the deckingwith the gable soffit, so that you can slide flashing upinside your gable soffit. If you can picture laying a 3/4board on your return decking and scribing a pencil line on topof the 3/4 against the big gable soffit and cutting that lineout....that way you'll have a open space to slide your flasinginto. But before you do that you need to address the heightof the queen ann in relationship to your fascia(raise it up oradd another piece of decking)That ought to be clear as mud
Good explanation Butch.
Adding the decking should be quite easy. I do it occasionally when my pine work doesn't fit the soffit as well as it should.
On the other hand, if this is dessert framing, I doubt that water intrusion will really be a problem. I'd still laminate the osb just to eliminate that flat spot that will be created.
blue
Good explanation Butch.
Half the time you wonder ifn what your trying to write makes any
sense, sometimes I just wish I could just show someone than trying
to splain it.
Butch, Blue: Thank you for taking time to critique and offer suggestions. Yes, the plane of the roof is a little low wrt the shadow bd and I will raise it up with another layer of osb.
As for the 3/4" between rake ends and roof plane - initially I chose to forgo that, reasoning that given PVC trim which won't wick moisture, and a thin metal roof, that a drip edge would slide into the 1/8 gap I left. Rethinking this after hearing your advice, and being in coastal Maine - not a dry habitat, I may retro fit a wider notch under the rake board.
I really like that look of the wider roof that Mike Smith showed. In my situation though I chose not to use that, with the rake overhangs already built at 12" it would have made for a very large box, imo.
Whoa hold on there Shearwater!
If you are using a thin metal roof, you probably will be able to create a water tight caulk joint. If that's the case, you won't have to worry about a gap to dry out the bottom of the soffit. This will be more true if you have a metal to metal connection. Just be sure to use a durable expanding caulk that has some thickness. Thin beads don't stretch.
The gap is critical when shingles are used because you can't create a sealed connection.
Don't worry, I'm not gonna pull out the sawsall yet! ;)
We'll see just how the metal roofing crew wants to handle this detail when they're on site next Tuesday. I'm a bit concerned about the little pocket created by the intersection of the rake underhand, the return's roof, and the inside of the rake board. (BTW, I will cover it with Grace).
I'll post one more picture when it's all done to wrap up the thread. Thanks.
As I had said awhile ago, I intended to post some more pictures of the finished product to wrap up this thread.
As someone had noted from a photo of the box, the roof plane was a little low. I raised up the deck a bit to bring the plane right even with the trim line using 1/2" OSB.
Flashed the entire box's roof with Vycor.
There was some discussion & good advice about keeping the soffit 3/4" above the return to allow clearance for flashing and shingles. In this particular case however, we were dealing with a standing seam tin roof, so that clearance was not needed. I debated between cutting a thin kerf to insert the roof drip edge, and just caulking in in well. The roofies decided to just run a drip edge along the rake trim and caulk it, then they hit it with some matching paint. Any water that may find its way behind that drip edge should just run down the face of the PVC Koma board. If water gets to the cornie return roof inside, the Grace is lapped over the edge of the shadow board and the water has a clear path out. That's my hope, at least, on this Maine island.
View Image
Here's a shot of the current state of things. Windows are arriving on Friday and we'll be busy setting those next!
View Image
Thanks to all who added their good advice to this thread.
Pete
nice detailing.. cool site.. where is it ?
Mike Smith Rhode Island : Design / Build / Repair / Restore
Mike, thanks. It is on Barter's Island which is in Boothbay, ME. It is a timber frame & SIP project, me as owner/builder. Right now it's at about the same dry-in stage as your excellent project in RI, but soon your progress will be light years ahead of us.
Thanks for the follow up, looks good
cool... take some more pics when you trial fit itMike Smith Rhode Island : Design / Build / Repair / Restore