FHB Logo Facebook LinkedIn Email Pinterest Twitter X Instagram Tiktok YouTube Plus Icon Close Icon Navigation Search Icon Navigation Search Icon Arrow Down Icon Video Guide Icon Article Guide Icon Modal Close Icon Guide Search Icon Skip to content
Subscribe
Log In
  • How-To
  • Design
  • Tools & Materials
  • Restoration
  • Videos
  • Blogs
  • Forum
  • Magazine
  • Members
  • FHB House
  • Podcast
Log In

Discussion Forum

Discussion Forum

I Love My Kreg

DonCanDo | Posted in Tools for Home Building on October 31, 2009 12:43pm

With all of the “I love my MM” threads, I thought it was time to extol the virtues of the Kreg pocket hole jig.  I got it relatively recently and only used it twice so far, but it has let me join panels in a fraction of the time that it used to take.

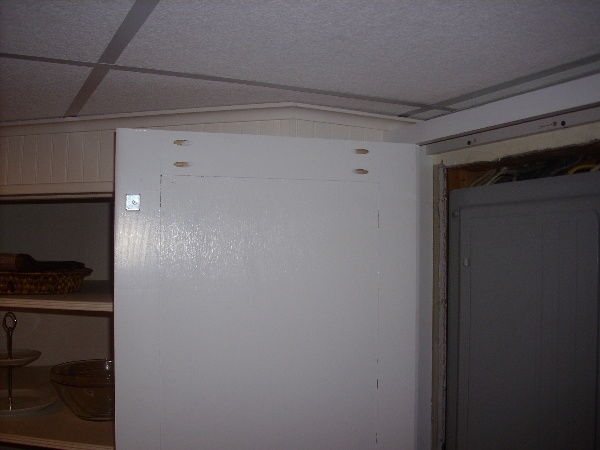
Here’s the latest thing I used it for.  The customer wanted a cabinet to hide the electrical panel:

View Image

Now, it looks like this:

View Image

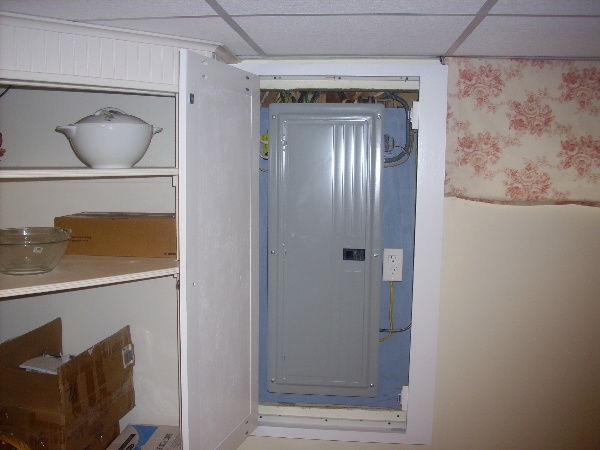
Nice big door for easy access in case they ever add another circuit:

View Image

And a close-up of the pocket screw holes.  I didn’t bother plugging the holes since they won’t normally be seen:

View Image

Reply
  • X
  • facebook
  • linkedin
  • pinterest
  • email
  • add to favorites Log in or Sign up to save your favorite articles

Replies

  1. DonCanDo | Oct 31, 2009 03:17am | #1

    Who moved my post to the Photo Gallery?  I started it under General Discussions.

    OK, so maybe it belongs here because, um.. it contains pictures???

    But then, not all posts with pictures end up here.

    I was actually hoping for a discussion of the Kreg pocket hole jig and maybe some examples of its use... something more along the lines of a general discussion.

    It's really no big deal, but it does make me wonder who is sitting around reading all of the new posts as they come in and making these decisions.  Is it necessary?  Does it add value?  Is it cost-justified?  I take no affront, I'm just a naturally curious guy.

    1. DonCanDo | Nov 01, 2009 03:12pm | #25

      OK, so now we're in the Tools for Home Building folder.  I suppose that probably makes more sense than either of the 2 folders that it's lived in so far, but I'd still like to know who's moving it.  Clearly whoever it is, is reading the posts and so they're reading this right now.  Who are you... you all-powerful, mysterious mover of posts?

  2. alwaysoverbudget | Oct 31, 2009 03:38am | #2

    that will teach ya to post pics!

    i'm like you i don't really see the need for not being in another cat.

    but anyway,i'm like you i bought a kreg,the cheapy deal,like 30.00

    went home used it and decided the best thing to do was throw it in the trash,so i would have to go buy their kit.i did buy it.

    i can't think of many 125. tools that paid for themselves so fast.

    face frames are painless now.

    on cabinet drawers i bore the front and back pcs. a little glue and screw them to the sides. the pockets are hidden by the fronts.  i think i could bust a finely dovetailed drawer before these would come apart.

    yea i wouldn't trade mine for a mm.

    the older i get ,

    the more people tick me off

    1. watchmenow | Oct 31, 2009 03:45am | #3

      on cabinet drawers i bore the front and back pcs. a little glue and screw them to the sides. the pockets are hidden by the fronts.  i think i could bust a finely dovetailed drawer before these would come apart.

      Nice move. maybe you could post some photos in the Gallery..............oh, wait, I think were there now.

      Pesky moderators.....Some of the saddest, emptiest people I have known are those who were raised to believe that they were above others. Even when among their peer group, they're not really happy because the bond which they share is easily broken, due to it's illusionary nature.

  3. Scott | Oct 31, 2009 04:39am | #4

    Which version of the jig did you buy? It's on my list.

    Thx,

    Scott.

    1. DonCanDo | Oct 31, 2009 06:00am | #5

      I bought the Kreg K3 which is also known as the Kreg Jig Master System.  I paid $139 locally.

      I had put off buying it for a while, but I'm glad I finally got it.  I've only used it twice on income-producing jobs, but with the "time is money" mentality, it's already paid for itself.

      1. Scott | Oct 31, 2009 06:19am | #6

        Cool thanks.Now if someone figures out a way to combine the MM with the Kreg system, I figure there will be a veritable thread Cartel here...LOL.Scott.

    2. JohnCujie | Oct 31, 2009 04:28pm | #10

      I use it to pre assemble meter joints on casing. John

      1. frammer52 | Oct 31, 2009 05:23pm | #11

        I know hwat is on my Christmas list now!!

        Thanks guys!

        Dave

  4. vintage1 | Oct 31, 2009 04:05pm | #7

    Don,

    I bought the kit about 5 years ago, but I typically just used the portable 2 hole jig with the clamp.

    I thought it was a nice tool but never really saw it as a time saver...


    Then I decided after three years of owing the whole kit to actually read the instructions and set it up properly.


    That made a huge improvement!  Now when I need to assemble face frames or exterior trim, such as azek window wraps, the kreg is the go-to tool.


    1. DonCanDo | Oct 31, 2009 04:19pm | #8

      when I need to assemble ... exterior trim, such as azek window wraps, the kreg is the go-to tool.

      I hadn't thought of that use, good call.

      1. vintage1 | Oct 31, 2009 04:25pm | #9

        Don,

        The kreg saves a ton of time on window wraps and it makes all of the joints virtually perfect.

        Just remember to use exterior/coated screws.


        1. mikeys | Oct 31, 2009 06:15pm | #12

          where do you get exterior screws for the kreg? 

          1. User avater
            FatRoman | Oct 31, 2009 06:29pm | #13

            You can get the Kreg brand and McFeely's stainless screws here
            http://www.mcfeelys.com/search/pocket+hole+screws+stainless'Man who say it cannot be done should not interrupt man doing it' ~ Chinese proverb

            View Image

          2. JulianTracy | Oct 31, 2009 07:07pm | #14

            I bought the original Aluminum version probably 10 years ago at a woodworking show..Recently, I bought the master kit plus about $100 in clamps and about $50 in screws from a guy on CL for about $75 or so. A great setup. Initially, I didn't like the look of the newer plastic units, but this thing is SUPER well made and thought out.And using the vacuum while drilling means you don't bog down your cordless drill.I don't use it often, but when I do, it's invaluable.Great for cabinetry filler/corners too.JT

          3. mikeys | Oct 31, 2009 09:17pm | #15

            thanks 

          4. vintage1 | Nov 01, 2009 12:23am | #17

            Looks like FR beat me to the punch on the SS, but I have also used coated screws from Kreg, available at your local BB or tool shop.

            Just another option.


    2. cowtown | Nov 09, 2009 05:00am | #30

      I bought one a few years back, and while it doesn't see daily use,when it does get used, it proves it's worth.


      found watching the 6 buck DVD helpful in conceptualization of the range applications outside of the obvious


      Eric.

  5. Hudson Valley Carpenter | Oct 31, 2009 10:53pm | #16

    Thanks for starting this thread.  I've already learned a couple of new ways to use the Kreg jig here.

    The only thing I have to contribute is that there are several good DVDs out which show how certain jobs are done.  Those demonstrations helped me to see how to set up and use the jig and the various clamps effectively and efficiently.

    Looking forward to making cabinets with it.  


    1. pixburd | Nov 01, 2009 05:38am | #19

      I bought Gary Steigler's DVD on the Kreg system at Rockler for $10 -- it's worth getting.I remember using dowels on my first project and then learning from Norm at NYW about how much better biscuits were. Most guys say that the switch from biscuits to pocket screws is just as dramatic. No more clamps while the glue sets up!

      1. Hudson Valley Carpenter | Nov 01, 2009 06:04am | #20

        That's been my progression too.  I have an old doweling jig, put away years ago.  I like biscuits but I've been using far fewer of them, since I bought the Kreg system.  Fast, accurate and strong. 

        Some guys say that they clamp some pocket screw applications but I haven't run into anything that needed it yet.

      2. Scott | Nov 01, 2009 06:38am | #21

        Ok, Guys.Seeing as we have the national brain trust for the Kreg system here, I've got a question. (I hope I'm not hijacking the thread.)I'm planning a large (42" x 12 feet) dining table out of VG Doug Fir.I'll start by ripping 1.5" pieces from 2x10 flat sawn boards. When the pieces are turned on edge I get a 1.5" x 2" piece of VG fir. Like I said, the pieces are 12' long.I have a jointer, and will no doubt need to build extension tables for 12' pieces.I always thought I'd put it together with biscuits every foot and lots of clamps. Would I be better with pocket screws?Much thanks,Scott.

        1. FingerJoint | Nov 01, 2009 09:27am | #22

          Scott,

          I think you coud go either way on this one.  Just plain glueing the jointed sides would be plenty sufficient.  I would probably use biscuits for alignment, but I don't think it's needed for strength. 

          That being said, I LOVE my Kreg pocket hole jig.  I use if for cabinet assembly.  Especially face frames.  It's the best bang for the buck of any tool I know.  And I own a lot of tools. 


          1. User avater
            talkingdog | Nov 01, 2009 11:57am | #23

            I don't have a Kreg, but I do have a Festool Domino, and have
            been using it for a lot of things other than the specialized
            purpose I bought it for. Using the built-in stops, it's just amazingly fast to build
            stuff that's strong and needs no fasteners.Costs a whole lot more than a Kreg, though.

        2. DonCanDo | Nov 01, 2009 03:06pm | #24

          I don't think that's the ideal application for pocket screws.  It seems like biscuits would be easier in this case since, once assembled, you can clamp the entire table with web clamps.

          Otherwise, you're talking about using something like 300 pocket screws.  I just seems like that would get tedious.

          Another advantage to biscuits is that if one day you decide to re-finish this table, you'll be able to remove a lot more material than if you had used pocket screws.

          1. Scott | Nov 01, 2009 07:39pm | #26

            >>>Otherwise, you're talking about using something like 300 pocket screws. I just seems like that would get tedious.My thoughts exactly, thanks.It will have to wait for another project.Scott.

        3. doodabug | Nov 01, 2009 07:50pm | #27

          If you ever drill holes for bench dogs, you won't want any metal in the top.http://dallasmartin.shutterfly.com

          1. Scott | Nov 01, 2009 07:57pm | #28

            Right. Tends to be a bit tough on those $50 Forstners.Scott.

        4. BradG | Nov 06, 2009 10:55am | #29

          stick with biscuits and clamps ... Screws + Kreg are good for one layer only.

          Bowling alleys use a stacked method of glued and nailed layers (think of adding 3" thick T&G and you get the idea) with twisty nails ... no screws.

        5. joeh | Nov 09, 2009 05:50am | #31

          Scott, I don't know how you're planning to glue this up, but glue has an open time that has to be taken into account.

          There's a limited time frame that allows you to align your pieces and get the clamps on.

          You thinking you can put this all together at one time?

          Joe H

          1. KenHill3 | Nov 09, 2009 07:35am | #32

            I'm gonna +1 for using the Kreg to pre-assemble exterior window wraps. Unreal, it's so much faster.View Image

        6. Shep | Nov 10, 2009 01:04am | #40

          For something like that, I wouldn't bother with bisquits OR pockets screws.

          I'd glue up the top in sections, maybe gluing 3 or 4 strips together at a time. Then glue several of those together, and finally glue 2 or 3 sub-assemblies into the full size top.

          First, you won't be wresting a big, heavy piece of wood until the last glue up. Second, you'll have more manageable pieces to clean up between gluings. Third, you won't be going crazy trying to get all those pieces together before the glue starts setting up.

          1. Scott | Nov 10, 2009 03:46am | #43

            Thanks, nice thinking.Yes, I would always build it up in smaller sections and then the two subs at the end.Cheers,Scott.

  6. fingers | Nov 01, 2009 01:03am | #18

    I agree with all the posts. It's a very handy device. I bought the heavy plate clamp which mounts to a bench. It really helps to hold the stock down so that there's minimal height discrepancy after the screws are inserted.

  7. Garry | Nov 09, 2009 10:29pm | #33

    Here's another use for the jig.I used it to fasten the risers to the stringers and the treads to the stringers and risers after setting them in construction adhesive. No face nails at all showing.

    View Image

    View Image

    View Image

    View Image

    http://www.superwoodworks.com
    1. frammer52 | Nov 09, 2009 11:27pm | #34

      May I ask why you fet it necessary in this application to use the Kreg?

      Nice looking stairs by the way.

      1. Garry | Nov 10, 2009 12:48am | #36

        are you referring to using the jig opposed to just using the step drill bit or to use hidden screws in general?http://www.superwoodworks.com

        1. frammer52 | Nov 10, 2009 12:52am | #38

          Using the kreg on the back side of a stringer.

          1. Garry | Nov 10, 2009 03:35am | #42

            To set the pockets to the correct depth so the screws did have a chance to come through the face of the risers and treads.

            The pocket screws pulled everthing tight together and as I said no face nailing was needed. Made for a very solid stairs and no squeaking.http://www.superwoodworks.com

    2. DonCanDo | Nov 10, 2009 12:34am | #35

      Seriously cool!

      And that landing is awesome.  What kind of wood is that?

      1. Garry | Nov 10, 2009 12:49am | #37

        Thanks Don,

        The wood is curly yellow birch.http://www.superwoodworks.com

    3. woodhak | Nov 10, 2009 01:03am | #39

      Great looking stair!! Fine homebuilding at its best. Unlike a thread else where on this site talking about building basement partitions on top of carpeting.

      this is work to be proud of..

      1. Garry | Nov 10, 2009 03:30am | #41

        Thanks woodhak.http://www.superwoodworks.com

Log in or create an account to post a comment.

Sign up Log in

Become a member and get full access to FineHomebuilding.com

Video Shorts

Categories

  • Business
  • Code Questions
  • Construction Techniques
  • Energy, Heating & Insulation
  • General Discussion
  • Help/Work Wanted
  • Photo Gallery
  • Reader Classified
  • Tools for Home Building

Discussion Forum

Recent Posts and Replies

  • |
  • |
  • |
  • |
  • |
  • |
View More Create Post

Up Next

Video Shorts

Featured Story

Choosing a Paintbrush

Tips for picking the right paintbrush based on paint type, surface, and personal comfort.

Featured Video

Builder’s Advocate: An Interview With Viewrail

Learn more about affordable, modern floating stairs, from design to manufacturing to installation.

Related Stories

  • Midcentury Home for a Modern Family
  • The New Old Colonial
  • Modern and Minimal in the Woods
  • Bryce Hollingsworth, Dry-Stone Waller

Highlights

Fine Homebuilding All Access
Fine Homebuilding Podcast
Tool Tech
Plus, get an extra 20% off with code GIFT20

"I have learned so much thanks to the searchable articles on the FHB website. I can confidently say that I expect to be a life-long subscriber." - M.K.

Get home building tips, offers, and expert advice in your inbox

Signing you up...

This site is protected by reCAPTCHA and the Google Privacy Policy and Terms of Service apply.
See all newsletters
See all newsletters

Fine Homebuilding Magazine

  • Issue 333 - August/September 2025
    • A Practical Perfect Wall
    • Landscape Lighting Essentials
    • Repairing a Modern Window Sash
  • Issue 332 - July 2025
    • Custom Built-ins With Job-Site Tools
    • Fight House Fires Through Design
    • Making the Move to Multifamily
  • Issue 331 - June 2025
    • A More Resilient Roof
    • Tool Test: You Need a Drywall Sander
    • Ducted vs. Ductless Heat Pumps
  • Issue 330 - April/May 2025
    • Deck Details for Durability
    • FAQs on HPWHs
    • 10 Tips for a Long-Lasting Paint Job
  • Issue 329 - Feb/Mar 2025
    • Smart Foundation for a Small Addition
    • A Kominka Comes West
    • Making Small Kitchens Work

Fine Home Building

Newsletter Sign-up

  • Fine Homebuilding

    Home building tips, offers, and expert advice in your inbox.

  • Green Building Advisor

    Building science and energy efficiency advice, plus special offers, in your inbox.

  • Old House Journal

    Repair, renovation, and restoration tips, plus special offers, in your inbox.

Signing you up...

This site is protected by reCAPTCHA and the Google Privacy Policy and Terms of Service apply.
See all newsletters

Follow

  • Fine Homebuilding

    Dig into cutting-edge approaches and decades of proven solutions with total access to our experts and tradespeople.

    Start Free Trial Now
    • Facebook
    • Instagram
    • X
    • LinkedIn
  • GBA Prime

    Get instant access to the latest developments in green building, research, and reports from the field.

    Start Free Trial Now
    • Facebook
    • YouTube
  • Old House Journal

    Learn how to restore, repair, update, and decorate your home.

    Subscribe Now
    • Facebook
    • Instagram
    • X

Membership & Magazine

  • Online Archive
  • Start Free Trial
  • Magazine Subscription
  • Magazine Renewal
  • Gift a Subscription
  • Customer Support
  • Privacy Preferences
  • About
  • Contact
  • Advertise
  • Careers
  • Terms of Use
  • Site Map
  • Do not sell or share my information
  • Privacy Policy
  • Accessibility
  • California Privacy Rights

© 2025 Active Interest Media. All rights reserved.

Fine Homebuilding receives a commission for items purchased through links on this site, including Amazon Associates and other affiliate advertising programs.

  • Home Group
  • Antique Trader
  • Arts & Crafts Homes
  • Bank Note Reporter
  • Cabin Life
  • Cuisine at Home
  • Fine Gardening
  • Fine Woodworking
  • Green Building Advisor
  • Garden Gate
  • Horticulture
  • Keep Craft Alive
  • Log Home Living
  • Military Trader/Vehicles
  • Numismatic News
  • Numismaster
  • Old Cars Weekly
  • Old House Journal
  • Period Homes
  • Popular Woodworking
  • Script
  • ShopNotes
  • Sports Collectors Digest
  • Threads
  • Timber Home Living
  • Traditional Building
  • Woodsmith
  • World Coin News
  • Writer's Digest
Active Interest Media logo
X
X
This is a dialog window which overlays the main content of the page. The modal window is a 'site map' of the most critical areas of the site. Pressing the Escape (ESC) button will close the modal and bring you back to where you were on the page.

Main Menu

  • How-To
  • Design
  • Tools & Materials
  • Video
  • Blogs
  • Forum
  • Project Guides
  • Reader Projects
  • Magazine
  • Members
  • FHB House

Podcasts

  • FHB Podcast
  • ProTalk

Webinars

  • Upcoming and On-Demand

Podcasts

  • FHB Podcast
  • ProTalk

Webinars

  • Upcoming and On-Demand

Popular Topics

  • Kitchens
  • Business
  • Bedrooms
  • Roofs
  • Architecture and Design
  • Green Building
  • Decks
  • Framing
  • Safety
  • Remodeling
  • Bathrooms
  • Windows
  • Tilework
  • Ceilings
  • HVAC

Magazine

  • Current Issue
  • Past Issues
  • Magazine Index
  • Subscribe
  • Online Archive
  • Author Guidelines

All Access

  • Member Home
  • Start Free Trial
  • Gift Membership

Online Learning

  • Courses
  • Project Guides
  • Reader Projects
  • Podcast

More

  • FHB Ambassadors
  • FHB House
  • Customer Support

Account

  • Log In
  • Join

Newsletter

Get home building tips, offers, and expert advice in your inbox

Signing you up...

This site is protected by reCAPTCHA and the Google Privacy Policy and Terms of Service apply.
See all newsletters
See all newsletters

Follow

  • X
  • YouTube
  • instagram
  • facebook
  • pinterest
  • Tiktok

Join All Access

Become a member and get instant access to thousands of videos, how-tos, tool reviews, and design features.

Start Your Free Trial

Subscribe

FHB Magazine

Start your subscription today and save up to 70%

Subscribe

Enjoy unlimited access to Fine Homebuilding. Join Now

Already a member? Log in

We hope you’ve enjoyed your free articles. To keep reading, become a member today.

Get complete site access to expert advice, how-to videos, Code Check, and more, plus the print magazine.

Start your FREE trial

Already a member? Log in

Privacy Policy Update

We use cookies, pixels, script and other tracking technologies to analyze and improve our service, to improve and personalize content, and for advertising to you. We also share information about your use of our site with third-party social media, advertising and analytics partners. You can view our Privacy Policy here and our Terms of Use here.

Cookies

Analytics

These cookies help us track site metrics to improve our sites and provide a better user experience.

Advertising/Social Media

These cookies are used to serve advertisements aligned with your interests.

Essential

These cookies are required to provide basic functions like page navigation and access to secure areas of the website.

Delete My Data

Delete all cookies and associated data