I discovered that I need to replace the toilet flange in a bathroom. The old one is cracked and can not be repaired according a plumbing supply store. Instead, I was told to replace the flange. The existing flange is glued to a 4″ pvc pipe. I was told to cut off the flange face and then try to remove the glued piece by sawing it off in sections and then prying it out. I have following questions;
1. What type of blade (tpi) to use on the recip saw to saw the flange face.
2. If I use a jig saw to score the glued piece, what tpi blade to use.
3. The bathroom floor has ceramic tile on a concrete floor.
4. The last time I used a recip saw on a yard sprinkler pvc line, I cracked it. I hope not to repeat that in this instance.
I will have to stuff the drain pipe to block sewer gas while I am working. The drain goes from 3″ (existing glued neck of the flange) to 4″. Do I just use rags?
4. Any other recommendations?
I know I am asking lots of questions. Since I am retired, I would like to save a few bucks instead of calling a plumber.


Replies
you can purchase a metal repair plate that you simply screw over the cracked flange. you can just use rags but make sure you remove them all. the sewer gas won't be all that bad anyway. I think the repair plate cost about $10.
There are many options to repair a cracked flange. Visit a well-equipped hardware store (not big box) and see what they have to choose from.
To cut through the pipe (if you go that route), just use a hacksaw blade wrapped with tape on one end (or in a hacksaw blade holder). Much more control than if you used a power tool (and you're retired anyway, so time isn't a factor). TPI isn't real critical, only something too fine will just result in the teeth clogging. Basically you want a coarse metal or fine wood blade.
If you do replace the flange, make sure the new one has a metal insert, so you won't end up with a broken flange again in a few years.
You don't need to plug the drain while you're working (though you may want to run the exhaust fan to keep any odors out of the rest of the house). Do plug it with rags when you're not working, though.
>>>(and you're retired
>>>(and you're retired anyway, so time isn't a factor)
Assumptions, assumptions, assumptions....LOL.
...coming from a guy who hopes to loosen the load sometime in the next decade.
And I was just about to remark that if you're over your head with a closet flange you're looking at the whole problem from the wrong perspective.
>>>"
Submitted by
>>>"
Submitted by gracecon on Thu, 02/18/2010 - 15:42.
you can purchase a metal repair plate that you simply screw over the cracked flange. you can just use rags but make sure you remove them all. the sewer gas won't be all that bad anyway. I think the repair plate cost about $10."<<<
Not bad advise. I'd do it if possible. Use a wax ring with a horn, Horn goes into flange. There are other options as well, but this could be the cheapest good fix.
You can get a PVC saw, it looks like a hand powered miter saw, come to think of it a miter saw would probably work too. Another saw to try is a little wire saw, they are about $5 I think, just make sure to move fast, and don't stop until you're through.
The PVC that you mentioned cracking while cutting it was probably an SDR21 type thickness. Your flange should be glued into Schedule 40, much thicker. If the PVC is close to room temp, I doubt it will crack unless you push a wood blade too hard. Just take it easy and don't try to hurry.
Lemme know what happens.
"you can purchase a metal
"you can purchase a metal repair plate that you simply screw over the cracked flange."
Does a repair plate somehow fit under the flange? I'm assuming that the flange probably cracked from the force of over-tightened toilet mounting bolts.
Bruce,
I'm thinkin' that there is more than one way to bust a flance. Poor floor, poor mounting, are two off the top of the old head.
They do make a split ring that could be put under the flange ring. But if you have good flooring and secure the flang to the floor good, a metal flange should hold the toilet in place.
Finally Done!
I want to thank everyone again for their valuable advice. It took a while to finish but I am done. My back was out for a while and then we had to do some 'elder care' for my father in law. I think it would have taken a full day to complete the job from start to finish if were able to stay with it. I hope the description below of what I did helps the next pencil pusher like me. Again, I followed the suggestions given to me in this forum.
1. Sawed old flange neck with a wire saw. (stuffed rags down into the 4" drain pipe to preven sewer gas from coming in)
2. To remove the glued neck of the flange, we had to make about six cuts with a small hand saw and remove those pieces with wood chiesel.
3. Purchased a glass bit set (when first suggested in this forum, I thought the bits would actually be made of glass!)
4. Purched a new flange with SS top.
5.Drilled four holes to screw the flange through ceramic tile and concrete subfloor
6. Three holes matched the flange hole pattern. One did not.
7. Filled three holes with two part epoxy mix and then glued the flange into 4" drain pipe. Inserted three 1.5" stainless screws through the flange into the epoxy filled holes.
8. Waited 24 hours and installed toilet bowl and tank. ( replaced old hardware in the tank with new hardware.)
One surprise was when I filled the tank, the toilet did rock and I shimmed in the back.
Sounds like it should be bulletproof. Just check your shim job from time to time to make sure that no rock develops.
Yo! Andy2
Glad you got it!
If only the flange is cracked not affecting the sealing I'd get a metal plate. If it's not possible to get a good seal with a wax ring, perhaps a waxless ring that seals along the inside of the drain would suffice.
If you have a drill you could use an abrasive wheel or fine toothed round blade to reach down and cut the glued section off from inside the pipe. Repair flanges that reach down farther than the old flange are availble.
I'd be tempted to use a short section of 1/8" metal pipe and an extra long screw on the multimaster to reach down in there.
Thanks to all for great suggestions. I plan to revisit another plumbing store which is bigger. I will see what they have and go from there. From reading about pvc glue, I discovered that it melts both joined pieces and becomes an integrated piece. Thats why it is may be harder to pry off.
>>In Over My Head?-Closet
>>In Over My Head?-Closet Flange
I recommend a really good pair of goggles, if not a full face mask.
Otherwise, do NOT work with your mouth open!
(Sorry, I just couldn't resist....{G})
>>>"
I recommend a really
>>>"
I recommend a really good pair of goggles, if not a full face mask.
Otherwise, do NOT work with your mouth open!"<<<
Excellent advice, Bob! hehehe
I actually seen a guy get a mouthful of yuk, when the end of a sewer snake came out of the cleanout after an UNsuccessful attempt at cleaning out a sewer.
I never got a speck on me,... but I was sick from just watching that blob of poo sail just perfect into his mouth! yucky yucky
Same dude about 2years later learned about walking on old septic tanks,.. a lid gave in under his weight. He was waist deep in it that time!!!
If I was him I'd quit plumbing!!!
I had the same problem in my house. I have wood floors. Don't know what yours is. But I didn't worry about the broken flange and just lag bolted my toilet to the wood. Problem solved.
I did install blocking first under the wood. I haven't tried using conc. anchors yet but I wouldn't hesitate to do so.
We have ceramic tiles over concrete. The bigger plumbing store recommended that I go ahead and remove the old flange.
Another option is to drill through into the floor and install double-ended closet bolts in lead shields.
And, BTW, the usual reason for a flange breaking (beyond the fact that the plastic ones are super crummy and should be outlawed) is that the toilet is rocking. (This sometimes abetted by overtightening of the closet bolts, attempting to prevent the rocking.) When you do get around to re-setting the toilet, be sure that it is shimmed somehow to ABSOLUTELY prevent any rocking -- this isn't the job of the closet bolts.
And once again, don't go to a "big plumbing store", go to a good hardware store. Check out the options.
Cutting out the broken flange is absolutely not necessary, although the choice is yours at the end.
Homedepot or professional's store, you'll find repair rings. I would get thicker brass repair ring. Also buy 1 wax ring with built in drain flange and extra 2 wax rings. You also need #12 bugle head stainless wood screws, 5 just in case.
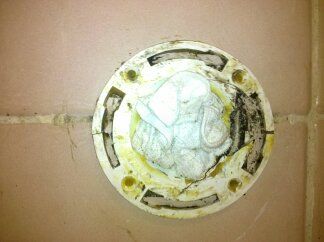
Your photo looks like the pvc flange sits on top of the tiles. Adding repair ring will raise the height of the flange, so when you return the toilet, you must raise the toilet on shims (No wood shims, I use pieces of vinyl commercial floor tiles). If you look under the toilet, there is about 3/4" of space for the wax ring. If you raise the flange too high, all the wax will squeeze out and you will not have water tight seal.
The concrete you see is about 1" thick layer of mortar that used to be used before they came up with cement boards. You may have to drill through this and the tiles, so, you also need masonary drill bit for the screws. You don't need hammer drill for this case.
First drill hole through the cement layer so that screw will pass. Try not to drill through the wood, but if you do, you can just screw on a back plate from the bottom. The screw will have to be long enough to hold repair ring, existing flange, tile.....past the wood underlayment. If your underlayment is old 1x6 t&g, I would cut 3/4" plywood ring and screw it on from the bottom as a back plate. The screws could hit the joint in the 1x6 and give you no support.
Then smear on layer of wax on old flange and put the repair ring over, matching the screw holes. Push down and squeeze out the wax. Smooth the wax. Screw down the repair ring. If the repaired flange is 1/2" off the tile, you should shim the toilet up 1/4 to 3/8". Try setting the toilet off the floor 3/8" before you do the repair. If the gap is too much for you to live with, you will have to cut the flange. If you cut the flange, however, you will have to secure the drain pipe so it does not move around.
Hope this helps.
K1c,
As Dick Cheney would say, I am still dithering. Once I start cutting the flange, there is no return. You are correct in that the flange sits on top of ceramic tiles. However, its a single story home which sits on a concrete slab. There is not much space between the flange and the tiles (perhaps a dime could slip under it). Also, I am not sure if I would crack the tile if I drill through it after placing a repair ring on top of old flange. When I went to Home Depot earlier, they did not have a full repair ring.
GO TO A HARDWARE STORE!!
If you are worried about cracking the tile, take a 4.5" angle grinder and press a diamond blead into the tile around the flange, making a series of cuts into an octagon (or whatever sided shape works. It's under the toilet so it's not seen. Then you can get to whatever you need without worring about chipping a tile in an area that can be seen.
Its kind of going slow. I cut the flange face with a wire saw as one of the members had suggested. It was pretty easy. The old flange was not screwed to the floor. Now I am chipping out the glued piece inside the 4" drain line with a hand saw and a chiesel. I purchased a pvc flange with stainless steel top and four stainless steel screws. I plan to glue the flange to the drain line and then screw it to the floor(tile over concrete). I have another question. Do these flange screws need to go through tile and concrete? (how deep). I dont have angle grinder. Only recip saw and a drill as far as power tools go. I probably can rent one from Home Depot if necessary. Comments are welcome. Thanks.
If the tile is firmly attached to the floor via thinset, and there are no major voids under it where you will be working, you can drill through it with very little concern for cracking. (If the tile was laid with mastic then several are probably already cracked.) First, use some sort of a center punch to make a slight dent in the tile face (this gives the drill bit the initial "bite" it needs to get started), then drill with a sharp masonry bit (or better, a glass bit, if you can find one, until you've breached the surface of the tile). Drilll holes sized to allow you to install lead shield anchors of the appropriate size for your screws. (Note: You need to drill the holes before you glue on the flange.)
I would say (thumb suck) that the screws need to go at least 3/4" into the concrete, over and above the thickness of the flange and tile and thinset.
Excellent suggestion. I will get longer screws. I was not aware of glass bits. I will call around to see if I can locate one. Any thoughts on wax rings? The underside of the toilet bowl is not deep. I have seen 3 or 4 different kinds of wax rings.
I've had great success with the non-wax rings. They have a rubber seal against the bottom of the toilet. They are forgiving if you need to adjust the toilet position too.
There are two basic types of wax rings -- with and without a plastic "horn" molded in. Then there are variations in thickness. For your use, where the flange will be flat on the finished floor, I'd suggest the standard thickness with the molded-in horn.
You'd go with an extra-thick ring if the flange were not standing proud of the finished floor, and you'd skip the "horn" if the flange were standing too proud.
Or you can try one of the several waxless schemes.
I hope, if you have finished the work, everything went well. I missed the concrete slab part, sorry. You can drill into the concrete with regular drill you have, it will just take longer. Go in 1/4" or so and vacuum out the dust. Dip the bit into water to keep it cool. If you don't plan on doing a lot of concrete projects, cheap masonary bits will do for this work.
Buy 2 bits. First drill a smaller hole for the tile and use the full size bit. This will decrease the chance of tile cracking. Drilling with regular drill may just be slow enough to prevent cracking.
I would drill bigger hole for the screws and use epoxy to hold the screws in the hole. The Locktite has smaller packages that look like a syringe. You must squeeze out the whole amount, mix and apply. I just used it for my synthetic surface work and I found it does not squeeze out reliably. Better to squeeze out the whole thing so you have right amount of resin and hardener. Get the 20 min set up or longer so you time to mix, apply and set the ring and screws. Even then, wait 24 hours, especially if work area is cold, before you set the toilet.
There are anchors, but you may have to drill bigger hole than you need. Tapcon screws, I don't know, but It may work itself loose over time. Good luck.
I really appreciate all the help I have gotten so far. I am getting close to getting it done. My wife is after me now to finish it by tomorrow. I bought Kobalt glass and tile drill bit set. Used one of the 1/4" bits to make four holes in the tile around the drain pipe. Only three of the four holes line up with the flange. So I plan to use three screws only to affix the flange. l will use plastic anchors in the holes. The three screws are stainless steel. If something does not seem rght, please let me know.