Installing 3/4″ hardwood on ceiling ; acceptable variance rafter to rafter
Hi,
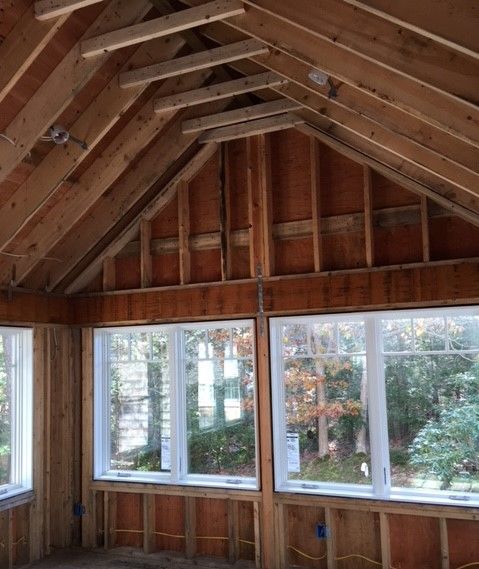
I am going to be installing 3/4″ x 3-1/4″ prefinished oak flooring on a 3-season porch ceiling. The rafters are 2×10, 16″ oc. I have two question on the best way to prepare these rafters for installing the hardwood. I am naling the boards horizontally dirrectly to the rafters. The ceiling willl be fully insulated with cathedral insulaiton. Because of the variance in lumber, the instalation area is not going to be a flat plane, there is going to be difference from rafter to rafter. To figure out how much difference ther is, I plan on tacking blocks to the first and last rafters, then run lines acroos the top, middle and bottom of the rafters. That way I can check to see where the lowest and highest points are and how each rafter varies from it’s neighbors. Using the lowest point as the baseline, where necessary, I will use shims. What I don’t know is how much variance is ok. I was thinking that anything less than 1/8″ I’d let go and shim anything 1/8″ or greater (numbers picked completely out of the air). Bur, with 3/4″ oak and 16″ oc, it seems like that is too much. I wouldn’t be able to nail the board tight to the rafter.
So, what do you think? How much variance do you think I can accept rafter to rafter and still have a good installation? Wince this is a ceiling i am not conserned with it supporting walking or squeaking. i just want it to look good.
If the wood was being installed vertically I would just use furrring to create a nice flat surface to install on, like for drywall. For this installation would it make more sense to furr out each raftrer before installing, rather than shimming under each board wher needed dyring installation? I don’t know which is the lesser PITA.
Thanks, i could really use some advice here before I get started. FYI, the wood has been acclimating for a few months (project has been delayed).
George


Replies
drywall first
Not sure of the acceptable variance. As an experienced diy I would say your 1/8 would be ok. I am annaul and if I were checking the plane and adjusting for gaps greater than 1/8 I would probbly staple crdboard shims were there were 1/8 inch gaps anyway. why not you are up there.
I would say that typically it is not recommended to just nail bords up with out first drywalling. this is to keep moisutre out of your insulation. the wood will leak like a sive. Maybe for a three season porch it would be ok, but then someday someone will decide to heat it in the winter......
oh, and definitiely shim the entire rafter before you start nailing anything! You can buy cardboard drywall shims which are 1/16 inch thick, four feet long and you just staple them up. It can go pretty fast. And you might want to go to a harbor freight store and buy a $30 power planer to plane down proud rafters. I did all this for my cathedral ceiling to be drywalled. Worst part is getting up there if you don't have good scaffolding. In your case you are not too high and can probably cobble together so easy cheap staging.
well....
If I understand this right.....
You will never get rafters 1/8" in plane. If you did come back in a week and you'll find they have moved. It's just not feasible in the real world or necessary.
If I had to assign a number it would be 1/4" but that may be overkill/pipe dream. The flooring does not have to be completely rigid tight to the framing, it just have to support itself.
Rest assured that flooring is going to move around some over the course of the seasons, all it has to do in this case is look nice. the t&g and fasteners should provide that with an intelligent install.
How do you plan to fasten it, or maybe I missed that part.
Your long acclimating period may be blessing/curse. Great it's moisture stabilized but likely you'll have more bowed pieces. It's all in the pesky details.
One great possibility is [you did say it isn't insulated yet, no] is you could use a bow wrench to install if required.
The entire porch will be insulated with kraft faced insulatiIon. It is a three season porch but the windows and doors were selected to support adding heat someday. For those times it is used in the winter I will probably just use a space heater. I have a bowjak to pull boards together when needed. I am going to nail with a finish nailer through the tongue, maybe double nail if I can do it without splitting the tongue. There will be a gap at the top and bottom for expansion. The gaps will be covered with custom molding.
Think about these points
Several things to think about:
1) if you are going to put batt insulation in rafter bays you need to think about how you will design a vent system for each rafter bay. Absent venting you run the risk of moisture accumulating in the insulation. One way to deal with this is to spray foam insulation into each bay. Very ex$pen$ive. 2) Consider running a power plane over rafters that stand proud. Avoid much more than a 1/8" variance between ADJOINING rafters. Over the whole area you may find a larger variance; say 1/4". What is important is the variance from one rafter to the other. 3) Finish nailing through board tongues, spaced 16" oc. is not going to hold 3/4" material. Gaps will develop as the wood expands and contracts. I would suggest face nailing. 4)You would be better served installing drywall. Seal it with BIN alcohol-based primer in two coats. Most folks prefer a 6 mil plastic vapor barrier, but I achieve the same results with alcohol-based primer. Technical data is available. 4.1) Consider 1/2" plywood instead of drywall. Now you have an excellent nailing base in addition to the rafters. 5) I would strongly recommend a thinner board. Anything from 1/4" - 1/2" will do. Glue and face nail interlocking wood strips with 18GA pneumatic nails.
Please realize that you won't be able to "pull" 3/4" boards together the way you do with a pneumatic flooring nailer. A bow wrench won't help much, because your strips of 3/4 material are nailed 16" oc, which too far appart for 3/4" thick material.
Suppose you insist on using 3/4" hardood flooring strips. Consider running them through a planer (table saw if planer is not handy), reducing thickness. Then glue and face nail. It may be poss to angle nail through the lip, but I suggest face nailing...and puttying.
Go to froscarpentry.com Go to the index. Look for my article and photos under the title A Remodel with a Greek Theme, and you will see what I am talking about. This job has a 1/2 layer of drywall, sealed and nailed to ceiling joists. Strips of wood were glued and 18 ga face nailed. Strips were stained and finished before installation. Nail holes were puttied, and a final clear finish coat was applied. Good luck.
On second thought
Stanely Bostich, among other tool-makers, makes a beautiful small flooring nailer for laminates and other T&G materials in the half-inch thickness range. If you install 1/2 plywood on the ceiling instead of drywall, you have a sound nailing base and can space your nails closer than the 16" oc rafter spacing. Best of all, you don't have to face-nail. I would recommend gluing as well.
Hi,
I have another question about providing a proper roof vapor barrier on this project To recap, three season porch with cathedral ceiling in New England. Three season only in that it is unheated. It is built with windows, doors and insulation as if it was a regular room. The ceiling is going to be a T&G strip ceiling.
The soffits are vented and there is a roof vent. I am installing baffles from the soffit up to the roof vent. The ceiling is being insulated with craft faced cathedral insulation. The 2x10 rafters do not have enough depth for the insulation required by the town so I am going to rip 2x4s and tack them to the bottom of the rafters to increase the depth. I'll also use these to even out the rafters for the strip install.
My concern is with having a good enough vapor barrier to avoid moisture problems. The porch is unheated now but I want to make sure I won't have problems if I decide to heat it in the future. From what I have read, the recommendation is to install drywall first and then the strip ceiling over that. The drywall is just used as a vapor barrier. I would really like to avoid installing drywall. Would a membrane barrier be sufficient if installed and sealed properly?
More replies from Mel
I am installing baffles from the soffit up to the roof vent. Baffles have to extend from the soffit all the way to the ridge vent in each rafter bay. You loose aprox 2" of rafter space.Insulation can not block the free flow of air in each rafter bay. Baffles need to be taped so no water drips onto insulation. Create your own CONTINUOUS air chute.
The 2x10 rafters do not have enough depth for the insulation required by the town so I am going to rip 2x4s... You will not get enough depth to meet code requirements! Please check the IRC 2014 for more information on min. R-value for rafters. As I recall, it is R-38. This is why I mentioned TJIs to you.
My concern is with having a good enough vapor barrier to avoid moisture problems. Vapor barrier only takes care of interior and rising moisture from the crawl space and the room.It does not prevent EXTERIOR, moisture-laden air, from damaging the insulation in rafter bays. You have a drew point where insulation and outside air interface. This is where moist outside air can condense and damange batt insulation. The IRC does not care whether this is a 3 season porch or not. There is only one building code standard and it applies uniformy across board to habitable, heated/cooled areas of the house...sigh.
To circumvent code requirements you need to have this room completely sealed off from the house. No heat ducts from the furnace can be in this 3-season room. You need to demonstrate that the room is a glorified porch.
The porch is unheated now but I want to make sure I won't have problems if I decide to heat it in the future. Heat how? A wood stove? Fine. Gas,oil, electric? Not fine. The Code is all about conserving fossil fuels in habitable areas of the home.
From what I have read, the recommendation is to install drywall first and then the strip ceiling over that. Agreed...but I mentioned plywood earlier and thinner wood strips....and glue...and closer spacing of nails. Did you read that? I want you to give these ideas serious consideration.
The drywall is just used as a vapor barrier. No...drywall IS NOT a vapor barrier.
I would really like to avoid installing drywall. Would a membrane barrier be sufficient if installed and sealed properly? Please review my earlier comments and those of others. A plastic membrane is fine, but you need more than that if you want a half-decent job that lasts. Drywall, better yet plywood, acts somewhat as a leveling agent. It hinders convection loops from forming. Please re-read the entire thread. I am happy to answer more questions.
colar ties not places correctly
OBSERVATION: The colar ties are best fastened to the underside of the rafters, Use metal plates as gussets and screws too. This way the entire rafter bay can be filled with insulation. Your ties are doing little placed that high up. Bring them down to the upper 1/3.