FHB Logo Facebook LinkedIn Email Pinterest Twitter X Instagram Tiktok YouTube Plus Icon Close Icon Navigation Search Icon Navigation Search Icon Arrow Down Icon Video Guide Icon Article Guide Icon Modal Close Icon Guide Search Icon Skip to content
Subscribe
Log In
  • How-To
  • Design
  • Tools & Materials
  • Restoration
  • Videos
  • Blogs
  • Forum
  • Magazine
  • Members
  • FHB House
  • Podcast
Log In

Discussion Forum

Discussion Forum

Installing mirror – is this possible.

mattt19 | Posted in General Discussion on January 24, 2008 04:34am

I’m remodeling my bath (still) and I’m trying to figure out if it’s possible to install an inset mirror over the vanity. I’m trying to figure all of this out before I make an appointment with the plumber.

The mirror is going into a non load bearing wall framed with 2 by 3’s. There’s plaster on the opposite side and they’re will be tile, mud wall and drywall on the bathroom side.

I know how to install the mirror and compensate for the studs I’ll cut. The problem is, is it possible to vent the sink without destroying the integrity of the wall? It seems to me that the vent would need to go through several studs, headers and the top plate (illustration attached) . If the vent is 1 1/2 pipe (that’s what the original plumbing was) that only leaves 1″ in the 2 by 3’s after the holes are bored. Would sheathing the wall in 5 ply Structural 1 plywood solve this problem?

Thanks

Matt

Reply
  • X
  • facebook
  • linkedin
  • pinterest
  • email
  • add to favorites Log in or Sign up to save your favorite articles

Replies

  1. FastEddie | Jan 24, 2008 04:53am | #1

    Since you're stripped down to the studs, don't recess the mirror, mount it on the surface of the wall and furr out the rest of the wall to make the mirror look recessed.

    "Put your creed in your deed."   Emerson

    "When asked if you can do something, tell'em "Why certainly I can", then get busy and find a way to do it."  T. Roosevelt

    1. mattt19 | Jan 24, 2008 04:57am | #2

      That's a good idea except I can't afford to loose the 3 - 4 inches this would require (small bath).

      1. FastEddie | Jan 24, 2008 05:07am | #3

        You're going to lose the 3" over the vanity.  You won't notice it.  Don't furr out the wall below the top of the sink cabinet."Put your creed in your deed."   Emerson

        "When asked if you can do something, tell'em "Why certainly I can", then get busy and find a way to do it."  T. Roosevelt

        1. mattt19 | Jan 24, 2008 05:21am | #4

          "You're going to lose the 3" over the vanity". I'm not sure I follow. If I use a flat mirror I won't loose any space. If I mount a medicine cabinet on top of the wall I'd loose 3-4 inches (is this what you mean?).Also the vanity only occupies 5 1/2 feet of a 9 foot wall, so I wouldn't be able to furr out the wall just around the mirror.

  2. Waters | Jan 24, 2008 08:41am | #5

    Perhaps if you 'headered' only once, across the old door opening and your new med cab opening, you wouldn't have as many (or any) lateral penetrations with your vent?

  3. User avater
    shelternerd | Jan 24, 2008 09:07am | #6

    Just use an air admittance valve to vent the sink. Also called a StudorVent. Problem solved.

    ------------------

    "You cannot work hard enough to make up for a sloppy estimate."

  4. RalphWicklund | Jan 24, 2008 09:38am | #7

    Maybe I'm missing something...

    Unless you have a fancy framed mirror that you will deeply recess there is no need for all that headering.

    You can mount a plate mirror directly to the backerboard and tile up to it. That will give a completely flush finish to the wall. Accent tile around the mirror.

    Or, you can mount the mirror to the studs and surround it with the backer and the tile. Then it will be slightly recessed. Still could accent with tile.

    Forget the header over the area that looks like former doorway. Place a stud directly under the one that is cut and bring it to the floor. You can scab on another full length stud for stability, either to the right or left. The longer header isn't needed, either.

    Offset the stubout for the drain to the right of the double studs left over from the door framing. There's a clear shot straight up from there for the vent. If the waste pipe goes straight down from the drawn position, move it over. No horizontal holes in the studs necessary.

    All plumbing is hidden under the vanity. You don't have to go straight back from the sink to connect.

    1. mattt19 | Jan 24, 2008 11:00am | #8

      Hi Ralph,The mirror is frameless and about 3" deep. If I attached it to the studs and put the drywall around it I'd still have 2 plus inches sticking out, which is more than I'd like.Even If I skip the header over the former "door" (this is where the old tub was. I don't know why they removed the stud. The drywall is a patch) I'd still need a header where the mirror is, correct? Wouldn't I still need to penetrate the stud that holds the header up over the mirror? Wouldn't covering the wall in plywood give me enough strength?Shelter, With the Sturdo Vent wouldn't I need an access panel in case it failed? How large are they? The wall cavity is only 2 1/2".

      1. JTC1 | Jan 24, 2008 03:12pm | #10

        StudorVents are generally installed in an exposed location - under the vanity -  the door to the vanity is the access panel.

        JimNever underestimate the value of a sharp pencil or good light.

      2. User avater
        Luka | Jan 24, 2008 05:26pm | #11

        I can't speak for Ralph, but this is what I would do, and it sounds like Ralph is saying pretty much the same thing...
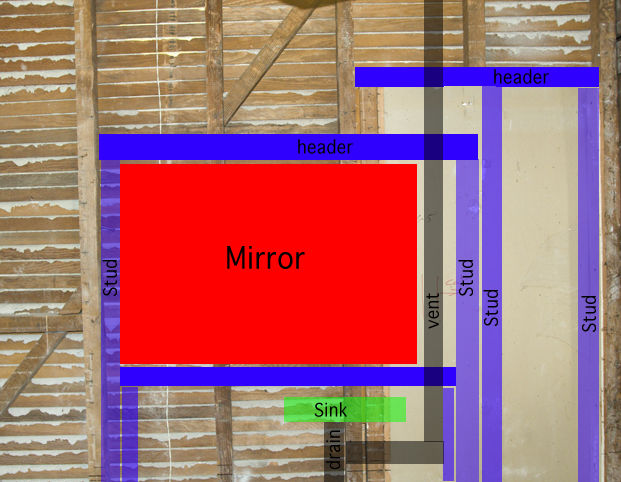
        View Image

        The drain and vent that is outlined in red is all within the vanity cabinet. It doesn't enter the wall until the point I have circled.

        I'm gonna grow me some wings. And I'll learn how to fly !

        1. User avater
          BillHartmann | Jan 24, 2008 08:30pm | #12

          The vent needs to come up 6" above the flood rim before it can turn horizontally..
          .
          A-holes. Hey every group has to have one. And I have been elected to be the one. I should make that my tagline.

          1. User avater
            Luka | Jan 24, 2008 10:54pm | #13

            Good point, Bill.But the picture is not meant to be a perfect diagram. It shows the rough idea...


            I'm gonna grow me some wings. And I'll learn how to fly !

          2. User avater
            BillHartmann | Jan 24, 2008 11:11pm | #14

            It might be a problem depending on how low the mirror will be.And I wish that he would explain how the mirror is 3" thick?.
            .
            A-holes. Hey every group has to have one. And I have been elected to be the one. I should make that my tagline.

          3. DaveRicheson | Jan 25, 2008 12:30am | #15

            Me too.

            Maybe it is a piece off one the larger refractory telescopes

          4. mattt19 | Jan 25, 2008 02:43am | #16

            First of all thanks for all the help on this.I'll see if I can clear up a few things.The "mirror" is actually a medicine cabinet that's about three inches deep. I haven't found what I want yet but it's similar to this http://catalog.robern.com/onlinecatalog/detail.jsp?item=181709?_num=CDC3526FS&module=CD+Series+CabinetsThe stud are 2" by 2.5".I'm attaching a new image that includes a more accurate placement of the vanity and mirror in relation to the studs.The following references the new image -I'd cut studs # 2,3 and 4 installing a header. The sink would vent to the left, going through the lower half of studs 2 and 3 which at this point provide no support to the wall correct? In the stud bay between studs 1 and 2 I'd head up, notching or drilling through the new header. This I assume ruins the header. Is there anyway to strengthen the header at this point. Anyone want to weigh in on sheathing the wall with structural plywood?Does anyone know if use of the Studor Vent is allowed by code in Los Angeles ( the plumber I'm using has a very thick German accent so every discussion is an adventure). What's the consensus on using a Studor Vent. Over at Terry Love it seemed mixed, though it would certainly solve my problems.Thanks Matt

          5. FastEddie | Jan 25, 2008 03:40am | #17

            I wish you had said irt was a medicine cabinet in the OP.  Cut one stud, install a header, recess the cabinet as far as it will go, trim out the part standing proud with some door casing to match what's on the door."Put your creed in your deed."   Emerson

            "When asked if you can do something, tell'em "Why certainly I can", then get busy and find a way to do it."  T. Roosevelt

          6. RalphWicklund | Jan 25, 2008 06:05am | #18

            There be another problem - potential problem - for you to deal with..

            Removing the studs to install a header will seriously compromise the lath and plaster wall.

            Do you know how many little nails you have tacking the lath to those studs? You will be vibrating and racking that lath and cracking the keys off and when you are through... watch out.

          7. calvin | Jan 25, 2008 02:51pm | #19

            Robern med cabs are pretty deep if memory isn't gone.  I would have said 3-1/2''.  Do you have the unit?  You may have already figured on having to build out the wall thickness.A Great Place for Information, Comraderie, and a Sucker Punch.

            Remodeling Contractor just outside the Glass City.

            http://www.quittintime.com/


          8. rick12 | Jan 26, 2008 06:20am | #20

            "The vent needs to come up 6" above the flood rim before it can turn horizontally."

            Bill, you you explain that to me.  Thanks

          9. User avater
            BillHartmann | Jan 26, 2008 07:16am | #21

            I BELIVE that the logic is that if the drain stopped up and stuff backed up into the vent it could settle in the horizonal section and fo vent and clog it up.Of course all it needs to be is for the bottom of the horizontal to be Just above the flood rim of the sink, but the code says 6"..
            .
            A-holes. Hey every group has to have one. And I have been elected to be the one. I should make that my tagline.

          10. DaveRicheson | Jan 26, 2008 04:43pm | #22

            The horizontal run of a vent needs to be above the flood rim of the fixture, but it is only neccessary for the vent to start up from the waste line within a few feet of the trap. A horizontal run of a 18" to 24" from the tee downstream of the trap is acceptable on bath tub installs as long as the vent goes vertical or starts up after that distance. He could use the same principle here if the horizontal distance allowed will get the vent outside of the area that is causing the framing headache.

            Maybe blumbill will see this and give us the skinny

    2. DaveRicheson | Jan 24, 2008 12:23pm | #9

      The mirror is going into a non load bearing wall framed with 2 by 3's

      Looks like they are on the flat, and I think he is talking about a cabinet mounted mirror. It would be some big hummin frame for a mirror alone to be 3" thick.

      dave

Log in or create an account to post a comment.

Sign up Log in

Become a member and get full access to FineHomebuilding.com

Video Shorts

Categories

  • Business
  • Code Questions
  • Construction Techniques
  • Energy, Heating & Insulation
  • General Discussion
  • Help/Work Wanted
  • Photo Gallery
  • Reader Classified
  • Tools for Home Building

Discussion Forum

Recent Posts and Replies

  • |
  • |
  • |
  • |
  • |
  • |
View More Create Post

Up Next

Video Shorts

Featured Story

Ranch Redux

An architect and a handy homeowner team up for an exterior upgrade with energy efficiency, comfort, and durability as part of the plan.

Featured Video

Builder’s Advocate: An Interview With Viewrail

Learn more about affordable, modern floating stairs, from design to manufacturing to installation.

Related Stories

  • Tools and Gear for the Moms Who Get it Done
  • An Easier Method for Mitered Head Casings
  • Beat the Heat: Cool Innovations
  • A Practical Approach to Exterior Insulation

Highlights

Fine Homebuilding All Access
Fine Homebuilding Podcast
Tool Tech
Plus, get an extra 20% off with code GIFT20

"I have learned so much thanks to the searchable articles on the FHB website. I can confidently say that I expect to be a life-long subscriber." - M.K.

Get home building tips, offers, and expert advice in your inbox

Signing you up...

This site is protected by reCAPTCHA and the Google Privacy Policy and Terms of Service apply.
See all newsletters
See all newsletters

Fine Homebuilding Magazine

  • Issue 331 - June 2025
    • A More Resilient Roof
    • Tool Test: You Need a Drywall Sander
    • Ducted vs. Ductless Heat Pumps
  • Issue 330 - April/May 2025
    • Deck Details for Durability
    • FAQs on HPWHs
    • 10 Tips for a Long-Lasting Paint Job
  • Issue 329 - Feb/Mar 2025
    • Smart Foundation for a Small Addition
    • A Kominka Comes West
    • Making Small Kitchens Work
  • Issue 328 - Dec/Jan 2024
    • How a Pro Replaces Columns
    • Passive House 3.0
    • Tool Test: Compact Line Lasers
  • Issue 327 - November 2024
    • Repairing Damaged Walls and Ceilings
    • Plumbing Protection
    • Talking Shop

Fine Home Building

Newsletter Sign-up

  • Fine Homebuilding

    Home building tips, offers, and expert advice in your inbox.

  • Green Building Advisor

    Building science and energy efficiency advice, plus special offers, in your inbox.

  • Old House Journal

    Repair, renovation, and restoration tips, plus special offers, in your inbox.

Signing you up...

This site is protected by reCAPTCHA and the Google Privacy Policy and Terms of Service apply.
See all newsletters

Follow

  • Fine Homebuilding

    Dig into cutting-edge approaches and decades of proven solutions with total access to our experts and tradespeople.

    Start Free Trial Now
    • Facebook
    • Instagram
    • X
    • LinkedIn
  • GBA Prime

    Get instant access to the latest developments in green building, research, and reports from the field.

    Start Free Trial Now
    • Facebook
    • YouTube
  • Old House Journal

    Learn how to restore, repair, update, and decorate your home.

    Subscribe Now
    • Facebook
    • Instagram
    • X

Membership & Magazine

  • Online Archive
  • Start Free Trial
  • Magazine Subscription
  • Magazine Renewal
  • Gift a Subscription
  • Customer Support
  • Privacy Preferences
  • About
  • Contact
  • Advertise
  • Careers
  • Terms of Use
  • Site Map
  • Do not sell or share my information
  • Privacy Policy
  • Accessibility
  • California Privacy Rights

© 2025 Active Interest Media. All rights reserved.

Fine Homebuilding receives a commission for items purchased through links on this site, including Amazon Associates and other affiliate advertising programs.

  • Home Group
  • Antique Trader
  • Arts & Crafts Homes
  • Bank Note Reporter
  • Cabin Life
  • Cuisine at Home
  • Fine Gardening
  • Fine Woodworking
  • Green Building Advisor
  • Garden Gate
  • Horticulture
  • Keep Craft Alive
  • Log Home Living
  • Military Trader/Vehicles
  • Numismatic News
  • Numismaster
  • Old Cars Weekly
  • Old House Journal
  • Period Homes
  • Popular Woodworking
  • Script
  • ShopNotes
  • Sports Collectors Digest
  • Threads
  • Timber Home Living
  • Traditional Building
  • Woodsmith
  • World Coin News
  • Writer's Digest
Active Interest Media logo
X
X
This is a dialog window which overlays the main content of the page. The modal window is a 'site map' of the most critical areas of the site. Pressing the Escape (ESC) button will close the modal and bring you back to where you were on the page.

Main Menu

  • How-To
  • Design
  • Tools & Materials
  • Video
  • Blogs
  • Forum
  • Project Guides
  • Reader Projects
  • Magazine
  • Members
  • FHB House

Podcasts

  • FHB Podcast
  • ProTalk

Webinars

  • Upcoming and On-Demand

Podcasts

  • FHB Podcast
  • ProTalk

Webinars

  • Upcoming and On-Demand

Popular Topics

  • Kitchens
  • Business
  • Bedrooms
  • Roofs
  • Architecture and Design
  • Green Building
  • Decks
  • Framing
  • Safety
  • Remodeling
  • Bathrooms
  • Windows
  • Tilework
  • Ceilings
  • HVAC

Magazine

  • Current Issue
  • Past Issues
  • Magazine Index
  • Subscribe
  • Online Archive
  • Author Guidelines

All Access

  • Member Home
  • Start Free Trial
  • Gift Membership

Online Learning

  • Courses
  • Project Guides
  • Reader Projects
  • Podcast

More

  • FHB Ambassadors
  • FHB House
  • Customer Support

Account

  • Log In
  • Join

Newsletter

Get home building tips, offers, and expert advice in your inbox

Signing you up...

This site is protected by reCAPTCHA and the Google Privacy Policy and Terms of Service apply.
See all newsletters
See all newsletters

Follow

  • X
  • YouTube
  • instagram
  • facebook
  • pinterest
  • Tiktok

Join All Access

Become a member and get instant access to thousands of videos, how-tos, tool reviews, and design features.

Start Your Free Trial

Subscribe

FHB Magazine

Start your subscription today and save up to 81%

Subscribe

Enjoy unlimited access to Fine Homebuilding. Join Now

Already a member? Log in

We hope you’ve enjoyed your free articles. To keep reading, become a member today.

Get complete site access to expert advice, how-to videos, Code Check, and more, plus the print magazine.

Start your FREE trial

Already a member? Log in

Privacy Policy Update

We use cookies, pixels, script and other tracking technologies to analyze and improve our service, to improve and personalize content, and for advertising to you. We also share information about your use of our site with third-party social media, advertising and analytics partners. You can view our Privacy Policy here and our Terms of Use here.

Cookies

Analytics

These cookies help us track site metrics to improve our sites and provide a better user experience.

Advertising/Social Media

These cookies are used to serve advertisements aligned with your interests.

Essential

These cookies are required to provide basic functions like page navigation and access to secure areas of the website.

Delete My Data

Delete all cookies and associated data