FHB Logo Facebook LinkedIn Email Pinterest Twitter X Instagram Tiktok YouTube Plus Icon Close Icon Navigation Search Icon Navigation Search Icon Arrow Down Icon Video Guide Icon Article Guide Icon Modal Close Icon Guide Search Icon Skip to content
Subscribe
Log In
  • How-To
  • Design
  • Tools & Materials
  • Restoration
  • Videos
  • Blogs
  • Forum
  • Magazine
  • Members
  • FHB House
  • Podcast
Log In

Discussion Forum

Discussion Forum

Installing Windows in Concrete Wall

pwg4274 | Posted in Construction Techniques on April 30, 2015 10:33am

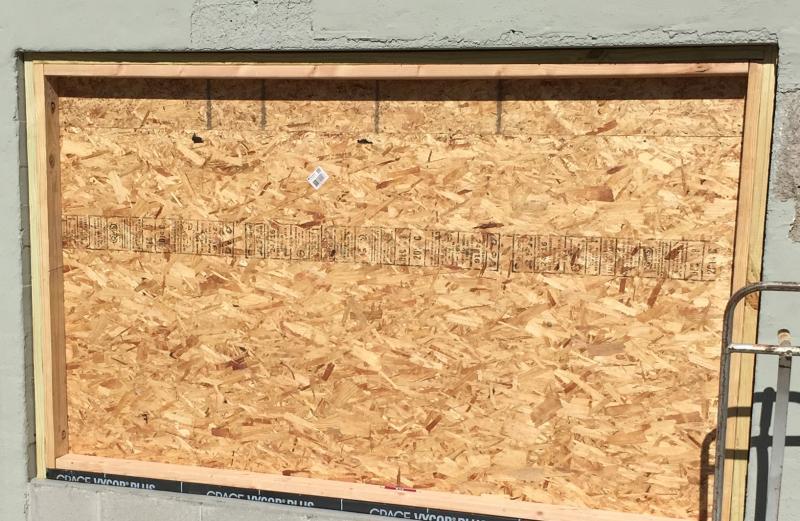
I have a walkout basement that was originally a garage. At some point 30 or 40 years ago, this was convereted into living space and french doors were put in where the garage door was. We recently built an addition and the last phase is to update the basement. The french doors were removed and blocked up to add a bank of windows.

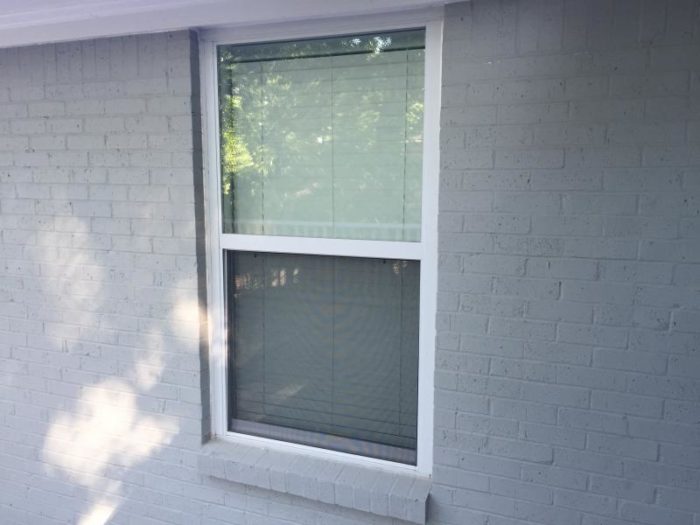
It’s been boarded up for a few weeks (see picture) and now I need to order and install the windows….the only problem is I’m not exactly sure the best way to install and properly flash them! The rest of the house is brick veneer and the windows are set back about 2″ (see picture). Since these new windows will be direcly below existing windows, I’d like to match the look as best as possible and set the new windows back 2″. The basement wall where the new windows will be is poured concrete with the exception of the bottom which is recently added concrete block. Once all the windows are in, the concrete wall will get a new coat of stucco.

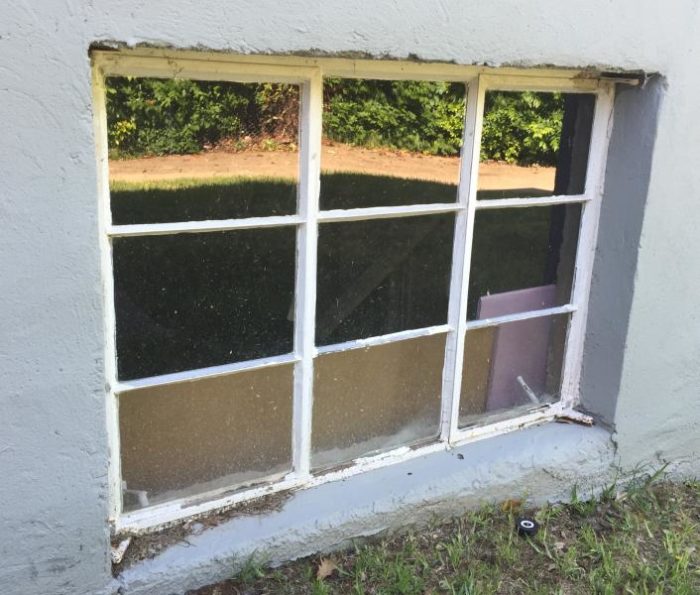
There is also one existing basement window (see picture) on the other side of the house that was originally set direclty into the concrete. It’s set back about 6″.

My first thought was to build out the window buck and set the new windows into that frame. If I do that, would replacment windows be better than flanged, new construction windows? Also, not quite sure how to properly flash them since they are recessed into a concrete wall. Is my only option sealant around the edges? Lastly, the new window opening is roughly 90″ and will get 3 windows – is that opening too large to mull them together and install as one unit?

Reply
  • X
  • facebook
  • linkedin
  • pinterest
  • email
  • add to favorites Log in or Sign up to save your favorite articles

Replies

  1. PatHamel | May 01, 2015 07:13pm | #1

    Window in concrete wall

    I'll try to explain how we install those windows here north of the frontier (i.e. Quebec, Canada) !

    1 - Lintel: First of all, with a 90'' wide opening, make sure you have a lintel strong enough to support the wall over the window. A 6''X6"X3/8'' steel angle inserted in a slot in the concrete wall would do the job (maybe a smaller steel angle would do, but stronger won't break !). The steel angle should extend approximately 6'' on each side of the window.

    2 - Window casing: build a wood casing (3/4" plywood or 2x wood) screwed to the concrete opening. Frame the bottom shelf with an angle so that the water striking the window will run away from it. Flash the entire wood casing with Blueskin SA from Henry, using the proper primer. Extend the Blueskin on the outside of the concrete wall.

    3 - Window installation: Install your new window in the flashed opening. Manage to leave a 1/2'' space all around the window for insulation. Fill that space with low expansion polyurethane spray foam.

    4 - Capping: cover the window casing with aluminum capping inserted just under and around the window frame. Seal with thermoplastic rubber-based sealant (e.g. Flextra) around the window frame and where the aluminum capping meets the concrete.

    Hope this help, good luck !

    Pat.

  2. MYBuilder | May 01, 2015 08:28pm | #2

    The problem, if one develops, is with the wood to concrete. The original windows you show have a flange that sites in a groove in the concrete block. This flange was the flashing and support a in one. It was mortared in, then painted. Wood in that place is subject to water damage from all directions. Even from the condensation at the cold area it may be. For your system, I would get a window that fits to the block directly. At the width you describe, different window types will be, of course, different weights. Some manufacturers don't warranty field mulls, so check with your supplier. See if they can even get that size in one piece to your rough opening. They may even help you set it. I would get a window sized with 1/4 to 3/8 of an inch all the way around. Shim with plastic or rubber shims, then screw direct to the concrete. Use a foam backer rod then caulk with a good sealant, not painters caulk or silicone. We use a Dow Corning 758 or 791. These can be ordered to match colors or painted. They are commonly used for commercial windows where aluminum meets masonry and they take UV light better, last better. There is no other flashing. Like the old windows, the integrity of the wall above is the key to leak free.

    I hope that gives you some good info.

    1. pwg4274 | May 02, 2015 08:38am | #3

      This is exactly what I was wondering: window buck vs screwing the window directly to the concrete. I liked the idea of screwing directly to the concrete - it would better match existing - but wasn't sure how to seal them.

      The original windows aren't much to look at (or through) and I'm guessing they haven't opened in about 30 years, but they don't leak! We just had two big thunderstorms come through in the last 2 weeks and there hasn't been a single drop of water come through. 

      Looks like my next step is talking to the manufacturer about getting the windows as one unit.

      One more question: the concrete block at the bottom sits level and will get a coat of stucco. Wouldn't that sill need some pitch? I'm just afraid the amount of material needed for a base and finish coat of stucco would end up being tall if the window is sitting directly on the concrete. Is it a terrible idea to install PVC stock along the bottom to raise the windows up to allow for a pitched sill? 

      1. MYBuilder | May 02, 2015 02:37pm | #4

        Slope is good...

        Slope that doesn't bind to the old masonry or support the weight of the new window is bad. To put on a sloped sill after the fact, you would want it to go trough the thickness of the wall. You would need the old paint off the old masonry( watch for lead) and a great bonding product that has time to cure( check a local supply for your area). More trouble than I would go to. Not a bad idea, but more opportunities for leakage over time. Now, if the masonry is new under the window already, it is a better bond and you may already need to core (fill)the block holes anyway. So slope away.

        1. pwg4274 | May 02, 2015 02:57pm | #5

          Block is new - worried about stucco height over window

          The block under the window is 'new'. It was done in December of 2014 (as opposed to the rest of the wall in 1949!). Currently, it's concrete block that has been filled and leveled on the top (see photo). I was thiknning when I added my scratch and final coats of stucco that would be built up too high and cover the bottom of the window. Or should I get my stucco work done first and then install and seal windows into a 'finished' wall? Thanks for all the help!

      2. MYBuilder | May 02, 2015 10:38pm | #6

        Tomatoe- Tomahtoe

        Sills slope for water run off obviously. You want the damaging affects of water to go away, dry off leave your house alone. However, if you put PVC trim there, you have a joint on each side that is susceptible to penetration. There is a joint at the bottom for air or driven rain and the PVC will expand and contract differently than the window and concrete block or stucco. So...not as much help as it seems. With no slope, all rain water except the last swoosh(technical measurement) will run off. The window will be weather proof(assumption). The block is too. If you slope it with mortar, ok but one more step with doubtful benefits at this point. If the stucco guy can get it to slope from wherever it is now at even 2 degrees, go for it. Whether you stucco before or after the window is a toss up, but keep a final distance from the stucco of 1/4" for your backer and caulk. Don't try to seal the stucco directly to the window.

  3. johnmeto | May 18, 2015 09:37am | #7

    Go with a Licensed Contractor

    Install those windows need a professional contractor. You can go through the above mentioned steps of you can get through Contractor Quotes for this Job they will offer you a Licenced Contractor with full security of Job.

    1. calvin | May 19, 2015 08:23pm | #8

      Bite me

      Take your cheap spam for that scum sucking contractor quotes operation and put it where the sun don't shine.

  4. florida | May 19, 2015 08:51pm | #9

    Here in south Florida almost all our windows are installed in block walls om pre-cast sills.  We nail 1" X 2" PT bucks to the concrete about 2 inches in from the outside face of the blocks. Run a good bead of poly sealant around the bucks and the sill lip  then set the windows into the caulk. We then attach the windows to the concrete with 3" concrete screws through the bucks into the concrete and we fill every hole. Another bead of caulk on the outside and we're done.  We get very strong driving rains and if I've ever seen one of these windows leak I don't remember it.

    florida almnost all windows are installed in walls like that. We shoot 1" X 2" PT bucks to the blocks about 2 inches back from the oputside face of the block.

    1. user-6729228 | Mar 20, 2020 07:55am | #10

      Also, the sill is pre-cast, has a lip, and is slopped.

Log in or create an account to post a comment.

Sign up Log in

Become a member and get full access to FineHomebuilding.com

Video Shorts

Categories

  • Business
  • Code Questions
  • Construction Techniques
  • Energy, Heating & Insulation
  • General Discussion
  • Help/Work Wanted
  • Photo Gallery
  • Reader Classified
  • Tools for Home Building

Discussion Forum

Recent Posts and Replies

  • |
  • |
  • |
  • |
  • |
  • |
View More Create Post

Up Next

Video Shorts

Featured Story

FHB Podcast Segment: Finding the Right Fixer-Upper

Get expert guidance on finding a fixer-upper that's worth the effort.

Featured Video

Video: Build a Fireplace, Brick by Brick

Watch mason Mike Mehaffey construct a traditional-style fireplace that burns well and meets current building codes.

Related Stories

  • Guest Suite With a Garden House
  • Podcast Episode 688: Obstructed Ridge Vent, Buying Fixer-Uppers, and Flashing Ledgers
  • FHB Podcast Segment: Finding the Right Fixer-Upper
  • Keeping It Cottage-Sized

Highlights

Fine Homebuilding All Access
Fine Homebuilding Podcast
Tool Tech
Plus, get an extra 20% off with code GIFT20

"I have learned so much thanks to the searchable articles on the FHB website. I can confidently say that I expect to be a life-long subscriber." - M.K.

Get home building tips, offers, and expert advice in your inbox

Signing you up...

This site is protected by reCAPTCHA and the Google Privacy Policy and Terms of Service apply.
See all newsletters
See all newsletters

Fine Homebuilding Magazine

  • Issue 332 - July 2025
    • Custom Built-ins With Job-Site Tools
    • Fight House Fires Through Design
    • Making the Move to Multifamily
  • Issue 331 - June 2025
    • A More Resilient Roof
    • Tool Test: You Need a Drywall Sander
    • Ducted vs. Ductless Heat Pumps
  • Issue 330 - April/May 2025
    • Deck Details for Durability
    • FAQs on HPWHs
    • 10 Tips for a Long-Lasting Paint Job
  • Issue 329 - Feb/Mar 2025
    • Smart Foundation for a Small Addition
    • A Kominka Comes West
    • Making Small Kitchens Work
  • Issue 328 - Dec/Jan 2024
    • How a Pro Replaces Columns
    • Passive House 3.0
    • Tool Test: Compact Line Lasers

Fine Home Building

Newsletter Sign-up

  • Fine Homebuilding

    Home building tips, offers, and expert advice in your inbox.

  • Green Building Advisor

    Building science and energy efficiency advice, plus special offers, in your inbox.

  • Old House Journal

    Repair, renovation, and restoration tips, plus special offers, in your inbox.

Signing you up...

This site is protected by reCAPTCHA and the Google Privacy Policy and Terms of Service apply.
See all newsletters

Follow

  • Fine Homebuilding

    Dig into cutting-edge approaches and decades of proven solutions with total access to our experts and tradespeople.

    Start Free Trial Now
    • Facebook
    • Instagram
    • X
    • LinkedIn
  • GBA Prime

    Get instant access to the latest developments in green building, research, and reports from the field.

    Start Free Trial Now
    • Facebook
    • YouTube
  • Old House Journal

    Learn how to restore, repair, update, and decorate your home.

    Subscribe Now
    • Facebook
    • Instagram
    • X

Membership & Magazine

  • Online Archive
  • Start Free Trial
  • Magazine Subscription
  • Magazine Renewal
  • Gift a Subscription
  • Customer Support
  • Privacy Preferences
  • About
  • Contact
  • Advertise
  • Careers
  • Terms of Use
  • Site Map
  • Do not sell or share my information
  • Privacy Policy
  • Accessibility
  • California Privacy Rights

© 2025 Active Interest Media. All rights reserved.

Fine Homebuilding receives a commission for items purchased through links on this site, including Amazon Associates and other affiliate advertising programs.

  • Home Group
  • Antique Trader
  • Arts & Crafts Homes
  • Bank Note Reporter
  • Cabin Life
  • Cuisine at Home
  • Fine Gardening
  • Fine Woodworking
  • Green Building Advisor
  • Garden Gate
  • Horticulture
  • Keep Craft Alive
  • Log Home Living
  • Military Trader/Vehicles
  • Numismatic News
  • Numismaster
  • Old Cars Weekly
  • Old House Journal
  • Period Homes
  • Popular Woodworking
  • Script
  • ShopNotes
  • Sports Collectors Digest
  • Threads
  • Timber Home Living
  • Traditional Building
  • Woodsmith
  • World Coin News
  • Writer's Digest
Active Interest Media logo
X
X
This is a dialog window which overlays the main content of the page. The modal window is a 'site map' of the most critical areas of the site. Pressing the Escape (ESC) button will close the modal and bring you back to where you were on the page.

Main Menu

  • How-To
  • Design
  • Tools & Materials
  • Video
  • Blogs
  • Forum
  • Project Guides
  • Reader Projects
  • Magazine
  • Members
  • FHB House

Podcasts

  • FHB Podcast
  • ProTalk

Webinars

  • Upcoming and On-Demand

Podcasts

  • FHB Podcast
  • ProTalk

Webinars

  • Upcoming and On-Demand

Popular Topics

  • Kitchens
  • Business
  • Bedrooms
  • Roofs
  • Architecture and Design
  • Green Building
  • Decks
  • Framing
  • Safety
  • Remodeling
  • Bathrooms
  • Windows
  • Tilework
  • Ceilings
  • HVAC

Magazine

  • Current Issue
  • Past Issues
  • Magazine Index
  • Subscribe
  • Online Archive
  • Author Guidelines

All Access

  • Member Home
  • Start Free Trial
  • Gift Membership

Online Learning

  • Courses
  • Project Guides
  • Reader Projects
  • Podcast

More

  • FHB Ambassadors
  • FHB House
  • Customer Support

Account

  • Log In
  • Join

Newsletter

Get home building tips, offers, and expert advice in your inbox

Signing you up...

This site is protected by reCAPTCHA and the Google Privacy Policy and Terms of Service apply.
See all newsletters
See all newsletters

Follow

  • X
  • YouTube
  • instagram
  • facebook
  • pinterest
  • Tiktok

Join All Access

Become a member and get instant access to thousands of videos, how-tos, tool reviews, and design features.

Start Your Free Trial

Subscribe

FHB Magazine

Start your subscription today and save up to 70%

Subscribe

Enjoy unlimited access to Fine Homebuilding. Join Now

Already a member? Log in

We hope you’ve enjoyed your free articles. To keep reading, become a member today.

Get complete site access to expert advice, how-to videos, Code Check, and more, plus the print magazine.

Start your FREE trial

Already a member? Log in

Privacy Policy Update

We use cookies, pixels, script and other tracking technologies to analyze and improve our service, to improve and personalize content, and for advertising to you. We also share information about your use of our site with third-party social media, advertising and analytics partners. You can view our Privacy Policy here and our Terms of Use here.

Cookies

Analytics

These cookies help us track site metrics to improve our sites and provide a better user experience.

Advertising/Social Media

These cookies are used to serve advertisements aligned with your interests.

Essential

These cookies are required to provide basic functions like page navigation and access to secure areas of the website.

Delete My Data

Delete all cookies and associated data