Insulating a 19th Century Balloon Framed Home
Hello All!
We are renovating a 19th century farmhouse located in the highlands region of Ontario, Canada (hardiness zone 4a). This means highs of approximately 30° C (~86° F) and lows of -30° C (-22° F). We also happen to have a higher elevation of 400m (1400 ft) above sea level.
We are a couple with some basic building knowledge but are by no means experts. This is the biggest project we have ever undertaken, so are doing our due diligence to ensure we are approaching this in the best way possible.
First and foremost, we have a limited budget for this project and are willing to make certain trade-offs to keep this our main priority. Energy efficiency is top of mind while we attempt to honour some of the home’s original features.
What we know about the home:
It is balloon framed. It sits on an old stone foundation that has been reinforced by a cinder block wall with parging
The house is two stories, with around a 550sqft footprint (1100sqft total).
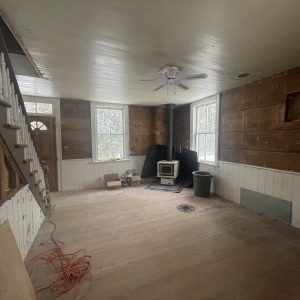
The main heating source is a wood burning stove. Our backup heating source is still to be determined and we welcome any recommendations you might have
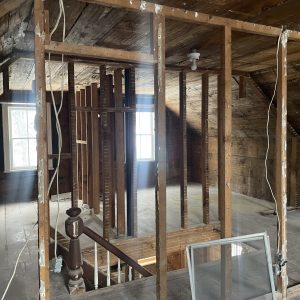
The current building envelope is as follows (working EXT to INT). Photos below to help illustrate:
– Siding: some parts are the original wood siding, some have been replaced with vinyl.
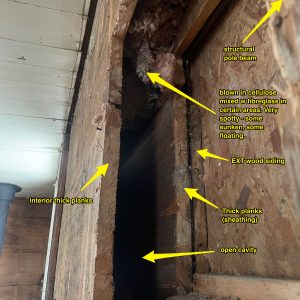
– “Sheathing”: not plywood but instead approx. 17” wide planks (and ~1” thick) that run horizontally across the structure.
– Framing: pole beams (old tree bark still visible). They are spaced around 40” on centre and create the 4.5” cavity where there is old cellulose insulation that has sunken over time.
– Interior planks: this is the main element to this home that seems to be unique and has caused us the most confusion. There is an additional layer of the same 17” planks mentioned above on the interior.
– See attached photo for detail on envelope.
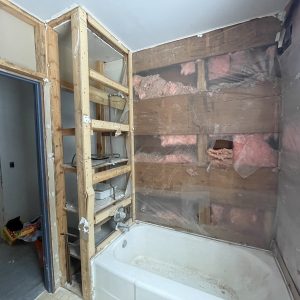
The cellulose insulation is very spotty at best. It seems to be present in some locations but is completely absent in others. There are small holes with caps on the exterior which leads us to believe this is where the cellulose was blown in. The cellulose also covers the attic floor. The bathroom has fibreglass batting and vapour barrier. The interior planks were cut in places to gain access to the cavity. See attached photo of bathroom for detail.
There is no vapour barrier present in the rest of the home.
The windows are likely original (or very old) – they are single paned, some with additional storm windows.
What is the problem?
– Our questions at this point are mainly regarding insulation/vapour/moisture movement:
– What should we do about the insulation and vapour barrier given the unique interior planks that are present? Our ideal scenario would be to keep the interior planks exposed (they also have original wainscotting attached to them and it would be nice to keep this intact also). However, would this mean that we would likely not be able to have a vapour barrier? Given the climate zone, we assume that the barrier needs to be on the warm side of the house which we believe would overrule the option of an exterior vapour barrier.
– There doesn’t appear to have ever been a vapour barrier (with the exception of the bathroom) and there have not been any major moisture issues as of yet but also this likely has led to a very draughty home in the wintertime. The age of the windows, most of the moisture likely passes through them. Will modernizing the windows or keeping them as they are affect the moisture in both scenarios (with and without a vapour barrier)?
– The upstairs also has the same interior planks but are not in as good condition and we do not wish to keep them exposed. We would like to cover them with drywall. Can we have a vapour barrier upstairs and not downstairs?
– If we are to do a vapour barrier, where should it go? Can it be flush against the wood planks? Would there need to be strapping first? What is the minimum air gap width required?
– How effective is cellulose insulation without a vapour barrier? (we would likely re-blow in existing holes)
– Are we missing any major questions or key considerations?
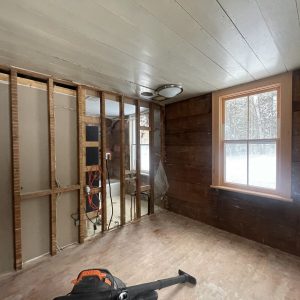
– We have attached photos of the home for your reference.
Thank you for your help!


Replies
Blown-in cellulose can be great, but depends on the equipment used and skill and care the installer applies to the job.
https://www.buildingscience.com/documents/insights/bsi-043-dont-be-dense
https://www.finehomebuilding.com/2017/11/10/dense-pack-cellulose-insulation-done-right
It looks like you removed interior wall coverings that were over the horizontal boards. one thing to consider (and talk to your insulation contractor) is how the cracks between those boards will impact the job. You might want to seal those cracks before blowing. methods can be influenced by your planned finish.
You can apply vapor barrier to part of the structure. Doing the bathroom, or the whole upstairs should be fine. It will reduce moisture accumulation in that part of the insulation during the heating season and improve performance.
One thing to further consider is to allow for ventilation of your roof deck. Where the second floor interior is close to the roof decking, you can consider pulling the boards instead of covering them, and use baffles to keep insulation away from the bottom of the roof deck. depending on the joist cavity depth, you may want to build out that part of the sloped wall (at the expense of some interior space) to allow for more insulation.
If you are happy with the flatness of the existing boards, you can put a vapor barrier up and drywall over. If you want to use strapping to adjust the flatness of the wall, it can go over or under the vapor barrier.
Your windows can have a couple issues. The moving parts or loose frames can be a path for air to pass around. single panes present a low R value surface which lets heat escape. they also will be subject to internal frost and dew accumulation in some conditions, which can lead to moisture problems. Storm windows can help.
Upgrading the windows can be worthwhile investment.
Thanks for your thoughtful response.
Good call on the insulation - we'll be sure to get it done correctly, and caulk the board beforehand. We've decided to take this approach for the whole house except the bathrooms (we'll be adding another one upstairs).
I'll check out the situation with the roof deck too. We'll likely see how the windows do next season before replacing them entirely.
Thanks again, i really appreciate your response.
expansion foam with a foam gun (rather than a spray can) to seal the spacing/cracks between the sheathing boards - quick & easy, minimal expanding foam and you're set
The sealant used should be selected with the finish in mind.
I want to guess you like the look and character of the boards.
One option could include stain/seal the boards before filling the cracks, to enhance the structure. You could then use a contrasting color sealant, and tape the edges to control edge blurring when you apply the sealant.
Might want to try whatever your technique will be on the attic boards (or others you plan to cover with drywall) to see how it goes and how the result looks.
I am looking forward to in-process and end result photos.
thought on the vapor barrier- those old homes were able to dry quickly if there was no pooling moisture. sealing with a vapor barrier can prevent drying even without pooling, so you might need new storm windows on those old wood window frames.
For my 1875 balloon framed house in Connecticut, the building department wanted fire stops added between all the wall studs at the floor level of the 2nd floor. They were happy with Firestop sealed plywood at the floor level plus Roxul in between the 2nd floor joists. Then we installed rolled fiberglass with paper backing in the walls.