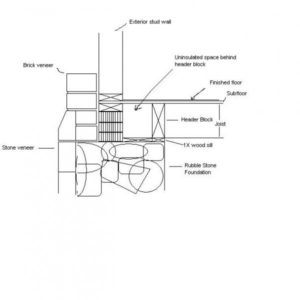
Insulating basement header cavity
The basement headers of our 73-year old house are flush to the inside face of the rubble-stone foundation. Behind them is a 10-inch deep cavity that is uninsulated (see drawing below). The exterior of the cavity is a 2X wood-sill atop a bed of mortar and brick (see photo). The top of the cavity is the underside of the subfloor above. The subfloor extends over top of the 2X woodsill on which the exterior stud wall above sits. The floor-joists project into these cavities and are free of decay as air has freely circulated around them.
I am told by a government building envelope specialist that blowing or spraying insulation into the cavity may prevent the wood from drying out. However, I wish to seal the space so that air does not infiltrate up through the subfloor into the room above.
One suggestion made is to drill a 2-inch access hole through the header through which a foam spray wand applicator can be inserted and apply closed-cell foam on the underside of the subfloor.
Has anyone else run into this type of problem?


Replies
What, precisely, is that "header" heading off? Is it simply blocking between the joists? Is it serving any structural purpose?
The blocking prevents the joists from twisting.
Right, but if all it does is prevent twisting it can be removed and new blocking installed about 8 inches into the room. Then the area should be easily accessible to install sheet foam or some such.
Gilding the lily
Wow, no rim joist so the blocking is of critical importance. Why do you worry about (cold?) air infiltrating up? Unless there are some unusual pressure dynamics, there will be no appreciable movement of the heavier cold air flowing up through subfloor (looks like 1x planking) and then the finished floor on top of that. You could foam the brick that joists are up against but you would never get any return on the cost or effort. You could pull the blocking 1 at a time and caulk joints in the subfloor, but again that is a lot of work for negligable return. I know how tiny things like this can be an aggravation but in this case it would be best to move on to a project with a better return to investment (satisfaction plus efficiency over time plus dollars) ratio.
Basement Header
Sorry - should have explained better. The overall plan is to insulate the upper part of the stone walls as well as the header blocks (see diagram below). The house is located in southern Canada on the 43rd parallel, zone 6a near Lake Huron. The winters are damn cold.
According to an advisor with whom I spoke at Natural Resources Canada, insulating the warm side of the header block and leaving the cavity uninsulated, will allow warm air to infiltrate into the cavity from above, condense and freeze. Apparently trials on NRC's test house in Manitoba revealed this problem. So, his best advice was an either: (a) don't insulate at all and just seal the header blocks to prevent air infiltration into the conditioned space, or (b) remove the blocks one at a time, insulate/seal the upper part of the cavity and the cold side of the block, and replace the bock. Yes, a lot of work.
We had the house door-blower tested and the greatest air leakage was coming from the basement headers.
So, I take your advice that it is a lot of work for seemingly negligible return, but need to weigh the advantages of sealing/not insulating with sealing /insulating to make the basement conditioned space as energy-efficient as possble given the structure with which we are working.
Old houses have their charms, but stone rubble foundations aren't one of them.
Thanks for the advice. Appreciate it.
Not entirely clear why they call it a "header block".
"Header Block"
Good point. It's really just blocking or end-blocking. Headers typically are what you find over rough window/door openings.
A Sawzall or Multimaster would be able to take care of those nails.
Thanks.
one possible solution...
I like the "...drill a 2-inch access hole through the header through which a foam spray wand applicator can be inserted..." suggestion. Except a smaller diameter hole may suffice.
This seems to follow the 'keep it simple, stupid' wisdom.
If nothing else, you can try this in one cavity.
Not sure, though, if any of the cavities have plumbing or electrical.
For fun, in one test fill you can insert a polyetheline trash bag and inject the foam into the bag, which will fill and expand into the cavity, similar to how packaging stores pack odd-shaped items for shipping and also foaming shaping into (inactive) fireplace dampers for sealing. (You may first need to rough expand the bag inside the cavity, which can be easily done with a shop vac in blower mode.) This way, if for any reason you do need to remove the blockings for working on anyting in the cavity area you won't have the foam mess to deal with.