FHB Logo Facebook LinkedIn Email Pinterest Twitter X Instagram Tiktok YouTube Plus Icon Close Icon Navigation Search Icon Navigation Search Icon Arrow Down Icon Video Guide Icon Article Guide Icon Modal Close Icon Guide Search Icon Skip to content
Subscribe
Log In
  • How-To
  • Design
  • Tools & Materials
  • Restoration
  • Videos
  • Blogs
  • Forum
  • Magazine
  • Members
  • FHB House
  • Podcast
Log In

Discussion Forum

Discussion Forum

joining walnut with bow tie dados

Fonzie777 | Posted in General Discussion on December 7, 2014 03:12am

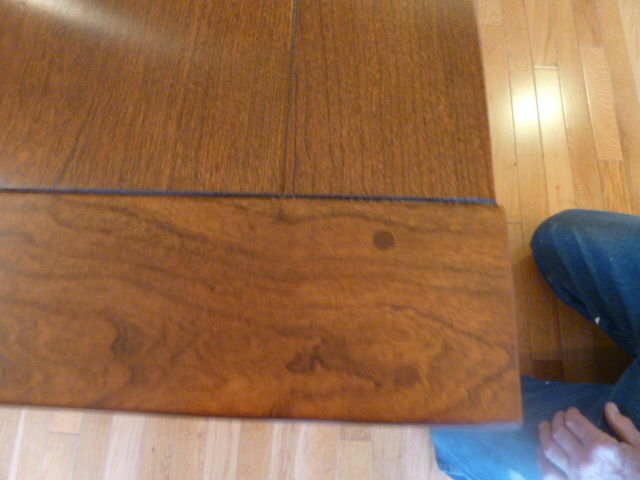
We have the pleasure of joining and natural finishing walnut with bow tie dados for a dining room cabinet countertop (overall dimension 16 1/2 in x 9 ft 3in  x  3/4 in).  The walnut  was pinned to dry in 1930 – plus, we get to do it to match the adjacent Gustov Stickley table (see attachments).  We planed and ran the boards through the joiner yesterday and they came out good.  

There will be 2 – 8 1/4 inch boards approximately 48 inches long with a 4 inch board on each end and a 4 inch board dividing the middle.  (We had to put the divider in the middle and ends in order to get enough good walnut out of what we had.  The Stickley table is 7/8 thick – (we had to plane to 3/4 thickness)  

We plan to edge glue the 8 1/4 boards together then make a 1 inch tenon on each end of both sets to fit in the 4 inch boards (which have mortises which stop before they reach the front).    

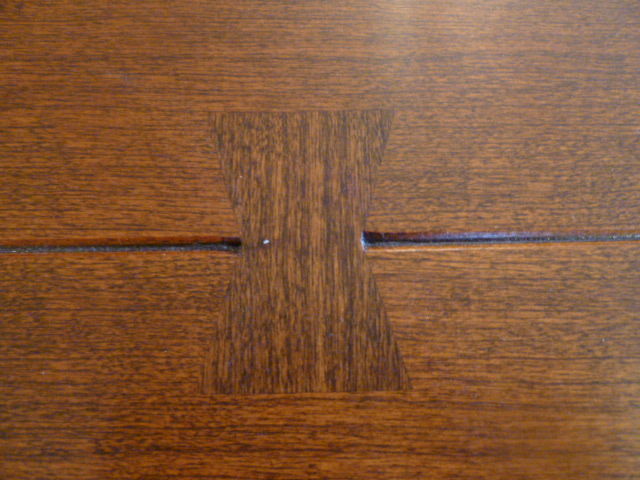
I’ve watched videos inlaying bow tie dados which use tite-bond yellow glue, masking so the glue doesn’t blotch.  What about the idea of using Gorilla glue for these – would there be less chance of the glue interfering?  We’re planning to inlay them about 3/8 inch.

Also we have had success in the past joining oak treads using Gorilla glue (which didn’t affect staining).  Is there any reason this isn’t a good choice for butt joining the 8 1/4 inch boards?  (I think we’ll probably use the Kreg Jig to add screws underneath on the joint).  We plan to finish with water borne oil modified Minwax clear satin polyurethane.  

I have some questions for those more experienced or other-experienced.  Is Gorilla glue right for edge joining the boards?  If not, what has to be done to keep Titebond from causing a problem with the clear finish?  

What is the best method of application for the finish?  I have an 18 in Padco applicator (for floors) but I’m concerned about getting too much finish in the champhered grooves.  Should I spray it on (with latex extender) with the HVLP?  Any other pointers for sanding, order of assembly, finishing, glue- or anything else would be appreciated.  We’d like for it to look better than the Stickley’s (ha).  

Reply
  • X
  • facebook
  • linkedin
  • pinterest
  • email
  • add to favorites Log in or Sign up to save your favorite articles

Replies

  1. Fonzie777 | Dec 10, 2014 08:14am | #1

    WOW - NO GLUE IN ENDS!

    Butterfly Keys - I like that.  

    OK - we were working on the oak trim and this walnut countertop while waiting for the cabinets to come in.  I just cut my first ever butterfly key and it's ready to glue.   I will mask for it.  Then as far as getting it cut off flush I followed advice on a video - cut an opening in a plastic school folder and we will make a preliminary cut off with an oscillating tool, then take it down with a block plane.   

    It so happens we have accidently followed your advice so far (before even getting it, ha).  We were afraid of the Gorilla glue, had some good experience with oak stair treads then a couple of failures.

    So we edge glued the 8 1/4 boards using biscuits, doing the champher on those edges and used yellow glue - left it clamped overnight.  We masked for the glue and had minimal cleanup.   

    We were just about ready late yesterday to glue the end and middle mortise and tenon boards on when we got the call that the cabinets were in.  You might have saved the whole project.  We have 1 inch x 1/4 inch mortise and tenons.  We may put the dowels in from the top since they show on the Stickley's table.  

    We have one small "ding" about 1/16 deep, half moon - a clamp or something.  I'm planning to steam it out with my wife's iron.

    We have the waterborne oil modified Minwax clear satin poly we will probably use.  The customer wants no stain and - get this - we thought the table was walnut, but it's actually cherry so they said not to worry about matching the color.  

    You're right we're having a lot of fun with this.  Any more advice will be appreciated.  We are going to be hanging cabinets for a while.   

  2. Fonzie777 | Dec 19, 2014 08:50pm | #2

    INSTALLED - THANKS FOR ADVICE ABOUT DOWELING

    FINEFINISH,

    We transported and installed the walnut countertop today.  It fit.  We're happy with it and so are they.  Thanks again for warning me not to glue the "breadboards".  

    I'm attaching pictures.  Don

    PS - the Stickley's Table is covered up.  (I don't like to be around it when it isn't)  It will be interesting to get a shot of both of them.  

    1. calvin | Dec 20, 2014 06:02am | #3

      Fonz

      can you take a couple more shots, standing away so we can see the whole wall unit?

      thanks

      1. Fonzie777 | Dec 20, 2014 10:13am | #4

        MORE PICTURES MONDAY INCLUDING THE STICKLEY'S TABLE

        Thanks for wanting to see more of it - I'll aim to do that Monday with the cover off the Siickley's table.  The upper part (case with glass doors and wall shelf) was built by an old carpenter that moved into the basement while building his dream upstairs.  

        I'm not a photographer - I just "take pictures" (ha).  

      2. Fonzie777 | Dec 24, 2014 09:46am | #5

        MORE PICTURES INCLUDING STICKLEY TABLE

        I have a few more pictures with the Stickley table uncovered.  

        1. User avater
          deadnuts | Dec 24, 2014 11:10am | #6

          Super nice job Fonzie! Great continuity with original table. What finish did you end up using on the counter tops?

          1. Fonzie777 | Dec 24, 2014 11:31am | #7

            MINWAX WATERBORNE OIL MODIFIED

            Thanks for my part! (the guy I work with has a lot of skill and great ideas) and thanks for the critical advice I got on this forum concerning doweling not gluing the breadboards.  It would have been sickening for a split to develop over time.  

            (we detected with a magnet the Stickley's has long screws coming in from the end on their breadboards.  I think they didn't want to just depend on the tenons).  We joined the lenghwise boards with biscuits then the dowels so there are no screws in the countertop.

            We used Minwax warterborne oil modified clear satin poly.  We brushed it on.  It has a slight amber tint (which probably you already knew, not to insult you).  We just put on 3 coats (one coat on the back) sanding with 320 between coats.  I thought about trying to wipe it on but figured it would dry too fast.  Spraying didn't seem right either - I mean since it was so narrow we were pretty confident we could get it smooth with a brush.  The Stickley's has an unbelievable finish.  It would be interesting to know how they did it.

            I was really surprised how easily walnut hand sands and responds to a sanding block.  Possibly this was easier to sand and plane being air dried?  

          2. User avater
            deadnuts | Dec 31, 2014 04:48pm | #9

            nice!

            Again, your photo shows a nice finish across the surface. As far as trying to match the Stickley finsish: maybe try buffing the final coat of a varnished sample (after sanding between 3 coats) with 0000 steel wool with wool lube and see how close this gets you just as an experiment. I've found that this technique imparts a nice, even, hand rubbed satin finish.

            I just milled a 50 year old piece of 12/4 black walnut somebody gave me a few years back into some S4S stock. I normally work with oak, cherry, maple, and African mahogany, but your walnut project has inspired me to experiment with finishing some of these pieces.

          3. User avater
            deadnuts | Dec 31, 2014 04:48pm | #10

            nice!

            Again, your photo shows a nice finish across the surface. As far as trying to match the Stickley finsish: maybe try buffing the final coat of a varnished sample (after sanding between 3 coats) with 0000 steel wool with wool lube and see how close this gets you just as an experiment. I've found that this technique imparts a nice, even, hand rubbed satin finish.

            I just milled a 50 year old piece of 12/4 black walnut somebody gave me a few years back into some S4S stock. I normally work with oak, cherry, maple, and African mahogany, but your walnut project has inspired me to experiment with finishing some of these pieces.

          4. Fonzie777 | Jan 01, 2015 07:34am | #11

            great idea with the steel 0000 wool and wax-

            I bet Stickleys wouldn't be above doing that :)  And thanks for the compliment and your interest in this project.  

            I forgot to mention a trick I saw on you tube that made joining with biscuits a WHOLE lot easier.  I had always struggled getting the Frued biscuit joiner to behave using the fence guide (very little surface area, hard to hold, etc), never getting it perfect it seemed.  

            This guy set the board against the fence on the tablesaw and sat the biscuit joiner base on the table.  This is a whole new world for me in buiscuit joining.  We put the boards as described face down.  Using the table saw table made the biscuit joiner perfectly stable and controllable.  The boards aligned perfectly (using the term loosely ha).  But that tip really worked good - I suppose I'm the last to know it.  

          5. Fonzie777 | Dec 24, 2014 11:32am | #8

            MINWAX WATERBORNE OIL MODIFIED

            Thanks for my part! (the guy I work with has a lot of skill and great ideas) and thanks for the critical advice I got on this forum concerning doweling not gluing the breadboards.  It would have been sickening for a split to develop over time.  

            (we detected with a magnet the Stickley's has long screws coming in from the end on their breadboards.  I think they didn't want to just depend on the tenons).  We joined the lenghwise boards with biscuits then the dowels so there are no screws in the countertop.

            We used Minwax warterborne oil modified clear satin poly.  We brushed it on.  It has a slight amber tint (which probably you already knew, not to insult you).  We just put on 3 coats (one coat on the back) sanding with 320 between coats.  I thought about trying to wipe it on but figured it would dry too fast.  Spraying didn't seem right either - I mean since it was so narrow we were pretty confident we could get it smooth with a brush.  The Stickley's has an unbelievable finish.  It would be interesting to know how they did it.

            I was really surprised how easily walnut hand sands and responds to a sanding block.  Possibly this was easier to sand and plane being air dried?  

Log in or create an account to post a comment.

Sign up Log in

Become a member and get full access to FineHomebuilding.com

Video Shorts

Categories

  • Business
  • Code Questions
  • Construction Techniques
  • Energy, Heating & Insulation
  • General Discussion
  • Help/Work Wanted
  • Photo Gallery
  • Reader Classified
  • Tools for Home Building

Discussion Forum

Recent Posts and Replies

  • |
  • |
  • |
  • |
  • |
  • |
View More Create Post

Up Next

Video Shorts

Featured Story

Outdoor Lighting

Lighting up an exterior isn't just about ambiance— it's also about code compliance. Here is what the code says about safety and efficiency when it comes to outdoor lighting.

Featured Video

Builder’s Advocate: An Interview With Viewrail

Learn more about affordable, modern floating stairs, from design to manufacturing to installation.

Related Stories

  • Design and Build a Pergola
  • Podcast Episode 689: Basement Garages, Compact ERVs, and Safer Paint Stripper
  • FHB Podcast Segment: Are Single-Room ERVs the Answer?
  • Fire-Resistant Landscaping and Home Design Details

Highlights

Fine Homebuilding All Access
Fine Homebuilding Podcast
Tool Tech
Plus, get an extra 20% off with code GIFT20

"I have learned so much thanks to the searchable articles on the FHB website. I can confidently say that I expect to be a life-long subscriber." - M.K.

Get home building tips, offers, and expert advice in your inbox

Signing you up...

This site is protected by reCAPTCHA and the Google Privacy Policy and Terms of Service apply.
See all newsletters
See all newsletters

Fine Homebuilding Magazine

  • Issue 332 - July 2025
    • Custom Built-ins With Job-Site Tools
    • Fight House Fires Through Design
    • Making the Move to Multifamily
  • Issue 331 - June 2025
    • A More Resilient Roof
    • Tool Test: You Need a Drywall Sander
    • Ducted vs. Ductless Heat Pumps
  • Issue 330 - April/May 2025
    • Deck Details for Durability
    • FAQs on HPWHs
    • 10 Tips for a Long-Lasting Paint Job
  • Issue 329 - Feb/Mar 2025
    • Smart Foundation for a Small Addition
    • A Kominka Comes West
    • Making Small Kitchens Work
  • Issue 328 - Dec/Jan 2024
    • How a Pro Replaces Columns
    • Passive House 3.0
    • Tool Test: Compact Line Lasers

Fine Home Building

Newsletter Sign-up

  • Fine Homebuilding

    Home building tips, offers, and expert advice in your inbox.

  • Green Building Advisor

    Building science and energy efficiency advice, plus special offers, in your inbox.

  • Old House Journal

    Repair, renovation, and restoration tips, plus special offers, in your inbox.

Signing you up...

This site is protected by reCAPTCHA and the Google Privacy Policy and Terms of Service apply.
See all newsletters

Follow

  • Fine Homebuilding

    Dig into cutting-edge approaches and decades of proven solutions with total access to our experts and tradespeople.

    Start Free Trial Now
    • Facebook
    • Instagram
    • X
    • LinkedIn
  • GBA Prime

    Get instant access to the latest developments in green building, research, and reports from the field.

    Start Free Trial Now
    • Facebook
    • YouTube
  • Old House Journal

    Learn how to restore, repair, update, and decorate your home.

    Subscribe Now
    • Facebook
    • Instagram
    • X

Membership & Magazine

  • Online Archive
  • Start Free Trial
  • Magazine Subscription
  • Magazine Renewal
  • Gift a Subscription
  • Customer Support
  • Privacy Preferences
  • About
  • Contact
  • Advertise
  • Careers
  • Terms of Use
  • Site Map
  • Do not sell or share my information
  • Privacy Policy
  • Accessibility
  • California Privacy Rights

© 2025 Active Interest Media. All rights reserved.

Fine Homebuilding receives a commission for items purchased through links on this site, including Amazon Associates and other affiliate advertising programs.

  • Home Group
  • Antique Trader
  • Arts & Crafts Homes
  • Bank Note Reporter
  • Cabin Life
  • Cuisine at Home
  • Fine Gardening
  • Fine Woodworking
  • Green Building Advisor
  • Garden Gate
  • Horticulture
  • Keep Craft Alive
  • Log Home Living
  • Military Trader/Vehicles
  • Numismatic News
  • Numismaster
  • Old Cars Weekly
  • Old House Journal
  • Period Homes
  • Popular Woodworking
  • Script
  • ShopNotes
  • Sports Collectors Digest
  • Threads
  • Timber Home Living
  • Traditional Building
  • Woodsmith
  • World Coin News
  • Writer's Digest
Active Interest Media logo
X
X
This is a dialog window which overlays the main content of the page. The modal window is a 'site map' of the most critical areas of the site. Pressing the Escape (ESC) button will close the modal and bring you back to where you were on the page.

Main Menu

  • How-To
  • Design
  • Tools & Materials
  • Video
  • Blogs
  • Forum
  • Project Guides
  • Reader Projects
  • Magazine
  • Members
  • FHB House

Podcasts

  • FHB Podcast
  • ProTalk

Webinars

  • Upcoming and On-Demand

Podcasts

  • FHB Podcast
  • ProTalk

Webinars

  • Upcoming and On-Demand

Popular Topics

  • Kitchens
  • Business
  • Bedrooms
  • Roofs
  • Architecture and Design
  • Green Building
  • Decks
  • Framing
  • Safety
  • Remodeling
  • Bathrooms
  • Windows
  • Tilework
  • Ceilings
  • HVAC

Magazine

  • Current Issue
  • Past Issues
  • Magazine Index
  • Subscribe
  • Online Archive
  • Author Guidelines

All Access

  • Member Home
  • Start Free Trial
  • Gift Membership

Online Learning

  • Courses
  • Project Guides
  • Reader Projects
  • Podcast

More

  • FHB Ambassadors
  • FHB House
  • Customer Support

Account

  • Log In
  • Join

Newsletter

Get home building tips, offers, and expert advice in your inbox

Signing you up...

This site is protected by reCAPTCHA and the Google Privacy Policy and Terms of Service apply.
See all newsletters
See all newsletters

Follow

  • X
  • YouTube
  • instagram
  • facebook
  • pinterest
  • Tiktok

Join All Access

Become a member and get instant access to thousands of videos, how-tos, tool reviews, and design features.

Start Your Free Trial

Subscribe

FHB Magazine

Start your subscription today and save up to 70%

Subscribe

Enjoy unlimited access to Fine Homebuilding. Join Now

Already a member? Log in

We hope you’ve enjoyed your free articles. To keep reading, become a member today.

Get complete site access to expert advice, how-to videos, Code Check, and more, plus the print magazine.

Start your FREE trial

Already a member? Log in

Privacy Policy Update

We use cookies, pixels, script and other tracking technologies to analyze and improve our service, to improve and personalize content, and for advertising to you. We also share information about your use of our site with third-party social media, advertising and analytics partners. You can view our Privacy Policy here and our Terms of Use here.

Cookies

Analytics

These cookies help us track site metrics to improve our sites and provide a better user experience.

Advertising/Social Media

These cookies are used to serve advertisements aligned with your interests.

Essential

These cookies are required to provide basic functions like page navigation and access to secure areas of the website.

Delete My Data

Delete all cookies and associated data