FHB Logo Facebook LinkedIn Email Pinterest Twitter X Instagram Tiktok YouTube Plus Icon Close Icon Navigation Search Icon Navigation Search Icon Arrow Down Icon Video Guide Icon Article Guide Icon Modal Close Icon Guide Search Icon Skip to content
Subscribe
Log In
  • How-To
  • Design
  • Tools & Materials
  • Restoration
  • Videos
  • Blogs
  • Forum
  • Magazine
  • Members
  • FHB House
  • Podcast
Log In

Discussion Forum

Discussion Forum

Kestrel’s house

kestrel | Posted in Photo Gallery on December 4, 2003 02:20am

A few days ago I posted a photo of the Cultured Stone wall on the house we are building and I promised to post some shots of the rest of it.  So here it tis.

My husband would rather work with steel than wood, so at first we thought of building an all steel house. After considering the details, pros and cons, however, conventional wood construction won out.  We wanted it to be mostly a cathedral ceiling, open with a loft, so  supporting it with 3 steel columns and ridge beam worked out perfectly.  We had the slab done by a contractor, and since then, it has been built by just the two of us.

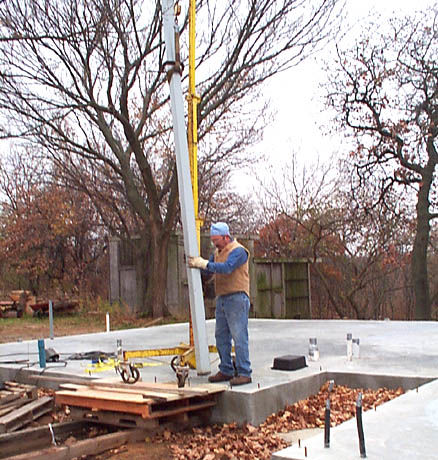
1)  The first column being raised.

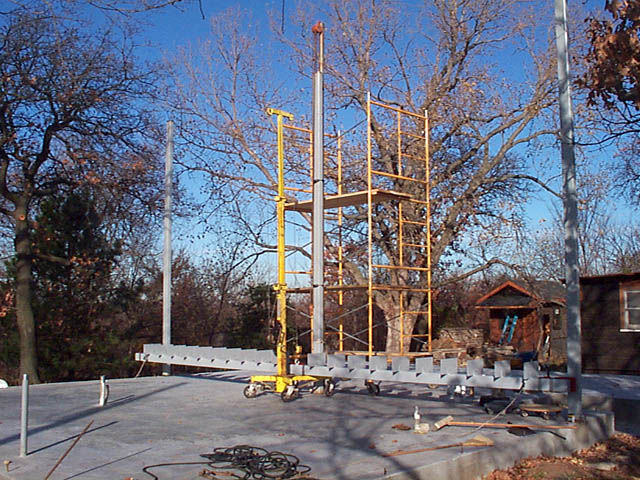
2)  After all 3 columns were up and welded to 3/4″ steel plates anchored in the concrete, we brought the ridge beam into position.  A pad eye was welded to the top of the ridge beam and a pipe a few feet taller then the columns was attached to the back of the center column.
A hoist on the pipe raised the beam to the top of the columns.
(Now that sounded easy – right?  I’m not sure that I’ve recovered yet from seeing that beam swing around while I desperately tried to hang on to the ropes that were supposed to hold it steady)

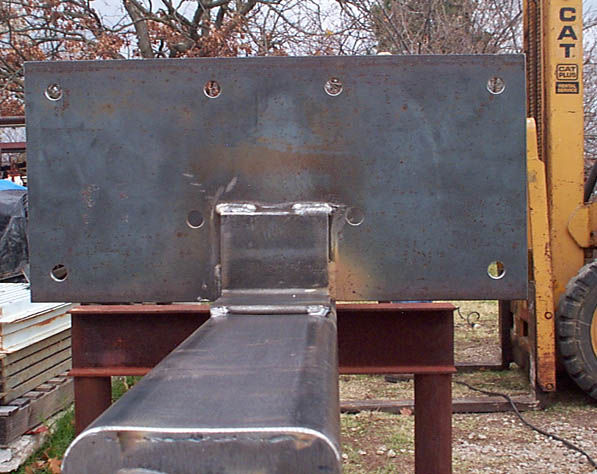
3)  The rafters will be bolted to steel plates that are welded to the top of the ridge beam.  This photo (taken while the beam was being fabricated) is of one of the plates.

kestrel

Reply
  • X
  • facebook
  • linkedin
  • pinterest
  • email
  • add to favorites Log in or Sign up to save your favorite articles

Replies

  1. kestrel | Dec 04, 2003 02:25am | #1

    1)  Once the beam was up, it was welded into position and the center pad eye was cut off to make room for the last plate for rafters.

    2)  Next came wood framing.  My husband was working full time, so work on the house was nights and weekends.

    3)  And there were delays

    Kestrel

    1. kestrel | Dec 04, 2003 02:34am | #2

      )  There were many frustrations working with a slab that isn't square or level, but it came together.

      2)  Now for rafters, little 2x12's.  Here is the first one, it's actually a double, 2 - 2x12's, notched for the outlooks that will support the overhang.  Our hoist only lifts 14' so the rafter was attached off center, closer to the outer wall.

      3)  Then to swing the rafters up to the beam, a steel counterweight was hung from the rafter tails.

      kestrel

      1. kestrel | Dec 04, 2003 02:43am | #3

        1)    Each rafter was drilled and bolted in place.

        3-5) Until all the rafters were in place along with the floor joists for our loft.

        kestrel

        1. kestrel | Dec 04, 2003 02:47am | #4

          And then the roof sheathing, shingles and skylights.

          kestrel

          1. kestrel | Dec 04, 2003 02:53am | #5

            What to do with the walls?   Having climbed all over this house, we are absolutely sure we never want to get up there again once it's finished.  So a permanent no maintenance siding was appealing.  We'd never done brick or rock - but they say cultured stone is DIY friendly.  So here goes.

            1)  Cover the exterior with lath.  The Cougar Paws boots and kneeling pad were a life saver.

            2) Window sills are to be supported by angle iron.

            kestrel

          2. kestrel | Dec 04, 2003 02:59am | #6

            1) Then cover it with a scratch coat.

            2) The stones were stuck on and temporarily spaced out and supported with small blocks.  The joints haven't been grouted at this point.

            3) The stones were held up from the intersecting roof about 2".  Grouting was done from the top down, mostly so that we wouldn't have to move the scaffold another time.

            kestrel

          3. kestrel | Dec 04, 2003 03:05am | #7

            One wall is finished.  Next we'll tackle the back.  Meanwhile one of the inspectors checks on progress.

            kestrel

          4. ~~BobL | Dec 10, 2003 07:51pm | #8

            This looks like a great project.   I like the stone detail on the walls.  Over how long of a time period have you been working on this house?

          5. kestrel | Dec 11, 2003 06:01pm | #13

            Thank you all for the nice compliments.  We really appreciate it.

            Barney  -We've been working on it for 2 years. It should start going faster now. My husband just retired, so we will be able to work on it full time (if the snow would just go away). 

            moltenmetal  -  Cool name!I see the roof picture I posted was taken before the roof was finished, so the ridge vent isn't shown.  We used Shingle Vent II with soffit vents and think we will have Icynene sprayed.  We are thinking of making the air channel out of polystyrene foam board, held out with foam blocks.  Haven't tried it yet, but I'm hoping they can be held in place with glue and just a few nails or brads and little canned foam to seal.  Do you think that will work?We live in north eastern Oklahoma, so the climate is mixed humid.  We get a little snow most years, blazing hot summers, and some very humid days, so we were hoping to have roof insulation that won't soak moisture from the outside humidity. 

            CAG - Will keep posting pictures.  I've found a tremendous amount of information on BT and in the archives, that has helped us.  We appreciate the time all of you give to the rest of us.

            Andy  -Real Stone?  Oh NO!  That stuff is heavy.  I wouldn't think cutting it would be easy either.  Our local Cultured Stone supplier was tremendous.  They let us practice on one of their walls and their masons were great teachers, so we knew we could do it with CS.BTW, I enjoyed the beautiful work on your website. 

            Butch -My husband is a welder by trade.  He started off with 20 years in the Navy.  Then we owned a welding company for several years.  His last job was in safety with an oil company.  They went through the corporate downsize games and gave him a nice offer to please retire. Exactly what he was hoping for.

            Thanks again for the comments,

            kestrel

          6. moltenmetal | Dec 11, 2003 11:50pm | #14

            Sounds like your insulation method will work.  I've never worked with spray foam, but it's got to be better from a moisture perspective than some of the other options.   I'm up in Toronto, so we have humid summers AND cold damp winters- and despite reading this forum and scratching my head repeatedly I have no idea where to put the damned vapour barrier on my insulated basement walls without having a moisture problem!

            FYI the name is from a wierd hobby I have, which your husband may get a kick out of.  I built a propane-fired melt furnace (basically a firebrick-lined box with a piece of hard firebrick for a hearth, wrapped with some Roxul FlexiBatt mineral fibre house insulation (popular up here!).  I use it to melt bronze scrap (plumbing fittings, turnings, and whatever else I can find) to make sand-cast rustic bronze hardware for my amateur furniture projects.  Nothing fancy- nothing complex.  Just the sheer joy of making a wooden pattern and duplicating it in bronze- it's a lot of fun (if you're careful and know what you're doing!)  

            I used to to art glass blowing as a hobby and loved it, but had to give it up because the local studio I rented space in part-time went broke.  So I turned my interest in hot work toward casting- got a few crucibles, some silica sand and some bentonite, made a few molding boxes, started collecting plumbing fittings and brass scrap, and I was away to the races!

          7. kestrel | Dec 12, 2003 06:09am | #16

            You did pick a challenging hobby!  I would love to see photos of your work if you have a chance.  I gather your doing the casting alone - - I'm sure you are careful, but that's one handful to handle!Hubby's reaction was along the lines of - Oh No!  We are not going to cast fixtures!

            kestrel

          8. donpapenburg | Dec 12, 2003 08:17am | #18

            Do you have to add anything to the brass when you melt/pour it?  I just got a setup for aluminum,have to put it together yet.

          9. moltenmetal | Dec 13, 2003 07:11am | #19

            Hey Don- surprised to find another fool out there who's doing this!

            To answer your question, I do add a little borax to my melts- right out of a box from the grocery store, the stuff used for laundry.  It forms a floating melt layer on top and dissolves all the oxides which form, plus it reduces the burn-out of the zinc by keeping oxygen off the melt (better than a crucible lid does IMHO).  My "bronzes" are a dog's breakfast- mixtures of copper, zinc, lead and tin, which is what you get when you melt plumbing fixtures and fittings- there's always some zinc in there, and you get a blue flame on top of the melt if you don't have a borax layer.  You have to pour off or skim off the borax just before you pour, or you'll get inclusions or surface defects in your castings.  My work is VERY rough- I usually just sandblast my castings and then maybe have a whack at them with a wire brush on the angle grinder- I'm not making close-tolerance articles.  A little left-over borax gives the parts some irregularity which gives them extra charm!

            Aluminum's way easier to work with- and there's a constant supply of old barbeques if you want raw material!

            Kestrel:  don't worry- I never do this alone.  There's always somebody to either help or check up on me.  It's easier with two- one to run the furnace and the other to ram the moulds- but it's a little difficult to find people interested enough to participate!

          10. Lateapex911 | Dec 12, 2003 04:34am | #15

            If all inspectors were like that, we'd all sleep easier!

            Very impressive. Quite an undertaking for a "retired" couple! LOL!

            Keep the photos coming!Jake Gulick

            [email protected]

            CarriageHouse Design

            Black Rock, CT

          11. kestrel | Dec 12, 2003 06:11am | #17

            >>  Quite an undertaking for a "retired" couple! LOL!

            Thanks, Jack.  But I feel like I'm 18.

            kestrel

          12. moltenmetal | Dec 10, 2003 09:26pm | #9

            The place looks great- you must be really proud!

            Question for you:  what are your plans for insulating the ceiling and venting the roof space?

          13. CAGIV | Dec 10, 2003 09:30pm | #10

            Great series of pics, keep them coming if you don't mind doing it.

            and that is one clean job-site.

  2. andybuildz | Dec 10, 2003 11:53pm | #11

    Quite an extensive job....looks great !!!!!

    Was wondering why after all that work you didn't top it all off with real stone?

    BE well

            andy

    My life is my practice!

    http://CLIFFORDRENOVATIONS.COM

  3. butch | Dec 11, 2003 01:56am | #12

    Some really nice looking work there. Thanks for sharing.  Please keep em coming.

    What's your husbands "day job", the finished product so far really looks great.

Log in or create an account to post a comment.

Sign up Log in

Become a member and get full access to FineHomebuilding.com

Video Shorts

Categories

  • Business
  • Code Questions
  • Construction Techniques
  • Energy, Heating & Insulation
  • General Discussion
  • Help/Work Wanted
  • Photo Gallery
  • Reader Classified
  • Tools for Home Building

Discussion Forum

Recent Posts and Replies

  • |
  • |
  • |
  • |
  • |
  • |
View More Create Post

Up Next

Video Shorts

Featured Story

Grout-Free Shower Panels

Engineered-stone shower panels are waterproof, but proper installation relies on tight seams and silicone sealing.

Featured Video

SawStop's Portable Tablesaw is Bigger and Better Than Before

The 10-in. Jobsite Saw PRO has a wider table, a new dust-control port, and a more versatile fence, along with the same reliable safety mechanism included in all SawStop tablesaws.

Related Stories

  • FHB Podcast Segment: Embodied Greenhouse Gas Emissions and the Building Codes
  • Old Boots Learn New Tricks
  • Install Denim Insulation Like a Pro
  • Podcast Episode 691: Replacing Vinyl Siding, Sloping Concrete, and Flat vs. Pitched Roofs

Highlights

Fine Homebuilding All Access
Fine Homebuilding Podcast
Tool Tech
Plus, get an extra 20% off with code GIFT20

"I have learned so much thanks to the searchable articles on the FHB website. I can confidently say that I expect to be a life-long subscriber." - M.K.

Get home building tips, offers, and expert advice in your inbox

Signing you up...

This site is protected by reCAPTCHA and the Google Privacy Policy and Terms of Service apply.
See all newsletters
See all newsletters

Fine Homebuilding Magazine

  • Issue 332 - July 2025
    • Custom Built-ins With Job-Site Tools
    • Fight House Fires Through Design
    • Making the Move to Multifamily
  • Issue 331 - June 2025
    • A More Resilient Roof
    • Tool Test: You Need a Drywall Sander
    • Ducted vs. Ductless Heat Pumps
  • Issue 330 - April/May 2025
    • Deck Details for Durability
    • FAQs on HPWHs
    • 10 Tips for a Long-Lasting Paint Job
  • Issue 329 - Feb/Mar 2025
    • Smart Foundation for a Small Addition
    • A Kominka Comes West
    • Making Small Kitchens Work
  • Issue 328 - Dec/Jan 2025
    • How a Pro Replaces Columns
    • Passive House 3.0
    • Tool Test: Compact Line Lasers

Fine Home Building

Newsletter Sign-up

  • Fine Homebuilding

    Home building tips, offers, and expert advice in your inbox.

  • Green Building Advisor

    Building science and energy efficiency advice, plus special offers, in your inbox.

  • Old House Journal

    Repair, renovation, and restoration tips, plus special offers, in your inbox.

Signing you up...

This site is protected by reCAPTCHA and the Google Privacy Policy and Terms of Service apply.
See all newsletters

Follow

  • Fine Homebuilding

    Dig into cutting-edge approaches and decades of proven solutions with total access to our experts and tradespeople.

    Start Free Trial Now
    • Facebook
    • Instagram
    • X
    • LinkedIn
  • GBA Prime

    Get instant access to the latest developments in green building, research, and reports from the field.

    Start Free Trial Now
    • Facebook
    • YouTube
  • Old House Journal

    Learn how to restore, repair, update, and decorate your home.

    Subscribe Now
    • Facebook
    • Instagram
    • X

Membership & Magazine

  • Online Archive
  • Start Free Trial
  • Magazine Subscription
  • Magazine Renewal
  • Gift a Subscription
  • Customer Support
  • Privacy Preferences
  • About
  • Contact
  • Advertise
  • Careers
  • Terms of Use
  • Site Map
  • Do not sell or share my information
  • Privacy Policy
  • Accessibility
  • California Privacy Rights

© 2025 Active Interest Media. All rights reserved.

Fine Homebuilding receives a commission for items purchased through links on this site, including Amazon Associates and other affiliate advertising programs.

  • Home Group
  • Antique Trader
  • Arts & Crafts Homes
  • Bank Note Reporter
  • Cabin Life
  • Cuisine at Home
  • Fine Gardening
  • Fine Woodworking
  • Green Building Advisor
  • Garden Gate
  • Horticulture
  • Keep Craft Alive
  • Log Home Living
  • Military Trader/Vehicles
  • Numismatic News
  • Numismaster
  • Old Cars Weekly
  • Old House Journal
  • Period Homes
  • Popular Woodworking
  • Script
  • ShopNotes
  • Sports Collectors Digest
  • Threads
  • Timber Home Living
  • Traditional Building
  • Woodsmith
  • World Coin News
  • Writer's Digest
Active Interest Media logo
X
X
This is a dialog window which overlays the main content of the page. The modal window is a 'site map' of the most critical areas of the site. Pressing the Escape (ESC) button will close the modal and bring you back to where you were on the page.

Main Menu

  • How-To
  • Design
  • Tools & Materials
  • Video
  • Blogs
  • Forum
  • Project Guides
  • Reader Projects
  • Magazine
  • Members
  • FHB House

Podcasts

  • FHB Podcast
  • ProTalk

Webinars

  • Upcoming and On-Demand

Podcasts

  • FHB Podcast
  • ProTalk

Webinars

  • Upcoming and On-Demand

Popular Topics

  • Kitchens
  • Business
  • Bedrooms
  • Roofs
  • Architecture and Design
  • Green Building
  • Decks
  • Framing
  • Safety
  • Remodeling
  • Bathrooms
  • Windows
  • Tilework
  • Ceilings
  • HVAC

Magazine

  • Current Issue
  • Past Issues
  • Magazine Index
  • Subscribe
  • Online Archive
  • Author Guidelines

All Access

  • Member Home
  • Start Free Trial
  • Gift Membership

Online Learning

  • Courses
  • Project Guides
  • Reader Projects
  • Podcast

More

  • FHB Ambassadors
  • FHB House
  • Customer Support

Account

  • Log In
  • Join

Newsletter

Get home building tips, offers, and expert advice in your inbox

Signing you up...

This site is protected by reCAPTCHA and the Google Privacy Policy and Terms of Service apply.
See all newsletters
See all newsletters

Follow

  • X
  • YouTube
  • instagram
  • facebook
  • pinterest
  • Tiktok

Join All Access

Become a member and get instant access to thousands of videos, how-tos, tool reviews, and design features.

Start Your Free Trial

Subscribe

FHB Magazine

Start your subscription today and save up to 70%

Subscribe

Enjoy unlimited access to Fine Homebuilding. Join Now

Already a member? Log in

We hope you’ve enjoyed your free articles. To keep reading, become a member today.

Get complete site access to expert advice, how-to videos, Code Check, and more, plus the print magazine.

Start your FREE trial

Already a member? Log in

Privacy Policy Update

We use cookies, pixels, script and other tracking technologies to analyze and improve our service, to improve and personalize content, and for advertising to you. We also share information about your use of our site with third-party social media, advertising and analytics partners. You can view our Privacy Policy here and our Terms of Use here.

Cookies

Analytics

These cookies help us track site metrics to improve our sites and provide a better user experience.

Advertising/Social Media

These cookies are used to serve advertisements aligned with your interests.

Essential

These cookies are required to provide basic functions like page navigation and access to secure areas of the website.

Delete My Data

Delete all cookies and associated data