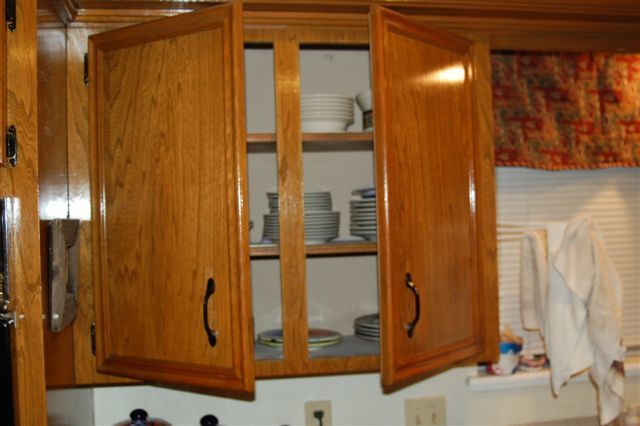
Is it possible to redo these overlay-style kitchen cabinets (see pics) and make them with inset doors and drawers? Last year I saw Norm Abram nail a mitered bead/trim piece to the inside of the cabinet frame, so I was thinking that I could do the same and clean up the exposed plywood edge of the cabinet face frame (holes in the frame were evidently cut by a jigsaw). Then I would have a square frame to inset the cabinet doors and drawers. I am planning to make the drawers, drawer fronts, and cabinet doors. The layout of the kitchen is nice, but we really need a makeover on the cabinets. We are planning to get new countertops as well.
One of the pics shows the center section between two adjoining cabinet doors that I believe would have to be removed – correct?. I was concerned that there wouldn’t be a stop for the two doors when pushed inward, however the shelves would stop the doors.
Is this a good idea or should I just try to make better overlay-type doors and drawer fronts?
Thanks,
Brian


Replies
Much easier to build new overlay doors. Besides the problem with hanging inset doors perfectly square in the faceframe your drawer slides may not give you enough travel in to do inset. Inset doors are a pain in the arse for myself, trying to get an even reveal all the way around your doors and drawers, too much. I like the forgiveness of overlay doors. I still use good Blum hardware for adjustments.
Vern.
The face frames were cut from a single piece of plywood, correct? I would check that the beaded trim will look good against "jig saw" cut outs. Some sanding/planing may be necessary to improve the joint between the face frame and new trim.
Looks like a lot of holes to fill where the existing hinges are screwed in. Sometimes the puddy/filler does a nice job and then there's the other 95% of the time.
As for the door stops. Leave the center stiles. You can attach a new piece of 1x to the top rail of the face frame and have it stick down approx. 3/8". This will stop the door. You can also install bullet or ball catches http://www.rockler.com/product.cfm?page=145. Simple to install
Drawers shouldn't be a problem, you will just have to move the slides. I'm assuming you knew that.
Dave Otto -- Otto Construction -- PA
Good tip - Forgot to mention that we are planning to pain all of the cabinets so will likely use poplar for frames and MDF for panels. Drawer bottoms will be baltic birch.
In this thread and the other one, I've seen it mentioned that the faceframes are cut out of plywood. Your pictures look to me like good old solid wood - which is pretty much standard for face frame cabs.You can do inset doors and drawer fronts if you add some kind of stop on the inside for the doors, and careful positioning of the drawer glides for the drawers. If you use side mount glides, you'll need spacers between the carcass and the glide. If you use glides that require that the drawer be "tipped" for removal, make sure that the drawer sides and back will clear the faceframe during removal. You MAY NOT ask how I know that!! - lolI usually install drawer glides with the cabinet back off so I can get everything dialed in just right.
"In this thread and the other one, I've seen it mentioned that the faceframes are cut out of plywood. Your pictures look to me like good old solid wood - which is pretty much standard for face frame cabs."
Nope -- look at the grain on the "face frame" rails -- it's verticle just like the stiles. Original builder just cut door holes out of a single sheet of ply to make the face frames.
To OP: Have you thought about removing the face frames and just making new ones out of something like maple or, cheaper, poplar, since it'll be painted? (You'd probably wanna invest in a pocket hole jig if you don't have one.) IMHO, that would be easier & quicker than trying to jury rig around what was a bad idea to start with.
Mike HennessyPittsburgh, PA
Oops, you're right. My morning vision is better than my evening vision. - lolGood idea about replacing the faceframe. I believe the OP said that the openings weren't square so a new faceframe could correct that. The problem may be getting the old one off - Care to bet on glue and nails? - lol
"Care to bet on glue and nails?"
Well, I sure wouldn't bet against it! LOL.
Still, a new face frame could be dadoed on the back to cover any damage removal might cause. I still think I'd rather do it that way than to try to work around a plywood face frame. I doubt the hinge screws would last long into the edgegrain of ply.
Mike HennessyPittsburgh, PA
One downside to this discussion (and the other one started by the OP) is that it seems to be approaching the place where complete replacement of the cabinets may be a more effecient path.I frequently have to explain to customers that modification of their existing cabs has limitations and complete replacement may be a more cost effective solution.
I realize we could do that but that is simply not in our budget. Since I enjoy woodworking and making things to help fix up the house, I didn't think it would be too daunting a task to replace doors, drawer fronts, and drawer boxes. My wife really wants to paint the cabinets so the lumber wouldn't be that expensive.
So what if I replace the ply face frames with poplar frames and still do the overlay doors and drawer fronts? Is there something I'm missing - that seems to be the weakest links in the cabinet structure (hadn't thought about screws on the ply frames wearing out after some use/cycles).
For you, it's probably cost effective to do what you're planning. If I were doing it for you, however, it would likely be less expensive to rip out what you have and start from scratch. Labor is the single biggest cost and yours is free..........mine isn't. - lolA couple of caveats here.
(1)I don't consider goofing around on BT as billable labor, so feel free to ask any questions you have. My advice, comments, and suggestions are free and worth every penny you pay for them. (2)My labor actually is free to a very small group of people. My daughters and SIL have quite a few pieces of pretty decent furniture that (sometimes) costs them the price of the materials and some of their time.
Someone hinted in a previous post that I might cause more damage in trying to remove the face frames. Some of them are loose, however a couple of them like the island frames are mitered on the ends and nailed. I plan to pry them carefully, but do you think all of those mitered seams and edges of the frames were glued as well? The last thing I want to do is to try to remove part of them and tear them up to where I can't fix it without replacing all of them.
They might be, but there's no way to know for sure until you try to remove them.Get a 5-in-1 painters tool (they look like an oddly shaped putty knife with a stiff blade) and use it to try removing a faceframe in an unobtrusive place. As soon as the faceframe begins to pull away from the carcass, you'll know if it was or wasn't glued and whether you want to go for it.
If you plan to paint the cabinets when done and make new overlay doors , then why change the face frames ?
In my professional opinion that style of mitered plywood face frames will not easily lend itself to be removed and replaced mostly because of the mitered corners , would you miter the new face frames ? The Poplar would need to be the same thickness as the existing faces to meet the miters and such .
Also when you mention flush inset and retro fit into jigsaw cut and rough openings you are headed down a road full of potholes .
Make new doors and drawer fronts more full overlay so less of the face will show for a fresher look with the new doors.
FYI you can place stops inside of flush inset doors .
good luck dusty, a boxmaker
Those face frames look like all plywood to me. First thing that jumps out is all the grain running same direction and grain pattern matches the doors which are obviously ply.I'd have two big concerns if a customer asked me to do this. First is whether the opennings are square and line up evenly. It's already a lot of work to get alignment on flush insets, but starting with sloppy holes cut from a jigsaw twenty years ago leaves me without any confidence on that pointThe other concern is that this would absolutely need to get a paint job for finish.
Welcome to the Taunton University of Knowledge FHB Campus at Breaktime. where ... Excellence is its own reward!
If economy is your first concern, leave the existing face frames and use overlay or half overlay new doors and paint it
Welcome to the Taunton University of Knowledge FHB Campus at Breaktime. where ... Excellence is its own reward!
It's almost certain that I wouldn't even attempt this approach for a paying customer. Most of the work would have to be done on-site, and it would involve a lot of "fit and fiddle" work to get it right.I could probably build all new cabs in my shop, demo the old ones, and install the new ones for less money than trying to beat the old cabs into submission.The OP, however, isn't trying to make a profit, so his "fit and fiddle" time doesn't count. - lol
absolutely, but his F&F time will count when he is trying to do all that while his wife is trying to fix dinner, the kids are gnawing at his ankles, and the coffee is getting cold.;)
Welcome to the Taunton University of Knowledge FHB Campus at Breaktime. where ... Excellence is its own reward!
You and I know that...........now. As someone once said (or should have), "Too soon old, too late smart". - lolI still have memories that I can't supress about some of my early projects.
Edited 3/14/2009 3:02 pm by Dave45
LOL, I'm so good I've suppressed some of them;)
Welcome to the Taunton University of Knowledge FHB Campus at Breaktime. where ... Excellence is its own reward!
For inset doors and drawers, the faceframes will have to be perfectly square.
Kinda hard to imagine that will be the case with jigsawed, plywood frames.
That would be where I would start. Go around the entire kitchen checking each and every opening. If most are good and the others only require minimal adjusting, it will make your life infinetly easier. If not, consider new overlay doors.
I'd keep the center stiles, otherwise your doors may be/look too big.
As someone mentioned....if you are determined on using the inset style, look to see how involved removing and replacing the existing frames may be.
J. D. Reynolds
Home Improvements
Proud recipient of the BT 'Truth In Print' award.
Are the boxes behind the face frame true? If so you might be able to convert to the "euro" style frameless cabinets, by just removing the face frames.
If the cabinet bodies aren't square, you will have to stay with a face frame.
The solution to the 45-degree miters where they were wrapped back to the original sides of the cabinets is to nail a temporary guide to inside of the cabinet, and use a flush trim bit in a laminate trimmer to cut the edge back true to the rest of the your edges.
I can't tell for sure, but I think the panels in your doors may be made from the cut out in the existing face frame.
Hiya Jigs ,
Kind of makes you wonder if the faces are cut sloppy and you can clearly see it , I don't reckon the boxes will be true ? but , stranger things have happened !
regards dusty
The body cut out could have been done on a table saw, and the face frame made with a jig saw, there used to be a "Sunset Magazine", book on remodeling your kitchen that gave instructions on how to build the cabinet style the OP seems to have, that did it that way. As a consequence there are quite few of them out there.