DW wants a island built in the kitchen. The room is rather large with surprisingly few cabinets, so space is not really a problem.
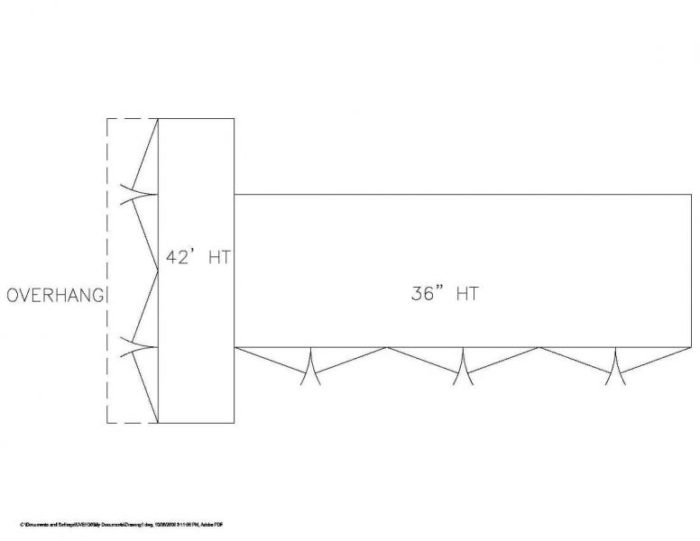
Here’s what I’m proposing. The larger part is standard height cabinets, with a top of undertermined material … still waiting for the customer to decide.
The T-part is at 42″ with an overhang for stools. The cabs there will only be 12″ deep since they are mostly for supporting the overhang, with storage being a bonus. I will probably build a 2×4 wall behind the high cabinets so I can add a couple of electrical outlet for the lower top.
Question: I’m unsure what to do about the toe space. The lower cabs with have a space, but what about the taller ones? Does the overhang preclude the need for a toe space there? What about on the sides of the taller cabinets? Since you can belly up to the edge of the high top, is a toe space needed?
“When asked if you can do something, tell’em “Why certainly I can”, then get busy and find a way to do it.” T. Roosevelt


Replies
I'd have a kick on the face but not the sides.
I've done a quite a few of these over the years and what I have found that works good is to make the bar cabinet a "free standing cabinet" that has a no to kick and use a 4" tall base that goes around the bottom.
depending on the style, we would use flutted collumns on the corners and wrap the base around those. Specially clean looking in a painted finish
My rule is that toe kicks are ugly, so only use them where they're functional--at countertops where you'll be standing and working. If the counter has an overhang, there's no need for the extra toe space.
First, I really prefer the counters to be at the same height. I find that the separated taller counters get much less use than if the whole counter is at the same height. [I do understand the desire to use the extra height to shield the kitchen from the rest of the room.] Just my 2¢; the customer is always right :-).
My kitchen is Shaker style, with frame & panels on the island face (barstool side) and end. I have the panels 3/4" proud of baseboard - so not really a toe kick but enough of a difference to add visual interest.
Now that I'm thinking about it, I should have followed this approach under the china cabinet at the right end - doesn't really need a kick. Oh well...
View Image
Edited 10/7/2006 12:59 am by wrudiger
Wrudiger,My wife and I have a similar plan for our kitchen. How long is your island from the back of the hutch to the opposite end?Also, are those custom or semi-custom cabinets?
The island is 15' long, the cabinets under the granite are 13½'.
The cabs are completely custom. How do you think I justified all those tools - LOL! My favorite part was matching all the wood for the frames, panels and solid drawer fronts - I'm really pleased with how they turned out.
The cases are all 27" deep, to support a 30" countertop against the wall. This also allowed us to put in 25" deep glides vs. the normal 21" (see Pantry picture). Total cost (not incl. granite or appliances) was $8,800. Oh yea, and a whole lot of time... Here are a few more pics:
Thanks. I am going to save those pictures as inspiration. We have room for a 55" x 85" island countertop so I'm also considering deeper base cabinets on the cooking side of the island. So you have an overhang at the far end of the island as well? It's an 18" overhang?[EDIT] Sorry, I looked at your original picture again and see the stool to the left of that pillar. Did you use an 18" overhang all around?I'm impressed with the prices you mention. What type of sheet goods did you use for the cases? And how many lineal feet of cabinets?And want did you pay per boardfoot for the hardwood? And what type of wood is that exactly? Soft, hard, or what? And what are the drawers?
Edited 10/8/2006 10:28 am ET by CJH
I have 14 base units, 4 wall units and one overhead unit (with appliance garage below). 37 lineal feet total. Plus 6 drawers in a unit under the fireplace.
The overhang at it's widest on the front side of the island is around 21". To support that I used a 13-ply void-free 3/4" plywood sub-top. I also installed maple 2x3 supports every 4' or so, extending the entire width of the unit, bolted into the cases. Others have embedded steel. The key is to get the base rigid enough that when the grandkids do pullups on it you don't get any cracks. So far, so good, though he's not quite 2 so we will see :-).
The cases are 3/4" Nova prefinished maple plywood. 2 coats uv-cure clear epoxy, so no messing with finishing them. All exposed plywood edges have 1/8" hardwood edging - goes reasonably fast when you get in the rythm but still takes a lot of time. At the time I was buying the plywood there was very little difference in price between 1/2" and 3/4" so I just went with 3/4" for the backs. Total overkill but made material handling in a tiny shop a little easier. Since the cases are prefinished I just screwed them together - pin nailed first to help hold them together. That was really helpful for the inevitable re-dos.
The drawers are 1/2" 9-ply Nova prefinished plywood with miter-lock joints. This is an area - if you are planning on building yours - that you should at least get some quotes from the knock-down drawer outfits. I have 50 drawers and slide-outs - that's 200 sides with multiple passes for various machining operations... Bottoms are mostly 1/4" Nova prefinished; the wide ones under the cooktop and the ones in the pantry that get the heavy stuff are 1/2". Glides are all Blum Tandem, sourced (along with the hinges, pulls and tambor door parts) from wwhardware.com.
The panel doors and drawer fronts are joined with floating tenons. The panels are 9/16" recessed 3/16" into the frame. They are raised panels, with the raised part on the back side (got that idea here) to get the shaker look.
Hardwood is all hard maple. Prices varied during the project and that was over a year ago so - generally in the $4.50 to $4.80 per bf for 4/4.
I build an entire set as a prototype to work out the details and the construction approach. I just happened to need laundry cabinets so that worked out really well. One of the things I found is that it looks much better to have varying heights on the drawers, especially in the 4-drawer units. I also learned that gluing flat stock to the edges of the plywood works better than the Burgess Bit approach (google it if you haven't heard of it). Nice theory but too much variance in the plywood thickness to get tight joints.
I have lots of other pics if you are interested. You can e-mail me if you want to keep it off-forum.
Email sent. And in my previous post I meant to write "what kind of maple", not "what kind of wood". Regardless, I figured it was hard maple.