I used to cut all my rafters down on the ground. Now I just get comfortable up there and hack away.
Here’s my basic setup.
I only needed a very few framing members, so I lean them up manually (the lift is in use in the rear). YOu can see the valley board peeking up and there’s a coupla 2×6’s leaning through the garage. I’ll scavange a bunch of kickers that I’ve been using for the garage roof too.
Warning! Be cautious when taking any framing advice from me. Although I have a lifetime of framing experience, all of it is considered bottom of the barrel by Gabe. I am not to be counted amongst the worst of the worst. If you want real framing information…don’t listen to me..just ask Gabe!


Replies
I've layed the osb under the layon and I'm ready to fill in the garage layon.
blue
Warning! Be cautious when taking any framing advice from me. Although I have a lifetime of framing experience, all of it is considered bottom of the barrel by Gabe. I am not to be counted amongst the worst of the worst. If you want real framing information...don't listen to me..just ask Gabe!
The first thing I do is build a scaffold. I'm using a 2x6 that will later be the last two rafters.
I'm getting my measurement for my ridge. The 2x6 ridge is balancing on a nail, that I've driven in horizontally 3/4" down from the peak. I've leveled it out with a torpedo and I mark the inside of the last truss. This is the total length of the ridge.
blueWarning! Be cautious when taking any framing advice from me. Although I have a lifetime of framing experience, all of it is considered bottom of the barrel by Gabe. I am not to be counted amongst the worst of the worst. If you want real framing information...don't listen to me..just ask Gabe!
Heres a close up.
Occasionally it's better to nip off the peak to create a flat spot, but that causes problems if the raw stock is more than 2' long.
blueWarning! Be cautious when taking any framing advice from me. Although I have a lifetime of framing experience, all of it is considered bottom of the barrel by Gabe. I am not to be counted amongst the worst of the worst. If you want real framing information...don't listen to me..just ask Gabe!
Heres a close up of the hacked cut that lays onto the roof. I got lucky and didn't need to "adjust'' the cut.
blueWarning! Be cautious when taking any framing advice from me. Although I have a lifetime of framing experience, all of it is considered bottom of the barrel by Gabe. I am not to be counted amongst the worst of the worst. If you want real framing information...don't listen to me..just ask Gabe!
I've stacked up the common "jacks" that go on the far side of the ridge. I'm cutting everything very comfortably on my plywood stack.
blueWarning! Be cautious when taking any framing advice from me. Although I have a lifetime of framing experience, all of it is considered bottom of the barrel by Gabe. I am not to be counted amongst the worst of the worst. If you want real framing information...don't listen to me..just ask Gabe!
I've installed the commons. They were about 60" long. One was very close to the underlying roof and luckily I noticed it before I cut up all the 2x6's. I used a 2x4 for that one. Becuase I didn't have "full bearing", I added a 2x4 filler...one that I had used the day before as a kicker on the garage roof backside.
blueWarning! Be cautious when taking any framing advice from me. Although I have a lifetime of framing experience, all of it is considered bottom of the barrel by Gabe. I am not to be counted amongst the worst of the worst. If you want real framing information...don't listen to me..just ask Gabe!
I've used a valley board (1x8) to rest my jack rafters on. Some only snap lines. I hate snapping lines so I simply make a sharp cut at the bottom and sight in the top edge to the ridge.
On most layons, I start with zero and add the common differences. On this one, I measured the garage truss and deducted the common difference. That put the longest jack at 24'' oc and made my plywood land without an additional cut.
blueWarning! Be cautious when taking any framing advice from me. Although I have a lifetime of framing experience, all of it is considered bottom of the barrel by Gabe. I am not to be counted amongst the worst of the worst. If you want real framing information...don't listen to me..just ask Gabe!
I've got to fit in a small triangular shaped piece at the bottom. I normally work from the valley out, but due to the mud (we couldn't get our sky trak up to the area I'm working), I opted to sheath the inside of the garage roof and stage the front with the crane on my rack. I had to lay the ply to install my rack....life gets complicated sometimes.
Anyways, I forgot my supplemental pouch...the one that carrys chalklines, nail pullers and calcuators. I don't have anything up there except my tape and pencil. I debate....do I walk down, or hack it in. I opt for the hack. If I could get my hands on a calculator, I'd make a cut stick and precut four pieces to fit into the valley, but instead I go for the one-at-a-time valley cut.
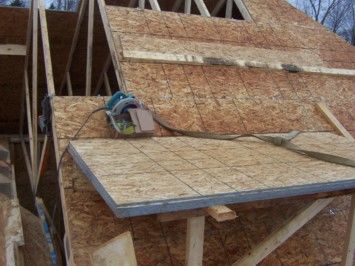
In this pic, I'm using the sight lines of the existing garage plywood horizontal line to give me a good idea of the cut. This is an old trick that no one taught me, but it evolved. I lay the plywood upside down and just try to cut level. If you look closely, you can see I'm running up hill slightly. That will force me to have to recut it when I slide it into the space at the bottom of the valley. It was close enough to leave, the shingles would easily work over it, but I don't leave gaps over the front door. A quick test fit and recut about 1/2" to nothing solved the gap.
After sliding it down tight, I have to cut the top off level with the first plywood course. I accomplish this by eye with no problem and no measuring, cutting the piece in its final resting place.
blueWarning! Be cautious when taking any framing advice from me. Although I have a lifetime of framing experience, all of it is considered bottom of the barrel by Gabe. I am not to be counted amongst the worst of the worst. If you want real framing information...don't listen to me..just ask Gabe!
The second piece needs a little over 24" on the bottom. I don't actually measure that distance, I just eyeball it.
I've staged the second piece at the top. This is where I cut a lot of these type angles, unless I precut the entire valley. The highest piece will not fit...I wasn't thinking right, but the bottom "scrap" will be plenty long enough. Either way, both those pieces are going into the valley, one right after the other.
Again, I'm using the ridge as my sight line. I just whack it off following the ridge line and this time the #2 piece fits perfectly into the valley...although a little longer than I wanted on the other end!
blueWarning! Be cautious when taking any framing advice from me. Although I have a lifetime of framing experience, all of it is considered bottom of the barrel by Gabe. I am not to be counted amongst the worst of the worst. If you want real framing information...don't listen to me..just ask Gabe!
The second piece was actually closer than I thought it would be. I've circled the scrap piece that I lap cut right in place.
The nine inch piece has slid down and I'll hang onto it in case I need one last kicker when I get near the top. I'm a real miser when I'm on the roof...I save everything. A 12' block is like gold to me....I don't want to climb down to retrieve a kicker....
blueWarning! Be cautious when taking any framing advice from me. Although I have a lifetime of framing experience, all of it is considered bottom of the barrel by Gabe. I am not to be counted amongst the worst of the worst. If you want real framing information...don't listen to me..just ask Gabe!
The third step in the lay on is the leftover piece from the previous cut. It's hanging over the rafter about 4", so it will easily be cut using my finger as a rip guide.
blueWarning! Be cautious when taking any framing advice from me. Although I have a lifetime of framing experience, all of it is considered bottom of the barrel by Gabe. I am not to be counted amongst the worst of the worst. If you want real framing information...don't listen to me..just ask Gabe!
I'm cutting the piece half on, using my finger as a guide. The actual drop isn't 4''...it appears to be about 2.5".
That's a pretty effective use of the resources.
blueWarning! Be cautious when taking any framing advice from me. Although I have a lifetime of framing experience, all of it is considered bottom of the barrel by Gabe. I am not to be counted amongst the worst of the worst. If you want real framing information...don't listen to me..just ask Gabe!
That about sums up how I cut everything up on the roof. I would have shown the finished valley, but I ran out of camera battery.
I'll take a pic tomorrow and post it.
You guys asked for more pics...so there ya go...Happy Holidays!
Incidently, I'll be copying a lot of my postings and creating training aids.
blueWarning! Be cautious when taking any framing advice from me. Although I have a lifetime of framing experience, all of it is considered bottom of the barrel by Gabe. I am not to be counted amongst the worst of the worst. If you want real framing information...don't listen to me..just ask Gabe!
Well done Blue. I do enjoy your tutorials. The way to cut the sheathing angles are definately new to me. I have always enjoyed framing those types. I learned to cut everything on the roof, but am pretty efficient with a chalk.
It's still nice to see how someone else does a job differently that I've taken the time to become good at in my own way.
Anyway, thanks for the pics.ADH Carpentry & Woodwork
Quality, Craftsmanship, Detail
Hook, I didn't start out doing it that way...I used to be a chalkline guy too. At some point, i began to hate chalking those lines, especially the diagonal ones. I think I hate them because there's no easy (fast) way to hook my chalkline hook on the edge of the plywood without it slipping. I'd always have to drive a nail....and the whole process just irks me.
In that situation, if I'd had a square or calulator, I'd have pre-cut two full sheets to fit them into the valley running them wild and cutting like I did on the third sheet.
If you ever get a chance, post some pics of your methods. I enjoy peeping too....
blue
Warning! Be cautious when taking any framing advice from me. Although I have a lifetime of framing experience, all of it is considered bottom of the barrel by Gabe. I am not to be counted amongst the worst of the worst. If you want real framing information...don't listen to me..just ask Gabe!
Being how I got 'lost' after pic #2, will these training aids be in stores for Christmas? DVD or VHS?
I didn't do it....the buck does NOT stop here.
No FramerT...these training aids will be used by me to personally deliver a written set of instructions to the rookies who work with me. I've repeated the same set of instructions so many times over the years, that I've always wished I could just make a recording. In fact, I bought a video camera about twenty years ago with the intention of just filming my processes so I could hand a tape to the rookies and tell them to watch it. Of course, that idea would never work..because someone would have to be aiming the camera properly to make sense of it.
I actually print out a lot of posts that I read in here and give them to my guys. Sometimes I print out stuff that I post too.
Now..quit being so sassy.
blueWarning! Be cautious when taking any framing advice from me. Although I have a lifetime of framing experience, all of it is considered bottom of the barrel by Gabe. I am not to be counted amongst the worst of the worst. If you want real framing information...don't listen to me..just ask Gabe!
"Heres a close up of the hacked cut that lays onto the roof. I got lucky and didn't need to "adjust'' the cut".Blue,You have to guess at that cut also???????????You do know how to get it with the framing square right or speedsquare?Why bother to guess at that cut so high in the air and take a chance on screwing it up when you can get it in 2 seconds with the framing square or speadsquare?Joe Carola
Framer, I don't have to "guess", I just do. Three things could happen. It could be right (it usually is). It could be too flat, I'd have to trim it. It could be too steep, I'd have to scribe the valley board under it.
I've never screwed one up that I couldn't fix and use. In my earlier days, I used to have to scribe a lot of them. Scribing with a saw like I use is very easy. The blade makes a cut 3/4" above what your scribing. It cant be done with your saw. Maybe thats why I learned to hit the cuts without the square.
blueWarning! Be cautious when taking any framing advice from me. Although I have a lifetime of framing experience, all of it is considered bottom of the barrel by Gabe. I am not to be counted amongst the worst of the worst. If you want real framing information...don't listen to me..just ask Gabe!
"Framer, I don't have to "guess", I just do. Three things could happen. It could be right (it usually is). It could be too flat, I'd have to trim it. It could be too steep, I'd have to scribe the valley board under it."As you once said to me Joe your dodging the question..;-)You didn't answer mine.Do you know how to figure that cut with your framing square or your speedsquare that you can that angle in 2 seconds like I asked you before?????You of all people who looks to find ways to get things done faster which you've impressively mastered as we should all do but why take the chance of having THREE possible things that could happen as you've just said when you can get the cut in 2 seconds with the framing square or speedsquare and have 100% chance of it fitting?Well forget the speedsquare for now.......;-)Joe Carola
Joe, I'll answer your question directly.
I cut every part on that roof section without a square. Only my first "common-jack" pattern needed a tweak, which I made before I marked the other three with it. Since I made fourteen cuts, and saved ten seconds each (I estimate that it takes ten seconds to mark a pitch cut), that totalled up to 240 seconds. The tweaking recut that I had to make took ten seconds. Using my numbers...I'm 230 seconds ahead.
Of course I know how to figure the angle with a framing square. For the ridge, hold ten and twelve, mark the twelve. For the plumb cuts, mark the ten, for the level cuts, mark the twelve. For the angle bevel. tip the saw to 36 degrees.
Now..the question for you...do you know how to do all of this by eye?
blueWarning! Be cautious when taking any framing advice from me. Although I have a lifetime of framing experience, all of it is considered bottom of the barrel by Gabe. I am not to be counted amongst the worst of the worst. If you want real framing information...don't listen to me..just ask Gabe!
Blue,The only things that I ever did by eye were crazy crickets like the one I did last week I brought the saw and the square with the material on the roof and cut everything up there and cut it all by eye. In your situation when I do that I just bring a pattern up with me with a plumbcut and level cut which takes 2 seconds to make and scribe. In my 20 years of framing I've cut a lot of things by eye especially shoes and plates if someone takes out a square I will throw it off the deck but not rafters as you do so to answer your question can I do all of this by eye I probably could because I do have a good eye but for plumbcuts and level cuts I'll stick to the pattern. Hip plumbcuts and level cuts I'll stick to the pattern. I'm impressed that you can do all this by eye and get it right the first time so maybe I'll try to cut some rafters like you do but being that I just turned 40 today my eyes aren't that good........;-)Joe Carola
Happy Birthday Joe! I'll buy the first round. I'm just catching wind of your awful fire. I feel for you. Hope things are working out ok and I'm glad that everyone is still healthy.
Thanks for the Happy Birthday but the fire wasn't on my house it was on Joe Fusco's house.I am getting old because last night I went out to dinner and had one beer and I had a buzz and today a overhang/hangover..............;-) and now I have to take my son to wrestling school.Joe Carola
Edited 12/12/2004 12:42 pm ET by Framer
Right, my bad. This is what happens when my feeble brain doesn't have a face to put with a name! Watch some football and nurse that hangover.
I can't relax now because we're taking my son to Radio City Music Hall to see the Christmas Show. He loves it that's how we celebrate my birthday every year.Joe Carola
When ever I get to 'cut', I'd just make a little patty block with say, a 9/12 on one end and the 12 side of a 9/12 on the other.No need for squares afterwards.I'm talking about fill-in rafters.I'll remember your 'angle-stick' idea next time I'm cutting. But I'm usually running the roof,bunch of scaredy cats on our crew.
Didn't mean to be 'sassy' blue. wink
I didn't do it....the buck does NOT stop here.
FramerT...I make one of those patterns too, especially when working with longer patterns.
I've never gang cut a roof with a chainsaw so I usually mark and cut each rafter when I'm cutting a large group.
Occasionally I'll cut a small ply...about the size of a speed square and use that...keeping it in my pouch...just like a SPEED square.
I always make a "speed square" for stair marking. I make them out of 3/8" ply using two nails for the guide.
blueWarning! Be cautious when taking any framing advice from me. Although I have a lifetime of framing experience, all of it is considered bottom of the barrel by Gabe. I am not to be counted amongst the worst of the worst. If you want real framing information...don't listen to me..just ask Gabe!
Framer....I cut my teeth on those crazy crickets and weird hip layon intersections!
I used to think I had to figure out every angle....some of them are so weird..I still cant figure them....like the round roof laying onto the main roof. I was flabbergasted at the actual cuts and I couldn't figure out how to lay them out with a square unless I had a PHD in math...which just ain't gonna happen in my lifetime.
Anyways, after I started whacking away on those weird ones...I just gradually started whacking the "normal" ones. I find that I can do most of the higher pitches quite accurately. It's the lower pitched level cuts that I have the most trouble. When I do those, I usually make a small pattern because they are too long of cuts to figure...the error is just too great. But really, anyone can do a 12/12 cut either way....which is probably the first cut that I mastered. After that...it's just a small mental adjustment...ie...I aim a 12/12 then back off a little....
I'm pretty steady on 8/12 and up...mainly because the last 20 years have been.....8/12 and up!
My absolute easiest pitchs are 12/12 and 9/12....don't ask me why...I don't know. I can always hit a 5/12 plumb cut too. I use that as my base for the starting point of lower pitches.
Incidently, when I build crickets behind chimneys and do saddles, I never measure or know what the pitch is. When it's done....it fits nice and the water runs!
blue
blueWarning! Be cautious when taking any framing advice from me. Although I have a lifetime of framing experience, all of it is considered bottom of the barrel by Gabe. I am not to be counted amongst the worst of the worst. If you want real framing information...don't listen to me..just ask Gabe!