FHB Logo Facebook LinkedIn Email Pinterest Twitter X Instagram Tiktok YouTube Plus Icon Close Icon Navigation Search Icon Navigation Search Icon Arrow Down Icon Video Guide Icon Article Guide Icon Modal Close Icon Guide Search Icon Skip to content
Subscribe
Log In
  • How-To
  • Design
  • Tools & Materials
  • Restoration
  • Videos
  • Blogs
  • Forum
  • Magazine
  • Members
  • FHB House
  • Podcast
Log In

Discussion Forum

Discussion Forum

Light switch in unfinished basement

jyang949 | Posted in General Discussion on April 10, 2014 05:30am

I need some advice on the easiest way to move a switch. The lights are in the unfinished half of the basement (which is where the laundry is), but the switch is outside in the finished half.

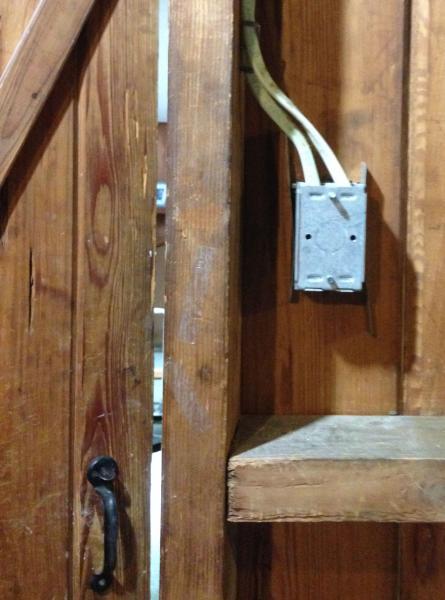
I’d like to replace the switch with one that has an occupancy sensor, but then it needs to be on the unfinished side. I can’t just flip the box in place (leaving it attached to the same wall) because it would be too deep for the sensor to work properly (see picture). There’s no wall on the unfinished side and I don’t want to have to add one!

Is there a mounting box or some other product for this situation?

Janet

Reply
  • X
  • facebook
  • linkedin
  • pinterest
  • email
  • add to favorites Log in or Sign up to save your favorite articles

Replies

  1. gfretwell | Apr 10, 2014 05:47pm | #1

    That is an old work box

    You can loosen the screws that hold the wings, it will come loose and you can "rock" it out.

    usually these have nail holes near the back that you can put long nails through  (Be careful yyou don't hit a wire) and you can "face" it on the other side and drive in the nails.

    Plan B is to remove the cables from that box and use a regular nail up box on the other side. That may actually be the best idea.

    Use a deep one so you have plenty of room for the Oc sensor.

  2. DanH | Apr 10, 2014 08:24pm | #2

    Yeah, you should be able to mount a box to that "stud" to the left.  You can use the existing box with long nails through the two holes that should be at the extreme top and bottom of each side (be careful of the wires), or you can get a "new work" box that's designed to nail to a stud.  (You can "scab" a piece of scrap 2x4 to the existing "stud" if you want the switch to be closer to it's current position.

    Or you can get creative, cut an appropriate hole in a piece of scrap plywood, mount the box to that, and nail it between two studs.

    1. jyang949 | Apr 11, 2014 03:36pm | #3

      Covering it up

      Just realized that the face plate for the switch is meant to cover a hole in the wall, not the electrical box. It will look weird, which I can live with (the convenience of an occupancy sensor is worth it).

      Still, there must be a specialized housing for this type of installation. I can almost remember seeing one in a stark place like a hospital corridor...a raceway leading to a surface-mounted housing that looks more finished than an electrical box. 

      Any idea what this is and where to find it?

      Janet

      1. DanH | Apr 11, 2014 08:36pm | #5

        Yeah, you can get what they call a "handy box" or "utility box" which is kind of bathtub shaped.  Get an "oversized" one like this: http://www.garvinindustries.com/electrical-junction-boxes/handy-utility-boxes/oversized-handy-boxes-device-covers/g20281

        and a matching "Decora-style" cover like this: http://www.garvinindustries.com/electrical-junction-boxes/handy-utility-boxes/oversized-handy-boxes-device-covers/g20470

        You have to be a bit creative mounting the "handy box", though (you might be able to find a ready-made mounting bracket or you may have to install a piece of wood behind the box for mounting, and you will need to feed the wires through a cable clamp sort of like this:  http://www.garvinindustries.com/electrical-fittings/power-cord-cable-connectors/nonmetallic-cable-connectors-screw-type/rxcn75

        There are other options.  Eg, a larger box with a "mud ring".

  3. renosteinke | Apr 11, 2014 05:02pm | #4

    OK, here's your shopping list, to take to your local box store or electrical supply house:

    1- 4S box with mounting bracket. A "deep" box is easier to work with

    1- Industrial cover for a single GFCI (or Decora) device

    1- Occupancy sensor/ motion sensor switch (most use GFCI cover plates)

    1- 2-screw cable clamp

    1- ground screw (probably need to buy a little pasck of 25 or so)

    4- Drywall or similar screws, #6 or #8, about 1-1/4" long.

    When you see the parts, I'm pretty sure you will see how they go together. The ground screw is for anchoring your ground wire to the box.

    Mount the box so that the bracket is almost, but not quite, flush with the face of the stud you mount it on. Later, if you decide to close in the wall, you need only replace the cover with a 'mud ring' and the usual plastic cover plate.

  4. jyang949 | Apr 12, 2014 04:35pm | #6

    The cable doesn't have a metallic sheath

    "However, metal boxes are required on a surface-mount, unfinished basement or garage wall, where they take a certain amount of abuse, and conduit must be run to protect the wiring at least up to 8ft overhead."—Wiring a House, Taunton Press

    Does this mean the existing wiring is wrong/dangerous?

    Janet

    1. renosteinke | Apr 12, 2014 07:47pm | #11

      There is nothing wrong with your existing wiring.

      That quote takes certain practices out of context, and does not apply to your situation. Your wires, etc., are "within" the wall cavity, and not on the 'surface' of the wall.

      1. jyang949 | Apr 13, 2014 10:51am | #13

        That's a relief.

        Thanks for clarifying.

        Janet

      2. jyang949 | Apr 13, 2014 10:51am | #14

        That's a relief.

        Thanks for clarifying.

        Janet

  5. DanH | Apr 12, 2014 05:11pm | #7

    You can sometimes feed two #14 romex through a single large cable clamp, though a clamp for each might be more convenient.

    The conduit requirement is regularly ignored in "unfinished" sections of a residence.  But turning the box around (so that you're facing it rather on the back side of it) makes the space arguably less "unfinished", so if you want to be a stickler you can install conduit up to the ceiling, with the romex running through it.  Just remember that there must be a clamp/bushing at the TOP of the conduit where the cable exits, mainly to protect the wire from cuts.  (You might want to consider using flexible conduit of some sort.)

    1. jyang949 | Apr 12, 2014 05:35pm | #8

      A separate conduit for each cable?

      <sigh> Guess this wasn't as simple a project as it appeared at first.

      Janet

      1. DanH | Apr 12, 2014 06:39pm | #9

        (Corrugated flexible (and blue) "smurf tubing" may be what you want to use here, if you decide to go with conduit.  Remember, if the conduit is large enough you can feed the romex through it -- there's no need to switch over to individual wires.)

        1. jyang949 | Apr 13, 2014 11:30am | #15

          Smurf conduit?!

          I am only familiar with the two kinds of conduit that are in my house! Home Depot listed so many different types, it was something of a relief (from sensory overload) when Greg and renosteinke said that conduit isn't necessary for my project.

          Janet

          1. gfretwell | Apr 13, 2014 12:17pm | #16

            I am a big fan of Smurf (Type ENT) but you do not really need it where you are. Terchnically, smurf is not really any more protection than Romex. The usage is virtually the same. What it does offer is flexibility in design. You can easily pull in a different combination of wires and if your design allows it, you can change what goes where.

            In my new addition I did home runs from every box to a common J box and my wife has already changed switch assignments a couple times

            View Image

      2. gfretwell | Apr 12, 2014 09:49pm | #12

        chill out

        jyang949 wrote:

        <sigh> Guess this wasn't as simple a project as it appeared at first.

        Janet

        Don't let the internet make this more complicated than it is. You ae just moving a box.

        Your Romex (wiring) is fine.

  6. renosteinke | Apr 12, 2014 07:44pm | #10

    I reccomend the 4" square

    I reccomend the 4" square boxes because:

    1) That's what the industrial covers and mud rings are sized to fit;

    2) It's always nice to have the extra room in the box; and,

    3) They're readily available.

    The 2-screw clamp I suggested will take two cables each.

    Just for fun, here are links to some artwork of the various pieces:

    http://www-public.tnb.com/ps/fulltilt/index.cgi?part=4SWFBSPL

    http://www.tnb.com/ps/fulltilt/index.cgi?part=NC301

    http://www-public.tnb.com/ps/fulltilt/index.cgi?part=479GFI

    1. jyang949 | Apr 14, 2014 11:11pm | #17

      Almost finished

      Thanks, everybody, for the advice and instruction. The new switch is installed and working, with no mishaps. The occupancy sensor is a real convenience. I'm considering putting one in every room my teenage daughter uses.

      Janet

Log in or create an account to post a comment.

Sign up Log in

Become a member and get full access to FineHomebuilding.com

Video Shorts

Categories

  • Business
  • Code Questions
  • Construction Techniques
  • Energy, Heating & Insulation
  • General Discussion
  • Help/Work Wanted
  • Photo Gallery
  • Reader Classified
  • Tools for Home Building

Discussion Forum

Recent Posts and Replies

  • |
  • |
  • |
  • |
  • |
  • |
View More Create Post

Up Next

Video Shorts

Featured Story

FHB Podcast Segment: Finding the Right Fixer-Upper

Get expert guidance on finding a fixer-upper that's worth the effort.

Featured Video

Builder’s Advocate: An Interview With Viewrail

Learn more about affordable, modern floating stairs, from design to manufacturing to installation.

Related Stories

  • Guest Suite With a Garden House
  • Podcast Episode 688: Obstructed Ridge Vent, Buying Fixer-Uppers, and Flashing Ledgers
  • FHB Podcast Segment: Finding the Right Fixer-Upper
  • Keeping It Cottage-Sized

Highlights

Fine Homebuilding All Access
Fine Homebuilding Podcast
Tool Tech
Plus, get an extra 20% off with code GIFT20

"I have learned so much thanks to the searchable articles on the FHB website. I can confidently say that I expect to be a life-long subscriber." - M.K.

Get home building tips, offers, and expert advice in your inbox

Signing you up...

This site is protected by reCAPTCHA and the Google Privacy Policy and Terms of Service apply.
See all newsletters
See all newsletters

Fine Homebuilding Magazine

  • Issue 332 - July 2025
    • Custom Built-ins With Job-Site Tools
    • Fight House Fires Through Design
    • Making the Move to Multifamily
  • Issue 331 - June 2025
    • A More Resilient Roof
    • Tool Test: You Need a Drywall Sander
    • Ducted vs. Ductless Heat Pumps
  • Issue 330 - April/May 2025
    • Deck Details for Durability
    • FAQs on HPWHs
    • 10 Tips for a Long-Lasting Paint Job
  • Issue 329 - Feb/Mar 2025
    • Smart Foundation for a Small Addition
    • A Kominka Comes West
    • Making Small Kitchens Work
  • Issue 328 - Dec/Jan 2024
    • How a Pro Replaces Columns
    • Passive House 3.0
    • Tool Test: Compact Line Lasers

Fine Home Building

Newsletter Sign-up

  • Fine Homebuilding

    Home building tips, offers, and expert advice in your inbox.

  • Green Building Advisor

    Building science and energy efficiency advice, plus special offers, in your inbox.

  • Old House Journal

    Repair, renovation, and restoration tips, plus special offers, in your inbox.

Signing you up...

This site is protected by reCAPTCHA and the Google Privacy Policy and Terms of Service apply.
See all newsletters

Follow

  • Fine Homebuilding

    Dig into cutting-edge approaches and decades of proven solutions with total access to our experts and tradespeople.

    Start Free Trial Now
    • Facebook
    • Instagram
    • X
    • LinkedIn
  • GBA Prime

    Get instant access to the latest developments in green building, research, and reports from the field.

    Start Free Trial Now
    • Facebook
    • YouTube
  • Old House Journal

    Learn how to restore, repair, update, and decorate your home.

    Subscribe Now
    • Facebook
    • Instagram
    • X

Membership & Magazine

  • Online Archive
  • Start Free Trial
  • Magazine Subscription
  • Magazine Renewal
  • Gift a Subscription
  • Customer Support
  • Privacy Preferences
  • About
  • Contact
  • Advertise
  • Careers
  • Terms of Use
  • Site Map
  • Do not sell or share my information
  • Privacy Policy
  • Accessibility
  • California Privacy Rights

© 2025 Active Interest Media. All rights reserved.

Fine Homebuilding receives a commission for items purchased through links on this site, including Amazon Associates and other affiliate advertising programs.

  • Home Group
  • Antique Trader
  • Arts & Crafts Homes
  • Bank Note Reporter
  • Cabin Life
  • Cuisine at Home
  • Fine Gardening
  • Fine Woodworking
  • Green Building Advisor
  • Garden Gate
  • Horticulture
  • Keep Craft Alive
  • Log Home Living
  • Military Trader/Vehicles
  • Numismatic News
  • Numismaster
  • Old Cars Weekly
  • Old House Journal
  • Period Homes
  • Popular Woodworking
  • Script
  • ShopNotes
  • Sports Collectors Digest
  • Threads
  • Timber Home Living
  • Traditional Building
  • Woodsmith
  • World Coin News
  • Writer's Digest
Active Interest Media logo
X
X
This is a dialog window which overlays the main content of the page. The modal window is a 'site map' of the most critical areas of the site. Pressing the Escape (ESC) button will close the modal and bring you back to where you were on the page.

Main Menu

  • How-To
  • Design
  • Tools & Materials
  • Video
  • Blogs
  • Forum
  • Project Guides
  • Reader Projects
  • Magazine
  • Members
  • FHB House

Podcasts

  • FHB Podcast
  • ProTalk

Webinars

  • Upcoming and On-Demand

Podcasts

  • FHB Podcast
  • ProTalk

Webinars

  • Upcoming and On-Demand

Popular Topics

  • Kitchens
  • Business
  • Bedrooms
  • Roofs
  • Architecture and Design
  • Green Building
  • Decks
  • Framing
  • Safety
  • Remodeling
  • Bathrooms
  • Windows
  • Tilework
  • Ceilings
  • HVAC

Magazine

  • Current Issue
  • Past Issues
  • Magazine Index
  • Subscribe
  • Online Archive
  • Author Guidelines

All Access

  • Member Home
  • Start Free Trial
  • Gift Membership

Online Learning

  • Courses
  • Project Guides
  • Reader Projects
  • Podcast

More

  • FHB Ambassadors
  • FHB House
  • Customer Support

Account

  • Log In
  • Join

Newsletter

Get home building tips, offers, and expert advice in your inbox

Signing you up...

This site is protected by reCAPTCHA and the Google Privacy Policy and Terms of Service apply.
See all newsletters
See all newsletters

Follow

  • X
  • YouTube
  • instagram
  • facebook
  • pinterest
  • Tiktok

Join All Access

Become a member and get instant access to thousands of videos, how-tos, tool reviews, and design features.

Start Your Free Trial

Subscribe

FHB Magazine

Start your subscription today and save up to 70%

Subscribe

Enjoy unlimited access to Fine Homebuilding. Join Now

Already a member? Log in

We hope you’ve enjoyed your free articles. To keep reading, become a member today.

Get complete site access to expert advice, how-to videos, Code Check, and more, plus the print magazine.

Start your FREE trial

Already a member? Log in

Privacy Policy Update

We use cookies, pixels, script and other tracking technologies to analyze and improve our service, to improve and personalize content, and for advertising to you. We also share information about your use of our site with third-party social media, advertising and analytics partners. You can view our Privacy Policy here and our Terms of Use here.

Cookies

Analytics

These cookies help us track site metrics to improve our sites and provide a better user experience.

Advertising/Social Media

These cookies are used to serve advertisements aligned with your interests.

Essential

These cookies are required to provide basic functions like page navigation and access to secure areas of the website.

Delete My Data

Delete all cookies and associated data