Hi. I’m new here and have a pressing question. I hope I can describe this sufficiently well. I have an old house built on a rubble stone foundation that has some sloping floors. Some of the joists in the basement had been compromised by having been cut into and sistered improperly. A couple of lally columns had been removed by a previous owner, etc.
We hired a contractor to increase the support – replace some of the joists, add ledgerlocks and joist hangers, etc. Additionally, he added an LVL to a beam that runs through the center of the basement, perpendicular to the joists. It’s about a 14′ run. Yesterday, I noticed that he notched through the top 1/3 or more of it, to accommodate a plumbing pipe. Today i looked again and saw that he cut the LVL in half, to fit it in, instead of waiting for the plumber to arrive to move the pipes that were in the way. Am I correct in my assumption that cutting the LVL in half defeats the purpose? Each half of the LVL is bolted to the beam, and the joists are attached to the LVL.
Also, how would i proceed? He did not inform me that he would cut or notch the LVL. Should I Ask him to replace it with a full LVL that has not been cut in half? He did not pull a permit for this job because he said it was unnecessary for a repair. 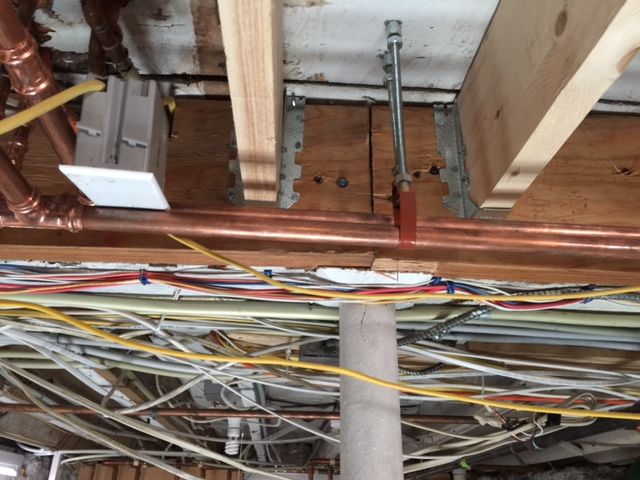
thanks,
Midge


Replies
Looks OK to me.
The notch in question is very close to the end of the beam. It appears to be in the area where notching is permitted.
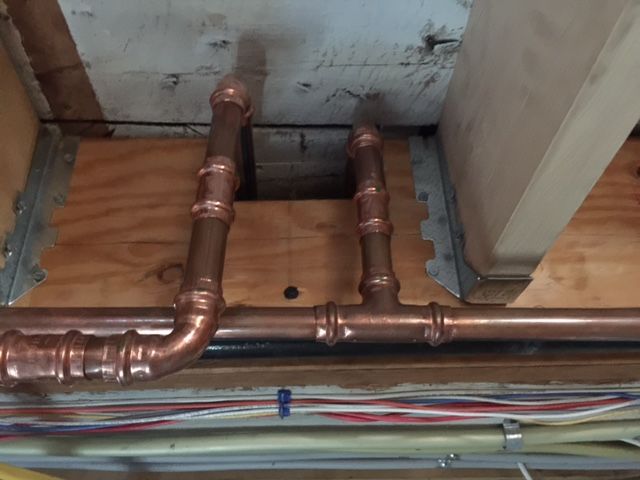
The cut in the beam is over a column. That's OK.
LVL continued
Thanks, Mike. I'm not sure if it's obvious, but the column is not underneath the LVL. It's under the beam that the LVL is attached to.
The contractor offered to replace the column with one that would go under both the LVL and the beam that it's attached to. So, if there's any question, would that resolve it? Thanks.
Bolts
As Dan says just make sure that there are plenty of bolts through both beams at the column. I'd suggest at least 4. 5/8" min.
It looks reasonable to me. Assuming the LVL is bolted securly to the other beam it should not need to rest directly on the lally column. And if the only notching in near the ends of the span that does not seriously affect strength. One would not want to see a similar notch near the center.
span
Don't know if it changes anything in your view, but the numerous cuts are in various places, i.e. each half of the 14-foot LVL (now 7' each) has a cut fairly close to the end of the half for wiring, and one in the approximate middle for plumbing.
The cut visible in the top picture is not a problem, being within maybe 18" of the end. A cut in the middle, on the other hand, does significantly weaken the piece. But how seriously it's compromised is hard to say -- there are a lot of variables here.
Not good...not good.
I am speaking as a seasoned, graybeard remodeler, whose speciality is preserving older/historic homes. To be frank, I am not enthused by what I see in the photos. It always is a challenge to make thoughtful repairs. Often they require patience, thoughtfulness and creativity. Any time a beam is cut into, it is weakened. While it is true that TJI floor joists have factory-provided knock-outs in SPECIFIC areas, a beam should, generally speaking, not be notched or otherwise compromised. Your contractor should have disconnected water lines and removed any other obstructions BEFORE the beam was installed. At this point, minimally, two columns need to be placed on each side of the pipe cut-out. At least 3" of full width beam should bear upon each support.
Read the contractor's proposal. Will this job be inspected? Will is meet code(s)? Look up the IRCode specific to beams (go online). If you need help let me know. Sit down with your contractor and talk this over. Unless there are compelling circumstances to leave the beam in place, I would recommend starting over. You are paying to get a job done PROPERLY...not "conveniently"...sigh. I wish you the best. Let us know what happens next.
Notching
If you look at the attachment to my original reply, you can see that there are specific guidelines for notching LVL beams. This appears to be within those guidlines. As to cutting, this beam supliments the original beam but doesn't replace it.
Was it OK to cut the beam?
In an ideal scenario the new beam remains uncut, and spans the full length of an existig opening. The new beam is given a minimum of 3.5" bearing on each end. Support columns are placed underneath this new beam, and spaced in accordance with load and other requirements. In an ideal situatione each column/support rests on a footing. The old beam and/or any existing load-bearing material is bolted to THIS beam and not the other way around. In other words, don't depend on the existing structure (old beam) to provide partial support for the new structure! That would be like putting the cart before the horse!
Remodeling often entails working in less-than ideal situations. Just getting a large span of beam into a basement can prove difficult. So...sometimes...it is necessary to accept a less-than-ideal situation. You will be challenged to match the "ideal situation" in unique ways. One way is through the use of vertical support structures(framed walls, columns etc.) that telescope loads to footers. This may mean cutting out sections of concrete in the basement floor and pouring new footings. It can mean setting a support column on an existing basement floor.
My main point is this: the new bem bears the loads that once lay upoin the old one, not the other way around.
ok to cut the beam (and more)
Thanks very much for the helpful responses. I am surprised that more issues continue to reveal themselves to me the more I look at it.
The main reason we undertook this work was because so many of the joists in the basement were compromised by cuts and inadequate support. It's an old house that has sloped floors and we are trying to prevent additional problems.
A few more details: The span of the LVL is 14 feet. It's 9.5 inches hight and 2 inches thick. It's cut in half, as I said before. Each of the two pieces has TWO notches; one for plumbing and one for wiring. The first notch for wiring is about 4" high and 4" wide at it's widest point. The first plumbing notch is about 3.5" high and almost 6" wide. The other notches are slightly smaller.
Another issue is that he was supposed to install a new lally column by digging and putting in a cement footer. When I came down to the basement he had set the column on a small cement pad (about 6"x 6")) on top of the cement floor. He said when he tried to dig he found no pre-existing footer under the thin layer of cement so he decided to just put it on top of the floor. I have since read that stone foundations generally don't ever have footers and that he would have had to put one in, which is what I thought was our agreement.
So, my basic questions are these: Is the LVL so compromised that I should reasonably ask the contractor to replace it? (He was supposed to wait for the plumbers to move the pipes; if he had done so, I don't think any of the cuts would have been necessary, and I believe he could have gotten the LVL in without cutting it in half.) But now everything is attached - nine joists and joist hangers on each side, etc, and the plumbers didn't move the pipes to where they were supposed to. so I know it will at least be difficult to remove.
Or, might it work to instead ask him to properly install two concrete-filled lally columns: the one he installed but with a footing this time, as well as a new one to replace the hollow one in middle of the run of the LVL, which if big enough, the top plate could bridge the crack that's dividing the LVL?
Or is there something else that could rectify this?
I did not get a building permit; the contractor said it wasn't necessary because it was a "repair."
I'm very grateful for any advice on how to go forward.
Many thanks.
The 4" notches effectively
The 4" notches effectively turn your LVL's into a 5 1/2" x 2" beam. Cutting it in half turns it into scrap. Fitting new framing into old houses can be a real hassle and sometimes the only reasonable approach is cut and bolt. In my experience the cuy=ts should be made as close to the bearing ends as possible. There's no doubt that even the comprimnised LVL, as long as it's bolted well to the old beam, will provide a lot of additional strength. Whether that will be enough to keep your house from sagging is another story. A 6" X 6" pad sitting on an iffy floor is better than nothing but a dug in footer is the correct method of repair. We're doing a job right now where we're creating pads 3' X 3" X 18" deep with 2 mats of 5 X 5 #5 rebar in each pad just to support the side of a very light cottage. I think an engineer is in in order.
Look at a bridge truss (I mean for a real bridge). The truss is taller in the middle than at the ends. The strength needs to be in the middle -- basic physics. Notching a beam near the ends (within about 1/4 of its length from one end, and to the depth you describe) does not significantly weaken the beam.
Look at that bridge again. If it's very long it likely consists of several spans, with the connections between supported by piers. Similarly, your beam is really two beams, with the joint between supported by the lally column.
As to the footer, it's hard to say. If the soil below is stable then digging to install a footer would only disturb it and could cause more problems than it solves.
he cut into the floor?
Of course there is no footer under the existing cement floor! They way you describe it suggests that he cut into the floor, removed the debris, decided not to dig/pour a new footer, and covered the cut-into floor with a concrete pad of some kind. Q: Did he repair the floor BEFORE he laid the cement pad?
I get the impression that your contractor is cutting corners, rather than stop work and consult with you. You and the contractor need to sit down and establish a working relationship. Do you have cell-phone contact with him/her. I, as a remodeler of older buildings have a $ amount set aside for "communications". Most of this happens by e-mail, or face-to-face. The fact is that remodeling older homes virtually guarantees "surprises". And these call for timely communications.
A 9.5" LVL spanning 14' isn't
A 9.5" LVL spanning 14' isn't worth much to begin with. Taking a huge notch out of it makes it all but worthless.
Boss, it isn't spanning 14 feet, it's spanning about 7. And the notch is about a foot from the end.
The contractor said a permit was not necessary for this repair. In my area that may be true, PROVIDED the existing beam stays in place (as appears to be your case). Permit or no permit is beside the point. The point is that the builder neglected to follow the understanding you had with him/her. Now the contractor wants to follow the path of least re$i$tance. Ok, I understand that...but I would not necessarily accept that uncrittically. The least he/she should do is to install additional columns at company expense; not yours. I agree that cuts made near the end of a beam are less likely to compromise it's strength than are cuts made near the middle. That said, a beam IS compromised when cuts are made.
As others have noted, a 4" cut on a 9.5" high beam, a cut that could have been avoided if pipes/wires had been re-routed, clearly weakens the beam, and it is a departure from a contractual agreement. In my view the contractor allowed convenience to trump structural integrity. Now you two must figure out how to rectify this.
Digging for footers is not hard if proper caution is observed. The key is to NOT loosen or otherwise compromise the soil upon which the pour will be made. That said, it may be OK to set each column on a 1/4" steel plate, so that bearing is distrubuted over a larger area than, say, a 4"x4" plate typically sold with an adjustable steel column. It should be noted that an adjustable suppoort column can be raised/lowered in years to come.
That said, a beam IS compromised when cuts are made.
That is simply wrong. The only problem the cuts shown might create is to create stress points from which a fracture might originate, but this is not a problem with a laminated beam. If you were to place the beam in a test fixture and measure it's deflection under load there would be no noticeable difference from a solid beam.
Going on from here...
Thanks to all for thoughtful feedback. I guess the big question is what is "reasonable" and what is correct.
I imagine if I asked the contractor to replace the LVL he may regard it as unreasonable because of all the work involved, including having the plumber come back for the third time to move the pipes and building a pony wall again for support, as well as removing all the joists and then putting them back.
However, I am also thinking about this question: What is a reasonable standard to expect from a professional, as opposed to, say, a group of friends who might do the work as a favor to keep the building from falling down? If I am paying a lot of money to have the carpentry done, as well as electricians and plumbers to move the pipes and wires as part of the job, do I have the right to expect more than just that the house won't fall down? I also care about whether it has true integrity for the long-run and how re-sale value will some day be affected.
Regarding re-sale, I have the disadvantage of significantly sloped floors to begin with. But I think if it looks like it's truly structurally sound based on fixes that are correct, that could mitigate that problem to some degree. This is particularly frustrating because I thought I was fighting against the fact that so much poor "weekend warrior" work had been done, and that this project would fix that both in actuality and in appearance.
Ultimately, I feel the question comes to deciding on a fix that MAY be adequate to support the structure vs. a fix that is truly right, based on our agreement.
I will also add that While this guy doesn't seem like a hothead, i find it really difficult to be in a position of conflict.
So I'm really interested in any advice about whether it seems reasonable to ask him to replace the LVL, and what would be the best way to support my point of view.
Thanks again. You guys are really helpful.
Unless you have a pile of bricks above, THERE IS NO NEED TO REPLACE THE LVL. It's more than adequate to support "normal" loads. You've not clearly stated what the existing beam is like, but my guess is that the LVL is at least twice as strong as the existing beam.
The work appears to be neat and "workman-like", and I see little to criticize. (In fact, looking at that rat's nest of wiring I'd say he did an amazing job getting the beam in there at all.)
what is reasonable; what is correct
What is reasonable? What is correct?
That is a value judgment I can't make for you. You must weigh several factors. I assume you hired a reputable company. I also assume you hired someone who has extensive remodeling experience. I assume you did not hire the contractor with the lowest price. Our business motto is: We will provide excellent service at a profit if we can and at a loss if we must; but always excellent service. For me, judging from the photos and your descriptions, this is less than excellent service. Only a contractor with a real love for (passion for) restoring old jewels knows what I am talking about.
I don't recommend starting over. I do recommend installing additional and adjustable steel columns, set on properly sized footings. The center of the (cut) LVL needs a column DIRECTLY under it, supporting both cut ends by at least 3". It should not, as the photos appears to show, be placed half way between existing and LVLbeams. The idea is to have the old beam fully supported by the LVL; not the other way around. If that pipe cut-out is not in close proximity to the foundation (bearing) wall, then an additional column underneath is desirable.
Here is what I consider to be a reasonable professional standard: The pro makes a careful list of existing conditions and takes cell phone photos as well. He/she schedules a walk-through and clearly addresses protential trouble spots. He/she explains what the options are/may be. An agreement is reached. For instance, most of my clients know my work so well that they fully trust me with virtually ALL decisions. Never the less, I ALWAYS document on-site changes and keep the client informed. In writing (usually e-mail, I explain the changes and ask for an affirmative reply. Change orders/memos note the increase or the decrease in cost.
You need to be more proactive; taking ownership of the project. After all, you are paying the bills and it is your house to sell. Don't lay the entire burden in the hands of your contractor. Tell him/her that hence forth you expect the contractor to abide by the spirit of the contract. If it calls for pipes to be re-routed before carpenty work proceeds, than that is what happens! Our company keeps virtually all work "in-house". This way we control the schedule, the quality of work and, most importantly, the overlapping of trades. The overlapping of trades, gray areas if you will, are the source of many problems. I've seen this over and over again...sigh. I wish you only the best...and the contractor too.
LVL - Mel
Mel Fros, Thank you for your very thoughtful comments.
Midge
you mentioned ledgerlock screws. How often and what placement were these used to fasten the lvl to the old beam.
screws?
Calvin, The screws appear to be randomly placed. How often and what placement should they be?
Also, I had asked him (on the recommendation of an engineer previously) to use ledger lock screws, but it turned out he actually used lag bolts. Does this matter?
Thanks!
The screws I see have fairly small heads, probably too small for conventional lag bolts. I'm guessing they're some generic equivalent of Ledgerlok. (Lag bolts are much more difficult to use.)
Midge82 wrote:
Calvin, The screws appear to be randomly placed. How often and what placement should they be?
Also, I had asked him (on the recommendation of an engineer previously) to use ledger lock screws, but it turned out he actually used lag bolts. Does this matter?
Thanks!
the type, size, length and placement all matter. If spec'd by the engineer, then that should be followed.
The same goes for using nails as fasteners.
Lag screws are fine, just usually harder to install. Lag bolts are though bolted and nutted on the other side, even better as no way pullout is going to happen.
in your use you want good connection to make the lvl one with the existing beam to strengthen it as well as fasteners that resist shear forces (as your joists are now fastened to the lvl and the lvl fastened to the original beam)
Lag bolts are though bolted and nutted on the other side, even better as no way pullout is going to happen.
"Lag bolt" is the old term for what has more recently come to be called a "lag screw". I don't think I ever even heard "lag screw" until about 20 years ago.
Ok
I'm 67.
lag bolt here in Ohio was threaded and needed a nut and should be washered at each end. No way for pull out.
lag screw didn't need a nut, should be washered under the head and could possibly be pulled out by someone way bigger than me.
and it's too bad Harbaugh didn't see it as we did yesterday.
1st Down!
I'm 67 as well. Like I said, never heard "lag screw" until about 20 years ago, growing up in Kentucky & living in New Jersey and Minnesota (and then, at first, only for the smalller ones). Google "lag bolt vs lag screw". Several sites say the terms have been used interchangeably, though "screw" is the current "official" term.
(And note that the through-bolt does not need the "lag" designation, as the bolt is a "bolt", and there's no special configuration for "lagging" use. This as opposed to the lag bolt/screw where the term defines the head, body, and point.)
Hi Midge, you've been given a lot of feedback, suggestions, and opinions to your question. I will just mention some things to think about in general terms because without seeing the jib with my own eyes it is tough to offer specifc engineering advice.
The most important thing to remember is that the LVL was added alongside the existing beam as a stiffener. It is not THE beam. That being said, allowable notching and drilling standards for a beam do not apply. Only an engineer could determine that for your specific situation. Would it be better to not notch and drill this stiffener? Yes, but that is not always feasible because of existing conditions.
I've done alot of this type of work, some with engineered plans, some without. If you are dealing with a contractor you like and trust talk with him about your concerns. If he can explain why he did what he did then that may ease your concers. You shouldn't ask him to redo work that is correct especially if you don't know if it is or isn't. The cut through the beam makes no difference if it lands over the post which it appears to in the photo. My recommendation: talk to him if you trust him. If not, get an engineer there to verify his work is done correctly.
LVL as stiffener...
Finefinish, thanks for your comment.
The LVL is not really over the post... it's in front of it. Only the original beam is over the post.
I don't think it was intended as a stiffener, really... The contractor originally emphasized the importance of an LVL that ran the full span of that part of the basement. If I understand correctly what a previous poster said, isn't it true that if it had been installed correctly, the LVL would end up bearing much of the weight the old beam had previously supported?
I understand you are worrying about the beam.....but with that rats nest mess of wiring....its more likely the place will burn down than fall down.
LVL- burning down the house
Cussnu2,
Yes, the wiring is a mess. The electrician moved it to accommodate the LVL, but not enough to actually allow the LVL to fit....
He is supposed to "tighten it up" once we determine any further work that needs to be done.
But should I really be worried about it meanwhile? Rerouting the wiring meant adding about a dozen junction boxes in the basement. Doesn't look great but he claims it's safe. Does that seem true?
Thanks.
Bring in an engineer. Simple.
bring in an engineer...
Montanaman, I've been trying to get a structural engineer to come. The one who looked at it before the work was done (a few months ago) is too busy. Haven't found another one here who can come in the near future.
One issue is whether an engineer would say it's good enough structurally. Another is the fact that the scope of the work was changed without my consent (or even an inquiry)-- and even if the work were potentially passable, it looks pretty awful and is not what we agreed upon.
Part of my goal in doing the work was to get rid of the aspects done by previous owners that looked like poorly executed homeowner crap. Sounds like not everyone thinks that appearance counts, but it seems important to me. Like if you brought your blue car to the body shop because your door was bashed in and they replaced it with a red door without telling you. Even if it were functionally fine, you'd always know it looked bad and that it would likely hurt the resale value.