At the request of a fellow smoked pork butt afficionado, I’ll post some pics of an in-progress master bath in an addition I’m doing on my own house.
I’ve never done Kerdi before — I’ve been using GP DenShield and I like it. Good experience with it for about 10 years now. So I thought I’d get my feet wet (groan) with Kerdi on this job, but I decided to do an experiment and combine Kerdi with DenShield. What better place to experiment than on my own house so I can keep track of the results and nobody to complain but me if it doesn’t work out.
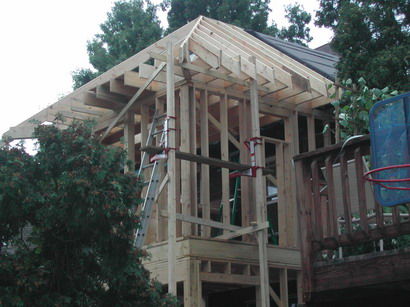
1) 1666. Framing. I sometimes hate to cover this up — I love how framing looks.
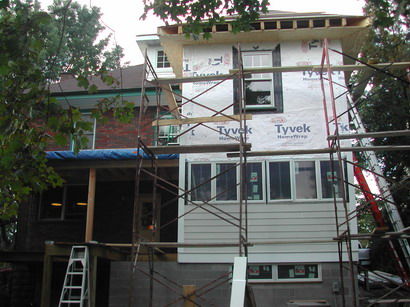
2) 1727. Siding. Hardiplank over Tyvek over ply.
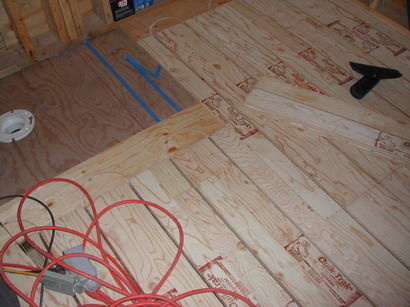
3) 1763. Uphonor QuickTrak system for hydronic floors. Quick, almost idiot-proof and does a good job of making an evenly-heated floor. Note that you don’t put the heating system within a foot of the toilet — it’ll melt the wax ring.
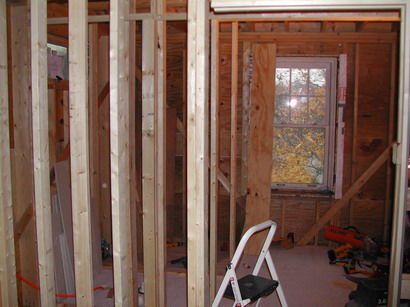
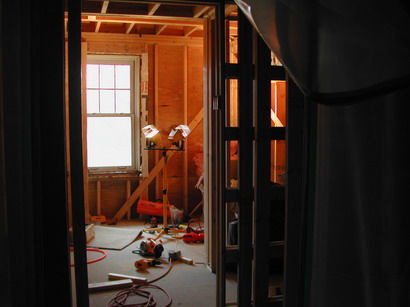
4) 1773. Starting to frame the partitions.
5) 1778. Partitions framed. Pocket door hardware installed.
Mike Hennessy
Pittsburgh, PA


Replies
Continued.
6. 1780. Hardi underlayment down.
7. 1811. Shower area almost framed in. Blocking for rails if ever needed in the future up high and down low for the deck form.
8. 1825. Cutting the drain pipe to fit the Kerdi drain unit. (I had left it long until I got the drain. Cut with an internal pipe cutter on a drill.) The Hardi in the floor is just temp to protect the heat tubes.
9. 1826. Ready to go.
10. 1828. Stapling down the lath for under the deck.
Mike Hennessy
Pittsburgh, PA
Continued.
11. 1830. Ready for drain.
12. 1831. Drain installed. You can't see it in this pic, but I made spacers from some copper pipe stubs to keep the drain level at the correct height, and screwed the unit to the floor through the spacers.
13. 1832. Setting the screeds for the deck. More mud to follow.
14. 1834. Finishing off the deck mud base.
15. 1837. Mud in and dry. A shower pan "curb" of DenShield installed, about 6" high.
Continued.
16. 1838. Troweling unmodified thinset to set the Kerdi.
17. 1840. Laying a sheet of Kerdi for the pan.
18. 1841. My Lovely Assistant bonding the Kerdi in the thinset. We used a laminate roller for this job -- worked well.
19. 1844. Kerdi shower pan installed. Joints overlaped 2" or more per Schluter instructions.
20. 1845. DenShield walls installed, niche and window included.
Mike Hennessy
Pittsburgh, PA
Continued.
21. 1847. Installing Kerdi strips to all seams. Never had any problem using thinset over mesh, but as long as I was trying Kerdi out, I figgured I'd use their strip product just to see how it worked. Pics don't show it, but I also fully Kerdi'd the niche as well.
22. 1860. My Lovely Assistant laying tile around the toilet area.
23. 1861. My Lovely Assistant laying tile in the main floor area.
24. 1863. Floor tile in and grouted.
25. 1864. Vanity area. I placed the ledger strips so I could make a template for the granite. (Cab will be made in place.) Funny story -- we were at the tile/granite place looking for tile and my Lovely Assistant saw some red granite that she fell in love with. The clerk lady said "Nice. But the most expensive in the store." I said "How much?" after figgerin, clerk lady said $20K. Didn't bat an eye. I asked how much for brown granite. $1,700. "Are you shure you figgered the red right?" "Oops. $2k" I bought it and told my Lovely Assistant that she owed me big time for letter her get her $20K countertop.
Mike Hennessy
Pittsburgh, PA
Mike,
You're moving right along. Looks good.
I did not know "Denshield" has been around for 10 years. I thought it was introduced in '04. Paperless sheetrock will be standard in the future. No mold food.
Tile work looks good. I am just finishing up a first time Schluter System master bath and will never use CBU again. 100% waterproof works for me.
Chuck S.live, work, build, ...better with wood
Dens Armor is a newer product for damp areas. I think DenShield is older and was the first "Dens" product line GP came out with. I first got DenShield years ago when my lumber yard had gotten some in and the sales guy convinced me to try the New Stuff.
Mike HennessyPittsburgh, PA
Mike,
I can't keep up with all of the new products (Digital levels?). Heck I still use a X46F Lufkin folding stick ruler. I can stand at the middle of a 23' wall and find the center quicker than someone using a recoil tape.
BTW Is the 'Green' board "DenShield"?
Chuck Slive, work, build, ...better with wood
Green board is just moisture resistant drywall. I used it on all the bathroom walls except the shower. DenShield is a GP tilebacker product that has a moisture impermeable membrane that'll hold thinset on both sides of a fiberglass reinforced gypsum core. Itchy stuff to use, but a good product for this purpose.
Mike HennessyPittsburgh, PA
Edited 7/10/2007 8:47 am ET by MikeHennessy
Your work is absolutely beautiful. Everything looks clean and....well...perfect. You even clean up after yourself...don't think I didn't notice..lol.
I "just" posted a picture to someone here of a the first Kerdi shower I did too in my house. I used the same triangle design you did.
Really nice work man. Something to be proud of!
"Even if embryonic stem cells are absolutely good for nothing at all how can anyone in good conscience be against using them for research given that they are going to be destroyed anyway"? J.Hayes
http://www.john-lennon.com/imagine-neilyoung.ra
http://WWW.CLIFFORDRENOVATIONS.COM
"Everything looks clean and....well...perfect."
Bwaa ha ha ha! Hey, I know "perfect", and this ain't it! Although I can tile (sorta), I can't approach the work a pro tiler can do.
As for clean, well, if I don't keep the job at least somewhat clean, I can't find my tools!
Mike HennessyPittsburgh, PA
Final (for now).
26. 1866. Panasonic fan installed. Vents shower and toilet area.
27. 1919. Shower tiled. Better Bench installed.
28. 1921. Niche tiled. Window on order.
29. 1928. Vanity with $20K <G> countertop installed. Face frame not yet completed.
30. 1930. Hammered copper sink installed.
That's pretty much up to date. Waiting for a drill bit for porcelain to install shower unit. Heading to the glass supplier this weekend to order a door.
Mike Hennessy
Pittsburgh, PA
Mike, nice shower...but, umm.. are you sure the Schluter guys spec for kerdi over Denshield??I like Denshield too, but, under kerdi? Why? I'd be worried about the thinset not curing properly between, essentially, two vapor and waterproof barriers.Btw, you ought to check out John Bridge's new book, "The Kerdi Shower". It's an e-book down-loadable from his site as a PDF for $10. Well worth it, IMO, if you do kerdi showers.
I'm pretty sure Schluter would not spec Kerdi over DenShield. That's why it's an "Experiment"! ;-)
Using unmodified thinset, there was no problem with curing -- it's just like overlapping Kerdi -- something that is required at all seams.
I did make liberal use of all the info at John Bridge -- a great site.
Mike HennessyPittsburgh, PA
Very nice work, Mike. I'm about to attempt something similar on my master bath remodel. I've never built a shower or done tile work before. If mine turns out even half as good as yours I'll be darn proud of it.
MichaelNew knowledge is priceless.
Used knowledge is even more valuable.
"I'm about to attempt something similar on my master bath remodel. I've never built a shower or done tile work before. "
Get thee to John Bridge forum with all due haste. Since you are in education, you know this: "Study hard and you'll do fine."
Mike HennessyPittsburgh, PA
Nice job Mike. Love that Hydronic heat.
Thanks.
Took me a minute to figure out what you were talking about tho' -- hydronic heat / porch railing? Then I remembered way back to the beginning of this thread (months ago) that it was initially all about a bathroom. LOL
Mike HennessyPittsburgh, PA
Guess I failed to look at the pics near the end. Mind if I use the shower seq to build my sons shower?
"Mind if I use the shower seq to build my sons shower?"
Well, be my guest, but be forewarned -- it ain't according to Hoyle (or Schluter). If you look at the posts, I used 5/8" (IIRC) DensShield for the walls and only Kerdi'd the joints on the walls since DenShield is waterproof by its own self. I only really Kerdi'd the floor and niche. I've used DensShield with success for years -- I like the stuff, but many don't. This was sort of an experimental concept to take advantage of the strenghts of both products.
It's been over a year and no problems yet. Functions well, dries quickly. If you want a good pic sequence for the officially approved Kerdi methods, search this forum for the "shower with niche" sequence by Mongo. Kerdi/Schluter also provides good tutorials, and there is a ton of info over at the John Bridge forum. Something that I haven't really seen mentioned elsewhere is that it helps to mix your thinset thinner than you would for tile. Makes it easier to get the Kerdi to bond. Also, I use a J-roller to roll out the Kerdi. And definately get the Kerdi Band for corners -- keeps things a bit flatter for when you're setting the tile later. It also helps if you pick up your Kerdi drain early so you can get things accurately measured out for it at the beginning of the job. Finally, if you're using a stock size (or anything close), consider using the Kerdi base instead of drypack. Save a few hours and guaranteed proper slope & drain setting.
Mike HennessyPittsburgh, PA
Well, I had a few minutes and, since this thread is up an running again, I thought I'd post a few of my favorite part of this project -- the brick oven.
Here's My Lovely Assistant about to heave a brick at me after some comment I made about her masonry work:
View Image
The view out the kitchen door:
View Image
Fire in the hole!:
View Image
Dinner:
View Image
In keeping with the original impetus for this thread, we have also put a pork butt in the oven after dinner was cooked and let it cook overnight, tossing some hickory chips on the coals every once in a while for the first hour or so, then rake out the coals. Let it cook in the hot oven (no fire, just retained heat) overnight and, 12-14 hours later, most excellent pulled pork. Can't beat that with a Viking!
We both love to cook, and this has taken things to a whole 'nother level! Nothing like cooking at 1,000°. We've been using it almost every weekend since it's been done.
Mike HennessyPittsburgh, PA
Mike,
Wow! I want one of those ovens. That pie looks like it could have come from Tambellini's on 7th St. in my 92 year old Mom's hometown.
I bake bread most Sundays. I could sure use an oven like that. Here is some salted Tuscan bread and Saffron Chedder bread.
View Image
Challah Bread.
View Image
Chuck Slive, work, build, ...better with wood
Ah, hand crafted bread. Nothin' better. Makes our house REAL popular around dinner time. ;-)
Mike HennessyPittsburgh, PA
PS: Tambellini's ain't got nothin' on me in the pizza department, if I do say so myself. (Tho' they got me whipped hands down in the fried zucchini event.) ;-) What part of town is your Mom in?
Mike,
Mom grew up in Mt Worshington, on Bertha St. She took the The Duquesne Incline to get into town.
Is LaMont resturaunt still there?
http://forums.taunton.com/tp-breaktime/messages?msg=89594.47
Chuck Slive, work, build, ...better with wood
"Is LaMont resturaunt still there?"
Yep. But since there are a lot more high-end eateries in town now, it's not as big a deal any more. I haven't been on the incline in 30 yrs. Still runs, tho'.
Mike HennessyPittsburgh, PA
Wow, never thought I'd see challa on BT. Looks like a good six braid too.But you know this time of year you gotta start baking that matza :)
God that framing looks good!
Thanks. The walls are pretty standard 2X6 -- extra depth for insulation. One oddity -- the archi speced (and I installed) let-in diagonal bracing -- I haven't ever seen that on a platform-framed structure that is sheathed with ply. Don't know why he called for it, but he was pretty firm on it when I questioned him. (Had the BI scratchin' his head too.)
The roof was a bit of a challenge for me. It's a hip tied into an existing hip, known as a California hip, or a blind valley hip. I'm sure there's an easy way to do these if you know all the ins & outs of a framing square, but it had me stumped for a while. Got 'er done, but SLOW! I had to pretty much figure and cut each rafter seperately.
Mike HennessyPittsburgh, PA
Thanks for this thread - I really enjoy construction sequences.
Bet you knew that!
Forrest
"Thanks for this thread - I really enjoy construction sequences."
Hey, no problemo. Inspired by the postings of others on this site, for once I documented each step of this job with photos. I've got hundreds. From "before" shots, to demo, to excavation, to framing, etc. Never did that before. Kinda fun to have. Not sure anyone would want to suffer through the whole deal tho.
Mike HennessyPittsburgh, PA
Some update photos.
Moved to the outside for a bit.
1934 - The porch. Time for railings.
1939 - Turning some white oak into sawdust. <G>
1942 - Lovely Assistant running the RAS making some dados for a comb to hold the balisters.
1946 - Me doing the same -- note that the flash stopped the blade. Hey, I wonder if that makes it safer?
1953 & 1954 - Gluing & nailing some railing together.
Continued.
1955 -- A couple of sections done.1956 -- Test fitting.1959 -- End wall framed in, waiting for sash (when I get to it).1960 -- Sawdust from making the rails, spread out to cover the clay that's been stickin' to my shoes for the last year.
Mike HennessyPittsburgh, PA
Mike,That is going to be a great looking porch. I like that privacy panel on the side.
I bevel the bottom rail and fillet about 10' to shed water. White oak is a good exterier wood.Thanx for sharing.Chuck Slive, work, build, ...better with wood
I hear you on the bottom rail. I wanted more strength on this though, so I thought I'd try this way. If it doesn't work, lesson learned. As I said in an earlier post, I like to do my experimenting on my own house.
Mike HennessyPittsburgh, PA
That deck looks fantastic!!! I'm always amazed how many hours it takes to do things....but then they are done and it's time to enjoy.
Thanks. We're pleased with it, tho' were still a ways off from the enjoyment part. Can't wait, tho'.
Mike HennessyPittsburgh, PA
When I first opened this thread,
I only glanced at 1934, 1939, 1942, 1946 etc. At first I thought it was the year the work had been done! LOL
Then I opened the pics and was amazed. Beautiful work. I love the diagonal on the landings.My brain + his brawn = a perfect team
It only SEEMS like I started in 1939 <G> -- I actually started about this time a year ago - nights & weekends stuff.
Thanks for the comment. Actually, the whole porch and landing is diagonal. It doesn't really waste much more than straight, and it makes the structure a WHOLE lot sturdier. I've always done decks that way. It can create some issues at the corners though, so you have to be careful with layout and spacing.
Mike HennessyPittsburgh, PA
We have done several decks with the diagonal lay. All the customers love them! I would love to have one, but my house is on a slab and I don't have a 2nd story. Maybe I need to build one so I can have the deck! LOLMy brain + his brawn = a perfect team
Mike,
Nice work! I really like your railing design and would like to do something similar. Do you have any more pics?
Man, I thought this post was dead! Go figger.
Here area few more of the railing, in progress and almost done:
Some sections waiting for paint and rail cap.
View Image
Installed, but no cap yet.
View Image
My Lovely Assistant running some drip edge on the bottom side of the cap. (This is one of my favorite ol' woodies and I use it every chance I get.)
View Image
Almost done. Rails installed. Cap installed. Need to finish the bottom of the steps -- either another pergola or trim the posts -- haven't decided yet.
View Image
Mike HennessyPittsburgh, PA
Mike HennessyPittsburgh, PA
Mike,
That looks realy great. I love old planes as well.
Chuck Slive, work, build, ...better with wood
Thanks. I have a bunch of the oldies. Some I use a lot, like this beader and a scrub, some I just hang on to. All are in good shape, but most need the irons re-ground -- something I keep meaning to do, but just never get around to.
Mike HennessyPittsburgh, PA
Thanks Mike for posting the photos.
Mike,
Congrats on your first Kerdi. Looks good.
Mongo
Thanks -- best part is, it doesn't leak!
Mike HennessyPittsburgh, PA
Nice work Mike...looks like a labor of love for sure. Nice clean lines and clean work. I love it...
PS..how do you like those lil' baby scaffolds I see in one of the pic?
I see them at HD for under $50 and keep telling myself I should buy a cpl.
"the most amazing buddhist prayer song I have ever heard during my trip through the hidden mystique countries like Nepal and India. I've heard it playing everywhere in Kathmandu - buses, ashrams, hotels,streets, etc... "author unknown
how it sounds^-->http://www.youtube.com/watch?v=2shskL0AYuE
http://WWW.CLIFFORDRENOVATIONS.COM
Thanks, Andy. "Labor of love" is right on target. While I've been doing this for years, this is a first for my Lovely Assistant. She's really been bitten by the construction bug, and has had a ball learning how to do framing, wiring, plumbing, tiling, . . . . And she's been a real sweetheart putting up with my perfectionism. Hardly ever smacks me with a 2X4!
Those mini scaffolds are one of those tools you wonder why you didn't get one sooner. I picked this one up on a whim 1/2 way through this job and use it constantly. Heck, we even use it as a job-site picnic table. I'm thinking about getting another just because it's so cool.
Mike HennessyPittsburgh, PA