FHB Logo Facebook LinkedIn Email Pinterest Twitter X Instagram Tiktok YouTube Plus Icon Close Icon Navigation Search Icon Navigation Search Icon Arrow Down Icon Video Guide Icon Article Guide Icon Modal Close Icon Guide Search Icon Skip to content
Subscribe
Log In
  • How-To
  • Design
  • Tools & Materials
  • Restoration
  • Videos
  • Blogs
  • Forum
  • Magazine
  • Members
  • FHB House
  • Podcast
Log In

Discussion Forum

Discussion Forum

mystery wood embedded in foundation

bricktron | Posted in Construction Techniques on February 27, 2016 10:20am

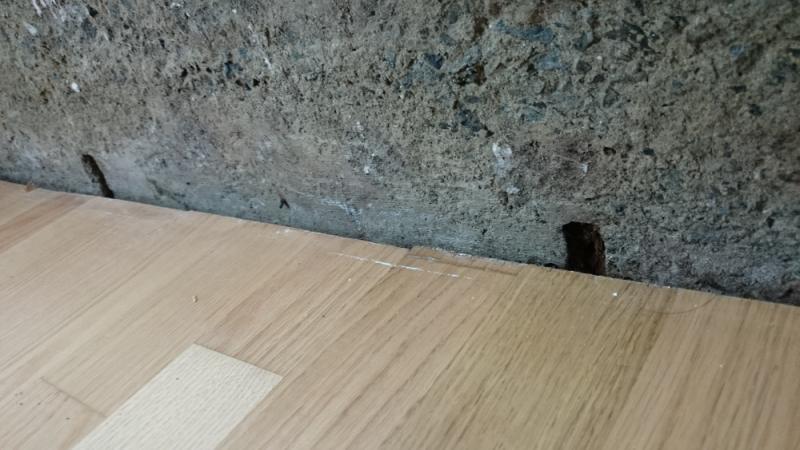
hello folks! we had a bit of water intrusion in this 1906 structure (a san francisco earthquake cottage). after removing the compromised drywall i am about ready to replace it. however, what i found in the foundation confuses me. about every 16 inches at the very base of the mudsill there is a small piece of wood embedded in the concrete. they are wet and rotten, and i couldn’t tell how deep they go, though of course they do not reach the exterior of the foundation. clearly this wood is not structural; why is it there? should i attempt to remove and/or dry out these pieces before replacing the drywall?

Reply
  • X
  • facebook
  • linkedin
  • pinterest
  • email
  • add to favorites Log in or Sign up to save your favorite articles

Replies

  1. User avater
    deadnuts | Feb 27, 2016 10:25pm | #1

    How about posting a photo of what you're talking about?

    1. bricktron | Feb 27, 2016 10:45pm | #2

      seriously. i had uploaded it but not "inserted" it, thanks for asking.

  2. DanH | Feb 28, 2016 08:08am | #3

    When they were setting up the forms to pour the foundation, they placed pieces of 2x4 between the inside and outside forms (which were likely pieces of wood plank later used for floor or wall sheathing).  These were to hold the forms apart until the concrete was poured, and ideally would have been removed as the concrete went in.  These didn't get removed.  (The ones farther up the wall apparently did get removed, though.)

    Dig them out as best you can and seal with hydraulic cement, possibly using a piece of cement brick to take up most of the space.

    1. bricktron | Feb 28, 2016 02:57pm | #4

      thank you, dan. i will dig or drill them out and close up the gaps with hydraulic cement as you suggest. if they held the sides of the form apart, though, i don't understand why they don't show on the exterior of the mudsill too (thank god, that would destroy the utility of the thing).

      this cottage may have been built in a hurry at a time when there was probably a great shortage of craftsmen. there are studs that were cut with an axe and studs that had been painted in a past (presumably pre-earthquake) application. the family that built it in 1906 waited until 1911 to add the garage and upstairs, and that construction is more regular, still pre-dimensional, but the lumber came straight from a mill.

      by the way, i like your melville quote.

      1. calvin | Feb 28, 2016 09:12pm | #7

        Brick

        How wide are these repeated recesses?

    2. User avater
      deadnuts | Feb 28, 2016 04:51pm | #5

      The "hole" in this theory

      The "hole" in this theory (besides the fact that Dan presents himself as having been there at the time of the pour during the1900's) is the fact that the wood does not reach the outside of the foundation. Kinda hard to hold the forms apart (or more likely together) with anything if the material never made contact with the outside of the form.

      IMO the photo doesn't give enough information to provide anything but a SWAG as evidenced from Dan's post.

      1. bricktron | Feb 28, 2016 06:24pm | #6

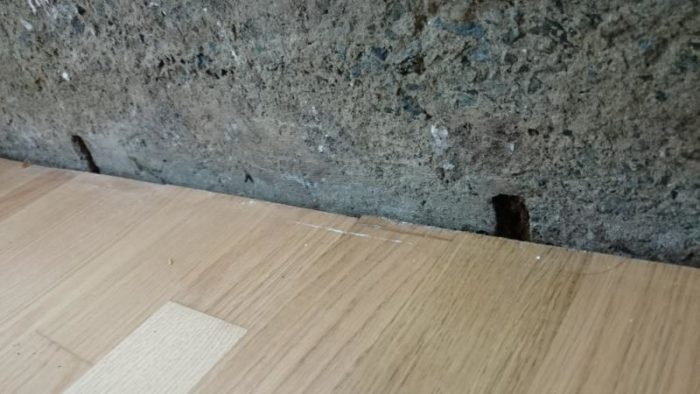
        here is one more picture. i would offer one from the outside, but there is nothing to see there but the concrete.

        1. DanH | Feb 28, 2016 10:11pm | #9

          It is as I said.  Very likely the forms spread slightly when the concrete was poured, so there may be a half-inch or so of concrete hiding the outside ends of the pieces.

          Not that it matters.  Regardless of the purpose of the wood originally, you need to dig it out (to a depth of several inches, at least) and seal the holes with hydraulic cement.

  3. finefinish | Feb 28, 2016 09:41pm | #8

    Hi Bricktron

       My guess would be that the wood was cast in place to serve as nailers for plaster lath or trim.  The photos show that the concrete is above the finished floor so attaching the wall finish would require (be made simpler) with some nice soft wood to attach to.  I have seen this on the outside of poured concrete piers and foundation walls.  Wood blocks were cast in place to allow for attachment of lattice panels, watertable trim, and the like.  Do the wood plugs line up vertically with the framing above?  If so, then I would venture to guess the mystery wood was just nailers.  

    1. User avater
      MarkH | Feb 29, 2016 06:56am | #10

      Yes, that is the purpose of the wood blocks.   Why there was water intrusion is a good question.  Rotted wood in concrete is not odd due to high moisture content, especially after 110 years.

  4. User avater
    BossHog | Feb 29, 2016 07:02am | #11

    My guess is that the ends of the floor joists were poured into the concrete. At some point they were cut off, and new joists put in.

    1. User avater
      deadnuts | Feb 29, 2016 09:53pm | #13

      Given the age of the structure, this is a very good guess. If the wood has end grain facing out of the pocket, that would further support Boss's theory.

    2. finefinish | Feb 29, 2016 10:16pm | #14

      Hey BH, I actually did have the same thought that these may be rotten and abandoned joist ends, but the dimensions the OP gave seem too small.  I would suspect the wood or pockets left after the wood rotted and fell apart would probably be at least 2" wide and at least 4" tall.  Not knowing the floor span I would assume a notched 2"x 8" joist would need a pocket of 2 1/4" x 6" or so (assuming again actual 2x stock given the age of the house).  What do you think?  

      1. User avater
        BossHog | Mar 01, 2016 06:24am | #15

        The dimensions were posted after my other post.  So I think you're correct.

  5. bricktron | Feb 29, 2016 12:47pm | #12

    thanks everyone. i didn't take these measurements when i was in the lower unit, but judging from the second photo, the pieces do appear to line up with studs. each is something like 3/4" x 1-1/2" on end.

    the nailer theory is an appealing one. drywall mounting would go better if i could use some of those now! as it stands i think i have to rip out a taller stripe that reaches the footer, which is just out of sight above. i suppose some 10 degree wood shims with the copper treatment could do well too.

    1. calvin | Mar 01, 2016 07:51am | #16

      Is this floor on a slab?  Could these pockets go below the floor?

      I asked about the dimensions as they do look like joist pockets often found in brick walls in this area.  Most of the basebd plugs I've seen were "dowel" type inserted into round holes in the masonry.

  6. DanH | Mar 01, 2016 08:56am | #17

    It would be a bit more helpful to know the geometries involved here.  Is this floor above or below grade?  How far above/below?  What is below the floor -- slab, joists, sleepers on a slab?  How big are the holes, and how far apart?  You say you've not dug all the way in on any of them, but how far in have you dug?

    1. bricktron | Mar 01, 2016 03:02pm | #18

      hi folks, thanks for the ongoing questions. the floor we have now is mounted directly on a slab which is right at grade. to be more accurate, the finish floor sits on top of those sacks of tiny foam balls that float it slightly. there is no subfloor nor joists below.

      i just dug out the seven exposed pieces of wood. they were mostly between 15 and 17 inches apart, but not lined up with studs, and one or two were missing entirely. these were tiny posts - only about 3/4" deep and wide, but maybe 6" long, with most of that length embedded in the slab. (what used to be) the wood came out in damp clumps. curiously, there are a couple of lower down nails exposed, within the concrete. one spot also revealed the telling root of a weed. they're terribly hard to take a photo of.

      my plan from here is to dry out each recess with (a) heat gun and (b) time and then fill them with the hydraulic cement.


      1. DanH | Mar 01, 2016 03:27pm | #19

        So you're saying these pieces of wood run down, into the slab below?  If so then they are clearly plain old stakes, used to hold the forms in place.

        1. finefinish | Mar 01, 2016 07:47pm | #20

          Hey Dan, if that's the case that the wood runs down then I think you are right, stakes make sense.  Apparently we all love a mystery around here.  

        2. mark122 | Mar 01, 2016 08:47pm | #21

          if this were the case, would the stakes not be on the outside of the form? (which would mean they would not be enbedded in the pour) if they poured the slab first and then the wall but didnt remove the stakes, the forms the stakes where holding would be there as well.

          I see this kind of thing all the time with double wythe houses and old poured walls. they were used as nailers. if you find where the kitchen was originally, and there happen to be any cabinetry on a masonry wall, youll find a 2.5x2.5 or so timber running the length of the wall at about 32'' from the original floor.

          windows that were set in masonry had timbers on the interior wythe or concrete where masonry sills sit on the exterior and doors will have a timber header on the interior with usually 2-3 timber blocks running down the jambs.

          1. DanH | Mar 01, 2016 10:14pm | #22

            What is the point in putting "nailers" that low, and making them that small and irregularly spaced?

            When they laid out the wall they drove the stakes into the ground, then assembled the planks of the forms against the stakes.

          2. mark122 | Mar 02, 2016 06:44pm | #23

            so your thinking they used the stakes on the inside of the form?

          3. DanH | Mar 02, 2016 06:50pm | #24

            When you're erecting the forms it's a PITA if the forms slip a little too far away from you.  You can always "persuade" the forms to move away from you, but getting them to come back towards you is not so simple.  So you use stakes to limit their movement in the "away" direction.

Log in or create an account to post a comment.

Sign up Log in

Become a member and get full access to FineHomebuilding.com

Video Shorts

Categories

  • Business
  • Code Questions
  • Construction Techniques
  • Energy, Heating & Insulation
  • General Discussion
  • Help/Work Wanted
  • Photo Gallery
  • Reader Classified
  • Tools for Home Building

Discussion Forum

Recent Posts and Replies

  • |
  • |
  • |
  • |
  • |
  • |
View More Create Post

Up Next

Video Shorts

Featured Story

FHB Podcast Segment: Finding the Right Fixer-Upper

Get expert guidance on finding a fixer-upper that's worth the effort.

Featured Video

Micro-Adjust Deck-Baluster Spacing for an Eye-Deceiving Layout

No math, no measuring—just a simple jig made from an elastic band is all you need to lay out a good-looking deck railing.

Related Stories

  • Guest Suite With a Garden House
  • Podcast Episode 688: Obstructed Ridge Vent, Buying Fixer-Uppers, and Flashing Ledgers
  • FHB Podcast Segment: Finding the Right Fixer-Upper
  • Keeping It Cottage-Sized

Highlights

Fine Homebuilding All Access
Fine Homebuilding Podcast
Tool Tech
Plus, get an extra 20% off with code GIFT20

"I have learned so much thanks to the searchable articles on the FHB website. I can confidently say that I expect to be a life-long subscriber." - M.K.

Get home building tips, offers, and expert advice in your inbox

Signing you up...

This site is protected by reCAPTCHA and the Google Privacy Policy and Terms of Service apply.
See all newsletters
See all newsletters

Fine Homebuilding Magazine

  • Issue 332 - July 2025
    • Custom Built-ins With Job-Site Tools
    • Fight House Fires Through Design
    • Making the Move to Multifamily
  • Issue 331 - June 2025
    • A More Resilient Roof
    • Tool Test: You Need a Drywall Sander
    • Ducted vs. Ductless Heat Pumps
  • Issue 330 - April/May 2025
    • Deck Details for Durability
    • FAQs on HPWHs
    • 10 Tips for a Long-Lasting Paint Job
  • Issue 329 - Feb/Mar 2025
    • Smart Foundation for a Small Addition
    • A Kominka Comes West
    • Making Small Kitchens Work
  • Issue 328 - Dec/Jan 2024
    • How a Pro Replaces Columns
    • Passive House 3.0
    • Tool Test: Compact Line Lasers

Fine Home Building

Newsletter Sign-up

  • Fine Homebuilding

    Home building tips, offers, and expert advice in your inbox.

  • Green Building Advisor

    Building science and energy efficiency advice, plus special offers, in your inbox.

  • Old House Journal

    Repair, renovation, and restoration tips, plus special offers, in your inbox.

Signing you up...

This site is protected by reCAPTCHA and the Google Privacy Policy and Terms of Service apply.
See all newsletters

Follow

  • Fine Homebuilding

    Dig into cutting-edge approaches and decades of proven solutions with total access to our experts and tradespeople.

    Start Free Trial Now
    • Facebook
    • Instagram
    • X
    • LinkedIn
  • GBA Prime

    Get instant access to the latest developments in green building, research, and reports from the field.

    Start Free Trial Now
    • Facebook
    • YouTube
  • Old House Journal

    Learn how to restore, repair, update, and decorate your home.

    Subscribe Now
    • Facebook
    • Instagram
    • X

Membership & Magazine

  • Online Archive
  • Start Free Trial
  • Magazine Subscription
  • Magazine Renewal
  • Gift a Subscription
  • Customer Support
  • Privacy Preferences
  • About
  • Contact
  • Advertise
  • Careers
  • Terms of Use
  • Site Map
  • Do not sell or share my information
  • Privacy Policy
  • Accessibility
  • California Privacy Rights

© 2025 Active Interest Media. All rights reserved.

Fine Homebuilding receives a commission for items purchased through links on this site, including Amazon Associates and other affiliate advertising programs.

  • Home Group
  • Antique Trader
  • Arts & Crafts Homes
  • Bank Note Reporter
  • Cabin Life
  • Cuisine at Home
  • Fine Gardening
  • Fine Woodworking
  • Green Building Advisor
  • Garden Gate
  • Horticulture
  • Keep Craft Alive
  • Log Home Living
  • Military Trader/Vehicles
  • Numismatic News
  • Numismaster
  • Old Cars Weekly
  • Old House Journal
  • Period Homes
  • Popular Woodworking
  • Script
  • ShopNotes
  • Sports Collectors Digest
  • Threads
  • Timber Home Living
  • Traditional Building
  • Woodsmith
  • World Coin News
  • Writer's Digest
Active Interest Media logo
X
X
This is a dialog window which overlays the main content of the page. The modal window is a 'site map' of the most critical areas of the site. Pressing the Escape (ESC) button will close the modal and bring you back to where you were on the page.

Main Menu

  • How-To
  • Design
  • Tools & Materials
  • Video
  • Blogs
  • Forum
  • Project Guides
  • Reader Projects
  • Magazine
  • Members
  • FHB House

Podcasts

  • FHB Podcast
  • ProTalk

Webinars

  • Upcoming and On-Demand

Podcasts

  • FHB Podcast
  • ProTalk

Webinars

  • Upcoming and On-Demand

Popular Topics

  • Kitchens
  • Business
  • Bedrooms
  • Roofs
  • Architecture and Design
  • Green Building
  • Decks
  • Framing
  • Safety
  • Remodeling
  • Bathrooms
  • Windows
  • Tilework
  • Ceilings
  • HVAC

Magazine

  • Current Issue
  • Past Issues
  • Magazine Index
  • Subscribe
  • Online Archive
  • Author Guidelines

All Access

  • Member Home
  • Start Free Trial
  • Gift Membership

Online Learning

  • Courses
  • Project Guides
  • Reader Projects
  • Podcast

More

  • FHB Ambassadors
  • FHB House
  • Customer Support

Account

  • Log In
  • Join

Newsletter

Get home building tips, offers, and expert advice in your inbox

Signing you up...

This site is protected by reCAPTCHA and the Google Privacy Policy and Terms of Service apply.
See all newsletters
See all newsletters

Follow

  • X
  • YouTube
  • instagram
  • facebook
  • pinterest
  • Tiktok

Join All Access

Become a member and get instant access to thousands of videos, how-tos, tool reviews, and design features.

Start Your Free Trial

Subscribe

FHB Magazine

Start your subscription today and save up to 70%

Subscribe

Enjoy unlimited access to Fine Homebuilding. Join Now

Already a member? Log in

We hope you’ve enjoyed your free articles. To keep reading, become a member today.

Get complete site access to expert advice, how-to videos, Code Check, and more, plus the print magazine.

Start your FREE trial

Already a member? Log in

Privacy Policy Update

We use cookies, pixels, script and other tracking technologies to analyze and improve our service, to improve and personalize content, and for advertising to you. We also share information about your use of our site with third-party social media, advertising and analytics partners. You can view our Privacy Policy here and our Terms of Use here.

Cookies

Analytics

These cookies help us track site metrics to improve our sites and provide a better user experience.

Advertising/Social Media

These cookies are used to serve advertisements aligned with your interests.

Essential

These cookies are required to provide basic functions like page navigation and access to secure areas of the website.

Delete My Data

Delete all cookies and associated data