Need advice for insulation project…
coolorwarmworkshop
| Posted in Energy, Heating & Insulation on
Hi folks!
I am a new member since a while but did not post much yet.
Actually trying to collect some smart advice concerning a project of mine to properly insulate my thermically challenged workshop/garage/garden house.
So below this text I am going to share a document I wrote recently showing my project and its issues that I am sending to various interlocutors in order to decide & strategize my next move.
Thanks for reading and share your thoughts.
———————————–
Hello!
Please excuse my English if it’s a bit difficult to follow, I am new to the US…
in addition to that my problem involve few different parameters that I will try to cover simultaneously in my explanation.
My workshop is based near Pasadena, CA, 15 minutes from Los Angeles and I would like to insulate primarily from summer heat as well as insulate to keep the heat inside for a longer period of time when I use my gas convection heater during winter…mostly at night in Southern California. Lowest outdoor nighttime temperature though rare in winter can reach 33F and the highest in September can reach 110F for a day or two.

I have been browsing your website (Insul4less) for a few weeks and I need precise & somehow customized information regarding the most appropriate way to install any of your products that you could recommend me.
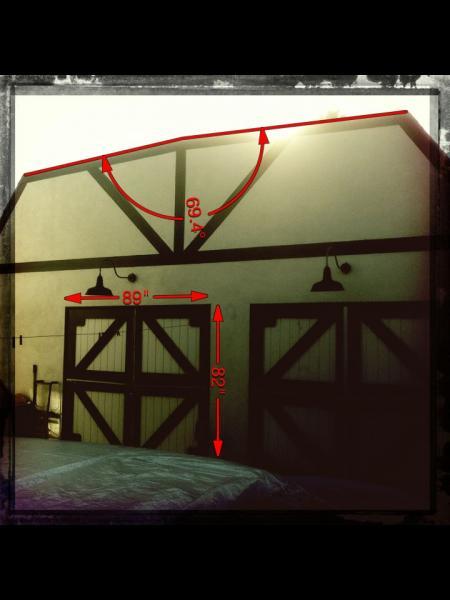
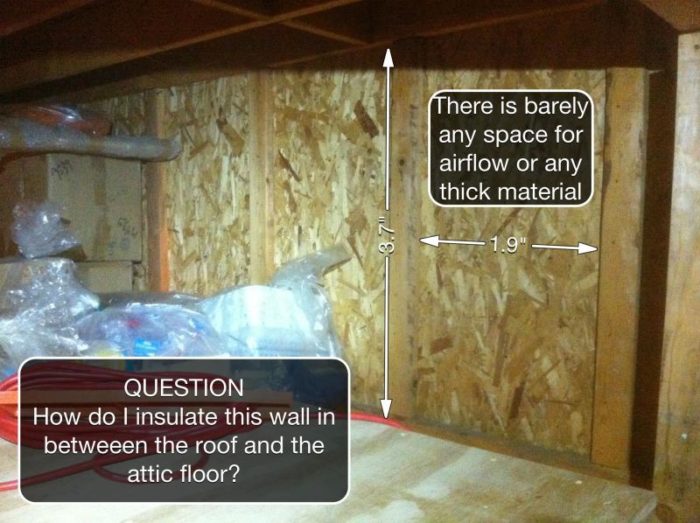
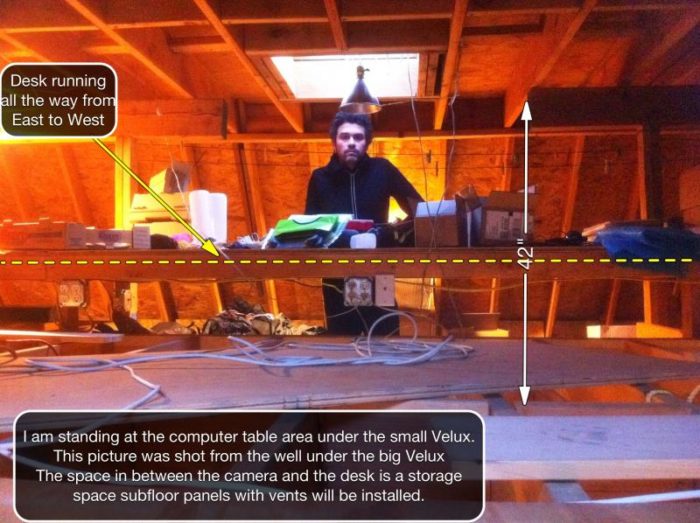
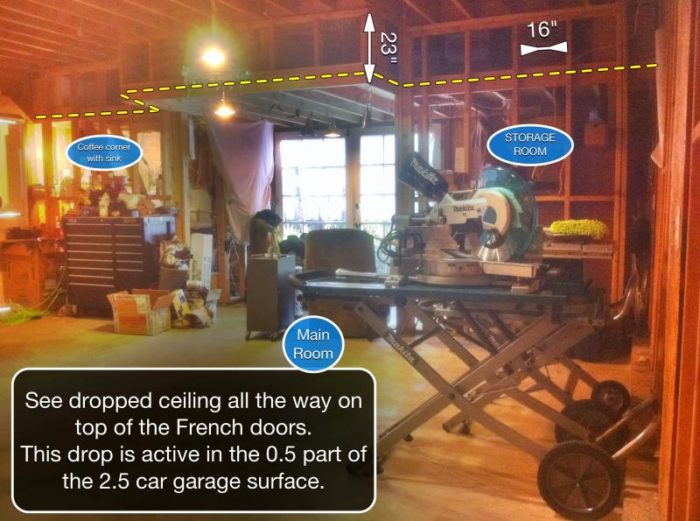
My workshop is built directly on a concrete slab [B]that is not insulated[/B]. Its size is equal to a 2.5 car garage, half of which has a dropped ceiling (see all attached photos) to allow an office area right under the roof and an access to the non-dropped ceiling used as a storage space. Therefore, in terms of usable space, it’s more like a 5-car garage in volume from the ground to the roof, all the space is utilized.

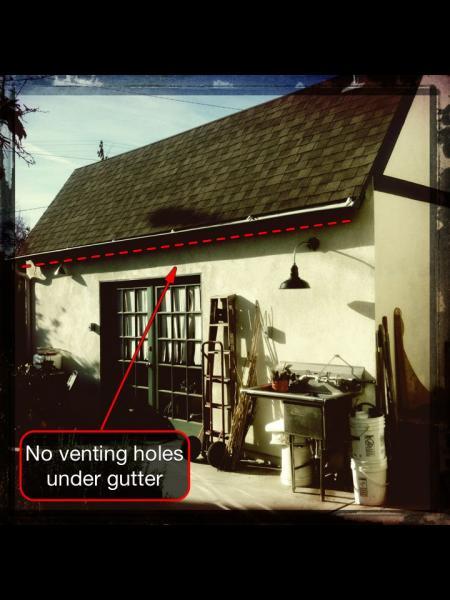
The Gambrel shaped roof is not at all vented. There is, however, one large Velux window on the north side and one small Velux window on the south side as you can see on the attached pictures. These are framed in the roof structure and there is no venting between the beams. If I understand the installation of your product correctly (Prodex radiant etc), it is necessary to have an air gap between your insulation and the roof. So, I’m wondering, does the type of roof that I have with this incline not allow this kind of air flow even if I drill holes between the beams to direct the air flow (exhaust) toward the Velux window frames? With these parameters in mind, would any of your products or its installation specifications be suitable for what I want to accomplish against both extremes of hot and cold?
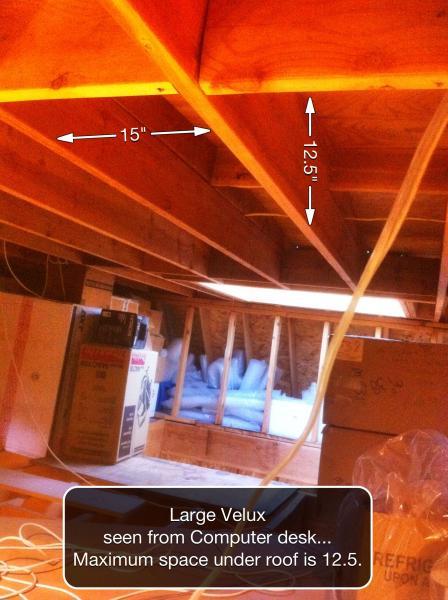
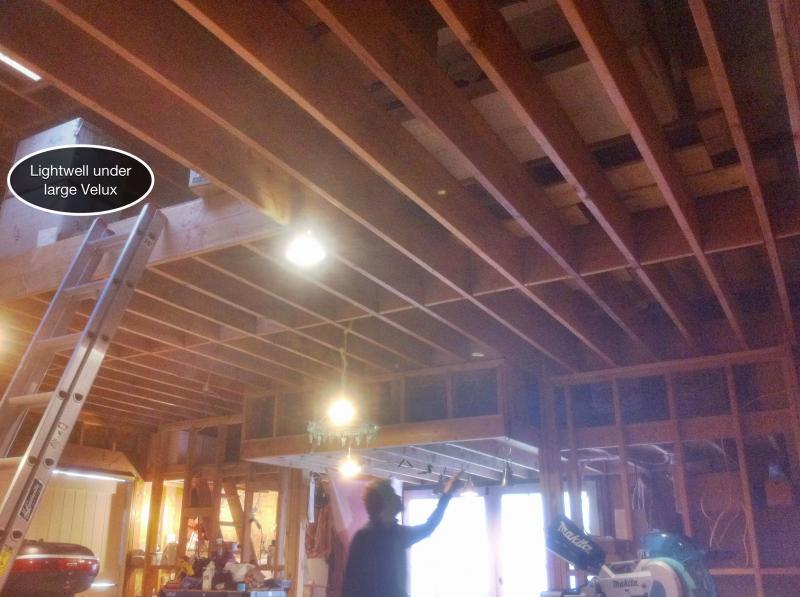
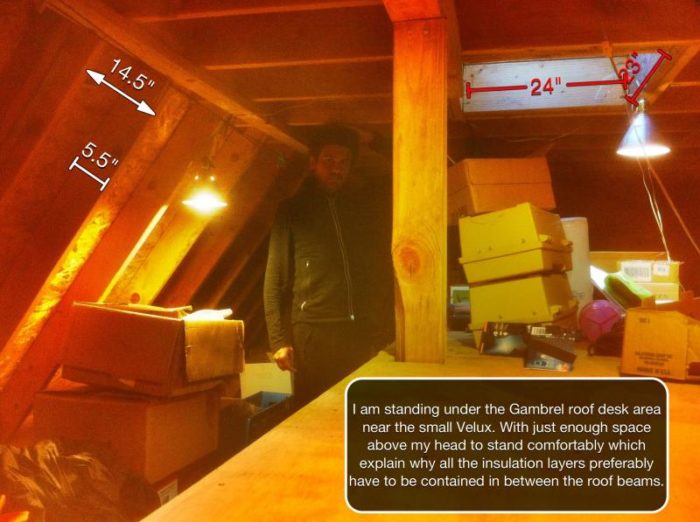
I am trying to find any smart solution’s to avoid installing an AC system specially to maintain reasonable temperature in the workspace under the roof. As you can see in the picture maybe the only good part is that I have a lot of fresh intake from Velux to French doors and Dutch garage doors. But there are two main issues that I hope you will integrate in your advice. The first one is the lack of bottom to top ventilation under my roof next to the 2 Velux windows. My second concern is that I need the insulation to be completely contained in the space that is in between the roof beams because I am going to walk and work often under the roof. If you think I would need to add fiberglass or insulation panels on top of your product for insulating heat in the winter, it would need to be done in a way that will not be obtrusive…preferably in the 16-inch wide space between the beams. The depth varies from 12.5 in. at the top of the Gambrel roof to 7.5 in. further down, and 5.5 in. in the steepest side of the Gambrel roof (north & south sides).
Once all will be insulated I am planning to use some thin drywall sheet over the roof beams.. or use panels like these: (click on me)
Finally, the roofing material is made of shingles.
Please see attached photos for further information. Thank you in advance for your assistance.
Cheers!
Frederic


Replies
A few basics:
For your climate and needs you only need to insulate the roof.
You only need a few inches of insulation to make a substantial difference in the summer daytime temp.
You can use either the "hot roof" or "cold roof" approach. Both have their advantages.
You do need to ventilate somehow, either above the insulation or below it.
I would not advocate drilling holes in the structural members. Not so much that it would weaken the structure, but you'd need an awful lot to do any good.
Still need Insulation
Hello Dan!
And thanks for your comment!
1. The climate in North East Los Angeles is not of course as it is in Denver or Boston but still at night it get chilly in winter time and every sunny summer days make it suffocating indoor from 11am to 4:40pm. (Particularly under my uninsulated roof)
But I agree I think it is possible to do without AC in such Area of LA.... of course Malibu or Venice beach summer temperatures would be much less challenging than Pasadena area.
2. I am glad if I just need few inches of insulation but I have these days a hard time to choose what will be the most appropriate material and the most efficient installation for this type of roof considering the fact that I need room under my roof.
3. Is "Hot roof" would be something like that? http://www.airtightinsulationpa.com/Applications/NonVentedHotRoofSystem/tabid/185/Default.aspx versus "Cold Roof" something like this fiberglass wool or foam board?
4. I am planning to start a thread on ventilation because as you can see on the attached picture below I have many ways to take some fresh & force in the attic a lot of fresh air from the East and North side of the buidling that can then be exhausted from the Velux windows
5. Ok! Forget about drilling holes it was just an hypothesis... but thanks for your feedback.
Conclusion: I am just starting to see a bit more clearly but no precise plan yet as far as finding the most efficient & competitive solution in terms of insulating materials, ventilation, free space under the roof etc etc
A "hot roof" has insulation
A "hot roof" has insulation directly beneath the roofing. A "cold roof" has a ventilation area below the roof and above the insulation. A conventional insulated-on-the-floor attic is a "cold roof".
Ignoring the cost, your best choice, as someone else said, is probably to place insulation ON TOP of your existing roof. Second-best choice (again ignoring the cost) is probably spray foam. Both of these would be of the "hot roof" persuasion. With either of these you have the option of laying spacers on top of the roof/insulation and then applying another roof deck, to create a ventilation cavity (creating a "cold roof").
Otherwise, it's difficult to ventilate your setup. If you don't use the above second roof deck approach then one option would be spacers below the framing (you'd only need 3/4" or so of opening) and some sort of ceiling treatment (ideally incorporating a modicum of insulation below the air space). A ridge vent can let air out at the top but letting the air in at the sides may be a challenge. But any way you cut this it takes away an inch or two of headroom that you don't have.
Perhaps one way around the ventilation/headroom problem would be to install a sort of soffit around the perimeter of the "ceiling", to allow air to "jump" from the side rafter cavities to the overhead rafter cavities. It appears (though it's hard to tell for sure from the pictures) that this is the main area where free flow cannot be obtained. This would let you inexpensively insulate the cavities with fiberglass batts (covered with perhaps 1/4" hardboard) and still ventilate above them. But you'd need to somehow let air in at the eaves, and, of course, install some sort or rooftop vents near the center.
Radiant barrier cold roof
I would consider avoiding the use of non-conductive insulation such as foam, cellulose, or fiberglass; and instead using a radiation barrier as Paul has suggested. With no non-conductive insulation, you will not be filling up the space between the rafters.
I would apply the foil faced OSB or some other reflective alternative to the underside of the rafters, thus enclosing the space between the rafters. Then that enclosed space can be used exclusively for ventilation airflow to help cool the heat gain in the roofing shingles and deck.
On a hot day with the doors and windows open, the most oppressive heat will be coming off of the roof deck and transferring to the interior objects and occupants exclusively by radiant transfer. A foil membrane will refuse to accept the radiant heat transferred from the bottom of the roof deck. It will accept the heat being transferred through the rafters by conduction, but that contact will be a relatively small part of the area. And whatever heat does get transferred to the foil membrane by conduction will blocked by the inability of the shiny interior surface to emit or radiate the heat into the room. Those ceiling surfaces will heat air by conduction, but that will tend to stay up there in a warm, stratified layer.
So you will end up with a shiny, metalic ceiling that will not be throwing heat at you.
With this approach, you don’t have to redo anything that has already been done. And it is probably the least costly approach besides.
Thanks!
Thanks Dan, Paul & Kdesign!
In few hours I got form you some interresting trails of thoughts...
But you know that you are not writing in my native langage and using all kind of technical words that I am lost with.
So! I need a few days to comprehende all that with my anglo-native assistant (My wife in fact) :))
But thanks a lot for your feedback!
I'll be back
Cheers!
Fred
Fred
I would suggest something b/4 you cover up anything.
In one of your original pictures I think I noticed a potential problem with the framing of the large skylight. It appeared I think that your opening is flanked to either side by single rafters-which in turn pick up the load of a couple or 3 other rafters.
You should double up those two full length rafters.
Potential Problem?
Hey thanks Calvin!
I am not sure if I understand well your description but what kind of problem do you see exactly?
I mean what kind of problems will be generated by the actual configuration that you describe in your comment?
Attaching a better picture for you...
fred
I took another look at your first picture. I see now that the skylight is almost down by the beam supported kneewall (right?). So, I guess, not knowing the span of those rafters, that I might be a little too concerned. When you cut 3 rafters and head them off to rafters on either side it's a good idea to double (join together) those 2 that hold the header, because you have added the load of the ones that were cut, to those two rafters. I would have doubled them anyway, but maybe it's not necessary.
That being said, they did double the headers so there must have been some concern, just not sure what.
What you could worry about if in fact you did worry (was this permitted and inspected?), would be that the portion of roof would sag at that location (up hill from the skylight).
Again, I'm not sure of the distance of the span of those rafters and if the inspector approved the design, then I guess you be okay.
EDIT: It dawned on me that I should look for a picture of the floor system in that skylight area.
That for sure I would double up. And I don't mean with blocks to fit alongside the joists-but continuous joists added and supported by whatever your other joist sit on.
Isn't that floor a bit springy under that skylight?
Was this job permitted and inspected?
Sag?? Ouch! :((
Yes Calvin!
This job was inspected and permitted... are you saying that if I install drywall or radiant osb over or in between those rafters as recently suggested in this thread by KDESIGN my roof might sag in this area?
You know English isn't my native langage
so it is slower for me to comprehend you explainations but I am going to figure it out in way or another soon.
Hey Fred, understand me? surely you jest.
I'm saying that I don't know anything about this bldg and cannot look at it other than the pictures and your description.
So with that disclaimer...............
I do not know the span of any of those rafters.
With a 4' skylight breaking up the framing, I would have doubled the single rafter on either side of the skylight.
I would expect our inspector and plan review to want to see that detail. Joist and header metal hangers.
But it snows here. That is a pretty flat upper portion of roof (nothing like the truss drawing you also posted up top) and with snow load, that's some weight.
In california, where I had heard every inspector and every board of plan review was like Napoleon on a bad day, I would have expected it from day one. I'm also no engineer.
So since I am only a carpenter 3,000 mi's away and can't really see what you have-I'll defer to your design and build as is.
But,
Is there bounce in that 2nd floor around the 4'skylight opening? You ain't huge, but if you stand there and bounce around, does it move?
thanks,
and welcome to Breaktime!
All Good!
Enjoy your breaktime ;)
I don't feel any bounce upstairs it seems super sturdy overall.
Cheers!
PS: "Napoleon on a bad day" is exactly what LA contractors describe about inspectors here...so you right!
Fred
PS: "Napoleon on a bad day" is exactly what LA contractors describe about inspectors here...so you right!
Cool, at least I got something right.
I live down in Cypress, about 1/2 hour south of you.
You are using the interior space probably about as efficiently as you can, so I wouldn't insulate there.
Instead, I would take up the existing roof deck entierly and replace it with radient barrier OSB - priced about $15 a 4x8 sheet at the moment. This will cut down your heat load right away. This one change made my garage attic space go from intorerable to being OK to hang out in. Bonus: The reflective underside helps distribute light in your dim workspace!
But since you want to work in this space, I would add a couple of inches of polyiso rigid foam board over that deck, with the seams sealed and taped, then deck and shingle over that. You would move your nice expensive velux windows up to the new deck line.
For heating - once it's insulated, you just need it warm enough to be not miseable... I'd ditch the gas and use radient electric instead. This way you are not introducing alot of moisture into your space.
Pretty "heavy" stuff...
Good evening Paul!
Are you asking me to re-do my entire roof?
I think your Idea is pretty good but I am afrain it is too heavy and costly to do specially for a building that I contracted 2yrs ago.
My contractor wasn't very nice and he didn't listen me.... so I am afraid he kept doing the cheapest & simplest stuff possible despite all the explaination I gave him about how I will use the building.
However your idea look great and seems the best I should have impose to my contractor but at that time I was swamp into just having him to show up on my work site :( that guy was a bit of a nightmare.
Actually, I'm reconsidering my proposal.
This is a workshop, not a living space. You are not going to be showering or cooking here. It's normally going to be dry (we live in a near desert like conditions).
Forget what I said earlier.
Fill the bays with R19 insulation, stapled to the underside of the rafters. Cover the underside of the rafters with 5/8" drywall at a level 3 surface finish (seems are taped, mudded, and finished), then paint the ceiling a nice flat white to help distribute light.
Easy, inexpensive job that will have you feeling the effects right away, without removing the roof that is still new.
What if?
What if I add some radiant foil before this R19 insulation then drywall everything?
Is a 5/8" drywall will not be too heavy if applied on the entire surface of my roof?
Thanks Paul!
Shiny Foil As a Radiant Barrier
The shiny foil radiant barrier will work on both sides. It cannot receive heat that is radiated to it; and it cannot re-radiate heat that is conducted to it.
However, for shiny foil to work as a radiant barrier, nothing can contact it except air. So if you sandwich the foil between the sheetrock, and the fiberglass, the fiberglass will conduct whatever heat it contains to the foil. Then the foil will simply conduct that heat from the fiberglass to the sheetrock. So there will be no radiant barrier effect. There will be no reason for radiant transfer to occur because the transfer can take place by conduction.
I would use only the OSB with foil on both sides as a ceiling finish. I would not fill the space above with any fiberglass insulation. Instead, I would leave it open and set up a system of ventilation for air to flow through the open spaces.
The building interior is going to reach whatever temperature is outside. Your main objective is to prevent the solar super-heated roof layer from re-radiating its heat down on you.
I think I Like your Idea
Hi Kdesign!
You wrote "I would use only the OSB with foil on both sides as a ceiling finish. I would not fill the space above with any fiberglass insulation. Instead, I would leave it open and set up a system of ventilation for air to flow through the open spaces." and I think I like your Idea but firstly let's clarify few points.
Is the "OSB with foil" something like on the picture below but double-sided?
In order to keep my overhead space would it be possible to cut it snugly then install sheets of it in between each rafter instead of over it?
When you wrote " Instead, I would leave it open and set up a system of ventilation for air to flow through the open spaces." The open space would be in that case the space in between the "OSB with foil" and the roof?
In that case how would I setup a ventilation system considering the fact that my roof is un-vented?
Is this option of using double sided OSB panel with foil would work as well in Winter?
I am not familiar with the climate in your area, but I was thinking that there is not much of a heating season. If you are planning on heating the building in the winter, then maybe what I have suggested should be modified somewhat. But if there will be wintertime heating that requires insulation, then insulating the walls should probably be included. In any case, the foil will act as insulation to keep heat in if you add heat, but I am not sure if it would be enough. If wintertime heating were minimal, then maybe the foil would be adequate.
I don’t have direct experience with foil-faced board as a radiant barrier, but if I were faced with the problem you are trying to solve, I would definitely try this approach. I would heavily research what type of foil-faced products are available. But generally what I am referring to is what you show in the photo. The more polished the foil is, the better its performance. Generally, the best product would be a relatively thin board because all it will be doing is making the foil rigid. A thickness of 1/4-3/8” would probably be adequate. At that minimal thickness, maybe a plywood material would be better than O.S.B.
I was referring to ventilating the space between the rafters to cut down on the heat gain. Generally, the ideal approach would be to have eave vents for intake, and a ridge vent for the outlet. So air comes in under the eaves, rises up between the rafters by natural convection as it is heated by the surfaces, and then escapes out the ridge vent. The eave and ridge vents should extend continuously the length of the building, so they send air through every passage between the rafters.
However, with your gambrel roof, you have a header there where the two pitches come together. That blocks the air passage that would be used for this venting between the rafters. So that requires some more thinking about how to set up the ventilation.
Maybe you could drop the foil-faced board in that junction between the two different roof pitches. You would just drop it maybe 6” there so the air could bridge under that header. It would use up some ceiling height right there under the header, but maybe that would not be too much of a problem.
What will happen if....?
Thanks KDESIGN! Oh lord! that is hard to come up with a real plan of action but this forum is helping it in just few hours...
So! What will happen if I use an USB with foil... seal the roof completely with it but kind of skip the ventilation part.
Can I cut those Foiled OSB's to fit them in between each beams or must I absolutely use them over the beams just like if it was drywall?
And why not using a white coating on my roof for summer
and a good combination of standard fiber glass bats for winter with drywall and paint on top?
Using a light color on your roof would be a good idea... later on when it comes time to replace your existing shingles. Don't do it now, and don't use a roof coating for it either. They make white shingles that last 50 years now, that coating might last 5 years.
Skip the ventalation - you only need ventalation if there is a source of moisture inside the space (like a shower, or a kitchen), which is unlikely in a workshop. You vent the roof to keep moisture from condensing on the underside of the deck, which would cause mold/rot.
Some believe that introducing ventalation air into an attic space will reduce the heat transmitted to the space below. This may or may not be correct (I don't think it's correct), but your shop is located IN the attic space, and there is no real good way to vent your gabrel roof. Skip the roof venting, you don't need it.
If you are really interested in using a radient barrier, there are a few options.
The first is the easiest: Use Radient OSB (it only has foil on one side) on the underside of your rafters instead of drywall. You can still insulate above the OSB between the rafters. Use foil tape on the seams. You will now have a shiney reflective ceiling.
You could also use a staple up radient sheet product (not the buble wrap stuff, ignor that)
You could cut foil faced Polyiso insulation board to fit between your rafters. This is labor intensive though, and pricey. This option is best when you are trying to insulate a thin space.
My suggestion of ventilation is not intended to address any problem of moisture condensation. Instead, it is meant to reduce heat gain in the space between the rafters if that volume were enclosed by a finished ceiling of foil-faced board. It would also cool the warm air stratification near the rafters if they were left unfinished and un-insulated.
The kind of common condition I would expect for this building, for example, would be say 85 degrees air temperature with full sun heating the roofing to say 150 degrees. The doors and windows could be open, so the interior air would also be 85 degrees. But the 150-degee roof deck is going to radiate heat down on the occupants, thus making the air temperature feel much hotter than 85 degrees. The radiation will also heat all the objects in the space, and they will in turn actually heat the air by conduction. This heated air will rise and stratify near the ceiling where it will be out of reach for the cross-flow ventilation from open doors and windows.
Since, to me, this seems like primarily a radiant heat problem, I would try to solve it with a radiant barrier. However, it might also be solvable with foam or fiberglass insulation.
I see the ventilation as reducing the burden on the insulation, whether it is foam, fiberglass, or radiant barrier. However, foam or fiberglass would consume most if not all of the space that could be used for ventilation.
Some believe that introducing ventalation air into an attic space will reduce the heat transmitted to the space below. This may or may not be correct (I don't think it's correct), but your shop is located IN the attic space, and there is no real good way to vent your gabrel roof. Skip the roof venting, you don't need it.
You need ventilation to let the heat out. There is a space of 2-3 feet at the center, above the ceiling level of his "attic". Heat from the sun accumulates there. I can tell you from working in my garage that, without ventilation, even on a "moderate" 80-degree day with the sun shining it feels like a giant radiant heater is blasting down at you, but let a little air through and it cools substantially.
And venting the roof is a simple matter of installing vents. Until some sort of tight ceiling covering is installed there's probably no need to provide for air coming in -- just open doors/windows.
For ventalation - isn't that what those velux windows are for?
Well, it's not clear that they even open, and they aren't very well distributed to let the hot air out.