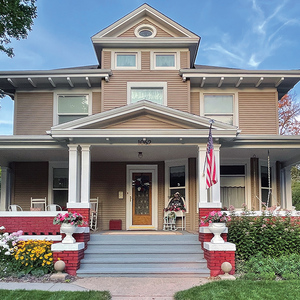
I’m planning a small house for my mom. To maximize space, it will be single story with a 12/12 roof that can be converted to second floor living in the future.
Joists and Rafters will be 16″ o.c. From ridge to plate is about 19’9″ (14′ span). 2x8x20′ are about $17 around here. 2x8x24′ Are about $39!
So.. I need to get creative with the tails.
I am trying for a “Craftsman” look so it will all be exposed. Any Ideas?
BTW, I found the thread on laying rafters on a plate on top of the joists interesting. I will be going that route also and plan on using Simpson VPA-2’s to attach the rafters to a 2×6 plate running perpindicular to the joists. That should take care of thrust issues and keep from having to notch the rafters.
Any and all ideas/experiences will be considered. You guys have really been a big help so far. I feel like my house is getting designed by committee! But, its working, and the local building department is happy. (so far, so good.)
Thanks
Terence
Edited 10/27/2005 4:07 am ET by TDRucker
Edited 10/27/2005 4:10 am ET by TDRucker


Replies
td... if you have exposed tails you also have exposed roof sheathing... and 16" oc is a bit busy for Craftsman
develop a plan to terminate your rafters at the plate line and scab on your decorative tails
a 2' tail with a 2' lap would be good ( 4' scabs )...
your fly rafter has to be one piece in the same dimension as the tail ( 2x6 looks good ...2x8 is getting a..... little bit ....wide )
drop your tails either 3/4 or 5/8 to allow for double sheathing at the tails
starting at your fly rafter, you want even tail layouts at 24" oc.. so it goes fly... then 24" ( which will fall between 2 of the real 16" oc rafters )
then the next one scabs to the side of a regular rafter... all of your regular rafters have a rabbet cut out of the top ( 3/4 or 5/8 ) to correspond to the dropped tails..
install your blocking as you install your tails... now overlay your tails with either 1x8 beaded t&g ( the 3/4" ) ... or you can use 5/8 t-1-11 in a 4" pattern....
pre-prime all of your sheathing , first coat paint all of your sheathing...i'd alos pre-paint all of your decorative tails
when you have all of your tails and decorative sheathing on , you overlay the entire roof , including the tail section with your regular plywood/osb sheathing
now you have a thickness of 1 1/8 - 1 1/4 at the roof edge and you can use 1" roofing nails to install your dripedge, paper, and roofing shingles
when you look up you will see traditional 1x roof sheathing, no nails , and your decorative tails at 24" oc
here's a garage with exposed tails , fly rafter on the gable ends, and 5/8 T-1-11 on the edges
I had trouble seeing the detail in the pic so I brightened it up and am reposting.
"BTW, I found the thread on laying rafters on a plate on top of the joists interesting. I will be going that route also and plan on using Simpson VPA-2's to attach the rafters to a 2x6 plate running perpindicular to the joists. That should take care of thrust issues and keep from having to notch the rafters."
I don't know what the big deal is with cutting a birdmouth in a rafter. It doesn't weaken the rafter at all and it's done every day. Your going to kill yourself with these VPA-2 hangers with their 4 step process for installation. Then try to set your 20' 2x8 rafters EXACTLY on the outside plate mark in position and then try to nail them in. Each rafter will take you 10 times longer to nail in then a rafter with a birdsmouth.
A rafter with a birdsmouth, you set it down and nail it in in 2 seconds. These hangers you have to do this as I siad to you in your last thread.
VPA Installation Sequence
Step 1) Install top nails and face PAN nails in "A" flange to outside wall top plate.
Step 2) Seat rafter with a hammer, adjusting "B" flange to the required pitch.
Step 3) Install "B" flange nails in the obround nail holes, locking the pitch.
Step 4) Install 10d x 1 1/2" nail into tab nail hole. Hammer nail in at a slight angle to prevent splitting.
If you don't have that much experience framing then you don't want to kill yourself and waste time trying to set these rafters. Get them up as fast and SAFE as possible and then go back and use H-3 ties and be done with it.
I'm just trying to offer you some advice to make your project easier and safer for you. The last thing you want to STRUGGLE with is RAFTERS. There heavy and you will be working high up on a scaffold and to try and line the rafters up and do all those steps at the plate line wastes to much time and the guy at the ridge end is standing on a scaffold wasting time has to hold this 20' 2x8 while the guy at the bottom is playing around trying to set the rafter in position and then try and hold the rafter and nail it at the same time.
Also if you look at step number 4 for these hangers it shows them beiling used for I-joists not 2x material becasue it clearly shows you and tells you to bend the flage over and nail it.
http://www.strongtie.com/products/connectors/VPA_SCL.html
You can do what ever you want and whatever way you choose what I always do for open soffits is cut my birdsmouth without an overhang. Just a seatcut and a plumbcut so it sits flush with the outside of the top plate.
Then I use 2x6's for the tails holding the the top of the 2x6 down 3/4" from the top of the 2x8 which allows for 1x6 T&G to be exposed. So the top of the T&G is flush to the top of the 2x8 rafter. Now you can nail your sheathing on top of that. We use 5/8" sheathing which gives you 1-3/8" of material to nail your shingles up without the roofing nails popping through but 1/2" sheathing will work also with 1-1/4" roofing nails.
Here's a drawing.
nice detail joe.... do we agree that 16" oc is a little busy for decorative tails ?
the attached tails can follow their own layout .... but it works better if as many of the common rafters as possible offer scab support for the decoartive tails..
every other tail will fall out between the common rafters on 16"OC.. so the sheathing is actually supporting the intermediate tailsMike Smith Rhode Island : Design / Build / Repair / Restore
Mike,
Thanks for the advice. 16"oc is a bit busy and 12/12 is a bit steep for a true "craftsman" style. I am constrained by a few parameters and sometimes its a bear getting them to fall in line. Your post and others helped confirm some ideas I had. I do have the time to play around with ideas some.
I'm going to be up in Port Townsend next W/E to get some wood for my boat and I'm going to take my camera. There are a lot of Victorians and Craftmans to steal some design ideas from. If I had to go with 16" oc, would it be possible to go with tails every 32" ? I wonder what that would look like. I am going to use T&G or beadboard where it will be visible under the sheathing. Trying to dream-up some gable-end design also. Maybe get cute with shingles. Not too busy or else it starts to look like a doll-house.
Thanks for the input.
You guys are great.
Terence
32" wouldn't be too bad .. i'd beef the tails up to say.... 3x8
and a break at the plate line.... changing your pitch from 12/12 to 8/12 wouldn't be out of the question either
if you can dream it ... someone else has already built it... at least that's been my experienceMike Smith Rhode Island : Design / Build / Repair / Restore
I stole your detail, Mike!
Or maybe Estes/Twombly stole it.
why , those bastids ...
heh, heh.... where's that one ?
occupational hazard... driving around checking out details Mike Smith Rhode Island : Design / Build / Repair / Restore
The original prototype is in Jamestown, done by Randy Gardner.
The pic is of the copy I did as a spec in Lake Placid, NY.
gene.... i wish you'd settle on a name....
is stinger your nome de-jour ?..... very confusingMike Smith Rhode Island : Design / Build / Repair / Restore
I would change it if I could, Mike. And I would go back to doing it as you do . . . using my own name.
But with Taunton's new show here, I don't see any way to do it.
Before, you could go into a profile somewhere, and change screen name. I went from my name to ImaWannabe after "Jay," a sub on that rafter tail job, went ballistic over my taking credit for his work. My Wannabe name came from his accusations.
"Stinger" is a name given me by the survey crews I managed back in the late 60s.
pickings is there anyway you could illustrate what you are describing - I'd like to say I follow you but I don't
nice thread you all
Will try....here goes.
Used this detail once on a Craftsman home where the HO wanted a gutter, and continuous soffit venting was req'd.
Edited 10/28/2005 9:48 am ET by pickings
Will try....here goes.
Used this detail once on a Craftsman home where the HO wanted a gutter, and continuous soffit venting was req'd.
(Sorry. Orig post had a "tif" file that was bugging out, so here it is in "jpg format")
Here are a few photos of a 12/12 roof w/ 2x10's rafters @ 16" o.c. The porch is 8/12 pitch w/ 2x8's.
While maybe not a true "craftsman" detail, I don't think it is too busy. Then again, maybe I'm a bit biased...
Craig
Thanks for the shots. It's seems to work on your structure. I think paint selection can help also.
I like the corner windows but the inspectors out here would have a cow if I tried to get one past. At least without engineering.
Thanks again.
Terence
Yeah, still kicking around all my options. I'm trying to maximize space under the rafters as much as possible. OK, so maybe I'm getting obssesive a bit. Birdsmouths are NBD and that's the way I've always done them, its just that I'm trying to keep a true 12/12 with a 28' outside dimension and the extra 1.5" helps in that regard. If I went to 11/12 or 10/12 it wouldn't be a problem at all and I could get away with a shorter (less expensive)rafter. Anything over 20' around here is just so d#*@ expensive.
The VPA2 is 1-9/16" for nominal lumber. The VPA25 is for I-Beams at 1-13/16" and bends over the flange for nailing.
Time not an issue with this one (well, not a huge issue) Its going to be a W/E, time-off project. I know, I know, my time is worth something but I enjoy doing this for and with family. Kind of a Zen thing. I actually get to spend some time planning/plotting/scheming. Plus, If I see a better way to do something, I can stop and re-do or think it through a bit. Try to get a little craftman'ship into the project. Plus, all the input I've got from BT has been a huge help. I've been away from the game for awhile and just reading through all the advice has been great. I even have a spot in my binder for your excellent diagrams. Thanks.
It will be nice to work on a structure where as@@ and elbows are not all that is expected. I got my start in Victorian Restorations so I lean toward that type of thinking. Not always cost-effective in this market but its where I have a comfort level.
Thanks again for the help.
Terence
terence, as far as i can tell, joe's tails are all scabbed on just like mine.. so buy your shorts... and pre-fab, pre-paint your tailsMike Smith Rhode Island : Design / Build / Repair / Restore
Good idea,
I might even get the trusty PC router out and try some detail work. Good rainy-day work. Once I get it all figured-out I will take your advice and try to get everything cut-out, detailed, primed and painted. That way when we get a sun-break (its a Washington thing) I can get to it.
Yeah, I think you and Joe nailed it.
Are you guys a team?
Thanks,
Terence
Another similar way.....
Traditiomal Craftsman styled homes had "fatter" (3x), "shorter" (4" to 6" not 8"). and spaced furthur apart 24" to 30" rafters. So.......
Sister up 2X4 rafter extensions (w/ the tops lined up w/ the tops of your 2x8's).
Extend out 24" measuring from wall to fascia (horizontally).
Enclose bottom of 2x4 "soffit" w/ 5/8" text 111 (scores at 4"oc and facing down) running perpendicular to 2x4's.
Put a 5/4 x 6 fascia board on (allows for a gutter) and allows for secure anchoring of next step- false rafter tails.
Now add 3x4 or any ripped stock preferably thicker than 2x false rafter tails below the text 111.
Benefit is that you can space the false tails any distance apart to allow for all "full" looking bays. The end effect is more polished, and looks more thought out, and has zero impact on the actual framing layout.
Also, despite looking like solid wood sheathing on the 3x4 "rafters", you can now do a continuous soffit vent in the text 111 since the 2x4's create an air space above the soffit.
Just a thought...
I do home remodels in an older area of town with Craftsman homes, and dealt with plenty of rafter tails.Do not extend the rafter out and over the top plate. Just end the rafter at the plate with a knotch. Sister larger format wood, like a true 2x8 in a rot resistant wood, like redwood starting about 6 feet inside the structure and above the top plate and push it out and over the top plate. Seal the bejesus out of the tail, and I would probably recommend one of the 2 part System 3 epoxy sealers, then a paint which would be compatable. Those tails really take a beating and can get weathered quickly, especially in damp climates with cheap wood.Get some designs and make a template out of half inch mdf. Here is one.Regards, Scooter"I may be drunk, but you're crazy, and I'll be sober tomorrow." WC Fields, "Its a Gift" 1934
Just a thought in a different direction here: are you locked into that 12/12 roof? If I read you right, you want maximum useable space inside the roof for finishing into living space at a later date. But generally, you lose close to 45% usable floor space inside a 12/12 unless the people who will be using it are midgets....
What I'd suggest instead is a gambrel. It'll give you 70% fully-usable floor space, and most of the 30% left over can be used as dead storage behind the kneewall. You'll also eliminate your problem of needing 24' rafter stock. 2 or 3 short rafters instead of one looooong one. Easier to set, easier to buy....
Dinosaur
A day may come when the courage of men fails,when we forsake our friends and break all bonds of fellowship...
But it is not this day.
I thought of a Gambrel also but it got nixed by the "Big Boss."
"I'm not living in a barn."
Wow, you think H.O.s are tough, wait till you build for mom.
Truthfully, she has been pretty easy to please but insists on a "craftsman" style home.
This also gives me the opportunity to do some detail design.
I really appreciate all the advice. All of it has been considered.
Thanks again.
Terence
I thought of a Gambrel also but it got nixed by the "Big Boss." "I'm not living in a barn." Wow, you think H.O.s are tough, wait till you build for mom.Truthfully, she has been pretty easy to please but insists on a "craftsman" style home.
Well, it sounds like you are 'locked in' unless you can show her a 'craftsman' style with a different roof line. Since I am famous for blithely ignoring architectural conventions in the pursuit of solving practical problems, I'd probably not be the best one to give you advice on that score, LOL....
OTOH, might she like a salt-box...? Seems to me I've seen more than one salt-box that could classify as craftsmanlike....
Okay, I'll shuddup now....
Dinosaur
A day may come when the courage of men fails,when we forsake our friends and break all bonds of fellowship...
But it is not this day.
thanks for the detail
besides providing for more "obscure" venting and facia for gutter I think the scale is very appropriate for craftsmen
A saltbox is the idea we started with. If the lot was closer to the sound then that would look fine. But, the lot is up in the forest where, if you really stretch, you can see The Olympics. So we were trying to come up with a design that would look more at home in the woods. Log cabins are out. A-frame considered and nixed.
So..
Just imagine a saltbox that has been added-on and with a few extra details. Actually, that is the way a lot of bungelow style started out.
Still noodling...
Terence
Gotcha; well, I'm just trying to come up with an idea that'll give you some useable space up on the 'second' floor. Around here, a house with living space inside the roof structure is designated as a 1½-storey structure. It's (a) cheaper to build, and (b) cheaper to insure. Two of the reasons there are so many 1½-storey houses here.
The gambrel was adopted to get the benefits of the cheaper 1½-storey structure while getting almost as much usable space upstairs. But if SWMBO Sr. doesn't like the barn-shaped roof, there's another option.
How about a Mansard? Wanna have some real fun framing it, LOL...?
Dinosaur
A day may come when the courage of men fails,when we forsake our friends and break all bonds of fellowship...
But it is not this day.
How about a mansard with inverted doghouse dormers and a flat roof on top. Were these designed for people living in Morocco? Not just a nightmare to frame but chasing down all the water incursions would drive me nuts.
Belive it or not, I was visiting my Mom today and we drove past a lot where they were moving an older home to make way for yet another Microsoft Building and the cottage they were moving was IT! Got out the Tape and the footprint is whinin 4"! I am going to steal all the details lock stock and barrels. She was thrilled as this little 1 1/2 story house had been there since she was little and she loved it. So... Case closed for details but some of the engineering still needs to be done.
Thanks for the input.
Terence
I'm having a little trouble imagining an inverted doghouse dormer, but having been in Morocco....
Dinosaur
A day may come when the courage of men fails,when we forsake our friends and break all bonds of fellowship...
But it is not this day.
Just imagine a normal everyday dormer and then invert it to the plane of the roof. It goes into the plane and leaves a flat area at the bottom of the window exterior. I know, lame description. They are popular in Paris where everyone hangs out, smoking, looking cool and wondering whether to insult Americans, the British, or, God forbid, provencials.
They were all over 3 story apartment buildings where I grew up in the Bay Area. Wood shakes, stucco, teenage girls hanging out..... you get the picture.
Anyway, anything like that is an open invitation to leaks. I always wonder at flat roofs. Its not a question of if, but when. Why fight mother nature?
Terence
Just imagine a normal everyday dormer and then invert it to the plane of the roof. It goes into the plane and leaves a flat area at the bottom of the window exterior.
Yeah, there are a few of those around here; ugliest rabbit-forkin' things I've ever seen.... I don't know what to call it either (except 'butt-ugly') but it's a window inset into the roof instead of a dormer bumping out over the roof.
Dumbest freakin' idea I've ever seen....
Dinosaur
A day may come when the courage of men fails,when we forsake our friends and break all bonds of fellowship...
But it is not this day.
actually , it serves a real purpose... it allows set-back dormers with normal height windows.. if done right it can be very attractive... usually a small copper section with a 1/12 or 2/12 pitchMike Smith Rhode Island : Design / Build / Repair / Restore
If you've got a pic of one of those done right, I wouldn't mind seeing it. I figure it's like a lot of other stuff: somebody did a nice detail once, and a bunch of idjits have been copying it badly ever since....
Dinosaur
A day may come when the courage of men fails,when we forsake our friends and break all bonds of fellowship...
But it is not this day.
You won't go wrong taking Mike smith's advice. Also, check out the forums at American Bungalow Magazine http://americanbungalowmagazine.com/ubbthreads/ubbthreads.php?
Thanks for the link. My neighbors across the street live in an honest to goodeness bungelow. What I grew up knowing as a "Berkeley Bungelow". It has all the right proportions, colors, built-ins, beams, lights.... you get the idea. They were fortunate that in all the interveining years it escaped "re-muddling"
So as I sit here staring at their front porch, pretending I live in sunny Pasadena and not the rainy northwest, but, it does inspire me. I can't build a true bungelow or true craftsman but I am going to incorporate some of the ideas and details if I can get it to work without over-doing it.
It is a wooded lot, so I am going to try and stay away from urban details.
BTW, I see that a lot of these homes had no rain gutters or very minimal gutters. I wonder if that can be swung?
Terence