 Hi All,
New guy with an old problem. We are have a little issue with condesation / water damage coming from our shed roof.
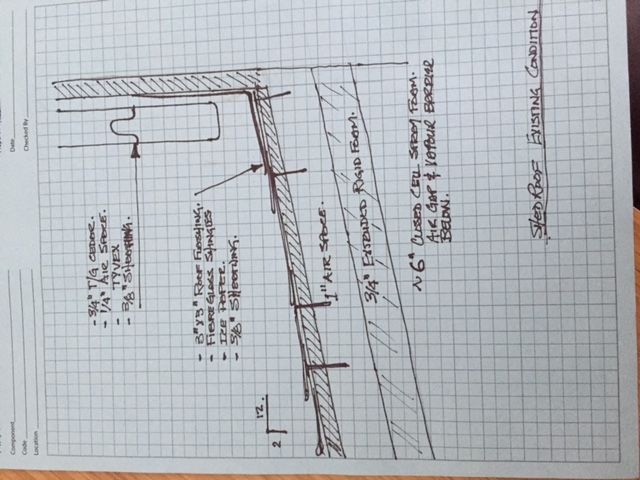
The roof is a 2/12 cathedrale with spray foam insulation. We had intended to spray foam tight to the underside of the roof sheathing but just prior to pulling the trigger our insulator informed us that the City of Calgary requires a 1″ air gap between insulation and sheating. For no good reason, as far as I’m concerned. However, after considering the expense of “correcting” it after the fact if the codes officer did come down on us we opted to install the 1″ air void by spacing ridgid insulation down from the sheathing.
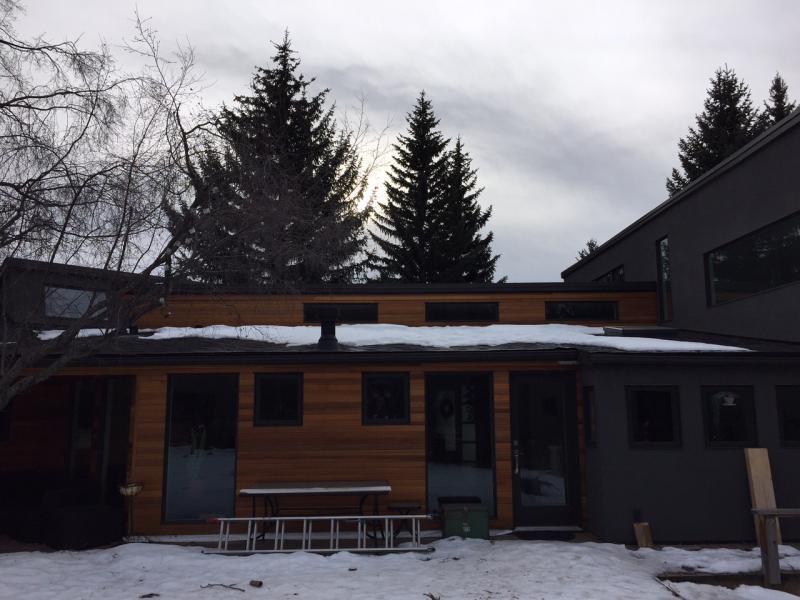
Most of the roof is porperly vented at the fascia and the ridge but one section is a shed roof with windows above and I couldn’t come up with a decent solution. So, I did nothing while I considered the options. We are now having some water damage issues around the windows in the wall below this roof. It only occurs during freeze thaw cycles and I’m quite sure that we are just getting condensation / icing on the roof nails / underside of sheathing and then melting when the roof warms. I dont think that we are driving any condensation from the house into the air void space as we have 6″ of spray foam and vapour / air barrrier between that and the drywalled ceiling.
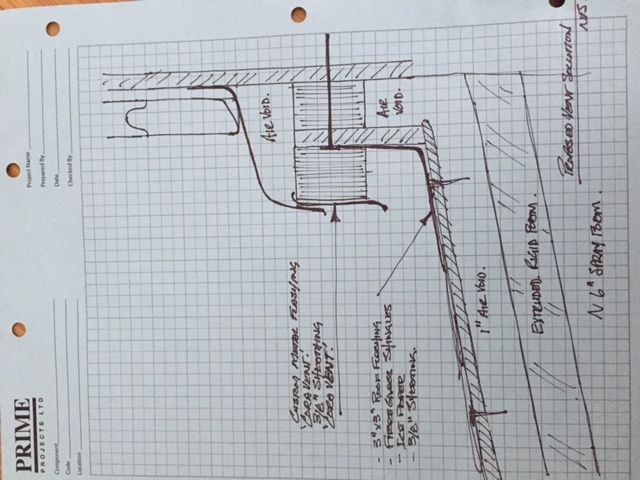
I think I have two real options. First, spray foam the void. Second, try to get a vent in at the top.
I’ve attached sketches of the exisitng condition and what I think may work as a vent (and a photo of the roof) Hoping to get some input / feedback from the pro’s here. Thanks, Ro


Replies
Ro
Are you confident with the existing roof/wall flashing and the window installation?
Thanks for the reply, I initially thought it was a leak from the exterior too. I'm 100% confident with the window install. Tyvex and redseal all lapped correctly. Roofer was good and I think flashed everything correctly, I can't see any issues, sealed all flashing pentration, etc.
Everything holds up well in the rain / snow, I only have issues in freeze - thaw conditions. My only other thought is that I'm some how wicking water back up under shingles when there is snow on the roof and it's warm outside. Only a 2/12 slope but it does have full ice barrier under lay.
I'm reasonably sure that its condenstation though but then again........
Thanks, Ro
Nothing is "attached".
Nothing is "attached".
Hmmm, I'm trying . When I click the boxes at the bottom of my original post the picture coems up fo rme. (I gather not for you?) but I can't seem to imbed the photo's in the post. I tried seaching for help on uploading photos but got side tracked on searching on how to search......? I must be missing something here.
Edit: Wait, I think I got it. Sketches are sideways but I'm geeting closer
2 problems:
1. Dimensional shingles not recommended for 2/12 pitch roof. Probably not warranteed either.
2. Double vapor barrier detailed in your roof assembly notes. I'd like to see a full roof assembly section that shows no chance of air leakage and thus, potential for trapped moisture or condensation.
I'd resolve both before considering resolution of venting detail. Personally I'd advocate with your local inspector for a properly executed unvented roof assembly. I believe Green Building Advisor website has details for this in your climate zone.
Thanks for the input. Shingling the 2/12 roof was debated at length prior to install. Roofer was / is confident of his install solution. He has been back to have a look. I'm only shying away from this as a possible casue as I have issues at 4 windows, different joist lines. So i would need to be an issue across the entire roof. (not saying thats not possible).
I've attached a detail of the roof to wall for reference.
few more questions...
1.nominal 6" of open or closed cell spray foam?
2. what constitutes your vapor barrier? Is it continuous with little to no penetration or leak points around outlets or fixtures?; even at ceiling-to-interior wall junctures?
3.what climate zone are you in?
1. "6 closed cell. 2. 6 mil
1. "6 closed cell.
2. 6 mil poly that meets Canadian air / vapour barrier standards. Little to no penetrations. There are no potlights in this ceiling and only 5 octangon boxes. All boxes have air barrier wraps around them and tie back into the air barrier with tuck tape or acousta seal and tuck tape.
3. Not sure of the correct answer to this, Semi arid, Energy star Zone B. Calgary, AB Canada.
I removed a top window trim today and a small section of drywall wall and ceiling. There is no evidence, at that location, that water is traveling down between the closed cell insulation and the top of the air barrier. I think I have the water path figured out as coming down the ceiling joist hangers at the perimeter beam. Still don't have the source figured out though.
I'd like to try and get a camera/light in the void space some how. Maybe a drain camera? Also think that some thermal imaging may help out.
Also, I'm considering trying to seal the soffit vent to see if the problem presist. I not sure why it hadn't dawned that I can still be getting air changes in the void with just the bottom vent. Of coarse I'm the guy that didn't put in the top vent so....I don't really need to finish that thought....
I very much appreciate the help and consideration you are giving this.
Ro
Just about EVERY shingle manufacturer warrants shingles on a 2/12 (the low spectrum of low slope). Diamond deck, winter guard and shorter shingle exposure. (certainteeds guidlines in case some clown wants to dispute it)
did you confirm with your local office about the air gap? Your air gap is killing you. Even if you can succesfully retrofit a vent on the top side it may not be enough to keep the condesantion from forming and freezing.
what is the size of that shed roof?
with a vented roof, to little ventilation causes these kinds of issues (and others) that will slowly decay your deck, rafters and eventually attached framing members.
i would be inclined to speak with your code official, explain your situation and explain your proopsed system (hot roof) for the shed only.
I wonder if your insulation guy was confused by this:
R806.3 Vent and insulation clearance.
Where eave or cornice vents are installed, insulation shall not block the free flow of air. A minimum of a 1-inch (25 mm) space shall be provided between the insulation and the roof sheathing and at the location of the vent.
which does not mean you have to have a 1" air gap across your entire roof deck.
Codes officer and city of calgary are very confused on this point. I did a lot of research on unvented roofs prior to decided on a non-vented system. After discussing at lenght with the city I decided to back down and install the 1" air space. Strangely enough the city has no code for venting tthe space. Which is just slightly more ridiculous. Long story / process short we tore off all the non-vented fascia, used ridgid foam to generated the 1" gap and Coravent at the soffit and ridges.
I should point out that this is city code, not provincial or federal. "Yeah I feel your pain, next town over sprays tight to the deck all the time, just not Calgary" Quote from the spray foam crew....
Shed roof is approxiamtely 30 x15. However, the entire house (2700 sf bungalow) is built the same way. About 700 sf of roof is 2/12 rest is 5/12. I have no known issues on the low slope front roof or 5/12 roofs which are vented top and bottom.
Thanks, Ro
explanation?
mark122 wrote:
Your air gap is killing you. Even if you can succesfully retrofit a vent on the top side it may not be enough to keep the condesantion from forming and freezing.
If you believe this is the case, then please explain why.
Ill talk to you like i do to my 5 year old, although im pretty sure he is smarter than you are.
The OP is all but certain there is no roof leak. What does this mean Dumbnuts? no water infiltration.
If there is no water infiltration, and there is moisture, this most likely means there is some degree of air leaking from the conditioned space. Because Calgary has an absurd code requiring a 1" gap, this gives that hot air a cavity to wreak havoc in that little space. causing condensation probablly mold and eventually rot.
This 1" gap is not vented properly so this space is not moving air as it should. When the vented space does not move the required air thtough it to properly it can not preform as a vented roof should.
Even if the OP can get some sort of vent at the low end of the roof, if he can not get the appropriate amount of ventilation it will be a futile attempt.
I get it, you read an article and speak on the issue as if you pattented the product, but, seriously...stick to houzz house wives man, im sure they are easily impressed.
The only "air gap" wreaking
The only "air gap" wreaking havoc is the one between your ears.
Look at the section. Perhaps you are unable to read drawings and notes, but the O.P. has indicated 6" of closed cell spray foam directly on the underside of his roof sheathing. This is no different from a typical "hot roof" insulation detail that is unvented. The "gap" is above the sheathing and is exposed to outdoor temperatures. There is no "hot air" pocket here as that zone is outside of the thermal envelope (and appears to be code), thus likely avoiding dew point temperatures. He has also indicated a complete 6 mil taped vapor barrier (thus air barrier as well) on the inside of his building thermal envelope. What is this tremendous amount of hot air and water vapor traveling through? Oh yeah, according to your "gap" it's traveling through the 6 mil poly AND the 6" closed cell foam-- which is also a vapor barrier. Right.
If you want to argue that the vapor barrier is compromised, then you'd have to accept the argument that the bulk water plane could also be compromised. However, I see that your engine has no spark; that may be impossible.
REALLY
Gap above the sheathing? WHAT are you talking about.
Ill leave you with your own thoughts...
"If you're absolutely sure you don't have bulk water intrusion issue from above, then I'd agree that your only avenue for moisture damage is condensation. Since heat energy moves from hot to cold and moisture moves from areas of high density to low density, warm, moist indoor air is naturally wanting to move outdoors where its generally colder and drier this time of year. Possible air leakage points and areas of inadequate thermal envelope would be prime suspects for your problem.
While some shingles may
While some shingle manuf. may warrant their shingles on a 2/12 pitch, what their warranty is based on is the use of their underlayment membrane. This is expensive and you're putting 4 holes in it per every three tab shingle. Sure, you can argue that each faster is "self sealed" by the membrane; but not an argument I would bet on long term for this shallow of a roof.
Anyhow, just because you may be able to monkey dance toward a warranty, doesn't mean it is good practice. In fact, Paul Fisette, editor at JLC writes in a Q&A section in April of 2001: "I would never install shingles on a 2/12 roof, especially in an area where snow falls. In fact, I have had numerous problems in northern climates with asphalt shingles on 3/12 roofs. As a result of this experience, I would limit the application of asphalt roof shingles to roofs that are 4/12 and steeper. The National Roofing Contractors Association recommends that asphalt shingles be installed only on roofs with slopes that are 3/12 and greater."
I believe that bit of good advice that is as relevant today as it was then.
BTW, you don't show how your roof 3/8" sheathing is supported in your section. I'm wondering if this could be a avenue for heat and vapor drive leakage. If you're absolutely sure you don't have bulk water intrusion issue from above, then I'd agree that your only avenue for moisture damage is condensation. Since heat energy moves from hot to cold and moisture moves from areas of high density to low density, warm, moist indoor air is naturally wanting to move outdoors where its generally colder and drier this time of year. Possible air leakage points and areas of inadequate thermal envelope would be prime suspects for your problem.
Ahh, I see what you mean, I missed line on my detail, the 2x10 ceiling joist rides higher than the 2 ply 2x8 beam. 3/8" sheathing is nailed directly to the top side of the 2x10. I do appreciate the low slope shingle comments but i just can't see any signs of daming, damage, improper install that would trigger water in that many joist spaces.
You have me thinking about every possible area that I could be driving humid area up there and I'm coming up blank. Since my spray foam is over 5" it techically is an air barrier. Reading Green Building is what triggered us to add the poly air barrier. Just as cheap insurance more than anything else and due to the limited depth 2x10 (2x8 in the 5/12) I killed all potlights in house to prevent this.
Should also mention that the 2x4 walls are closed cell sprayed foam and air barriered. All windows are spray foam sealed.
At this point I think I should try venting it. I'm working on a slightly simplier top vent detail but need to check some calculations. My vent at the top will be continuous so I think my calculation should be based on a bunch 14 1/2" by 15' roofs. Does that make sense? but, I have a feeling that I can't just apply venting calculations in a linear method.
Again, any help is appreciated.
Thanks, Ro
It might be worthwhile wondering what your inside humidity is. With the envelope so tightly sealed you could easily be hitting 60-70% humidity inside if nothing is being done to ventillate the structure.
I don't think that's my issue, most of time I'm down under 35 humidity wise. I have two, large hrv's that cycle with the furnaces plus they are interlocked to kitchen and main bath exhausts. So, I have a good amount of relatively dry, fresh air coming in. You made me run down and double check my humidifiers to see if anything went sidewise though! Thanks for the input. Ro
some additional thoughts looking at your roof wall section:
1. You don't really have a continuous thermal break at your double x8 header. The lower part of beam seems uninsulated. Maybe your spray foam comes all the way down in actuallity, but it's not shown here. Anyhow, designing a sandwich layer of 2" rigid insulation between structural wood members may have been a good "belt and suspenders" approach here. 2- LVL's with structural screws cinching rigid insulation may have been worth looking into with your engineer in order to accomplish structural as well as thermal break integrity.
2. You have metal hangers that are great thermal conductors at this beam area with ends having virtually direct exterior exposure . Could these conduits be sweating on the other side of your 6 mil poly and running out behind your interior trim?? I realize it's not a tremendous amount of material exposure, but couple that with partial cold wood surface (beam) and warm, moist air migrating to that area and it could be enough to drip when it's super cold outside.
Also, when its warms up outside (and has been relatively dry), you might want to hose test the roof to verify it's not a bulk water penetrating issue. Can't hurt mimicking rainfall and I'm still not convinced it's not the problem with low pitch shingled roof. Keep in mind that the only thing you won't be able to mimick with a hose is ice daming. If your underlayment membrane is at all compromised and warm air is leaking causing ice daming, those shingles aren't going to do a damn thing to keep bulk water out.
1. I agree with the thermal break comment. The house was built back in 1972, its was an extensive renovation but we did not get into large structural changes. Sprayfoam at the perimeter does actually roll down to the top sill plate of the wall.
2. Also agree with the metal hanger, it's not ideal but I tend to think I get some sweating at best in the location. Plus, it just hasn't been that cold here this year. I do think the inherent space between the 2 ply 2x8 and the 2x10 ceiling joist is providing the pathway for the water.
I purchased a borescope and hope to feed it into the void. As luck would have it they are calling of a full range of weather in the next few days. Warm and rain today and tonight, then sunny and cooling. Getting down to 6C below on Saturday night. Hopefully something will show up.
If it works out I will post some pics. Thanks again.
Deadnuts, thanks for not letting me overlook the bulk water possiblities....
The other day it had not frozen over night and it started to rain about mid day. A small but steady drip formed at my exterior wall. So back up on the roof I go to investigate. Everything looks to be fine, I still had a band of snow and ice about mid way down the roof. My feeling now is that band is creating enough daming to drive some water up under the shingles, down though any penatations (roofing nails), ultimately traveling down the air void to the celing joist hanger where it has a path to the inside of the exterior wall.
I guess I need to figure out / install a roof finish solution. While I'm at that I will install the venting as well.
Any thoughts on a "shingle looking" metal roof on a 2/12 slope?
I'm not familiar with the material to which you refer. Send a link.
Be aware that any metal roof without standing seams will have the potential for backflow due to damming on low slopes. Its simple geometry. Either prevent the dams or use a continuous membrane.
be aware of bs
DanH wrote:
Be aware that any metal roof without standing seams will have the potential for backflow due to damming on low slopes.
Yet another bit of false information from someone who usually has no idea what he's talking about. There are plenty of metal systems installed on low slope (less than 3/12) roofs that are not standing seam. Most will have an interlock detail that is also joint sealed. The sealing material can be any one of 7 types of liquid sealants; which may include a semi-solid form offered in "tape".
In my opinion, any roof with a pitch of 2/12 or less deserves special detailing and installation; and it definitely would not involve dimensional asphalt shingles. This is evidenced in the problems you're having here. Most code officials will accept manufacturer installation speciifcations and ICC reports during plan review or inspection for whatever material you're using. Most manufactureres for low slope roofing materials will also indicate a solid warranty for their product. If it doesn't have one that you or your customer are comfortable with, then don't use it; even if your roofer claims it's the best thing since sliced bread. Chances are he's only going to stand behind his installation, not the material.
BTW, why doesn't your roofer stand behind his (apparently) recently installed and leaking roof? If he installed your roof according to low slope installation guidelines which support any warranty (if their is one), then he should have no problem making a warranty claim on the material he used.