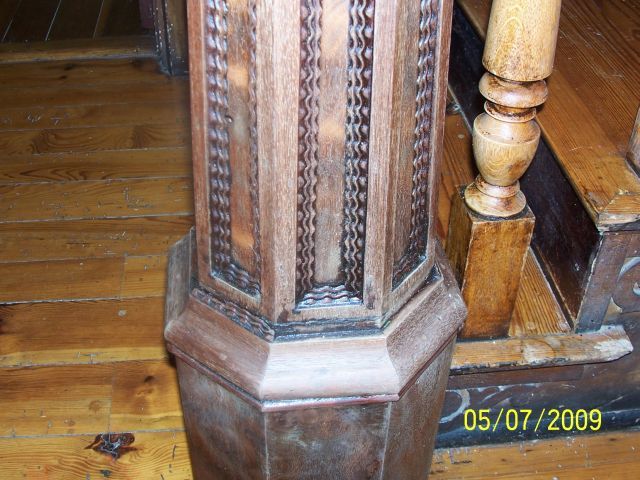
I got a few quick shots of the molding detail I’ll be needing to copy. I guess just getting the proper sweep gouge is my best bet.
You have any other brainstorm? I have never run across this style before. It’s fragile, and I only need a few feet at most.
I stripped of gobs of shellac. And still have to detail the details and chase the boogers.
Spheramid Enterprises Architectural Woodworks
Repairs, Remodeling, Restorations
“If Brains was lard, you couldn’t grease much of a pan”
Jed Clampitt
Edited 5/7/2009 12:51 pm ET by Sphere
Edited 5/7/2009 12:52 pm ET by Sphere
Edited 5/7/2009 12:54 pm ET by Sphere


Replies
Oh, option #2 that I have done on organ casework and pediments, is make a latex mould backed up with modeling clay, and mix walnut stain w/bondo and cast new parts..it works well for "Up there" but "under yer nose" it may not be so great.
That ribbon is shoing nice grain under the shellac.
Everything is being waxed, no more shellac.
Spheramid Enterprises Architectural Woodworks
Repairs, Remodeling, Restorations
"If Brains was lard, you couldn't grease much of a pan"
Jed Clampitt
View Image
A mold was gonna be my suggestion.
Family.....They're always there when they need you.
If it was painted or far away from direct view, I'd do that. But this is kinda like a focal point ..so the stained bondo would stand out I think.
You have to use red hardner and marbelize the stain into the mix and even then , faux grain paint it in.
I use mold latex from Dick Blick art supply, and a few layers of that make a neat copy. Then back it up with clay for the casting.Spheramid Enterprises Architectural Woodworks
Repairs, Remodeling, Restorations
"If Brains was lard, you couldn't grease much of a pan"Jed Clampitt
View Image
Wow, that's pretty!
The only thing I can think of is routing out the inner most part to set the depth (assuming you aren't making matching linear trim using just one half of the pattern). You might be able to jig up a drill press with a repetitive stop (like a finger jointing jig), but only if the pattern is on a straight line. I'd carve it, myself.
Wilbur shows a nice little tool in "Carving Architectural Details" that he uses for laying out the stops in repetitive patterns like this. It's basically a handmade version of one of those sewing pattern doohickeys:
http://www.largescaleplanes.com/tips/RatoMarczak/riveting_1/rivets06.jpg
It seems like the layout is the longest part - simple patterns like this, (waterleaf, bead and billet, etc..) actually go pretty quick.
I love the little devil horns at the top.
-t
Router duplicator? http://www.wood-carver.com/
Way cool, Duane.
I am not experienced with anything this complex. Looks like the top part would be done with scrollwork on 1/8" - 1/4" ?
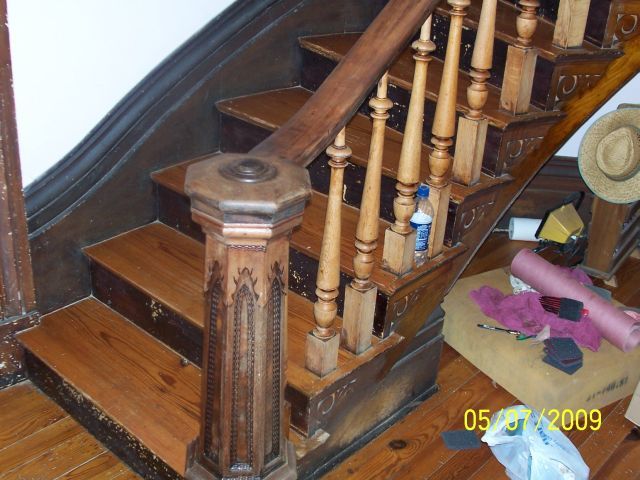
If you look at pic 2 , post 1, the squiggly stuff is missing down at the base of the newel. There are a few sections over all that have gone missing, under the cap there are awol pcs. too.
The part you are referring to (I think) is all extant and yes, it's overlaid on the 8 facets.
Bear in mind this was made in 1830-40 or so, and there fore must have been hand carved, or water powered / belt driven toolage.
I'm reluctant to machine fab it , due to the facts (a) I love a challenge, and (b) it wasn't made that way to begin with, so devising a jig or cutter may take longer than putting on my whittling shoes.
This isn't a "historic preservation" quest, just my way giving the HO a little extra. Not a big fat money maker, just good folks that keep me on a "retainer" more or less, with a monthly cap of what they can pay for what I do best. There is a lifetime of work on this home yet to be prioritized, with weeks of rain here, I took this on to be inside.
Apparently one of things I do best, is undoing 150+ yrs. of shellaccing (G).Spheramid Enterprises Architectural Woodworks
Repairs, Remodeling, Restorations
"If Brains was lard, you couldn't grease much of a pan"Jed Clampitt
View Image
Interesting.........So, I suppose try to pop one of those little puppies off and go join the ol' timers whittlin' down in front of the barbershop or the feed store?
I have a fair range of carving gouges. It seems everytime I tackle a new project like this, I aquire at least one more.
It's the final detail sanding and picky, picky nits that drive me nuts after hogging out the waste. I'm a perfectionest to a fault, and get lost in the minutia and forget that I'm matching imperfect work anyway.
Three days later and a pile of itty bitty sandpaper scraps on the bench, bleeding ,printless finger tips, and finally I call it good enough..LOLSpheramid Enterprises Architectural Woodworks
Repairs, Remodeling, Restorations
"If Brains was lard, you couldn't grease much of a pan"Jed Clampitt
View Image
D,Find someone that has a cnc point to point with a c axis.Or a lot of carving. :-)Chuck S
live, work, build, ...better with wood
Here's what I got done so far. I also rebuilt that window up there, WAY up there.
View Image
And the next project, reroof and strip, repair this front entrance.
View Image
These are the azec window glass stops on some of the sash.
Spheramid Enterprises Architectural Woodworks
Repairs, Remodeling, Restorations
"If Brains was lard, you couldn't grease much of a pan"Jed Clampitt
View Image
Edited 5/7/2009 4:49 pm ET by Sphere
Edited 5/7/2009 5:10 pm ET by Sphere
D,
Very nice.
Chuck S
live, work, build, ...better with wood
Sphere,
Very nice to get your hands on something like that.
Could it be built up from three thin layers? It would be reasonably easy to carve out a single layer at a time with a small drum sander.
Ron
Actually, it could. And might be fairly easy that way. Just make the squiggle template and decrease the width as I apply the 2nd and 3rd tiers.
Cool!
God I love this place, you guys so rock.Spheramid Enterprises Architectural Woodworks
Repairs, Remodeling, Restorations
"If Brains was lard, you couldn't grease much of a pan"Jed Clampitt
View Image
Several ways. I suppose you could try the router dupe thingy, but I've never done that and can't advise. It may work really well though as it looks like just the type of project it was invented for.
Casting I have done, mostly plaster though. If you're a good in-painter or copier of colors & textures, it may be just the ticket. There are epoxies & resins for just this sort of thing.
http://www.smooth-on.com/gallery.php?galleryid=308&cPath=1271
Bondo works & colors up nice with universals, but it's not a real liquid & you gotta watch the air gaps by pressing it into the mold like they do with a tile mold. Add just a touch of the catalyst paste to give yourself work time. I usually make a little of the casting material first and use a paint brush to work it into the nooks & crannies, then I do a bigger mix & fill in the rest. I used to cast rosettes for newels this way. The liquid resin stuff may cast more detail than the regular Bondo paste.
I've done some chip carving and relief and as you know it's tedious, but put on the headphones and spend the time. I would try a little at first to see just how tedious that process may be. If your only doing a few feet, then it may be the way to go, certainly would be the most impressive. For this, you may want to try and grind out a scraper to the profile of each little ribbon and do a scratch molding after the major stuff is hogged out. Small V gouges & scrapers would be the way to go I would think.
Hey!
How the F are you anyhow?
Glad ya got some work.
I might shout over the wkend, they're makin' me into a genuine city-slicker on this job. Saw Joe Frasier yesterday in Ctr City. Native son.
Doing great. Eating at least..LOL
Give a ring a ding anytime after darkthirty, I'll be in from taming the wild frontier that used to be my yard.
Smokin Joe eh? Now head up to meet the Easton Assassin, seen him up there my self. Back in the day.Spheramid Enterprises Architectural Woodworks
Repairs, Remodeling, Restorations
"If Brains was lard, you couldn't grease much of a pan"Jed Clampitt
View Image
Beautiful newel you've got there Sphere. If what you need to make is the smaller molding at the base it shouldn't take that long to do.
I strongly suspect that it was hand carved and if you are going to match it you'll most likely have to do the same. The pattern appears fairly straight forward, I think you are on the right track with finding the gouge that was used. Most likely the whole thing was done with 3 or 4 chisels. Rather than trying to match the lone piece there I would pop it off and make all new. Mill up a piece long enough to do all the parts and carve it as one piece, miter & apply in the same order.
If you weren't several states away I love to help just to see it. Good luck, hope some of this helps.
gobs of shellac jujst might be the final touch
I would try cutting the saw toothe pattern across a 5/4x4 piece of basswood then rip slices off at the desired thickness and laminate it up staggered like
from the picture it looks like the upper corners were cut and bent to fit the relief, then boogered over
glaze it to suit
Have you run this by your local Catholic priest? Judging from those carvings, you might be dealing with The Devil, you know.
AitchKay