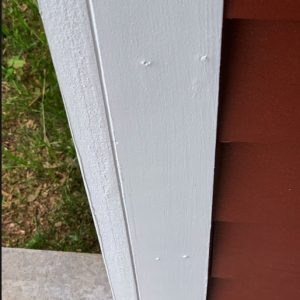
I recently had a new home built and noticed that there are bumps everywhere this is a nail in my outdoor siding. Is this normal or shoddy workmanship? thanks in advance. See pic
Discussion Forum
Discussion Forum
Up Next
Video Shorts
Featured Story

Tamper-resistant receptacles can make it difficult to insert a plug. Here are the code-acceptable solutions.
Featured Video
SawStop's Portable Tablesaw is Bigger and Better Than BeforeHighlights
"I have learned so much thanks to the searchable articles on the FHB website. I can confidently say that I expect to be a life-long subscriber." - M.K.
Fine Homebuilding Magazine
- Home Group
- Antique Trader
- Arts & Crafts Homes
- Bank Note Reporter
- Cabin Life
- Cuisine at Home
- Fine Gardening
- Fine Woodworking
- Green Building Advisor
- Garden Gate
- Horticulture
- Keep Craft Alive
- Log Home Living
- Military Trader/Vehicles
- Numismatic News
- Numismaster
- Old Cars Weekly
- Old House Journal
- Period Homes
- Popular Woodworking
- Script
- ShopNotes
- Sports Collectors Digest
- Threads
- Timber Home Living
- Traditional Building
- Woodsmith
- World Coin News
- Writer's Digest


Replies
https://www.jlconline.com/how-to/roofing/q-a-sheathing-nails-popping-through-shingles_o
Pay attention to the last line in the article.
Frankie
thanks Frankie, so it looks like i need to followup with the builder to have him fix my whole house.
I doubt the contractor used green lumber for trim work and I'm not sure what you have is a nail pop. It looks more like they used a nail gun and didnt countersink the nail and simply painted over it.
It's a straight forward fix. Countersink the nail and fill the hole then touch up the paint. Your contractor should take care of it.
appreciate it.
The photo wasn't in the original post when I replied. I envisioned something totally different - siding, not trim.
Seeing it now, I agree with Sawdust Steve. Countersink the nails, scrap the face of the trim to make flat and fill nail holes. Touch-up prime. Paint.
Frankie
Check with manufacturer specs. It’s hard to tell from the pic, but it looks like the trim is LP Smart siding or something similar. Many manufacturers want the nail to be flush with the surface. If you exceed 1/8” depth LP instructs to install another nail and seal the overdriven nail. Hard to see, but it looks like the nail is overdriven. What you are seeing are the wood fibers popping out of the face (I think). If nail is installed flush you will not see all the fibers exposed. If you set nails much you can be making the problem worse. The wrong nails may have been used as well. Again, refer to the manufacturer. You will see the nails typically. When installed at the right depth they are simply painted over, no sealant or sanding required.
They are LP Smartside. I did send something to the manufacturer questioning if I should be able to see literally every single nail in the trim.
You will see every nail when up close if installed properly. Here is the spec from LP
Often the flush nail looks cleaner than having a sealant slopped on top of nail hole as well. Either way you will be able to see where trim was nailed when looking up close. It’s fairly typical of all wood and concrete trim products unless you use Aluminum trim coil or some other type of trim.
I used Shou Sugi Ban wood for my home siding. I just couldn't resist to amber spruce color:D, bought it from these guys https://degmeda.eu/
If you want I can send you some pictures of how I used it for cladding