
As posted in another section of this forum, we’ve sold our home and purchased another in the same city. I get to start all over as we completely remodeled the first home and bought another one in need of much attention.
It’s a 1958 brick ranch, approximatley 1700 sq/ft up, and 700 sq/ft basement with the remainder a crawl space.
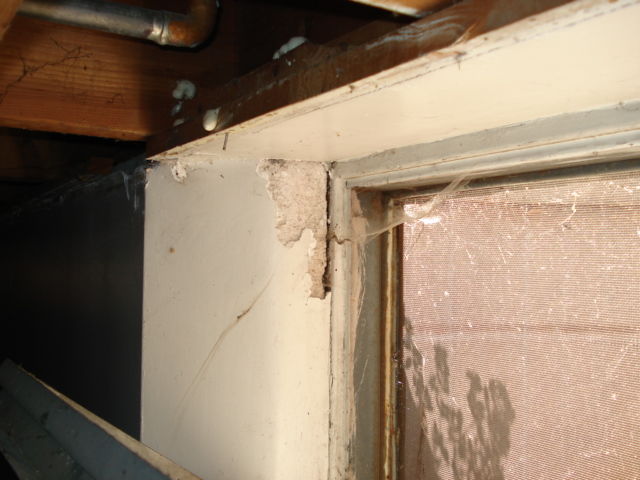
The first emergency happened a week after taking possession, big storms in the area, clogged gutters, bad grading not allowing proper drainage around the south and southwest end of the house = water in the basement. Ive always wanted a water feature but not from 3 to 5 below grade basement windows.
Water also entered through (I think) small craks in the exterior wall, emerging between the floor joist and down the basement wall.
I’m thinking of regrading around the problem areas and replacing the window wells with deeper models. Fixing the morter joints of the brick is something I have not done before. Also insulating between the floorjoists and the brick exterior seems to pose a problem, I wouldn’t want to trap moisture in the wall.
Pics are always worth a thousand words, let me know what the experts think.


Replies
Hate to be a buzz kill, but I never trust a stick framed house with a stucco, brick, or stone veneer exterior. Too tight of a tolerance for easy installation errors to become big problems. 1958 is not too old in the housing market compared to a post and beam early 1800s home or a 1902 brownstone. However, a certain technological arrogance was fueled by a booming housing market when your home was built. The new building design and materials combined with a guaranteed buyer, which led to bad building practices that persist today. The new design was really the elimination of tried and tested building details to reduce cost. This is true of most post World War II residential homes, and it is worse today.
I worked on a repair made to an addition that was build onto a solid stone home, which was done with stone veneer exterior. The door jamb was was rotting after only a couple of years. and when we removed it there were no studs in the wall cavity. I could stretch the full length of my arm plus my framing hammer and there was nothing in the cavity, except rot.
Thankfully, this does not appear to be your problem. Such a massive problem would have proved fatal to your home decades ago. Install a french drain and sump pump in the basement, and repoint your brick or maybe you could get away with caulk: Dow gray 795, into cracks cleaned out with a pneumatic air blower. Hope I have been of some help and good luck.
When there is a building boom there is a lot of pressure for builders to cut corners.
And the character of the houses goes down as well imo.
I'm in a post ww11 neighborhood and they are all pretty much the same.
But they are in a good location. If our house was in a bad location we never would have bought it.
Another thing is that since they are such a good location they are priced pretty high for what you get. And because of the high mortgage a lot of people don't improve them.
Maybe it takes some turn over of new wealthier owners leaving big city life. "There are three kinds of men: The one that learns by reading, the few who learn by observation and the rest of them have to pee on the electric fence for themselves."Will Rogers
Thanks to all that have replied so far.
Buzzkill, I don't think so, I would rather know the facts than burry my head in the sand.
What kind of corners were cut regarding building practices during that era? My cuz in the same city has a 70's home with a brick veneer just on the bottom half of the first story, the whole thing is peeling away from the house!
I was of the impression that brick homes are better than framed homes with siding, maybe not? The neighborhood I'm in was developed in the 50's, many of the homes are being completely remodeled, from removing the top and going up to scraping the whole thing and starting over.
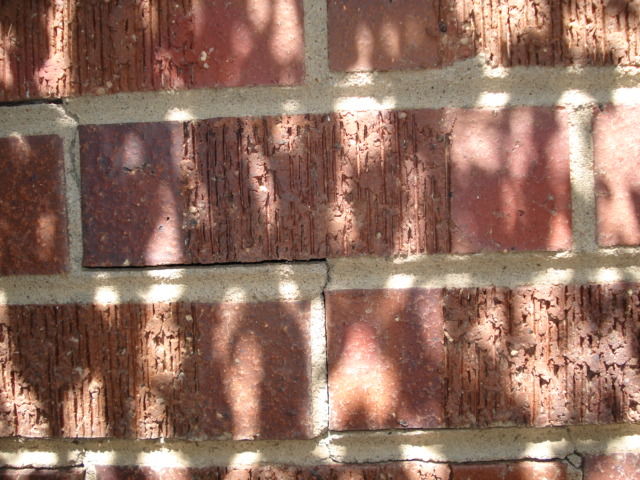
Back to the original question. So no need to remove the existing mortar to redo the tuckpoint? I'm wondering why this is the only section of the house that has the cracking, or more appropriately separating of the mortar from the brick, why? What about waterproofing of the brick below grade?
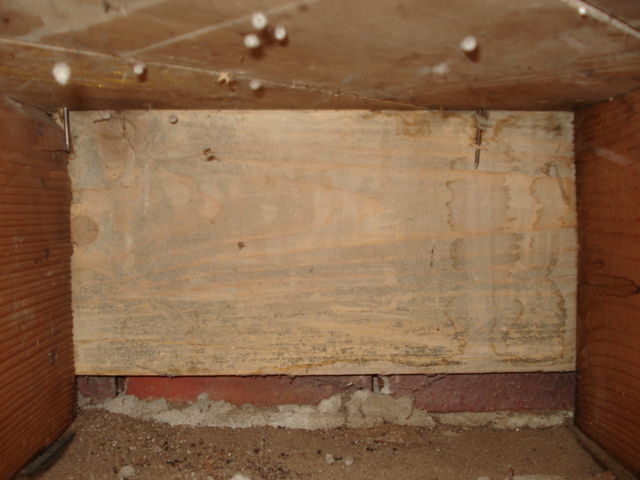
The pic inside between the floor joist you can see the outside brick, what would Fine Homebuilding say about the insulation value of that! I would think spray foam is the way to go to seal and insulate, but would that create an area for mold growth in that wall?
Lots of questions I know, thanks to all.
The pic inside between the floor joist you can see the outside brick, what would Fine Homebuilding say about the insulation value of that! I would think spray foam is the way to go to seal and insulate, but would that create an area for mold growth in that wall?
There should be some space between sheathing and brick veneer, also weeps (usually gaps in mortar) at the base where brick sits on foundation. I'd probably confine insulation to the inside plane of the blocking so air space is maintained.
Is there an attached garage near that crack? Foundations in older homes often weren't continuous underneath garage door openings. That can cause differential foundation settling which might cause what you're seeing.
Everything will be okay in the end. If it's not okay, it's not the end.
Edited 9/5/2009 11:51 am ET by PeterJ
The only way to insulate that area then would be to use fiberglass cut to fit, that would leave the gap between the brick and framing.
The area where the mortar separated from the brick is only in small sections of the south wall, which is over the basement.
if there are open weeps on the outside and a gap between sheathing and brick veneer, foaming that area would be fine and provide an air seal. Just want to keep the foam from spanning the gap between framing and veneer....make sense?
Everything will be okay in the end. If it's not okay, it's not the end.
I'm going to look for those weeps you are talking about, so far I have not seen them. The brick does go below grade, how far I don't know yet.
Spray foam could be contained I geuss, I would have to come up with a way to keep it from expanding into the gap between the brick and framing. I know it's not hightech anymore, but fiberglass might be the way???
Could I use something like Quickrete's stucco repair, easy to apply, dries like concrete.
Hi again, I went back to photo to clairfy what I'm looking at. Floor joist bay, joist on top of foundation wall, looking at back of sheathing, right? I've attached a pic of how weeps are often done.
Exterior grade should not be above foundation wall, but perhaps there's brick veneer on the wall itself? If grade's above foundation wall, moisture will certainly find it's way in...not good. Regrade if possible. It's also possible that weeps were intended to be that gap at bottom in photo, not typical, but old houses are quirky like old people.
Plugging that gap would be easy, scraps nailed on and foam it, doesn't have to be pretty or a perfect seal, that's the foam's job. I'm not a huge fan of fiberglass, it doesn't stop air movement in and of itself. If you decide to use it though, air sealing first would best.
Everything will be okay in the end. If it's not okay, it's not the end.
Yes, you are looking the floor joist bay. Floor joists sit on the mudsill which sits on the concrete foundation. I don't know what the part perpendicular to the floor joists is called, but you can see the exterior brick through a gap at the bottom of it.
Searching the net to educate myself on how brick houses were constructed.
Don't get me wrong, I really like spray foam. I agree with your approach, once I fix the water issue, regrading, mortar, etc, that will be next.
Looked closer, so far I've found no weeps???????
It's purely a guess, but maybe the builder figured that the space at bottom of rim /sheathing would suffice. Does the joist bay you show go into the basement or crawlspace?
Everything will be okay in the end. If it's not okay, it's not the end.
The one in the pic is in the basement, though the crawlspace is the same.
Well it seems to me that moisture behind brick means wet basement...not good. Can you tell if there's building paper on sheathing / rim board? Mirror and flashlight?
I'd likely regrade so no dirt above foundation, drill some weeps in bottom course in mortar and foam like we've talked about . Gotta give any moisture an alternate route.
Everything will be okay in the end. If it's not okay, it's not the end.
Good point! If its still sound, then don't bother. If it is moving or crumbly or otherwise looks questionable, than break out the 'ol cold chisel and remove the bad grout. I suppose that you could use an angle grinder but just stay in the joints!
You could be like some of the other guys here and complete the entire job, from mixing grout, to removing joints, to tuckpointing with your MM. ;o)
You could write an entire book on cutting corners in post World War II homes. Builders probably cut corners in the 1800's too, but those houses have collapsed by now. Here's one of my pet peeves.Plywood is a good post WWII product, OSB is garbage. I've worked with it and especially for sheathing it is no good. When wet, it swells up to a half an inch, and doesn't go back. On one job (I wasn't in charge) we jokingly called 3/4 OSB 1 1/4" because it had swollen to that dimension. When really wet, it will eventually reach structural consistency of wet bread, which is why it is banned in many hurricane areas. Even in good condition, it will not hold a nail as well as plywood. Why use OSB? The builder or owner can save a few hundred bucks on a home. Penny wise, pound foolish.
I joist are an engineering contribution that makes the structure of you floor rely completely on a OSB web that connects the two flanges. So, OSB no good = I joists no good.Look out for any cedar shingle siding with a exposure greater than 6". My cousin and I bid a job to re-side a house where the exposure was a good 12". Since a shingle is tapered, the top end is very thin (1/32") while the bottom end is 3/8" thick. It was nailed off on the bottom rather than behind the course above it. Needless to say, it failed after 20 years because the top was exposed to the the elements and wore away. But the builder initially save on labor and material.Labor corners cut. Carpentry is being overrun will illegal aliens. Granted some of these guys are pretty good and many are stand up guys (I've worked with plenty}. The problem is they will work for a lot less, no health insurance, and for cash. This has suppressed carpentry wages for decades and made a job with health insurance a rarity. So, as a trade, carpentry has not been attracting the best and the brightest because who wants to bust their *@% for peanuts. Me, I did a 4 year apprenticeship combined with a state approved tech. college. This is not typical. Overall, the quality of the person building and renovating your home has dropped, although there are still some excellent tradesmen out there.Hope you learned a couple of things to look for when evaluating a home.
I was of the impression that brick homes are better than framed homes with siding, maybe not?
"Better" is a hard call. Better in that brick veneer almost never needs sanding, scaping, and painting. Almost.
But, brick veneer also requires suitable detailing. Like brick ledges to carry the load; lintels over door and windows; adequate, properly-fastened brick ties; and sensible placement of doors and windows.
Oh, and an airspace so that the back of the brick can dry, and any condensed moisture go down to the weeps and back out again. So, probably, foaming to the back of the brick veneer not the best of ideas.Occupational hazard of my occupation not being around (sorry Bubba)
JLC recommended insulating the brick as if it were the roof side of a cathedral ceiling, air pocket then polystyrene foam board to separate pocket from insulation, followed by insulation.
That's a great idea, using foam board, thanks.
More pics of the joist bay, you can see they used fiberboard against the brick on the outside wall. Another close up of the joist bay, at the bottom of the bay, just the brick. Lots of mortar slop probably covering a mud sill.
A little more investigating and here is what I've found. Still no weep holes and cracks in the mortar I can fit a trowel into.
The soil was against the brick, above the window well. They used steel garden edging to create more height for the window well, didn't work.
When it rained, water and soil would enter through gaps in the mortar into the stud bays, nice!
So the question is, I can regrade some, but not to the point where no brick is touching soil. You can see from the pic that it's impractical. The brick that is below grade I want to coat with something, any ideas?
I've read on this forum that coating brick is discouraged, what are the options then?
I'm no expert, but you're on the right track. You need a brick trowel, and a tuck-pointer. Mix your mortar per manufacturer's suggestions and scoop up a big chunk on to your trowel. Hold the trowel along the joints and with the pointer, just press it into the joints. You can press pretty hard, and just move along the joint pushing the mortar in. Once your mortar bucket is empty, pull the pointer along the joints at an angle. If mortar ends up where you don't want it, scrape it off with the trowel. A brush is also handy to lightly brush the area and blend everything together. Simple. Good luck with the new house.
I love pictures. You have some problems. Could you back up and give us a general view of outside the home?
Maybe back up a bit on all the picts to give us some perspective?? thanks!