Hello,
Our food disposer went out and gave me a good reason to make needed changes that have bugged me for years. My issue has been that the the food disposer was installed beneath the shallow sink rather than below the deeper sink. We have always believed that washing dishes was meant to be done in the larger sink and rinsing in the shallow sink. In addition, our sinks are arranged as follows from left to right: deep sink, shallow sink and then the drain shelf. In my mind this means, wash, rinse, and drain. Since the washing sink is where the food particles will end up it makes sense to me that this is where the food disposer should be. So why the food disposer was installed on the shallow sink is beyond me.
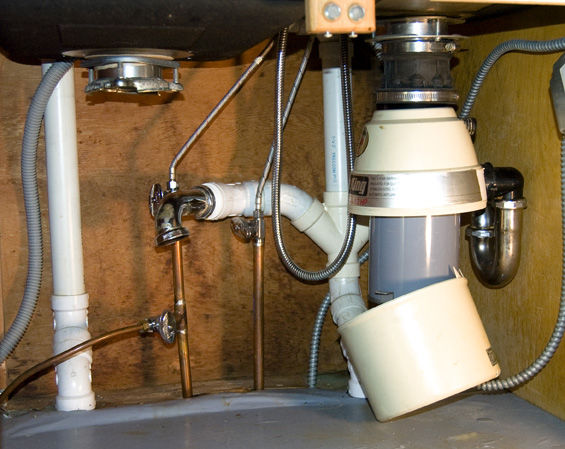
Now, in looking at what will have to be done to the PVC drain system to make this happen, I am wondering why two separate drain systems were installed beneath this kitchen sink to begin with. In the attached photos, I have tried to show that the upper ends of each drain pipe are connected together with PVC piping in the shape of an inverted U. Each of these drain pipes has their own vent as well.
Now here are my questions on all of this. Since both of these drain pipes are available, I would like to use the left drain pipe to attach the new food disposer to, and the right drain pipe for the shallow sink drain. And, unless I am overlooking some fundamental law of plumbing, I see no reason to reconnect these drains as they currently are. Doing so will simplify the work that I will have to do and get the job done sooner.
All suggestions and comments are most welcome.
Thanks to all,
Phillip


Replies
The left pipe is the venting system (no through the roof venting).
You can't use it as a drain.
Liberty = Freedom from unjust or undue governmental control.
American Heritage Dictionary
Thanks for getting back to me.Sorry if I didn't make this clear, but both of these drain pipes have their own roof vents. This is why I am so puzzled by this system.
OK
View Image
The horizontal vent line from the right attaches to the vent stack on the left? That vent stack then runs up the wall and out the roof, correct? That would make it a dry vent. If you make it a wet vent (adding a drain), you may be required to upsize the entire vent stack and drain to 2"... you'll get better service even if code isn't an issue.
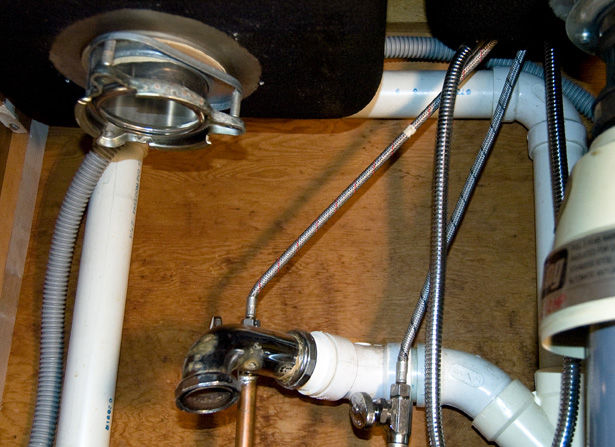
Missed the incorrect wye... should be sani. While you're down there, replace those faucet supply hoses with some that are longer... those are leaks awaiting "the worst possible moment".
Liberty = Freedom from unjust or undue governmental control.
American Heritage Dictionary
Didn't study the photo long enough to catch the horizental run thought both were vertical. But if the horizental ties into the pipe on the leftt shouln't that happen above the flood plane of the sink not below? That is what threw me.Start asking questions about a can of worms and someone is sure to have an opener to open it with. As Hackinatit say replace, extend those lines, what about the faucet, is the sink that good and those counters change them might as well do the cabs. Just a tease but do something with the supply line.Wallyo
Yes the branch vent should be at least... uh, something... some inches above... 6" above the sink... 42" above the floor for margin of safety.... <reading, reading>...
Dangit... that's why I prefer Studor AAVs <G>
Plumbing... gotta love it.Liberty = Freedom from unjust or undue governmental control.
American Heritage Dictionary
This looks like it's an Island or peninsula, and the loop from the drain up, left, down is the vent. You must use the existing drain line.
BIll
Hi Bill,I am not sure what you mean by Island or peninsula, but both of these drains have their own separate roof vents. I have no problem doing as you suggested because it may make my work easier to do, but I'm just puzzled as to why these two drains are configured as they are.Thanks for your help.Phillip
I am not sure what you are talking about.
A picture showing the back left of the underside of the cabinet would help.
It is not clear what happends with the left vertical pipe or the horinzontal pipe under the sink.
You talk about a double drain, each with a vent through the roof. Implying 2 roof penatrations, at least in my mind. The pipe on the right turns over towwards the left pipe so it does not look like it would have a separate vent pipe at that point.
Is this over a basement or crawlspace? If so what do the 2 pipes look like under the floor?
The wye on the right side is not correct, it should be a double sanitary T.
In most cases a the drains from the 2 side (with or without a GD) connect together and then go to a common trap.
BTW, my GD is under the shallow sink and that is where I think that it should be.
You can scrape food into it while the deep sink is full of dishes and water.
.
A-holes. Hey every group has to have one. And I have been elected to be the one. I should make that my tagline.
On an island or peninsula sink you would loop vent ie not through the roof directly behind the sink. I think you are saying your sink is against the wall and the left and right pipe vent through the roof. Is there a laundry or bath under the kitchen, in a basement? If so the left pipe may be a vent for that fixture and for ease they ran it through the cabinet then into wall up to roof and wet venting in this situation is not allowed, I think. But it looks like you have two traps unless local code say else wise, you can put a clean out plug on the right side of the wye, run a arm straight out the disposal into an L that goes up to the basin strainer on one end to the trap on the other. This will give some more under the sink room.Just noticed Bill's post before I finished mine. He makes the point that a wye is not allowed I thought it looked weird but did not know that.
Edited 1/16/2008 2:16 pm ET by wallyo
Bill,Thanks for your comments. I'm going to back up a bit and clear up some points that I failed to address in my original post.First of all, this sink does sit in an island, of sorts. The image below should make that clear. See image 'Kitchen Island'. My apologies for this oversight.Secondly, I dug up an old photo I took of the sink drain system as it originally was before I got started. See image 'Original Kitchen Drain System'.I have tried to show the back left underside as you wanted. All that is there is the vertical pipe connected to the horizontal PVC pipe with an 90 degree elbow. I hope the photo shows that well enough. This connection is simply a loop between the two drains. See image 'Left side of undersink'. I also took another image of the right upperside as well. See 'Right side of undersink'.And as you wanted, I included an image of the two kitchen drain pipes as they exit into the basement. As can be seen they both head towards their respective vent pipes which exit the roof of our bungalow. Why someone chose to install two vert side-by-side makes no sense to me, but that's what we have. See 'Kitchen sink drains to basement'.As to your comment about the Y being incorrect, I always thought that there were waste T's (or Y's) and vent T's. I found a photo in a plumbing book and it seems that the waste T's are really Y's to make them drain better I suppose. The vent T's are at right angles to the vent pipe which is not a problem since only air (hopefully) would pass through this connection. I'm not trying to be a wise arse here, I just want to be clear on what should be done. I took a photo of these T's or Y's from my book for your perusal. See image 'Drain T's'.Now, you have brought up an interesting point when you said that you believe that the food disposal should go under the shallow sink. If this is indeed how it should go then this will make my job a lot easier. What I said was simply what I thought based only on what my experience has been. For sure I am not a professional dishwasher (ha!), but if this is how it should be done then I'll be happy to simply remove the old food disposer and install the new one. If you look at the first image that I posted with my original post you will see a rubber boot between the food disposal and the sink. That boot would make it very difficult to install beneath the deeper sink because the food disposal is a bit over 16-inches in length plus the flex cable exits from the bottom of this particular unit. Because of this, I believed that whomever installed this unit under the shallow sink did so because of the problematic fit that doing so beneath the deeper sink would be. Guess I was wrong about this.Thanks for all your comments.Phillip
A Sanitary tee looks like this see attachment. One pipe is your vent and one pipe your drain it loops together under the sink usually the have four 45 degree ell's attached where you have the two 90'sWallyo
"Now, you have brought up an interesting point when you said that you believe that the food disposal should go under the shallow sink. If this is indeed how it should go then this will make my job a lot easier. What I said was simply what I thought based only on what my experience has been. For sure I am not a professional dishwasher (ha!), but if this is how it should be done then I'll be happy to simply remove the old food disposer and install the new one."That was only my personal opinion and why I liked it that way.I also have a cutting board with a semi circle that opens over the disposal. I looked at Kohler's website a while back and they still make the same model sink, but don't make that cutting board. The one that they make now fits over the big sink. So maybe more people thought like you.If I am nor mistaken the fitting that you have is called a Y-T and with the 45 a Combo.I don't really understand it all either. The combo is used to go from verterical drains into horizontal runs.The sani-tee is to go from horizontal runs into verital drains. Don't know if it is a potential problem in other applications.But in here you have the trap. The problem is the weir point in the Y-T is lower than the trap and can suck it dry. I thinkt that is the reason.Here are a couple of examples of look venting.http://en.wikipedia.org/wiki/Chicago_Loop_(plumbing)
http://www.rd.com/content/openContent.do?contentId=19540http://tinyurl.com/2cqf8k.
.
A-holes. Hey every group has to have one. And I have been elected to be the one. I should make that my tagline.
Can you explain the sani-tee and weir?.
.
A-holes. Hey every group has to have one. And I have been elected to be the one. I should make that my tagline.
Yeah no problem.
I will post it to the OP.
I will also include a pic of an island vent system from the illustrated training manual.
Have to do a search I don't have a scanner on this pc, I know I posted one a couple of years ago.
“We need to be a country of tall fences and wide gates.”
Fred Dalton Thompson
Bill,As usual, you are forever coming up with the good stuff.Since I started looking into this strange drain system, I have since discovered that it is not so strange after all. It really makes good sense and from the link you provided for the 'Chicago Loop', I have learned that that is almost what I have in our bungalow. If you look at the diagram, here:http://tinyurl.com/yr6ll7I have the same thing except I do not have the line that goes from the vent line to the drain (lower horizontal) line. In other words, the right diagonal line is missing in my system. I also saw a diagram very similar to this in an old plumbing book that I have. I puzzled as to why that has to be there because the overhead vent line will prevent an vacuum from developing without this addition line to the drain line. I don't understand why this has to be tied in as it shows. My system works fine without it. I hope I have explained myself clearly enough for you to understand.Thanks for all the help,
Phillip
The reason the "foot" vent ties back into the waste line is for drainage.
if you do not tie it in it traps the line between two high spots.
If water is introduced into that part there would be no where for the water to drain creating a very long trap which would defeat the purpose of the venting system.
From your basement photo , it looks like the loop vent is not tied into the drain at its low point as it should.
How much of the system do you want to correct?
I deal with the UPC which is arguably the most stringent of plumbing codes.
Here is a pic of the text book way to plumb & vent an island sink.
http://forums.taunton.com/n/docs/docDownload.aspx?guid=4EFAD6F4-1E9F-4BD7-A162-4A2CA76B9BD2&webtag=tp-breaktime
The fitting you have that is picking up both traps is a double "wye" what you need to have is a "fixture cross" AKA "partition cross".
A "sanitary cross" does not work (per code) in this application. When using a "san cross" the vertical waste must be 2 pipe sizes larger than the largest side inlet.
The reason you should not use a "wye" branch fitting in the vertical configuration for a trap arm is that the vent take off to vertical is below the bottom of the trap arm pipe. That creates an "S" trap like the glass ones that were made famous by the chemical drain cleaning products on their commercials.
The "S" trap will siphon itself dry after each use. Then you have no "trap seal" & sewer gas will come out of the sink when there is either a negative pressure in the house or a positive pressure in the drain system.
We generally do not use two traps under a sink to pick up both bowls.
We use a " continuois waste" system that has only one trap. A continuous waste system connects one bowl & the other bowl with a tee & the trap would be located under that.
Two most common are end outlet (PIC) & center outlet (PIC) .
They also make a kit that comes directly out of the disposer so you don't have to use the 90 that was supplied with the disposer.
View Image
The "foot vent" also needs a clean out.
Any questions, feel free to ask.
“We need to be a country of tall fences and wide gates.”
Plumbbill,I got a question for you. You say, "We generally do not use two traps under a sink to pick up both bowls." Is there a problem with function using 2 traps, or is it just a matter of being efficient? Thanks for any light you can shed on this.Bill
It's flat out money.
Most cabinets only have a single arm coming into the space & per our code you cannot have two traps on a single trap arm.
I found that one out the hard way when I was a second year apprentice.
We were doing a repipe of a fire damaged apartment complex & came up with a great idea of using a double "wye" that picked up two traps & used the center opening as a cleanout.
It looked great until the inspector came out & called us all numbnuts.
But if your waste pipe is vertical then you can have two traps like the OP has, just piped slightly different.
“We need to be a country of tall fences and wide gates.”
Fred Dalton Thompson
Thanks, that was helpful.Two traps on one trap arm is against the code. I accept that. Could you share, if you know it, what rationale is behind that code provision?Here is why I want to know. Many years ago I had a recurrent problem with my own sink where the disposer and the other sink bowl drained via a baffle tee into a common trap. Baffle tee would plug up often.I fixed it by trapping them separately, two 1.5" traps into a 2" trap arm. It worked perfectly for a decade until I moved, probably still works for the current owners. another plus was that the waste from a stopped disposer did not fly up out of the other sink bowl.If I understand you correctly, the way to make such a solution legal is to have two independent trap arms running back to the vent. Is that right?Bill
Two seperate trap arms to the vent would be the text book.
If you wanted to put a fixture cross in the wall & stub out twice would be perfectly legal as well.
As far as reasoning for the code of two traps on a single trap arm I will have to look into. As I know most of the code's reasoning to the madness they have a few things that just baffle me.
“We need to be a country of tall fences and wide gates.”
Fred Dalton Thompson
Bill,I hope you do not think I was ignoring your astute comments. I was not. In truth, I have been mulling over all that you have said, re-reading my plumbing book, and taking a hard look at what I have to work with to make all of this come together correctly.First of all, last evening I was wondering why the loop vent had to tie back into the drain line. You caught one of my posts and answered that very nicely. Thanks for the clear answer and the diagram on that as well. My system does not have that particular connection, nor does it have the required cleanout fitting. I will make sure to do both of those updates.Back to the double-wye system that I presently have. I have attached a photo from my plumbing book which is what I believe you are referring to. Removing the double wye will simplify my connections and free up some valuable space beneath the sink. If you concur that my attached image is what you were speaking of, I will be grateful. I believe that it is. This matches your attached 'end outlet' image as well.I want to move the food disposal switch to the sink top, so I will be heading back to Lowe's to look for one and all of the other plumbing components that I will be needing. My book did not show that waterproof switch and that has me puzzled. I hope it was an oversight because I have seen and used an above board food disposal switch which I think is very convenient. I will have to drill the hole in the sink to make this happen but that is no problem.I sincerely appreciate all of your knowledgeable comments, attachments and your time as well.Phillip
Phillip,
If I understand correctly, and you want to mount the disposal switch in the countertop, you might take a look at an air-activated switch. There's no power run to the plunger itself, the plunger uses a plastic tube to take air to the switch itself, which can probably stay right where it is now.
I wish I had a manufacturer to name, I used one when the switch failed in my jet tub. They're great for wet locations. Plumbing supply house might be a better source than the electrical supplier. It's a very neat, clean, surface installation.
Greg
Greg,You really pulled my chain on that one. I had completely forgotten that we may have an air activated switch in our jacuzzi/jet tub upstairs as well.I use a air-activated switch to run my router bench so I know that much about these types of switches. Mine is a half-bulb affair that is activated by stepping on it. I will check these out a Lowe's, but if that fails I know of a plumbing supply business that I can get to quite easily. The fact that they have no hot wires that can be compromised is a very good reason to use them for this particular application.Thank you very much for your comments. I really appreciate it.Phillip
Wow, I don't feel like I contribute much at all around here, except for a wise-a$$ comment every now and then that gets a laugh. Glad to be of help !
I learn a whole lot more than I give here at BT.
Greg
PhillipIf you did not find the switch at Lowes H Depot has had them, the last one I got was around thirty. They kept them with the disposals which depending on your HD layout may be on a different asile then the sink traps etc. One HD by me the disposals are by the waterheaters.Wallyo
wallyo,You know after I mentioned Lowe's in the post you are referring to, I should have mentioned HD as well. Both of these stores are close to each other which is good for us. I'll check both out.I appreciate the help. Take care.Phillip
Wallyo,$30? Mine cost $58. They musta been reading this thread and decided to jack up the price just before I got there. No, wait a minute. It's the extra two designer buttons that they included that added the extra cost. My mistake. I got a nice white one and another chrome one along with the stainless one that I'll be using. The other two should look nice on the shelf. Ha.Man, I swear. I went to both and HD and Lowe's. They both had the same exact remote switch (air controlled) made by InSinkerator. HD was $57.95, Lowe's $58. Anyway, the boss will hopefully give a a few atta boys for making this install. Take care
I said the last time, should of said two years ago, sorry. Price went up a bit, Huh.
They are slick though for when you have power but no switch. The 58 is a cheap electrican.
Wallyo
Edited 1/18/2008 3:56 pm ET by wallyo
You said all the right things. I feel much better now. I'm laughing when I say that If I had gotten paid for all the work I've done to this house, I'd be rolling in the dough, but actual work vs DIYing it can't be as much fun. Or on occasions, as frustrating as when the help you get at the big hardware houses is non-existant. But, that just makes these projects so rewarding in that you learn as you go and don't have to pay someone to make mistakes. Not, of course, that I have ever made any myself. Ha!And yeah, the $58 is a cheap electrican. Take care and thanks for the help.
I see you picked up an air switch, that takes care of that issue.
The pic from your book is almost correct.
Problem with the picture are as follows.
1. The trap is actually backwards, the tall part of the trap receives the vertical tail piece, not the trap arm.
2. The side inlet of the end outlet continuous waste is below the trap arm creating a very long & large trap.
When you assemble your system you want to make sure that the disposer pipe is clearly above the trap arm.
If the clearance is too tight you can remove the disposer's flanged 90 degree fitting & replace with a flanged tailpiece----- they are the same connection.
Edited 1/18/2008 8:04 pm ET by plumbbill
Thanks for getting back to me. On a previous page of this same book, I did notice the same trap-continuous waste T connection was different and just as you said, they reversed the trap on the image that I attached, but they had it right in the previous image. And, by installing the trap correctly, your second concern takes care of itself, in that the disposer pipe will be clearly above the trap arm. Thanks for noting that distinction and making it crystal clear.And yes, I do know that I can eliminate the 90-degree disposal connection and replace it will a straight flanged tail piece section. I looked at that option, but think I will have more than enough room to use the original 90-degree piece that came with the disposal.I'll know more tomorrow what my clearances will be. The PVC drain and vent loop currently are all Schedule 40 1-1/2 inch components. I have everything I will need to replace the double-wye setup and convert it to a single trap system as the photo shows. Once I remove the double-wye, I will measure and assemble all of my new components and then assemble the new vent and drain system to match.I will keep you posted. Again, I cannot thank you enough for all of your help.Phillip
Any time.
Bill,Here are the results of all the hard work.The double wye-T has been replaced by a single p-trap. There was a lot of PVC measuring, and re-measuring, then cutting with fingers crossed. Lots of math to make sure it would all come out right. And it did. Cutting the hole for the disposal switch in the SS sink was not much fun either. But that too is done. The sink also took a lot of scrubbing to bring back some of its lustre. Made a big difference as well.Plumbing is not a piece of cake by any stretch. At any rate, the wife is ecstatic with the results. Now on to the next project.Again, thanks for all your help.Phillip
Looks much better Phillip, that air switch is real handy, just keep an eye on that streched supply line.Wallyo
I'm glad you mentioned the stretched faucet hoses. My apologies, but someone made this point earlier in this thread and I'm not sure if it was you or not. Point being that I did make adjustments to correct this potential problem. Although it is not obvious by looking at my last images, both hoses are limp and not taunt as they appear to be. I had to make my own support brackets from plumbers tape to pull them both up a bit higher that they originally were. This was done from below in the basement. In all of this, I also learned why the right-handed sink was blowing back when the stopper was removed to drain the sink. Someone previously had by-passed the vent line connection with the vent loop and tied it directly into the drain line. I reconnected this as it had been originally and now the water does not spew out giving you a shower in the process. That's a slight exaggeration, but that sink drains normally now as it should without any blowback.IMHO, plumbing ain't much fun, at least not in this case because I had to cut into both the drain and vent lines of my system to make it right. Cutting was the easy part, putting it all back together was the major issue. You've got to think the whole thing through - end to end - before you even make your first cut, and you'd better be able to put it back together correctly or you'll end up calling a real plumber to fix your mess. These are rigid connections you are making, so there's very little flexibility and practically no room for error. I learned a lot and did what I had to do, but my project was not much fun. I had to have help from my neighbor once because the glue up was in the sink cabinet and I had to push the PVC up from below in the basement. No way I could do that by myself. At any rate I'm very glad this project is over with. Funny (now, that is), but this all began by simply wanting to replace the non-operative food disposal and it turned into a very major project. Total cost: $130 plus some gasoline. The food disposal was free. It was brand-new-still-in-box and snatched from my neighbor's garage sale. The major cost was the above sink disposal switch. $60.That's my story. Thanks for the comments and the thumbs up.Phillip
Not a major problem just a mistake a lot of DIY's make in supporting copper pipe is that they don't use a copper or plastic supports, they use galzinized steel, which in theory at some point sometime could eat through the copper pipe, you don't want this to happen when you are away at your other house. So if you did that change it out TODAY man, right now, get in your truck and get to the store!All kidding aside not a major issue have never seen it actually happen. If you did use galvinized you could insulate between the two with a bit of rubber wraped around the pipe.Good Job I like it when people post the results of their work after and all the advice is given.Wallyo
Here I go again not filling in all the blanks as I was taught to do. Keen-eyed guys such as yourself and others, will always take a guy to task for failing to do the obvious and correct thing in completing a good DIY job. However, I did do the right thing, in this case. I just didn't clarify that point, thus leaving you with no choice but to point out the potential problem just as you did about the faucet hoses. My bad.The hot water line has always been covered with a tubular foam strip made for that purpose. The cold water line is not insulated. I did have, however, the good sense to wrap both lines - where the galvanized tape contacts each line - with several wraps of that stretchy, rubber tape that most electrician's do not use today. So, just as you so astutely pointed out, I did this to protect each line from potential damage due to the contact with the galvanize tape. I knew that there was not likely to be much, if any, vibration to even remotely cause any damage, but regardless, I opted to tape each line just as an extra protective measure that cost less than nothing and about 2 minutes to complete.Thanks for pointing that out, but this time I did have my bases covered.Phillip
Just wanted to be sure you didn't over look it, like I said I have never seen damage done by it on pipes just have heard that it could happen. I have watched this old house where copper flashing was ruined by steel nails.Just did not want you to run into a situation like my sisters neighbors. With out going into too much detail in Boise we have geothermal heat from hot springs. The water is piped under the sheets to the houses with the service. It enters at about 190 degrees. They went on vacation a pipe burst and came back to a full basement of hot water no boiler to of burned out, just kept pouring hot water endlessly. Not that you would of had that problem but they had to completely gut all three floors to the framing. Been redoing it for a year.acidents happenGood job Wallyo
I appreciate your diligence in pointing that out. IMHO, if a guy is gonna ask for advice in this forum, he'd better be able to walk the walk and do what supposed to be done and not whine about it. Else, why ask for advice to begin with. As I mentioned earlier, my original goal was to simply replace the food disposal, buy in so doing, I puzzled over what I thought was a double drain system and everyone quickly educated me on island venting systems, double wye-T's, and so on. In short, all of this turned into a major project, as far as I was concerned anyway. But in my heart, I knew that those who made comments about the mechanics of what needed to be done knew what they were talking about. As to which side the disposal should go on is/was strictly a personal issue based on their own preferences. So, if I was going to do this correctly, I had no choice but to take the advice to heart and make changes to all the affected plumbing. But, it's a done deal now, and I can't help but smile every time I walk into the kitchen. And, for that I have to say 'Thank You' to all of you who helped me git 'er done.As to your sister's neighbors home, whenever we will be gone overnight, I always turn off the water main valve in the basement just in case the water heater decides to go out. Forty gallons is a lot less than the water running for days on end. That would indeed be a mess. All of my wood working tools and wood inventory would probably be lost. What a mess that would be. As always, I appreciate the help and comments. Have a good evening,
Phillip
Nice job.
Atleast it wasn't a cast iron sink you had to add a hole in that is a real PITA.
In search of a new tagline, don't worry I'm sure I'll find one that will bother somebody. ;-þ
I know I'm jumping in kind of late, but here in stl mo the inspectors require that the disposal be connected directly into the top of the 1 1/2" tubular t just above the trap, and that the other sink connects to the tubular extension arm with a 2 bowl sink; just the opposite from what the sketch shows.
I believe the reason is that there is a possibility of clogging in the horizontal tubular arm if the disposal does not grind up everything or if the HO does not flush enough water down the drain when grinding. They want the shorter run from disposer to trap for the best scouring action.
sully
I've heard of that being a requirement in some locations, but haven't seen it in person.
In search of a new tagline, don't worry I'm sure I'll find one that will bother somebody. ;-þ