Parge coat fails – need suggestions
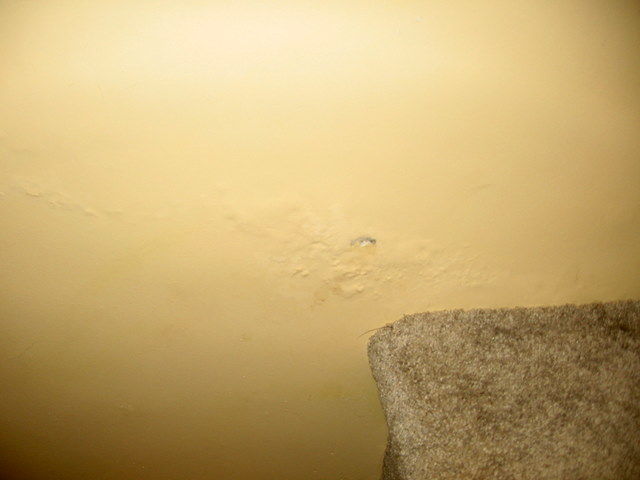
This basement staircase wall is constructed perhaps of brick with a cement-like coat over it, and had an uneven surface. When we refinished the basement this year I put a series of parge coats of Flex-All (premixed all purpose patch) to even out the surface, primed and painted it. After about 3 months the paint bubbled in a linear patch in one section. I thought it might be due to water in the wall, but the wall is an interior wall, separating two conditioned spaces and there is no source for water in that wall. The other side of the wall looks just fine. I slit open one of the bubbles and there is no water there at present, but the Flex-All has turned to powder. I’m at a loss to understand what’s happening and how to fix it. I would appreciate any suggestions. My thought is to use an abrasive grinder to get back down to the cement, apply a waterproofing concrete patch, then more Flex-all, but this is just a guess. See picture.
A bit more background: The house is about 110 years old and the foundation is brick with a cement-like coat over it. This basement staircase wall would have originally been an exterior wall with an exterior staircase on the exterior wall. This exterior staircase well is now enclosed, leaving this wall to separate two conditioned spaces. My best guess is the wall is probably brick with a cement coating . The staircase is far too narrow for solutions that would substantially thicken the wall.


Replies
just a guess is that the wall was parged with a lime puddy and you topped it with a portland based product or a plaster based product... and they didn't like each other... I don't know the pecking order but i know many plaster/lime/portland products will not mix..
p
You have described a problem I am attempting to resolve at a customers house.
This house was also brick foundation and brick facade over frame which was stuccoed in part in the 1940's and restuccoed fully in the '70's.
I described this problem to this forum a few years ago but there were no definitive solutions.
What is interesting is that only the finish coat of the stucco is affected, turning to dry sand under the paint, except for a couple of areas where the original mortar between the bricks was so compromised that I could scrape it out with my fingers. The scratch and brown coat(s) are still intact.
After much scraping and repair back then, April of 2002, the original problems have reoccurred.
It is my belief that buildings with brick foundations cannot be stuccoed over and painted or parged and covered with the EIFS finishing material without a complex ventilation system allowing moisture wicking up from the foundation to be released.
What leads me to this conclusion is that the brick facade portion is unaffected with the ground moisture able to dissipate into the air space while the columns and walls that are multi-wythe brick from the foundation up are crumbling because the brick is sealed in on all sides.
This might be what you have in the wall area you described.
My next step is to once again chip away at the damaged areas but this time cut into a transition area where an original solid water table covered the brick foundation and meets the applied stucco. My plan is to put some form of a weep screed in that area and make it part of the water table design. In order to allow the climbing moisture to escape from the wall I'll extend this cut completely through the layers of stucco to the brick and insert a strip of vent material, such as the woven mesh in Coravent, and disguise it with the weep screed.
If my calculations are correct, this should allow rising ground moisture to dissipate to the air and prevent future deteriorization of all the stucco.
Several posters have asked if it would be ok to stucco directly over brick and have received affirmative answers. Just slather it on in the traditional 2-3 coat method. I think this would work IF the other side of the wall could breath.
In our cases, I think we are attempting to seal in rising moisture and it's not going to happen without the consequences we have seen.
I can't get to the repairs necessary on my job for quite a while but since yours is rather small, why don't you give a vent system like I decribed a try. Use a grinder to cut a horizontal slot low in the wall, all the way in to the brick, disguise it as some kind of vented trim, fix the delaminated section and report back the results.
Hope this has helped.
Ralph
Also, there is a way to put in a damp-proof course by drilling and injecting sealant. I did a search on "damp proof course" (in quotes to match the phrase exactly), and, eg, this site came up: http://www.diydoctor.org.uk/projects/dpc.htm.
Check out this one for a somewhat opposing view of injectable sealants.
I'm inclined to believe that ventilation, especially after the fact, is the way to go.
http://www.buildingconservation.com/articles/risingdamp/risingdamp.htm
I agree it seems like a last resort. That article is more in line with what I've done - ventilate and space the drywall out and up (the original remodeller screwed up that last part pretty badly).On the original question, would lime plaster work? I understand that it's essentially mold-proof, and you could leave it unpainted to dissipate the moisture and avoid bubbles. I was thinking of that for some of my problem walls, but I've never tried it.
Here ya go...
http://www.vcrestorations.co.uk/intro.htm
The proof is in the pudding, as they say...
These guys answer your question.
Thanks for all your contributions. It appears from the posts that the problem is moisture that is not dissipating. <!----><!----><!---->
Several asked about surface preparation: I think the wall is brick with a top coat (though unclear whether lime plaster or a cement product). I used a grinder to remove many layers of paint then applied multiple layers of Flexall (all purpose filler) to even out the surface up to a half inch in depth variation, sanded, primed and painted with latex paint. The opposite side of the wall is in a conditioned storage area, and I also painted that surface, and based on the posts, this may have contributed to the problem by locking moisture in the wall. Do you think it is worth removing the paint from the side of the wall in the storage alcove?<!----><!---->
I need some details on the suggestions for a horizontal vent system. This is what I’m thinking. Use a grinder to waste a strip about a half inch wide below the delaminated section. Insert a wood strip in the strip flush with the wall. Would latex paint on the wood strip allow moisture to escape from a wood strip? Is there another material I should use instead of wood? It would probably be wise to also install a vent on the opposite side of the wall in the storage alcove. <!----><!---->
As mentioned the staircase is very narrow and solutions involving a suspended gypsum wall will make the staircase too narrow to be unusable.<!----><!---->
Finally, I have a couple other unfinished basement rooms where the parge coat has failed and that need to be repaired. I had intended to cover these with cement patch product and then cover with latex paint. From the posts this sounds unwise if the cement or latex would not permit drying. Can anyone suggest a product and a color solution? Pictures attached.<!----><!---->
According to the renovators website the moisture rarely goes above 3-4 feet where it starts to delaminate the parging.
My plan is to cut a dado into the wall parging to the original brick as low in the wall as possible, install a thin strip of course plastic mesh that I will cut from left over Coravent ridge vent material and cover that with a vented plastic weep screed material. That should provide the start of the ventilation process and keep the bug from finding an attractive nesting place.
You mentioned a wood strip, much like the grounds used in plaster work. I think I prefer an air space strip as mentioned above to assure a real ventilation path.
From that point I will clean up the failed parging back to sound material and begin reparging and finishing.
I will also treat this as you would a wooden column with another ventilation strip as high on the wall as possible, thus providing a through passage for any moisture that continues to rise. Overkill maybe but since I have to refinish the whole wall it's not a big thing.
There was a section of wall on my job that had originally been an exterior porch, had been enclosed as part of a hospital foyer and stuccoed directly over the brick. When the hospital was dismantled and the old structure restored to its original single family home status the new owners added a second layer of stucco to this wall and then stuccoed the whole house, which was previously a wonderful flemish bond brick.
When I repaired this double stuccoed wall portion I was able to pry the entire wall off the brick with my hands and with a fingernail could dig out the mortar between the bricks. That's how bad the damage was due to the moisture trapped in the wall. Even though I tried to get the stucco off ALL the original brick and restore the home to its original facade I couldn't because the process damaged the brick beyond salvage.
I used Densglas gold over the brick, using the original mortar lines as the air space and left a ventilation strip open at the bottom and the top. I used a cementious base coat as used under EIFS to topcoat the Densglas and then a sanded local topcoat product similar to Dryvit to match the stucco texture on the rest of the house.
This fix has worked. My failure points are similar to yours where the original stucco could not be removed and there was no room for a vented overlay. My mistake was in not thinking through the ventilation needs of impervious paint covered stucco over brick and not finding the reasons through research that I have now.
This house also has a basement, which is unusual for the location, (JAX, FL) with parged walls. This parging is also failing and shows signs of moisture damage and much efflorescence. There is really no way I can see to remediate the water intrusion/hydrostatic pressure from the inside and expect any new parging to hold up.
I don't really have experience with basements so others will have to chime in. I would probably overlay this wall, providing for a ventilated airspace behind and go from there. I think Calvin and a few others have spoken about this in the past. I'd like to hear their views again.
I've had similar problems with an old concrete foundation. What I did was chip off the plaster and hang drywall down almost to the floor with a small airspace behind it. I left the bottom open because it was in a storage area, but I suppose a wall vent would work too.
Looking around at the library I found an old British book about "Rising Damp". It gives some good principles to go by, such as not sealing moisture in from the sides, because then it will wick up even higher, and using vents, etc. to regulate the evaporation. Their philosophy seems to be to embrace porous materials like drywall because they allow moderate amounts of water vapor to disperse, but to leave an air gap or otherwise isolate it from capillary action against the damp foundation. I can't remember everything they advised, but it was a good read when I was wondering why some parts of my wall were turning to mush.
Another tip I remember is that high-cement mixes like 1:1 sand mix have much lower porosity and wicking rates. I used that mix to fill in a few problem areas behind a tile baseboard, where moisture was coming in from all directions (foundation, shower, etc.).
It does look like a mpoisture/bonding problem. You don't say much about what you did or whether you did anything to clean and seal to prep the wall
Welcome to the
Taunton University of Knowledge FHB Campus at Breaktime.
where ...
Excellence is its own reward!
whether you did anything to clean and seal to prep the wall
My thoughts as well
Beer was created so carpenters wouldn't rule the world.