Patio cover attachment through brick veneer
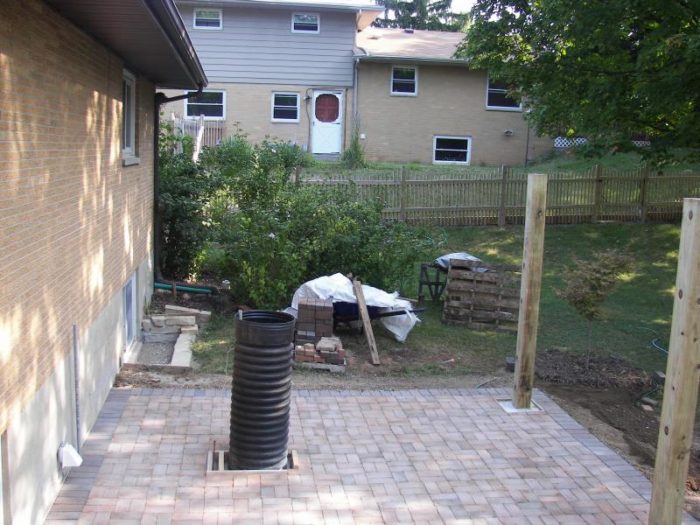
Our house is brick veneer over standard 2×4 construction. I want to add a small (14′ x 12′) patio cover over a nerwly installed paver patio. 6×6 posts at the corners and a ledger board along the house supporting the top of the simple shed roof.
I discussed the idea with an inspector at our county Building Regulation department, he said it would fine to use 1/2″ lag screws to attach the ledger board into each stud (16″ OC) through the brick veneer. I drew up the plans that way, and they were approved.
Now I’m having second thoughts. The inspector who looked at the pier holes sure didn’t like the idea of using the lag screws. His logic is sound: The screws are cantilevered through the 1″ air gap and the 4 inches of brick, plus the 1 1/2″ ledger board. That’s a lot of bending load, and if/when the screws bend they’ll be resting on the (non-structural) brick. Plus–how can you tighten up the bolts without risk of cracking the brick?
Other info:
Required snow load is 20 lbs/sf.
The ledger board will be 24″ below a 24″ roof overhang, so it probably won’t see much water.
The two posts are embedded in 12″ diameter concrete piers that go down 32″ (our frost line). I’m counting on these to provide a lot of resistance to racking and other movement.
Questions:
1) Should I stop worrying and just build the patio cover using the lag screws into the studs as approved by the county engineers?
2) If the lag screws aren’t a good idea, what would you do? I’d sure hate to tear up my newly-laid pavers to install two new posts near the house–but I could do it. Easier–there is 20 inches of exposed concrete block basement, and I’ve got easy access to the back side. Maybe posts on the outside bolted through this foundation?
(Disregard the large black vertical pipe in the photo. It provides access to a deep external sump pit and will be trimmed down to the height of the pavers and covered soon)
Thanks for any input or suggestions, even snide remarks.


Replies
Are you set on your high side elevation?
Any chance you could raise the high side so the rafters set on the top plate of your wall> A good roofer could tie it together and you would have more pitch to clear snow and rain, new gutter configuration too. Just a thought
Your yard looks swell
Jim
Structurally, that would work great.
I'm going to go look at this in the light tomorrow, maybe your idea would be a better approach. In the early stages I'd rejected the idea of extending the present roof on the house because it was so high up there, and because I wanted a simple (that is, inexpensive) project that I could handle myself. Modifying the sofiits, attaching to the existing rafters, and extending the roof decking and shingles so it looks like the original sounds like a tall order. But, maybe it's not as hard ($$) as I figured and maybe it would look okay or even better.
One downside: We enjoy the view out of several of the windows to the back yard (we've got lots of birds and chipmunks). A higher roof over the patio with a steeper pitch would block some of those sightlines.
Thanks for the idea and for the comments on the back yard. You can't see much in the picture, but my wife has made a lot of headway in getting the place shaped up.
If it's standard brick veneer with masonry mortar and a brick ledge supporting everything at the bottom, etc, then it is already supporting a massive amount of weight, and a little more won't hurt. You want the bolts to somehow bear on the brick, though there should be rigid spacers (eg, pieces of pipe) that prevents the brick from being moved laterally by the force of the bolts.
The spacers/bushings take the lateral load
Right, it's standard brick veneer (circa 1959).
Yes, I see where you're going. The sleeve/bushing/whatrever around the lag screw is what I'd be tightening against. (until the ledger board just touches the brick).
While the roof is small, under full rated load each lag would be asked to support over 800 pounds (which already accounts for the weight supported by the freestanding posts). That's a lot of weight. I sure whish I could find a code page, construction detail, or an engineer's drawing that details the types of materials and expected bearing capacity for this attachment method. Still, I'm sure it must be possible. Those guys installing aluminum patio covers of this size aren't puting posts next to the house, and their products have to carry the same snow load .
Thanks for the input.
Even without bearing on the brick, the larger the bushing the more weight it can support. The lags are in pure tension. Have the bushing bear downward on the brick and the weight it can support is pretty much unlimited (or at least more than you'd ever need).
Did you ever say where you live? How much is snow load an issue?
In southern Ohio
We're in southern Ohio and we design for 20 PSF snow load.
I'm hoping my bricks will survive the drilling of the holes. The house was built in 1959 and the bricks are "Roman" size: 1 1/2" H x 12" w x 4" d. wide (12"). After I drill a hole of any significant size in a brick that's only 1 1/2" high, there ain't much left!
Thanks.
I guess I'd start by having a tendency to not tie it into the house structurally (or physically). I guess I always want to avoid tying into the house to avoid any 'issues' that might arise from doing so ... decks the same way.
I tend to agree about 1/2" lags being puny. Maybe go to 5/8" lags? I also tend to agree that you tighten lags agains brick w/ an air space behind it may mean you end up w/ problems. But I'm no expert on working with a brick veneer like this.
Also doesn't sound like the BO is too sure of himself. You could set more posts 1-2 ft out from the wall ... but that may not sit well w/ your plans. You could use two posts instead of 4 by desiging the upper beam for the load. Several options exist for that solution (solid wood beam, wood and cable, and steel come to mind).
Or you could hope your posts can carry a cantilever roof load and not need anything ... but you probably didn't plan for that :) That was my token snide comment.
Yep, I can see the advantage of a standalone structure--now in retrospect (as usual!).
Or, cantilever everything off the two outide posts using Kevlar cables, a king post,, and about 20 hours of mainframe computer time to figure out what would happen in the wind. Hmm-- "How my $1500 patio cover ended up at $50,000 and became the talk of the town."
Use double bolts on each stud.
I'd use two bolts per stud, with compression sleeves. I'd recommend that the ledger be at least a 2X8, so that you can come in 1-1/2-inches from the sides, and still have 4-inches between the centers. For sleaves use 1-inch steel pipe.
This keeps the load off the brick, and shouldn't sag.
Do you mean drill holes big enough for the sleaves to go through the brick to the sheathing? Seems like a good idea to me.
All the way to the studs
The sleaves need to pentrate all the way in to where the load bears on the studs. If the sheathing is in good shape that will work fine. Essentially what you are making is two small beams out of the sleeves that hold the moment and wont sag, while the bolt carries the shear load. Ideally, the bolt is at the top of the sleeve and carries the tension, the bottom of the sleeve is in compression.
The sheathing is Celotex (fiberboard), so I'll go all the way tot he studs with the sleeves.
I like the idea of the two rows of support.. This way any overall bending moment on the ledger (viewed from the side) is resisted by the lower set of supports in compression and the upper set in tension. I'm thinking I can obtain a similar result by using a single lag bolt and sleave per stud, but staggering them (high-low). I want to assure I maintain the structural integrity of these studs, and a single 1/2" lag will do less damage than two of them per stud. They'll be sunk 2 1/2" Could I get the same result by using just one lag-and-sleave per stud, but staggering them?
I would go to two smaller lag screws
If you go to two smaller lag screws you should be fine. The half inch will give a shear area of roughly 0.196 square inches. you can equal that with two 3/8-inch lag screws. The other option would be to stay with the 1/2 inch in the top where it will see the most tension, and then drop down to a 1/4-inch lag screw in the bottom sleeve, where the sleeve will carry the compression, and the shear is already being carried by the 1/2-inch above it.
Thanks to all--decided to go with a freestanding cover
Thanks to all who chimed in. After trying to attach the framing to the house, I decided it would be easier and more foolproof to just add two more posts and go the freestanding route (as suggested by clewless1)
As is often the case, the difference between "on paper" and "in practice" became very apparent right away. It turns out my studs aren't precisely at 16" centers, so I had to drill lots of test holes to exactly locate each one. Then, when drilling through the veneer I had several cases where the brick chunks broke loose at the back, getting wedged in the air gap. It's lots of "fun" to try to clear these out with the hammer drill, as they lock up the bit and remind your (repeatedly) of the large available torque these units produce. Then, I would have had to drill out the Celotex sheathing to get to the studs, and insert the pipe (sleeve), which would have to be just the right length to be slightly proud of the brick. Now what? Do I drill the pilot holes in the studs for the lag bolts? If so, how do I assure the holes for these same lag bolts are in the precisely right spot in the ledger board? And I'd have to do this 18 times. . .
In the end, puting in two new posts seemed faster and more likely to result in a satisfactrory structure. I'm sure a lot of folks could have fastened through the veneer without incident, but my skill level just wouldn't let me do it in a way I felt was proper.
I had to take some time off, but I notched all four posts for the beams today, and the rest will go up shortly.
Thanks again
thnk of all this extra work
You could build a regular reverse A or hip matching the details of your house and not deal with this. Shed roofs always look like cheap unplanned additions and imo devalue the house. Raise it up and spend the money.