FHB Logo Facebook LinkedIn Email Pinterest Twitter X Instagram Tiktok YouTube Plus Icon Close Icon Navigation Search Icon Navigation Search Icon Arrow Down Icon Video Guide Icon Article Guide Icon Modal Close Icon Guide Search Icon Skip to content
Subscribe
Log In
  • How-To
  • Design
  • Tools & Materials
  • Restoration
  • Videos
  • Blogs
  • Forum
  • Magazine
  • Members
  • FHB House
  • Podcast
Log In

Discussion Forum

Discussion Forum

Pergola Design (2)

Jak2 | Posted in Construction Techniques on July 4, 2014 08:43am

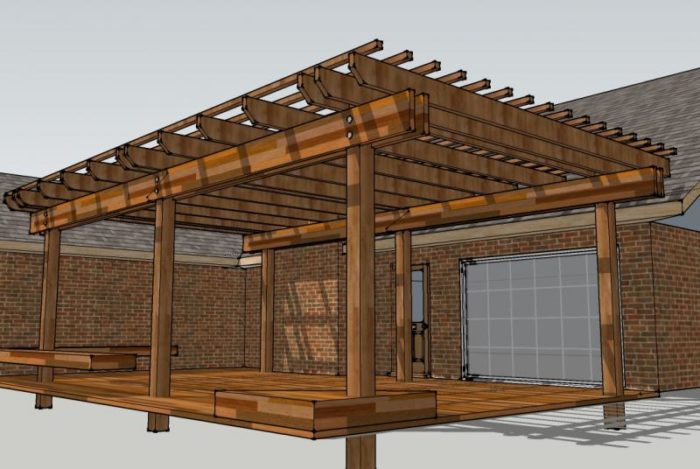
I’m getting closer to actual construction of this Cedar pergola, thanks to the forums responses.

Attached is the latest design image.

My questions are:

1)  Post Notching:  Do I really need to notch the 6×6 post 1″ on each side so the 2×12 (or possiblily 2×10) Beams have a resting spot?  My thoughts are the load from the 2×8 joist (or possibily 2×6) and rafters above the beam are that heavy compared to a fully covered roof.  And I’m thinking by notching the post, this leaves an area where moisture can reside which may lead to premature wood rotting.  Your thoughts?

2) Beam Size:  I’ve shown 2×12 beams on each side of the post, but thinking 2×10’s would be sufficient, again as the load above is rather light.   The distance between each post is 11’.  I’ve even had some recommendations that 2×8 beams would be sufficient for an open Pergola such as this.  What is the reccomended beam size for 11’ span between post for an open Pergola style such as this, using cedar?

3) Joist size:  Similar to be beam size question, I’ve shown 2×8 joists spanning from beam to beam.  The distance is 12’.  Would 2×6’s be sufficient or should I stick with 2×8’s?.  Above the joists I plan on having 2×2 rafters. 
Reply
  • X
  • facebook
  • linkedin
  • pinterest
  • email
  • add to favorites Log in or Sign up to save your favorite articles

Replies

  1. User avater
    deadnuts | Jul 04, 2014 10:19am | #1

    I like your thinking

    I like the way you're thinking on the detail. I won't speak to your structural aspects of your spans because that is something you should work out with a qualified engineer, but I can give you some advice on question #1.

    It probably won't matter too much in terms of the longevity of your open air pergola, but if you want to maximize the life of any wood outdoors, you need keep two things in mind:

    1. protect wood fibers from wicking miosture; particularly end grain where it is absorbed most readily.

    2. shed water as best you can and allow wood to dry.

    There are a myriad of ways and opinions on how to do this. It depends on how passionate you are (and how much time & money you have) for waging war against the natural elements.

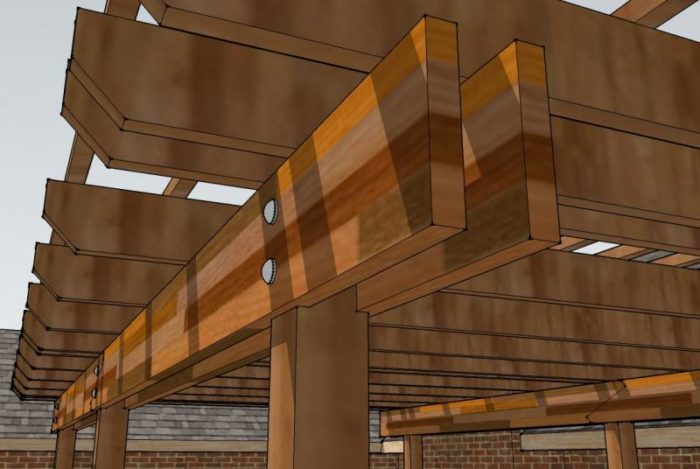
    I have constructed some clear western red cedar pergolas with some similar details. I had to attach some beams with no visible hangers which presented the problem of capping shallow mortises for bolts and still maintain structural integrity. Some mentioned that's hard to do; and they're right.  Here's one way to handle it.

    I also notched my 6x6 posts 3/4" to accept part of the beam. I used Smith clear epoxy sealer on all end grain and Eterna Bond taped the end grain of posts. If I had the time and inclination to do it again, I just thought of some additional details I might incorporate: sloping cut details in sketch included here. Tie slope cuts would still bear some of the wieght of the beams.(bolts would work harder with additional thrust; but they can handle it if designed properly) and if they were cut at a 15-20 degree angle will allow shedding of bulk water ( particularly with epoxied end grain sealed). However, those slope cuts add complexity to the assembly and additional cost ot my customer; but you may not have those restrictions. One has to guage their approach accordingly.

  2. sapwood | Jul 04, 2014 12:05pm | #2

    1. Post notching: The loads from this non-roof are really pretty minor so simply through bolting is probably OK. (I say probably because I've not done any calculations, nor will I do calcs. This is an educated guess based on many years as an engineer and builder of stuff.) But, I would cut the notches  because it makes the structure look better... gives it some visually structural integrity. I wouldn't worry about the wetting of the end grain. The top of the post is also exposed. You could minimize this by adding a bit of peel & stick to the notch. The top of the post could receive a copper cap. 

    2. Any of the beam sizes you mention are going to be adequate to keep the structure from falling down. I think you could use all 2x4's and it would not fall down. It'd sag like crazy though. I would size the members for their visual integrity... make it look good. That means having proper size relationships among all the structural members. This is totally a subjective thing. You get to decide. 

    3. Joist size: see #2

    Not asked this time: You are still showing the scarf as running the wrong way. What you show will probably still work since its all gravity loads and these are supported by the notches and bolts. But you might as well not slope the cut because this adds nothing. Do a simple half lap thing. That is, make the longitudinal cut horizontal, not sloped. 

    1. User avater
      deadnuts | Jul 04, 2014 01:24pm | #3

      I don't find anything wrong with the proposed scarf joint for this project. You've provided bearing for both timbers (wave type moments are not an issue here) and given nice structural continuity to the beam members (particularly if glued up).

      If you are going to make the scarf joint and glue it  (cedar epoxies nicely-but clean wood with acetone) the tranditional lenght of the scarf is commonly recommended to be 8-12 x's the thickness. So for a 2x beam, that would be about 15-16" long. Your's appear shorter than this. I would also counter bore and lag together at the thinner ends during glue up...then plug it.

      1. sapwood | Jul 04, 2014 05:26pm | #5

        My point is... If we're going to call the joint he drew a scarf, then the thickness must be taken to be 11.25" (for a 2x12). Then at 8 to 12 times the thickness his scarf length would be 90 to 135". This would be, of course, crazy to do. If the scarf isn't done in this manner (this length) then there will be way too much end grain in the joint and the glue would fail. Even an epoxy joint would not be structurally sound.

        The reality is that a scarf isn't needed since there is a support post at the joint. This post will take all the load thus making "nice structural continuity" (whatever that is) unnecessary.  The other reality is that this is a pergola not a roof. The weight/loading is chump change. One could use nails to keep it all together.

        1. DanH | Jul 04, 2014 06:02pm | #6

          But the knee braces are needed, assuming any sort of wind exposure.

          1. User avater
            deadnuts | Jul 05, 2014 02:29am | #8

            Presumptive ignorance

            Of course there is wind exposure. Do you know of anywhere we live that there isn't? You don't know whether the knee braces are needed or not. That is presumptive ignorance. The O.P. hasn't discussed the post connection to the ground. It could be the moment involved with the post connection to the ground (as a cantilever) is sufficient w/o knee braces. There are also (apparently) built in benches. These can create an opportunity to introduce a structural moment connection between the post, bench, and deck surface that can also additionally brace the cantilever.

          2. sapwood | Jul 05, 2014 11:49am | #9

            Knee braces are not necessarily needed and they would fundamentally change the visual presence of the structure.* However the OP ought to consider lateral bracing of some sort. 

        2. User avater
          deadnuts | Jul 05, 2014 02:16am | #7

          Here's my definition

          By strucural continuity I am mean that, with a properly constructed scarf joint, the beam can be act as continuous structural section in a multi-span condition (vs. simple span). This would introduce negative moments in the beam over the posts and assist with limiting deflection. BTW, deflection will exist whether we load the beam with a roof; or not. The OP talked about not being settled on 2x12's, but rather 2x10's or 2x8's. In that case the structural continuity would help achieve structural effeciency to a greater degree. Perhaps 8-12 x's the thickness (meaning 1.5") is not the correct rule of thumb for the scarf length, but eight or so feet is not it either. Hopefully someone more knowledgable on this type of joinery can weigh in on what a correct rule of thumb is for thickness and width of certain lumber sections (like 2x12 or 2x10's).

          To your point on when a scarf joint is needed or not: Of course the posts will take "all the load". What else would carry them to the ground? The family pet? Anyhow, that is beside the point of choosing whether to use a scarf joint or a broken butt joint. Iit the fabricator's choice. I happen to think there are legitimater reasons to utilitze it...and have pointed them out.

          Also, we don't always have to limit ourselves to building detail that just "keep(s) it all together". Sometimes there is value (to some folks) in expressing elegant joinery, a recognition of weathering elements, and balance in architecture. I recognize that you may not get that value.

  3. User avater
    Mike_Mahan | Jul 04, 2014 01:43pm | #4

    Knee braces

    You need to consider adding knee braces. This could easily rack.

  4. Jak2 | Jul 06, 2014 10:35pm | #10

    New Pergola Design

    After lots of research, the design has changed.

    The beams are now 2x8's, running perpendicular from the house. The span between the post with the double 2x8 beams are longer (13') than the other direction (11'), so figure the larger boards should span the longer distance.

    The joists are still 2x6 and now spanning the shorter distance of 11'.  Separate 2x6 boards meet at the center post, butted together.  Those meeting at the post are bolted thru the 6x6 post.  This forms some support to racking, but I do plan on adding knee braces (not shown yet).

    All 6 posts are attached to concrete using Simpson ABA66RZ metal post bases.

    Appreciate any feedback on this latest Pergola design.

    1. ewmyers | Jul 11, 2020 05:36pm | #11

      Hi Jak2, did you end up building this? If so, could you share some pictures of how it came out? I am working out similar design issues for mine, which is 12'x20' compared to your 13'x22', and I would love to hear what you think you got right or would do differently after finishing yours.
      Thanks

Log in or create an account to post a comment.

Sign up Log in

Become a member and get full access to FineHomebuilding.com

Video Shorts

Categories

  • Business
  • Code Questions
  • Construction Techniques
  • Energy, Heating & Insulation
  • General Discussion
  • Help/Work Wanted
  • Photo Gallery
  • Reader Classified
  • Tools for Home Building

Discussion Forum

Recent Posts and Replies

  • |
  • |
  • |
  • |
  • |
  • |
View More Create Post

Up Next

Video Shorts

Featured Story

FHB Podcast Segment: Hand Tool Sharpening Tips

Learn how the pros keep their hand tools sharp without breaking the bank.

Featured Video

A Modern California Home Wrapped in Rockwool Insulation for Energy Efficiency and Fire Resistance

The designer and builder of the 2018 Fine Homebuilding House detail why they chose mineral-wool batts and high-density boards for all of their insulation needs.

Related Stories

  • Podcast Episode 690: Sharpening, Wires Behind Baseboard, and Fixing Shingle Panels
  • FHB Podcast Segment: Hand Tool Sharpening Tips
  • Old House Air-Sealing Basics
  • A Drip-Free, Through-Window Heat Pump

Highlights

Fine Homebuilding All Access
Fine Homebuilding Podcast
Tool Tech
Plus, get an extra 20% off with code GIFT20

"I have learned so much thanks to the searchable articles on the FHB website. I can confidently say that I expect to be a life-long subscriber." - M.K.

Get home building tips, offers, and expert advice in your inbox

Signing you up...

This site is protected by reCAPTCHA and the Google Privacy Policy and Terms of Service apply.
See all newsletters
See all newsletters

Fine Homebuilding Magazine

  • Issue 332 - July 2025
    • Custom Built-ins With Job-Site Tools
    • Fight House Fires Through Design
    • Making the Move to Multifamily
  • Issue 331 - June 2025
    • A More Resilient Roof
    • Tool Test: You Need a Drywall Sander
    • Ducted vs. Ductless Heat Pumps
  • Issue 330 - April/May 2025
    • Deck Details for Durability
    • FAQs on HPWHs
    • 10 Tips for a Long-Lasting Paint Job
  • Old House Journal – August 2025
    • Designing the Perfect Garden Gate
    • Old House Air-Sealing Basics
  • Issue 329 - Feb/Mar 2025
    • Smart Foundation for a Small Addition
    • A Kominka Comes West
    • Making Small Kitchens Work

Fine Home Building

Newsletter Sign-up

  • Fine Homebuilding

    Home building tips, offers, and expert advice in your inbox.

  • Green Building Advisor

    Building science and energy efficiency advice, plus special offers, in your inbox.

  • Old House Journal

    Repair, renovation, and restoration tips, plus special offers, in your inbox.

Signing you up...

This site is protected by reCAPTCHA and the Google Privacy Policy and Terms of Service apply.
See all newsletters

Follow

  • Fine Homebuilding

    Dig into cutting-edge approaches and decades of proven solutions with total access to our experts and tradespeople.

    Start Free Trial Now
    • Facebook
    • Instagram
    • X
    • LinkedIn
  • GBA Prime

    Get instant access to the latest developments in green building, research, and reports from the field.

    Start Free Trial Now
    • Facebook
    • YouTube
  • Old House Journal

    Learn how to restore, repair, update, and decorate your home.

    Subscribe Now
    • Facebook
    • Instagram
    • X

Membership & Magazine

  • Online Archive
  • Start Free Trial
  • Magazine Subscription
  • Magazine Renewal
  • Gift a Subscription
  • Customer Support
  • Privacy Preferences
  • About
  • Contact
  • Advertise
  • Careers
  • Terms of Use
  • Site Map
  • Do not sell or share my information
  • Privacy Policy
  • Accessibility
  • California Privacy Rights

© 2025 Active Interest Media. All rights reserved.

Fine Homebuilding receives a commission for items purchased through links on this site, including Amazon Associates and other affiliate advertising programs.

  • Home Group
  • Antique Trader
  • Arts & Crafts Homes
  • Bank Note Reporter
  • Cabin Life
  • Cuisine at Home
  • Fine Gardening
  • Fine Woodworking
  • Green Building Advisor
  • Garden Gate
  • Horticulture
  • Keep Craft Alive
  • Log Home Living
  • Military Trader/Vehicles
  • Numismatic News
  • Numismaster
  • Old Cars Weekly
  • Old House Journal
  • Period Homes
  • Popular Woodworking
  • Script
  • ShopNotes
  • Sports Collectors Digest
  • Threads
  • Timber Home Living
  • Traditional Building
  • Woodsmith
  • World Coin News
  • Writer's Digest
Active Interest Media logo
X
X
This is a dialog window which overlays the main content of the page. The modal window is a 'site map' of the most critical areas of the site. Pressing the Escape (ESC) button will close the modal and bring you back to where you were on the page.

Main Menu

  • How-To
  • Design
  • Tools & Materials
  • Video
  • Blogs
  • Forum
  • Project Guides
  • Reader Projects
  • Magazine
  • Members
  • FHB House

Podcasts

  • FHB Podcast
  • ProTalk

Webinars

  • Upcoming and On-Demand

Podcasts

  • FHB Podcast
  • ProTalk

Webinars

  • Upcoming and On-Demand

Popular Topics

  • Kitchens
  • Business
  • Bedrooms
  • Roofs
  • Architecture and Design
  • Green Building
  • Decks
  • Framing
  • Safety
  • Remodeling
  • Bathrooms
  • Windows
  • Tilework
  • Ceilings
  • HVAC

Magazine

  • Current Issue
  • Past Issues
  • Magazine Index
  • Subscribe
  • Online Archive
  • Author Guidelines

All Access

  • Member Home
  • Start Free Trial
  • Gift Membership

Online Learning

  • Courses
  • Project Guides
  • Reader Projects
  • Podcast

More

  • FHB Ambassadors
  • FHB House
  • Customer Support

Account

  • Log In
  • Join

Newsletter

Get home building tips, offers, and expert advice in your inbox

Signing you up...

This site is protected by reCAPTCHA and the Google Privacy Policy and Terms of Service apply.
See all newsletters
See all newsletters

Follow

  • X
  • YouTube
  • instagram
  • facebook
  • pinterest
  • Tiktok

Join All Access

Become a member and get instant access to thousands of videos, how-tos, tool reviews, and design features.

Start Your Free Trial

Subscribe

FHB Magazine

Start your subscription today and save up to 70%

Subscribe

Enjoy unlimited access to Fine Homebuilding. Join Now

Already a member? Log in

We hope you’ve enjoyed your free articles. To keep reading, become a member today.

Get complete site access to expert advice, how-to videos, Code Check, and more, plus the print magazine.

Start your FREE trial

Already a member? Log in

Privacy Policy Update

We use cookies, pixels, script and other tracking technologies to analyze and improve our service, to improve and personalize content, and for advertising to you. We also share information about your use of our site with third-party social media, advertising and analytics partners. You can view our Privacy Policy here and our Terms of Use here.

Cookies

Analytics

These cookies help us track site metrics to improve our sites and provide a better user experience.

Advertising/Social Media

These cookies are used to serve advertisements aligned with your interests.

Essential

These cookies are required to provide basic functions like page navigation and access to secure areas of the website.

Delete My Data

Delete all cookies and associated data