I recently finished building a shed. A magazine I subscribe to happens to be accepting entries from home owners who have built their own shed. I entered the below and thought that it might be of interest here.
I also have other photos for viewing at:
http://www.flipdrive.com/nov141992
no need to register to see them, just copy & paste above into browser
Since I made a 3D model I was able to also make an animation of it, which is viewable at:
http://video.google.com/videoplay?docid=-173459991592921585
I should point out that the book I reference below is “Building a Shed” which is published by Taunton. I also benefitted from “Working Alone” by John Carroll, another Taunton publication.
Most people I know think I’m crazy for spending so much time and money on a shed. But the way I figure it I have to look at it every day and if I’m going to make it I’m going to do it the way I think is right. I suspect Breaktimers may be a little bit more of that mentatlity.
Let me know what you think.
Thanks,
Tim
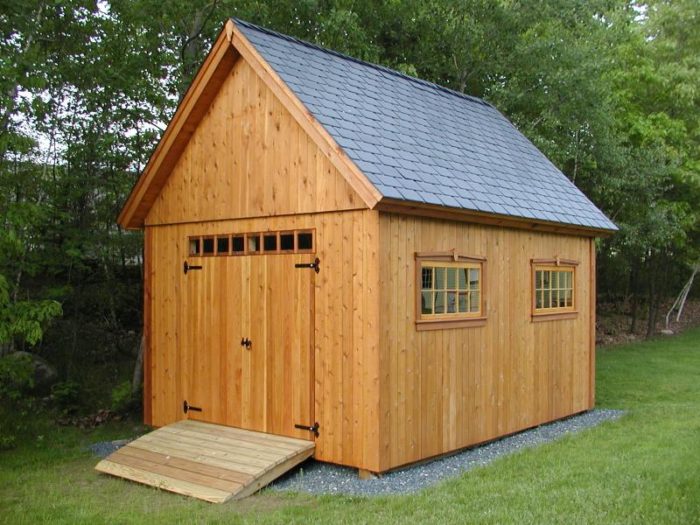
After buying a large commercial mower and not having any room to park my car in my garage, I decided it was time to build myself a shed. Not just any shed though, I wanted one that would look nice, be made of quality materials and be built to last. I also wanted to build it entirely by myself.
After looking through several books on sheds I found a colonial style I liked the looks of. Ironically the book was written by PM author Joe Truini.
I made a three dimensional CAD model and a set of detail drawings of my 12 X 16 colonial shed then I started the physical work by putting four tons of crushed bluestone on the site. I built the floor on top of 6 X 6 runners using Pressure Treated 2 X 6 joists and ¾â€ PT plywood. I supported all of the plywood edges using blocking cut from the 2 X 6s. I made all of the framing throughout 16†on center. For the walls I wanted a siding that looked nice and would be durable so I chose western red cedar tongue and groove boards. Not cheap but worth every penny.
Getting the 16 foot walls up by my self wasn’t easy, more difficult though was getting the 260 pound end trusses up, the tops of which are 15’ high. It’s amazing what can be done with a come-a-long, some simple wood fixtures and patience.
I made the roof with a 45° pitch so it would match that of my house and provide plenty of space for the storage loft. For the finishing touch I used faux slate shingles on the roof.
In the end I spent around $6300 and six months of weekends building it. For me, it was worth it. I now have a nice shed that will probably outlast me and I have the satisfaction of having done it myself.


Replies
Very nice job! Congratulations...
congratulations & very well done
what magazine you putting it in?
I submitted it to Popular Mechanics. They haven't replied though, so I'm not holding my breath.
congratulations & very well donewhat magazine you putting it in?
Very nice. Looks like you had some good help there, too.
If having a low wage work force was good for a country's economy then why hasn't Mexico built a fence?
Thanks. I made it a point to try to include my kids to some extent. I figure it's something they'll remember and they'll learn that it's possible for one to do things on their own instead of always paying someone else to do it.
"Very nice. Looks like you had some good help there, too."
I'm sure someday she will brag about helping you build it.
You must have followed that book very closely. The shed looks like it could be on the cover.
If having a low wage work force was good for a country's economy then why hasn't Mexico built a fence?
"You must have followed that book very closely. The shed looks like it could be on the cover."
Funny you should say that. The shed I liked the looks of, and consequently emulated is on the cover of the book I referenced. I figured if I was going to spend a lot of time and money I should maximize the liklihood of ending up with something I like the looks of. So I looked through a few different books and made the CAD model.
Well, you did a great job all the way around. PM should definately pick it.
If having a low wage work force was good for a country's economy then why hasn't Mexico built a fence?
Cool. I really like the window trim- do you have any close up pictures of that? I don't think I've ever seen the headpeice with the keystone like that.
zak
"so it goes"
Thanks, I cropped and enlarged a photo of it and attached it here.
A lot of people comment on the window trim. I wish I could take credit for it but in the case of the window trim I almost copied that exactly from the information in the Truini book I mentioned in my original post.
If you pause the animation I linked at the right time you can make out detail on the window trim and almost anything else.
"Cool. I really like the window trim- do you have any close up pictures of that? I don't think I've ever seen the headpeice with the keystone like that. "
zak
nice work! when are you coming to build mine?
I've taken the liberty of resizing the photo for those who are broadband-less...
thats way to fancy to hold a lawn mower. it would make a great internet hideaway from the family. a mans place. what type wood is that on outside, knotty pine.
"what type wood is that on outside, knotty pine."
Western Red Cedar, select tight knot grade, 1 X 6 Tongue and Groove. Bought it from a local Weyerhauser distributor. Very expensive, cost around $2100.
Trying to source where to buy it from was a major pain. Most lumberyards I contacted were only familiar with the clear vertical grain grade which is even more expensive, and were unwilling to look into anything different then what they were used to. Almost every lumberyard of the ones willing to get it were only willing to sell it to me in random lengths even though I was only looking for 8' and 10' lengths. Finally I found a place that was actually willing to pick up the phone, call their supplier and ask what they had in stock in my requested lengths.
The pine would have been less expensive and easier to get, but I like (and was willing to pay for) the look and decay resistance of cedar.
Thanks for the downsizing, torn. Still took over a minute to load but would have had to breeze by it if you hadn't reworked it.
Beware. RFID is coming.
Very nice. You've got very good tase. I really like the window details.
Rock the Tipi!
That is very nice looking shed. What kind of CAD did u use? My son wants to build a chicken coop and he did some drawings. Not sure of what he is thinking or doing on it but the CAD would be a better picture to see what it would come out. Easy to use CAD?
You guys use PLANS for a shed?
I knew you'd have to show up here.
ROAR!
Beware. RFID is coming.
"That is very nice looking shed. What kind of CAD did u use? My son wants to build a chicken coop and he did some drawings. Not sure of what he is thinking or doing on it but the CAD would be a better picture to see what it would come out. Easy to use CAD?"
I used Pro Engineer. It's an expensive package starting around $6000. Purchased by companies typically.
How easy is CAD? Depends on the person, his experience (ever do drawings on another CAD system, drawing board..) and the CAD system. Most people starting out will find it time consuming.
I agree wholeheartedly that it provides a better picture of what you're going to end up with, see attachements. That's a large part of the reason why I modeled it first. Also that's why I found a shed in a book that I liked the looks of as a starting point.
""I used Pro Engineer. It's an expensive package starting around $6000. Purchased by companies typically.""
So you used the company's cad? We got a cad for the machine shop and I can't use it. (Too far over my head!) It does a lot of amazing things! We have a full time programer on that there. I got another one that I could program parts to be machined and it is still a little over my head but I can make it. I'm a CNC machinist.
I do a lot of woodworking as a hobby and would love to have a cad that is easy to use and run. I got the free software from cabinets and it is still a little hard to use.
Sketchup is very easy to use, and it is a free program downloadable from Google.
Here is a view of a house I did with it.
Pretty neat for a free small one and I download it on and seems easy to do. Showed my son and he says "Hey email me that". I like that step by step showing the way.
You have done a good thing. I wish all my neighbors would build sheds of this quality so I would have more nice things to see each day.
I would even call it a carriage house, since shed seems inadequate when that much quality goes in.
Beautiful. A FIRST CLASS PROJECT I would be very proud of building.
Some flower boxes under the windows and some theme shutters would a be nice touch.
Is your roof / building vented for convection flow to keep it cooler? I am in Texas and we are always concerned about the heat. If not, you could find some attrative gable vents in western red cedar that would be functional in keepint the building cooler and they would add a decorative touch.
"Is your roof / building vented for convection flow to keep it cooler? I am in Texas and we are always concerned about the heat. If not, you could find some attrative gable vents in western red cedar that would be functional in keepint the building cooler and they would add a decorative touch."
Although I'm in the cooler north east, I did provide venting. In a lot of ways Ii tried to use construction standards commensurate with that of a house (yes, overboard I know). Consequently I used a ridge and soffit vents. One of the photos on the website shows one of the soffit vents. My perception is that the soffit/ridge is more effective than gable vents. The gables would have been a lot easier though.
Yes, you are right, ridge venting is better. Idid not suggest it becaus I saw your roof was already installed.....I didn't see the ridge vent.
That is really something to be proud of. Congrats! Do you ever go back inside the house now? <G> Definitely one of the nicest sheds I've ever seen.
Wow - NICE shed!
and thanks for the inspiration reading your thread gave me since I'm in same boat as you were (prior to your shed's completion...) and I'd recently ordered the same 2 books!!!!!!!!!!!!!
kinda bizarre!
Hopefully, one day i'll be posting my own shed thread and let y'all know how it turned out. But meanwhile, I gotta get back to my LR project (a never-ending beast!)
DUM SPIRO SPERO: "While I breathe I hope"
Congratulations, that has to be one of the nicest sheds I've seen in a long while.
Pat yourself on the back, pull up a lawn chair and enjoy a premium frosty adult beverage, go ahead you've earned it.
Lots of work and a very nice result. Great job! I was trying to figure what the use of the come-a-long was while you raised the gable end walls. In the pictures it appears that you have applied tension to a 2 x 6 brace across the shed width and you're using a brace attached to the ridge of the gable to raise the gable end into place. How does the come-a-long help raise the gable end, if at all? Is the come-a-long just there to keep the bottom from sliding out of place?
What CAD program did you use?
75468.31 in reply to 75468.1
Lots of work and a very nice result. Great job! I was trying to figure what the use of the come-a-long was while you raised the gable end walls. In the pictures it appears that you have applied tension to a 2 x 6 brace across the shed width and you're using a brace attached to the ridge of the gable to raise the gable end into place. How does the come-a-long help raise the gable end, if at all? Is the come-a-long just there to keep the bottom from sliding out of place?
What CAD program did you use?
***************************************
Thanks for the kind words.
The attached jpeg should help visualize how I used the come a long to raise the gable end truss by myself. The 2x6 going across the width was a temporary beam acting as an anchor for one end of the come a long as well as a temporary support for the truss as it lay horizontal. By cranking the come a long I pulled the bottom of the 16' 2x4 thus the other end of the 2x4 pushed up on the top of the gable, causing it to pivot from horizontal, eventually to vertical.
The bottom of the gable was hinged by way of some simpson strapping so that the bottom wouldn't slide out of place.
I used Pro Engineer.
Love it!
Are you leaving it unpainted?
We have WRC clapboard on our own old farm house in Maryland.
It's wonderful stuff and it is tempting to let it weather naturally.
However, if our own experience with white stained (not painted) cedar is any guide, you might not be happy with the results after a few years unless you consider mildew, cupping, checking , etc. a desirable "patina".
In a different climate, with T&G not horizontal clapboard, your mileage may vary.
In any case, I want a shed just like yours!
tom21769 <!----><!---->
Thanks
Presently I have no plans to paint it. The shed is stained with an oil based semitransparent stain made by Sikkens. I realize this is not as protective as paint. It's my impression that this stain is used on cedar houses (at least according to the product's marketing). I have seen some houses with some type of semi transparent stain, usually darker though.
I'm guessing that I'll end up having to re-stain it every two to three years.
I really don't want to paint it. I like the looks of the cedar and if I painted it I'd lose that, no grain visible.
What type and brand of white stain did you use? Was it opaque or semi transparent?
Previous owner stained it. I think it was Olympic oil-based, and looked to be semi-transparent.But I agree your cedar looks great just as it is.Did I read you're in Connecticut?
That should be a more forgiving climate than Maryland.
If you re-stain it that often I bet you'll do o.k.
Well folks it's me the shed builder again. Now with a question. This week the woodpeckers took a liking to my shed (see photos below).
1. Can anyone recommend an exterior wood filler that can be stained with an oil based stain?
2. Any suggestions for keeping the woodpeckers away. I'm hanging reflective film from it, like mylar. It's visible in one of the photos. Anyone have any luck doing anything else?
Minwax two part in a dark filler..
make it look like a knot....
only a fin solution seems to work on woodpeckers..
Life is not a journey to the grave with the intention of arriving safely in a pretty and well preserved body, but rather to skid in broadside, thoroughly used up, totally worn out, and loudly proclaiming<!----><!----><!---->
WOW!!! What a Ride!<!----><!---->
Forget the primal scream, just ROAR!!!
I would replace that one corner board and restain.
ANDYSZ2WHY DO I HAVE TO EXPLAIN TO FRIENDS AND FAMILY THAT BEING A SOLE PROPRIETOR IS A REAL JOB?
REMODELER/PUNCHOUT SPECIALIST
I should have been more clear. The two photos are of two different corner boards. In all there's around six different locations of damage including rake boards. Repacing the damaged areas would be the best fix but I'm not up for that much work. Maybe after I'm convinced the woodpeckers are gone for good.
75468.38 in reply to 75468.36
I would replace that one corner board and restain.
ANDYSZ2
I like shooting them with my Ruger Mark II .22 handgun, recently outfitted with a red dot sight. Awesome. Pick 'em off in profile so as not to poke bullet holes in the buildings.
But I am politically incorrect, most of the time.
Actually I do own a Ruger 10-22. Couple of problems with that method though. The thought of being hauled away in handcuffs (I'm in Massachusetts) isn't too apealling. Also I never actually saw the woodpecker(s) so I might be in for a long wait.
Nice thought though. I certainly feel like doing it.
75468.39 in reply to 75468.36
I like shooting them with my Ruger Mark II .22 handgun, recently outfitted with a red dot sight. Awesome. Pick 'em off in profile so as not to poke bullet holes in the buildings.
But I am politically incorrect, most of the time.
You're not a Boy Scout, are you?
Umm, no I'm not. I'll probably regret asking this, Why would you ask that?
From:
JoeArchitect <!----><!---->
9:20 am
To:
nov141992 <!----><!---->
(42 of 44)
75468.42 in reply to 75468.41
You're not a Boy Scout, are you?
Go buy some handheld mirrors at the local drugstore, thge kind that magnify on one side. Hang them up around your trouble spots, the birds will see a larger bird already there and find someplace else to peck.
idea #2 that i've always wanted to try was to drive a large fencing nail as a perch just below the hole and from inside hook it up to a live wire and hide the other live wire with bared metal somewhere by the hole...but probably would pass code...
Clean up the hole with a router, install a perch dowel below the hole and box in the backside (inside the shed) to create a home for the woodpecker....maybe he won't need to create anymore holes. : - )
Wha zup with November 14, 1992?
Stop, and think for a minute.... why are the birds pecking there? Woodpeckers eat insect larvae. They find them by 'rapping' on wood, and listening for the echo from a tunnel a grub might make. Then, they follow that tunnel until they find dinner at the end! So.. the way to discourage woodpeckers is to make sure there are no empty spaces under the wood.Woody will peck once, hear no echo, and move on.