FHB Logo Facebook LinkedIn Email Pinterest Twitter X Instagram Tiktok YouTube Plus Icon Close Icon Navigation Search Icon Navigation Search Icon Arrow Down Icon Video Guide Icon Article Guide Icon Modal Close Icon Guide Search Icon Skip to content
Subscribe
Log In
  • How-To
  • Design
  • Tools & Materials
  • Restoration
  • Videos
  • Blogs
  • Forum
  • Magazine
  • Members
  • FHB House
  • Podcast
Log In

Discussion Forum

Discussion Forum

Plumbing Part 2

byrd48 | Posted in General Discussion on February 4, 2012 11:01am

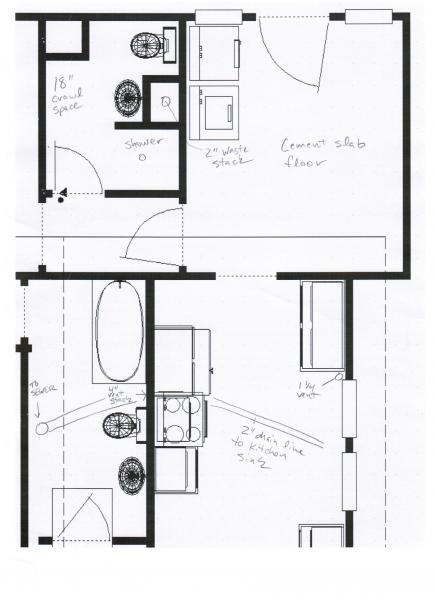
I’m renovating an old house and adding a second bathroom in the rear of the house where there previously was not one.  I’ve attached two images to help illustrate what I’m describing.  The back of the house was a bedroom and a porch with a cement slab floor.  I’m converting the ‘porch’ to a laundry room, but due to the slab, I need to run the plumbing for it in the bathroom on the other side of the wall where there is an 18inch crawlspace (I’m digging some of it out).

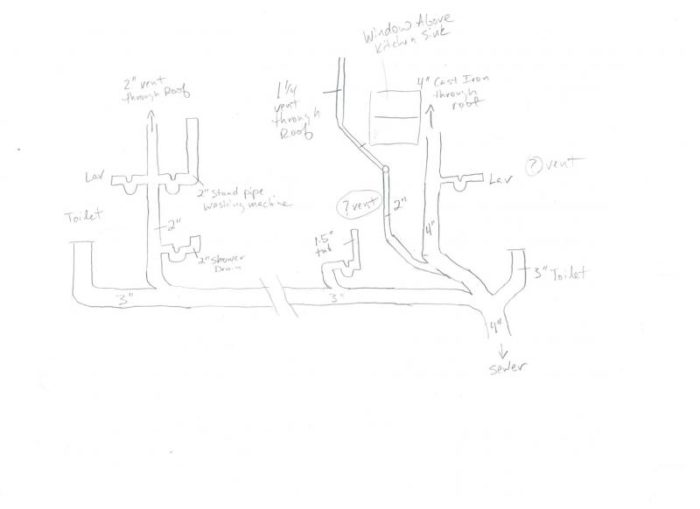
So I was thinking of creating a chase to contain a 2 inch waste stack which would vent through the ceiling.  I would like to attach the shower, lav, and washing machine standpipe to this stack.  The stack would come down and join the 3 inch line from the toilet.  From there, it’s about 15 feet to tie into the existing cast iron vent stack / sewer drain.  The main vent stack is offset from the sewer drain (which drops straight into the dirt) by about 4 feet, it’s easier to see the spatial layout in the blueprint image.  I plan to cut this 4 foot section to tie in the three inch line coming from the back bathroom as well as the fixtures from the original bathroom.

In this 4 foot section, there is a wye to a 2 inch drain line which the tub used.  The tub was originally unvented and I cut out this section of pipe and was planning to use that wye to feed the kitchen sink drain.  I would then drop the tub drain down into the 3 inch pipe coming from the back bathroom (or I suppose it could still feed into the original wye and that could serve both the tub and kitchen sink.

The original toilet sat directly above the sewer out.  

The original lav connects via a sanitary tee to the 4 inch vent stack .  I plan to reuse this connection.  It is not currently vented.

I’m looking for advice on the proposed layout and if I have it vented properly.

Thanks,

Jon

Reply
  • X
  • facebook
  • linkedin
  • pinterest
  • email
  • add to favorites Log in or Sign up to save your favorite articles

Replies

  1. rdesigns | Feb 06, 2012 10:09am | #1

    From your description, It's not completely clear to me just how you plan to connect and vent everything. But since it sounds like you will have at least 18" of crawlspace below the floor that has all the fixtures except for the kitchen sink, here's a way that will meet the code and be simplest.

    This method will allow you to run trap arms from a 3" vertical stack to each of the fixtures on the common plumb wall without the need for additional vents. The KS will have its own drain and vent thru the roof as you planned.

    So, starting at the low end:  begin with a 3" line that ties into the existing 4" line by means of a wye connection.

    Keep this new 3" line running low all the way to a point under the wall and positioned right near the foot of the tub.

    Turn up vertically with a three-inch 90 to begin a vertical waste/vent stack.

    Using sanitary tees (NOT wye's), you will create a stack of trap arms to catch the toilet, tub, washer and sink. Stick to the order listed. In other words, the lowest trap arm (a 3" sanitary tee) will catch the toilet, the next will be for the tub (3 x 2 sanitary tee), and these two will be below the floor. Above the floor, the 3" stack will first have the tee (3 x 2 sanitary tee) for the washer. Last and highest will be the tee (3 x 1-1/2) for the lavatory. The 3" line will continue up and out thru the roof. Do not offset it horizontally untill it is at least 6" above the flood rim of the lav.

    You can tie in the drain from the KS to the 3" horizontal drain line at any point BELOW the 3" vertical stack. Here, you would use a 3 x 2 wye.

    Be sure to include a 3" cleanout, preferably in the 3" stack above the highest tee, if you will have access to it at that point. Otherwise, it could be anywhere it will fit in the vertical stack, or, if that's not possible, it could go in the horizontal section of the the 3" drain line betweeen the stack and the starting point where you tie into the 4" line. 

    One possible complication: it may be that the lav trap arm that must run horizontally thru the studs will be longer than your local code allows for an unvented trap arm. (Some codes limit the length to 42".) In that case, you would simply install a relief vent in the trap arm itself. This is done by cutting into the horizontal trap arm at a point closer to the lav. The fitting you would use is a 1-1/2" wye on its back combined with a 45 to begin a vertical vent. This vent rises to at least 6" above the flood rim of the lav before turning horizontally to tie back into the 3" stack by means of a 3 x 1-1/2 sanitary tee turned upside down.

    1. byrd48 | Feb 07, 2012 12:05am | #2

      Hi and thank you for the advice.

      I took a stab at the design with SketchUp, please look at the attached photo and let me know if that is what you were suggesting.  In this model, the tub drain does not connect to a dry vent, but drops down to the drain.  I could run a 1.25 vent up through that wall and revent it into the new line from the back bathroom (the one on the left).

      Thanks again

      Jon

      1. rdesigns | Feb 07, 2012 09:28am | #3

        Nice job with sketchup--I think you've got the idea.

        Just to clarify a couple things that were probably hard to show in your diagram: 

        The trap arm that catches the washer drain will need a p-trap of course, and, with the exception of toilets, any other trap arms must not jump up along their horizontal run; they must be run maintaining their minimum slope or 1/4" per foot. If you jump the arm up with an offset, this will create a potential for self-siphoning of the trap. This means that it's important to set the height of the tee at a level that aims for about an inch or so below the outlet of the trap.

        The tub drain can connect without an additional vent if you tie into the VERTICAL wet vent that has the lav above. Again, make the connection with a sanitary tee, NOT a wye, so that you don't create a potential self-siphoning connection. (This assumes that the length of the tub's trap arm will not exceed 42" for a 1-1/2" trap arm, or 60" for a 2" trap arm--either size is OK.)

        1. byrd48 | Feb 07, 2012 03:01pm | #4

          Thanks much

          I meant to comment the p-traps and cleanouts and yes, the slope is understood.

          So then the 3 inch pipe coming from the back bathroom would have a cleanout at the end and the 3 inch vertical stack.  Could the toilet and shower drain plug into the stack with a double sanitary tee?  And above that the lav and washing machine could use another double sanitary tee?

          As per venting the tub in the main bathroom, I can't drain into the vertical stack without cutting the cast iron, so I'll just vent it up the wall and tie into the back bathroom vent.

          Thanks again,

          jon

          1. rdesigns | Feb 07, 2012 05:11pm | #5

            Double san. tees can only be used with certain restrictions--namely that the barrel or body of the fitting must be a pipe size larger than the branches. Example:  a dbl. san. tee that connects two toilets would have to be a 4" san. tee with 3" branches.

            This can vary by local amendments and interpretations, but, in general, dbl san tees are not the best since you can't snake the line as effectively because the snake will enter the opposite branch. For modern toilets, there's also the problem that their high velocity flush can send a slug of water straight across the san tee into the opposite trap arm and cause the other p-trap to burp.

            So, if you have the vertical space to do it, it would be better to stack single san tees for each trap arm.

            For your tub vent, keep in mind that the vent must take off in the vertical and stay vertical until it reaches a height at least 6" above the flood rim of the tub. "Vertical", in code terms, means not less than 45 degrees above horizontal.

            Edit for afterthought:  For the toilet and shower connection to the stack, you could use a 3" tee with either a left- or right-hand inlet. This fitting would not allow the toilet to shoot straight across the tee since the 2" inlet is on one side or the other.

  2. rdesigns | Feb 09, 2012 04:53pm | #6

    The toilet should tie into the vertical stack, and it sounds like you'd best use the 3" tee with a side inletto catch the tub. (Side inlets can be bought with the 2" inlet on either the RH or LH side of 3" tee branch.) To save height, you can use a 3" street 90 where you turn vertical. The street 90 will have a male end that glues directly into the bottom of the 3" tee with the side inlet. This saves about 1-1/2" compared to using a regular 3" 90.

    Since you apparently have a 3" or 4" vent thru the roof above the other bathroom, you will be able to reduce the vent size from 3" to 2" as you wanted to. It can be reduced to 2" at the tee that will catch the washer drain, with the drain from the lav connecting to the 2" stack by means of a 2 x 1-1/2 sanitary tee.

Log in or create an account to post a comment.

Sign up Log in

Become a member and get full access to FineHomebuilding.com

Video Shorts

Categories

  • Business
  • Code Questions
  • Construction Techniques
  • Energy, Heating & Insulation
  • General Discussion
  • Help/Work Wanted
  • Photo Gallery
  • Reader Classified
  • Tools for Home Building

Discussion Forum

Recent Posts and Replies

  • |
  • |
  • |
  • |
  • |
  • |
View More Create Post

Up Next

Video Shorts

Featured Story

FHB Podcast Segment: Hand Tool Sharpening Tips

Learn how the pros keep their hand tools sharp without breaking the bank.

Featured Video

How to Install Cable Rail Around Wood-Post Corners

Use these tips to keep cables tight and straight for a professional-looking deck-railing job.

Related Stories

  • Podcast Episode 690: Sharpening, Wires Behind Baseboard, and Fixing Shingle Panels
  • FHB Podcast Segment: Hand Tool Sharpening Tips
  • Old House Air-Sealing Basics
  • A Drip-Free, Through-Window Heat Pump

Highlights

Fine Homebuilding All Access
Fine Homebuilding Podcast
Tool Tech
Plus, get an extra 20% off with code GIFT20

"I have learned so much thanks to the searchable articles on the FHB website. I can confidently say that I expect to be a life-long subscriber." - M.K.

Get home building tips, offers, and expert advice in your inbox

Signing you up...

This site is protected by reCAPTCHA and the Google Privacy Policy and Terms of Service apply.
See all newsletters
See all newsletters

Fine Homebuilding Magazine

  • Issue 332 - July 2025
    • Custom Built-ins With Job-Site Tools
    • Fight House Fires Through Design
    • Making the Move to Multifamily
  • Issue 331 - June 2025
    • A More Resilient Roof
    • Tool Test: You Need a Drywall Sander
    • Ducted vs. Ductless Heat Pumps
  • Issue 330 - April/May 2025
    • Deck Details for Durability
    • FAQs on HPWHs
    • 10 Tips for a Long-Lasting Paint Job
  • Old House Journal – August 2025
    • Designing the Perfect Garden Gate
    • Old House Air-Sealing Basics
  • Issue 329 - Feb/Mar 2025
    • Smart Foundation for a Small Addition
    • A Kominka Comes West
    • Making Small Kitchens Work

Fine Home Building

Newsletter Sign-up

  • Fine Homebuilding

    Home building tips, offers, and expert advice in your inbox.

  • Green Building Advisor

    Building science and energy efficiency advice, plus special offers, in your inbox.

  • Old House Journal

    Repair, renovation, and restoration tips, plus special offers, in your inbox.

Signing you up...

This site is protected by reCAPTCHA and the Google Privacy Policy and Terms of Service apply.
See all newsletters

Follow

  • Fine Homebuilding

    Dig into cutting-edge approaches and decades of proven solutions with total access to our experts and tradespeople.

    Start Free Trial Now
    • Facebook
    • Instagram
    • X
    • LinkedIn
  • GBA Prime

    Get instant access to the latest developments in green building, research, and reports from the field.

    Start Free Trial Now
    • Facebook
    • YouTube
  • Old House Journal

    Learn how to restore, repair, update, and decorate your home.

    Subscribe Now
    • Facebook
    • Instagram
    • X

Membership & Magazine

  • Online Archive
  • Start Free Trial
  • Magazine Subscription
  • Magazine Renewal
  • Gift a Subscription
  • Customer Support
  • Privacy Preferences
  • About
  • Contact
  • Advertise
  • Careers
  • Terms of Use
  • Site Map
  • Do not sell or share my information
  • Privacy Policy
  • Accessibility
  • California Privacy Rights

© 2025 Active Interest Media. All rights reserved.

Fine Homebuilding receives a commission for items purchased through links on this site, including Amazon Associates and other affiliate advertising programs.

  • Home Group
  • Antique Trader
  • Arts & Crafts Homes
  • Bank Note Reporter
  • Cabin Life
  • Cuisine at Home
  • Fine Gardening
  • Fine Woodworking
  • Green Building Advisor
  • Garden Gate
  • Horticulture
  • Keep Craft Alive
  • Log Home Living
  • Military Trader/Vehicles
  • Numismatic News
  • Numismaster
  • Old Cars Weekly
  • Old House Journal
  • Period Homes
  • Popular Woodworking
  • Script
  • ShopNotes
  • Sports Collectors Digest
  • Threads
  • Timber Home Living
  • Traditional Building
  • Woodsmith
  • World Coin News
  • Writer's Digest
Active Interest Media logo
X
X
This is a dialog window which overlays the main content of the page. The modal window is a 'site map' of the most critical areas of the site. Pressing the Escape (ESC) button will close the modal and bring you back to where you were on the page.

Main Menu

  • How-To
  • Design
  • Tools & Materials
  • Video
  • Blogs
  • Forum
  • Project Guides
  • Reader Projects
  • Magazine
  • Members
  • FHB House

Podcasts

  • FHB Podcast
  • ProTalk

Webinars

  • Upcoming and On-Demand

Podcasts

  • FHB Podcast
  • ProTalk

Webinars

  • Upcoming and On-Demand

Popular Topics

  • Kitchens
  • Business
  • Bedrooms
  • Roofs
  • Architecture and Design
  • Green Building
  • Decks
  • Framing
  • Safety
  • Remodeling
  • Bathrooms
  • Windows
  • Tilework
  • Ceilings
  • HVAC

Magazine

  • Current Issue
  • Past Issues
  • Magazine Index
  • Subscribe
  • Online Archive
  • Author Guidelines

All Access

  • Member Home
  • Start Free Trial
  • Gift Membership

Online Learning

  • Courses
  • Project Guides
  • Reader Projects
  • Podcast

More

  • FHB Ambassadors
  • FHB House
  • Customer Support

Account

  • Log In
  • Join

Newsletter

Get home building tips, offers, and expert advice in your inbox

Signing you up...

This site is protected by reCAPTCHA and the Google Privacy Policy and Terms of Service apply.
See all newsletters
See all newsletters

Follow

  • X
  • YouTube
  • instagram
  • facebook
  • pinterest
  • Tiktok

Join All Access

Become a member and get instant access to thousands of videos, how-tos, tool reviews, and design features.

Start Your Free Trial

Subscribe

FHB Magazine

Start your subscription today and save up to 70%

Subscribe

Enjoy unlimited access to Fine Homebuilding. Join Now

Already a member? Log in

We hope you’ve enjoyed your free articles. To keep reading, become a member today.

Get complete site access to expert advice, how-to videos, Code Check, and more, plus the print magazine.

Start your FREE trial

Already a member? Log in

Privacy Policy Update

We use cookies, pixels, script and other tracking technologies to analyze and improve our service, to improve and personalize content, and for advertising to you. We also share information about your use of our site with third-party social media, advertising and analytics partners. You can view our Privacy Policy here and our Terms of Use here.

Cookies

Analytics

These cookies help us track site metrics to improve our sites and provide a better user experience.

Advertising/Social Media

These cookies are used to serve advertisements aligned with your interests.

Essential

These cookies are required to provide basic functions like page navigation and access to secure areas of the website.

Delete My Data

Delete all cookies and associated data