FHB Logo Facebook LinkedIn Email Pinterest Twitter X Instagram Tiktok YouTube Plus Icon Close Icon Navigation Search Icon Navigation Search Icon Arrow Down Icon Video Guide Icon Article Guide Icon Modal Close Icon Guide Search Icon Skip to content
Subscribe
Log In
  • How-To
  • Design
  • Tools & Materials
  • Restoration
  • Videos
  • Blogs
  • Forum
  • Magazine
  • Members
  • FHB House
  • Podcast
Log In

Discussion Forum

Discussion Forum

Pool table

dthoughton | Posted in Photo Gallery on December 7, 2005 09:59am

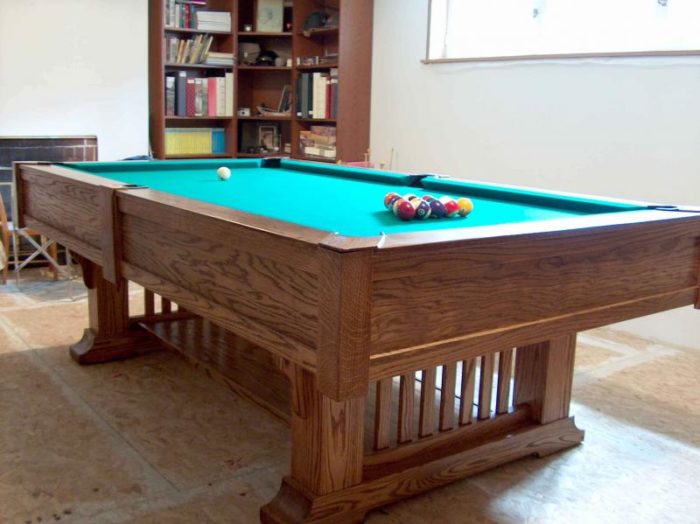
I thought some of you might appreciate the attached, not because it is an example of fine design or craftsmanship, but because the inspiration came from articles in Best of Fine Woodworking and Fine Homebuilding. After reading Paul Bowman’s article on building a pool table, I was sure I could do it, but was put off by the price and availability of the slate for the bed. A few years later I read the article on concrete countertops and realized that I might have found a suitable alternative to slate. After buying Cheng’s book and studying the techniques, I was sure of it. The table is solid oak with a custom designed subframe (more inspiration from Fine Homebuilding articles). The bed of the table consists of a 3 piece slab of 2″ thick concrete poured using the countertop technique. The whole thing cost me a fraction of what I would have spent to buy a similar slate table so I was prepared for a less than perfect result. To my great delight the table is as solid, flat and playable as anything you can buy in a store. I only wish I had finished the rec room before finishing the table because getting the flooring under this thing is going to be a real challenge.

Reply
  • X
  • facebook
  • linkedin
  • pinterest
  • email
  • add to favorites Log in or Sign up to save your favorite articles

Replies

  1. jw0329 | Dec 08, 2005 12:06am | #1

    Resized it for you.

    Jim W.
    Coventry Woodworking

  2. User avater
    jhausch | Dec 11, 2005 06:03pm | #2

    Bump

    I think more people might want to see this.

    I am interested in learning more about how you made the top and handled the seams.  Why 3 pieces?  Because the slate is done that way or because of "move-ability"?

    1. dthoughton | Dec 12, 2005 05:12pm | #5

      Move-ability. Even a single section is heavy and unbelievably awkward to handle. I formed the first piece in my garage and enlisted a friend to help me carry it into the house and down the stairs to the rec room. When we finished he told me to call on someone else to help with the next two! I ended up doing them in the basement so I wouldn't have to move them so far. The seams line up pretty tight because of the form design. The gap can be filled with bees wax, although I used Durabond 90.

      I think I have a few pictures of the form and the assembly process if you're interested in seeing them.

      1. User avater
        jhausch | Dec 13, 2005 04:59am | #8

        I think we'd all like to see some construction pics!

        1. dthoughton | Dec 13, 2005 07:44pm | #9

          Here you are. Because the three top sections are exactly the same size, the one form is used for all three. The styrofoam pocket cutouts just need to be changed for the center piece. The metal reinforcement is attached to the MDF and that whole framework is forced into the concrete when the form is 2/3 full. Then the center is filled until flush with the MDF. The MDF provides a smooth surface for levelling when the slab is flipped over, as well as a tacking surface for the table fabric. Note the air sander and recip.saw attached to the workbench for vibration purposes.

          1. User avater
            aimless | Dec 13, 2005 08:10pm | #10

            That is incredibly cool and clever. Thanks for sharing it!

          2. User avater
            jhausch | Dec 14, 2005 01:21am | #11

            too cool!

            What are the round items sticking in the concrete on the finished side?  Are those the Re-grid attachments that I see on the mdf frame?

            Are those pennies that you are pulling the leveling string across to act as a consistent spacer?

            Did you then cut out the mdf in the pocket areas?

            How do the rails attach?

            Is there a small radius on all the edges, if so how did you create it?

            Thanks for sharing.

          3. dthoughton | Dec 14, 2005 04:54am | #13

            The round items are lengths of copper pipe. The slabs have to have bolt holes all around each edge to allow for the side rails to be attached later. I figured it would be easier forming the holes than trying to cut through the concrete later. I'd do it with wood dowel or foam next time. The MDF in the pocket areas gets cut out after the slabs are in place. As for the radius on the edges, the only place it really matters is on the pocket edges because all the others are covered by the rails. The bead of silicone around the edge of the form serves to make a perfect radius. And yes, those are pennies under the string used for the initial levelling. Final adjustments were done with a straight edge across all the seams. Thanks for the interest.

          4. DougU | Dec 14, 2005 01:54am | #12

            That's very cool!

            What do you have in this cost wise? Maybe you said so in the other thread, I'm assuming  that you did it for considerably less then buying a table.

            Doug

          5. dthoughton | Dec 14, 2005 05:10am | #14

            I wish I had kept better track of the costs, but I bet I didn't spend much more than $2K CAD total, and some of that was on tools that I'll get to use for other things. The concrete was cheap compared to what the slate would have cost me ($1K + shipping) The oak was about $500 and the fabric was close to $250, although there are less expensive types. Throughout this project I was very hesitant to spend too much because I was never really sure what the end result would be like. Now that I know the concept is sound, I would probably use more expensive materials for some of the components and would spend more time on design, finish and overall appearance. As it is, a very similar table in the store sells for $10,000, and I'll bet mine is a lot more solid!

          6. IdahoDon | Dec 14, 2005 07:22am | #15

            This is the first table I've ever heard of that uses concrete instead of slate.  Are there benefits/drawbacks to the concrete other than the lower cost of the concrete?  Does it play the same?  A very interesting idea. Thanks for the post.

            Don

          7. dthoughton | Dec 14, 2005 06:55pm | #16

            Other than cost,  I can think of two, the first being the ability to adjust the size of the surface to fit your room. Nothing more annoying than a table that's just a shade too big for the room. Although there are some accepted standard sizes for tables, the basic rule is that the length should be twice the width. If your room won't quite accommodate a 4'x8', reduce the size of the form slightly. If you can handle more than 4'x8', increase the dimensions. The second advantage, and something this audience would appreciate, has to be the satisfaction of being able to say "I made it myself". Drawbacks, probably the difficulty getting the form perfectly flat as any mistake will result in an uneven slab that would be almost impossible to level. Maybe I got lucky, but my table turned out to be extremely smooth and level. It plays as well (or better) than some slate tables I've tried. Interesting note, I bought my pockets and rubber from a Vietnamese guy who imports table parts from Asia and assembles them for some of the large retailers in my area. When I mentioned that I was using concrete he laughed and said that it was a very common substitute for slate in his home country, but that North Americans were reluctant to accept it. I also discovered in my research that there is a much reduced availability of good quality slate for tables. Many of the slate tables on the market today use an inferior grade which could mean that a slate table today isn't as good as a slate table made 30-50 years ago.

          8. pickings | Dec 14, 2005 07:01pm | #17

            the fabric was close to $250, although there are less expensive types

            Iwan Simonis?

            I have a Brunswick Medalist 9' (bought used from a friend) that gets about 45 mins to an hour of my attention most evenings. Great thing about pool is that you can play alone if no-one is around. Very therapeutic.

          9. dthoughton | Dec 15, 2005 02:53am | #18

            Simonis alright. Worth every cent, although not something you want to make a mistake with.

          10. pickings | Dec 15, 2005 05:23pm | #19

            Yeh...that is what I have. Plays fast, and even w/ some "nicks" in it from the teenagers, rolls straight and true.

            Congrats again on a great looking table. Hope you have the time to enjoy it.

  3. User avater
    Sphere | Dec 11, 2005 06:31pm | #3

    Very cool. Great Idea on the concrete.

    When I completed a home for a very good customer, we moved his pool table thatwas in the garage..and set it up agiain in the house..refelted the bumpers and top etc.

    The beeswax in the seams was kinda fun to do.

    Did you also wax the joints?


    1. dthoughton | Dec 12, 2005 05:15pm | #6

      There were a few small pits in the surface of the finished slab and I decided to use Durabond 90 to fill them. Once I got going I it just made sense to smear it over the seams as well. No problems so far.

  4. stinger | Dec 11, 2005 06:32pm | #4

    Nice table!

    I scratchbuilt a "pro 8" sized table once, after getting the slates from my BIL who was throwing an old table out.

    Did it in cherry, in a great art-deco design I saw done by Neal Barrett in a Popular Mechanics article.

    I found that upholstering the rail bumpers was the tougest part of the job.  Second to that was using rock putty to repair the damage to the slates around a couple pockets.

    I used the recommended playing cards for shims when leveling the slate slab joints.  Did you?

    Pool table slates are milled to a tight-tolerance flatness.  How were you able to get your 'crete slabs flat?  Did you use a melamine form and mount your slabs on the table with the formed face up?  Sounds likely.

    To those who ask why do the top in thirds, the reason is for setup, takedown, and portability.  Handling pool table slates is like lifting and carrying sidewalks sections.  Imagine the hassle of getting single-piece slate slabs up into the second and third walkup levels of all those old pool halls out there.

    1. dthoughton | Dec 12, 2005 05:27pm | #7

      I would have to agree that covering the bumbers was one of the tougher parts. I decided to splurge on the fabric and bought the best I could find. They don't give you a lot of extra material though. Stretching it tight and smooth was a real challenge.

      The form was melamine and the formed side of the concrete does end out face up. I spent a great deal of time making sure that the work surface supporting the form was as smooth and flat as possible so as to avoid any sagging from the weight of the concrete. I used an expensive 48" straightedge to check the inside bottom of the form for flatness prior to pouring the mix. I used playing cards for shimming the underneath of the form as well as shimming the slabs on the sub frame. When I dumped the first piece out of the form I was absolutely amazed that concrete could actually be that smooth. In fact, neighbors that stopped by to see what I was doing couldn't believe it wasn't slate.

Log in or create an account to post a comment.

Sign up Log in

Become a member and get full access to FineHomebuilding.com

Video Shorts

Categories

  • Business
  • Code Questions
  • Construction Techniques
  • Energy, Heating & Insulation
  • General Discussion
  • Help/Work Wanted
  • Photo Gallery
  • Reader Classified
  • Tools for Home Building

Discussion Forum

Recent Posts and Replies

  • |
  • |
  • |
  • |
  • |
  • |
View More Create Post

Up Next

Video Shorts

Featured Story

Podcast Episode 693: Old-House Hazards, Building Larsen Trusses, AI in Construction

The crew talks about work start times, fire-resistant construction, fixer-uppers, building Larsen trusses, and AI for construction.

Featured Video

How to Install Cable Rail Around Wood-Post Corners

Use these tips to keep cables tight and straight for a professional-looking deck-railing job.

Related Stories

  • Podcast Episode 693: Old-House Hazards, Building Larsen Trusses, AI in Construction
  • FHB Podcast Segment: Finding Hazardous Materials in a Fixer-Upper
  • A Classic Paint Sprayer Gets a Thoughtful Refresh
  • Podcast Episode 692: Introduction to Trade Work, Embodied Carbon, and Envelope Improvements

Highlights

Fine Homebuilding All Access
Fine Homebuilding Podcast
Tool Tech
Plus, get an extra 20% off with code GIFT20

"I have learned so much thanks to the searchable articles on the FHB website. I can confidently say that I expect to be a life-long subscriber." - M.K.

Get home building tips, offers, and expert advice in your inbox

Signing you up...

This site is protected by reCAPTCHA and the Google Privacy Policy and Terms of Service apply.
See all newsletters
See all newsletters

Fine Homebuilding Magazine

  • Issue 332 - July 2025
    • Custom Built-ins With Job-Site Tools
    • Fight House Fires Through Design
    • Making the Move to Multifamily
  • Issue 331 - June 2025
    • A More Resilient Roof
    • Tool Test: You Need a Drywall Sander
    • Ducted vs. Ductless Heat Pumps
  • Issue 330 - April/May 2025
    • Deck Details for Durability
    • FAQs on HPWHs
    • 10 Tips for a Long-Lasting Paint Job
  • Issue 329 - Feb/Mar 2025
    • Smart Foundation for a Small Addition
    • A Kominka Comes West
    • Making Small Kitchens Work
  • Issue 328 - Dec/Jan 2025
    • How a Pro Replaces Columns
    • Passive House 3.0
    • Tool Test: Compact Line Lasers

Fine Home Building

Newsletter Sign-up

  • Fine Homebuilding

    Home building tips, offers, and expert advice in your inbox.

  • Green Building Advisor

    Building science and energy efficiency advice, plus special offers, in your inbox.

  • Old House Journal

    Repair, renovation, and restoration tips, plus special offers, in your inbox.

Signing you up...

This site is protected by reCAPTCHA and the Google Privacy Policy and Terms of Service apply.
See all newsletters

Follow

  • Fine Homebuilding

    Dig into cutting-edge approaches and decades of proven solutions with total access to our experts and tradespeople.

    Start Free Trial Now
    • Facebook
    • Instagram
    • X
    • LinkedIn
  • GBA Prime

    Get instant access to the latest developments in green building, research, and reports from the field.

    Start Free Trial Now
    • Facebook
    • YouTube
  • Old House Journal

    Learn how to restore, repair, update, and decorate your home.

    Subscribe Now
    • Facebook
    • Instagram
    • X

Membership & Magazine

  • Online Archive
  • Start Free Trial
  • Magazine Subscription
  • Magazine Renewal
  • Gift a Subscription
  • Customer Support
  • Privacy Preferences
  • About
  • Contact
  • Advertise
  • Careers
  • Terms of Use
  • Site Map
  • Do not sell or share my information
  • Privacy Policy
  • Accessibility
  • California Privacy Rights

© 2025 Active Interest Media. All rights reserved.

Fine Homebuilding receives a commission for items purchased through links on this site, including Amazon Associates and other affiliate advertising programs.

  • Home Group
  • Antique Trader
  • Arts & Crafts Homes
  • Bank Note Reporter
  • Cabin Life
  • Cuisine at Home
  • Fine Gardening
  • Fine Woodworking
  • Green Building Advisor
  • Garden Gate
  • Horticulture
  • Keep Craft Alive
  • Log Home Living
  • Military Trader/Vehicles
  • Numismatic News
  • Numismaster
  • Old Cars Weekly
  • Old House Journal
  • Period Homes
  • Popular Woodworking
  • Script
  • ShopNotes
  • Sports Collectors Digest
  • Threads
  • Timber Home Living
  • Traditional Building
  • Woodsmith
  • World Coin News
  • Writer's Digest
Active Interest Media logo
X
X
This is a dialog window which overlays the main content of the page. The modal window is a 'site map' of the most critical areas of the site. Pressing the Escape (ESC) button will close the modal and bring you back to where you were on the page.

Main Menu

  • How-To
  • Design
  • Tools & Materials
  • Video
  • Blogs
  • Forum
  • Project Guides
  • Reader Projects
  • Magazine
  • Members
  • FHB House

Podcasts

  • FHB Podcast
  • ProTalk

Webinars

  • Upcoming and On-Demand

Podcasts

  • FHB Podcast
  • ProTalk

Webinars

  • Upcoming and On-Demand

Popular Topics

  • Kitchens
  • Business
  • Bedrooms
  • Roofs
  • Architecture and Design
  • Green Building
  • Decks
  • Framing
  • Safety
  • Remodeling
  • Bathrooms
  • Windows
  • Tilework
  • Ceilings
  • HVAC

Magazine

  • Current Issue
  • Past Issues
  • Magazine Index
  • Subscribe
  • Online Archive
  • Author Guidelines

All Access

  • Member Home
  • Start Free Trial
  • Gift Membership

Online Learning

  • Courses
  • Project Guides
  • Reader Projects
  • Podcast

More

  • FHB Ambassadors
  • FHB House
  • Customer Support

Account

  • Log In
  • Join

Newsletter

Get home building tips, offers, and expert advice in your inbox

Signing you up...

This site is protected by reCAPTCHA and the Google Privacy Policy and Terms of Service apply.
See all newsletters
See all newsletters

Follow

  • X
  • YouTube
  • instagram
  • facebook
  • pinterest
  • Tiktok

Join All Access

Become a member and get instant access to thousands of videos, how-tos, tool reviews, and design features.

Start Your Free Trial

Subscribe

FHB Magazine

Start your subscription today and save up to 70%

Subscribe

Enjoy unlimited access to Fine Homebuilding. Join Now

Already a member? Log in

We hope you’ve enjoyed your free articles. To keep reading, become a member today.

Get complete site access to expert advice, how-to videos, Code Check, and more, plus the print magazine.

Start your FREE trial

Already a member? Log in

Privacy Policy Update

We use cookies, pixels, script and other tracking technologies to analyze and improve our service, to improve and personalize content, and for advertising to you. We also share information about your use of our site with third-party social media, advertising and analytics partners. You can view our Privacy Policy here and our Terms of Use here.

Cookies

Analytics

These cookies help us track site metrics to improve our sites and provide a better user experience.

Advertising/Social Media

These cookies are used to serve advertisements aligned with your interests.

Essential

These cookies are required to provide basic functions like page navigation and access to secure areas of the website.

Delete My Data

Delete all cookies and associated data