Poured Exterior Door Sill Questions and Problem
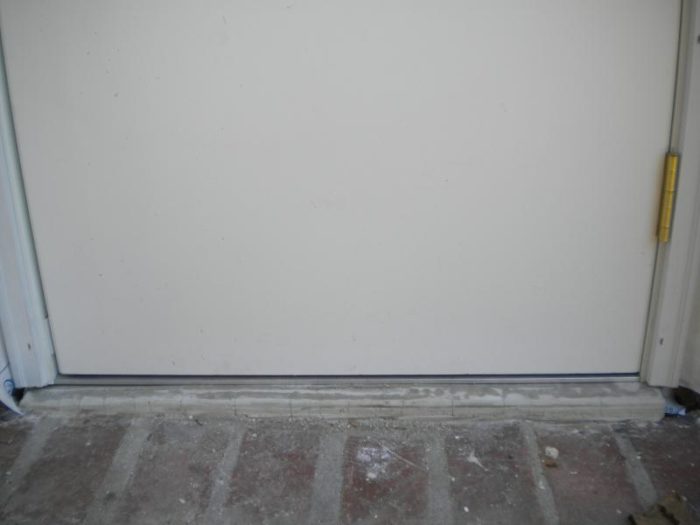
I had a prehung exterior door installed at my Mother’s garage. Although there was a wooden soleplate elsewhere, between the door jambs, the inside baseboard and the stucco wall, there was a fill of concrete under the swinging area of the door. In removing the heavily glued threshold of the old door, that concrete cracked and was removed.
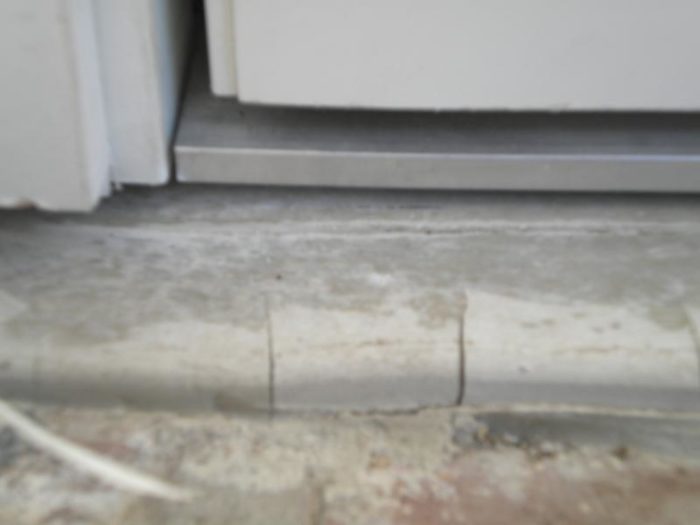
The door man, in a hurry to finish the door installation, replaced the old concrete with rapid-set cement which he extended in a lip out on to the exterior brick landing. His pour was 1/4″ below the level of the aluminum threshold at one end and the outside lip is heavily cracked.
Unless someone has an elegant solution that allows me to fix this issue with the hung door in place, I’m going to have to remove it and the rapid-set cement and start over on a new sill.
Questions:
What materials, additives and reinforcement might lead to a water-resistant, durable result in a poured sill balancing those
factors against an early curing time allowing quicker reinstallation of the door with an aluminum threshold?
Is there a minimum thickness of a poured sill for strength? Unless I raise the header and the door, I am going to have to taper the pour down from a .5″ level point on one end of the threshold.
**Would a specific bonding agent be advised to unite the poured sill with the brick landing?
Is there another approach that I’m overlooking here?


Replies
Here are some additional pictures of the door from outside looking at the rapid-set cement lip.
Thanks for considering my difficulty.
First off, if you can remove the existing patch without having to pull the door, it may not be necessary to remove the door to install new material. I've quite successfully filled in under an aluminum threshold with patching material, and the seal you get is better than doing it the "right" way, plus you're assured there will be no gaps. (Note this was for our front door, and the wife didn't complain, so it must look OK.)
It's unclear what is under the area. I assume there's a garage slab under most of it, but apparently part is resting on a brick "landing"? Unless the brick is set on the same slab as the rest, you should not "span" the joint between the two with your patch, as differential movement between the two will quickly crack it.
As to the patch material, your local big box will have at least a half-dozen choices. Some are made to go on thick and will not "feather" very well (but likely can "feather" to 1/2"). Others are intended more as a skim coat and "feather" nicely but are not "happy" when applied in thick coats. You want one of the types intended for thicker applications.
I'm guessing your door guy used what he had on hand or the first thing he could grab, and got something intended more for skim coating. Then he likely mixed it a little too thin, so it shrank and cracked as it dried.
Tediously and carefully, I think the rapid-set can be removed without the door coming off. I think the main cracked area is the lip you see extending beyond the aluminum threshold. Nonetheless, if I have to remove the door to get needed access as ideas develop, I will.
Your comment on the point that the brick landing is a separate slab of different material and will invite cracking is simple and
simply brilliant. I'll keep that fast in mind. A sloping lip is needed outside of the aluminum threshold but it is
going to have to maintain an air gap with the brick landing.
Now I'll turn to thinking about the idea of inserting a piece of Azek or other impervious material on top of whatever poured material goes between the stucco and inner garage wall baseboard to serve as a drip lip.
The door installer wanted to be doublequick and my discussions with others confirm that on a day of mild temperature highs
the best way to get the rapid-set cement to crack was to get it too wet, something he may have done to extend its working life.
I appreciate your insights and help.
The idea of a white oak sill has on top of the upright concrete pour where the wooden sill plate normally would be has come up. It would be wide enough to furnish a good drip edge and sturdy but not maintenance free. One potential problem
might be its thickness. If it is too thick it may require raising the header to raise the door, something I'll check on tomorrow.
Some complain about Azek movement if not secured at intervals. Here, it would be trapped by the aluminum threshold and concrete pour. Can anyone think of a better candidate material that would work under the threshold as a drip edge/sill that would be sturdy stable and not require maintenance in a smaller thickness than a wooden door sill? Stone?
Anyone have experience with stone for sills? What would be a durable variety in, say, a starting 1" thickness that
could bridge the new concrete, broken stucco wall and brick landing without cracking and permit grinding a runoff
slope into it? How must the stone be supported and affixed in this installation?
I tear out and replace doors and sills often as part of what I do and I'd suggest against anything too complicated for the fix.
Anytime you have materials under a door threshold there are problems with sealing out moisture and the more different materials used the worse it gets. Wood of any kind is not a good substitute for an aluminum or cement-based sub-threashold if you will.
Bonding/strength additive is generically called Moose Milk by some and is an acrylic used in place of some or all the water in your mix - the more Moose Milk the stronger the mix will be. Rather than simply plooping it on top of the concrete below, to fully bond it has to be worked into the surface by scratch coating the surface first - this is a thin layer pressed hard onto the existing and the trowel should be making a scratching sound. The noise is simply the sand particles being in contact with both the trowel edge and hard concrete.
If done correctly the additional concrete will bond with the surface of the existing so well that it will rip the old surface off if you try to remove it.
Personally when I rebuild sub threasholds I like to use a good quality of modified thinset mortar with moose milk. Modified thinset has a compressive strength exceeding normal concrete and if done right can't be chipped off without ripping off the surface of the original concrete. This also makes a very water resistant joint, not at all the same as a normal cold joint when a layer of concrete is simply put ontop of an old layer of concrete. The scratch coat combined with the moose milk is the key.
The downside to using moose milk is that it's harder to finish the more you use. The same goes for thinset vs. morter with more larger aggregate....you don't trowel thinset smooth - you simply coax it into position and grind it smooth if need be.
If I was in your situation I'd mix up some good thinset and squish it under your threashold and scratch coat the cracked concrete you already have, which will fill any cracks preventing water from freezing and further damaging those areas and it will provide a uniform look. It might outlast us both with that simple fix. The absolute worst thing that will happen is you'll get partial separation/flaking off of the poorly poured concrete that can be built up with additional thinset when the time comes, if it comes.
Along the same lines there are bonding epoxies made specifically for concrete applications that can be used to reattach any portions that may come off in the future. An industrial concrete supply house will have some guys used to solving all sorts of problems that are concrete related and they can also recommend fixes both simpler (replacing your cracked concrete with a better mix) or more exotic such as using water reducers and reinforcing fibers, and maybe topping it off with an epoxy finish coat in any color you want!
Today, the door was unhinged, the prehung jamb unscrewed from the rough opening and then the door hinged to the
jamb and laid flat in the house so gravity closes it against the weatherstripping. The door is also covered with a tarp
to shield from sun through the window.
I also broke out the rapid-set cement pour. It was weak, soft, the lip cracked as seen and it also wasn't tall/thick enough to allow for a sill that would slope and project out far enough over the outside brick landing. The first attached picture shows (top to bottom) the brick landing, 1" wide strip of broken stucco wall and 4" wide stub wall atop the garage slab.
I carefully read IdahoDon's post. I didn't know about the slurry coat application of acrylic fortifier in repairs. Thanks, Don, for that and your other experienced description.
I don't want to put a wood sill on top of the concrete if it can be avoided. An aluminum sill that could be somehow affixed
to the new concrete pour would be great. The new concrete pour will be 4" (if just atop the stub wall) or 5" (atop the stub wall and broken stucco wall) depending on advice.
Look at the last picture. Tha shows the prehung door threshold in final necessary position relative to the stucco wall. Any aluminum sill that goes under entire 4 5/8" prehung threshold as pictured and overhangs a decent distance unto the brick landing is goint to have to really wide. Either that, or I cut a piece of flat 1/4" aluminum to fit under the back of the prehung threshold and cut another piece with a lip to abut with it and extend a decent distance over the landing. Anyway, that is a notion and I hope you have a better one.
And I'm assuming the aluminum can be attached to the concrete with polyurethane and tapcons. Improved ideas or solutions are welcome. My head hurts.
What you have there is a bad design -- the brick is set too high relative to the threshold, and there's no widened threshold surface built into the garage footing. This makes it hard to keep water away from the joint with the brick. (Hopefully the brick is reasonably well sloped away.)
I'd give up on having your new base overlap the brick and just have it butt up to the brick, with a caulkable gap between the two. (Hint, use a couple of layers of water-resistant corrugated cardboard to create the space.)
Clean/prep the surface (just roughing it up a bit with a hammer will suffice, but you can use a bonding agent if you wish), reinstall the door & threshold, and then insert your mortar. Thinset, as someone else suggested, is an excellent choice, though it sets quite dark, and is a bit more expensive than most other options. If you're obsessive you can use an additive in the thinset, but it's probably not necessary.