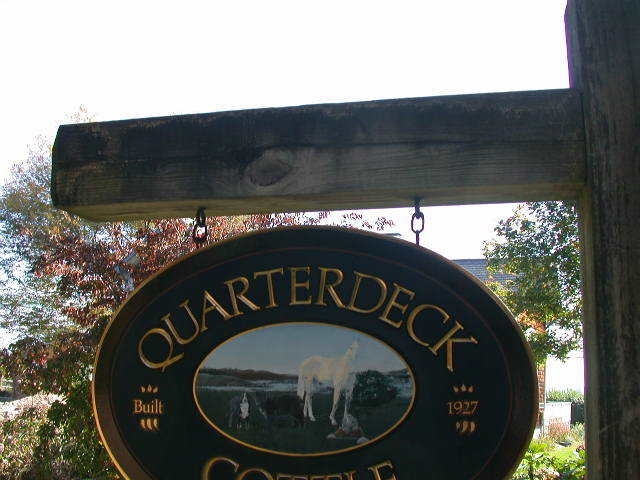
here’s a new project … Design / Build… existing house built CA 1927 on a gorgeous lot overlooking the East Passage of Narragansett Bay….. about a quarter mile South of that job we did the deck / patio / landscapng on
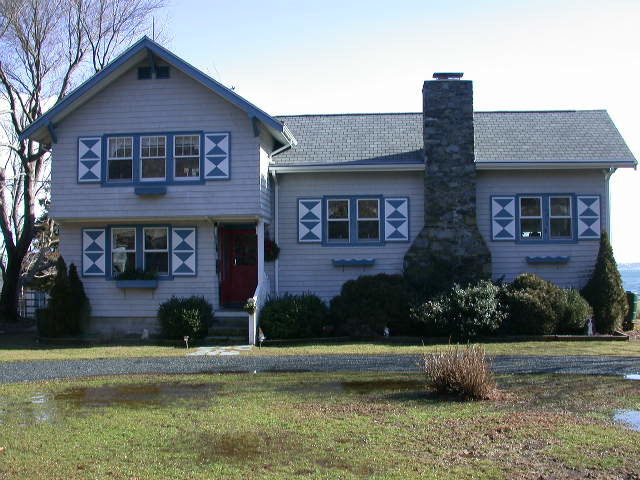
here’s the Existing: Front Elevation
small 2-car garage to be demolished
entry to be re-oriented
and the 2d floor Master Bedroom to be remodeled
all-in-all we decided the scope would be 2-car garage with attached 12 x 20 workshop and 2d floor workout room
garage attached to house by means of a covered porch, and re-orient the entry to welcome arrivals
remodel the bedroom by blowing out the East wall with a walk-in Bay, and a small balconey to give better access to the deck
Mike Smith Rhode Island : Design / Build / Repair / Restore
Edited 12/18/2006 8:17 pm ET by MikeSmith


Replies
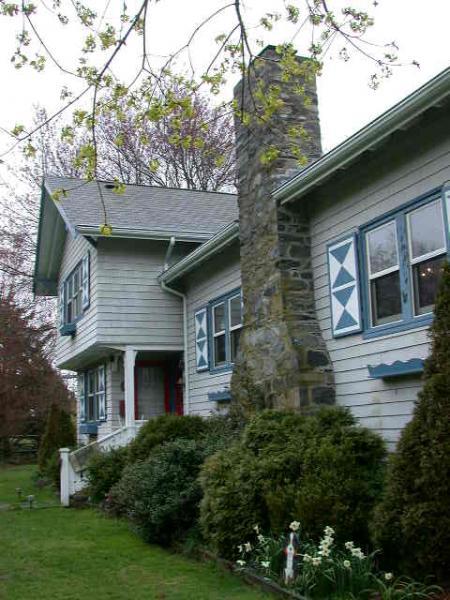
here's the East Elevation that overlooks the bay
View Image
View Image
View Image
View Image
I think the style is "Chalet" .. and I'm going to try to repeat that theme in the additions.. mostly by keeping the same roof pitch, same overhangs, same style knees
Mike Smith Rhode Island : Design / Build / Repair / Restore
Edited 12/18/2006 8:26 pm ET by MikeSmith
wow it sure doesn't look like the same house from the back
you got that right !
anyways.. i decided to angle the garage away from the house at a 30 deg angle
and separate it with the covered porch so it is a minimum of 10' at the closest point
got the digger in as soon as we signed the contract... i wanted the foundation & slab in before we got into heavy frost
View Image
the shale at the far end was only about 2' down.. and we wanted 40" of excavation for our frost wall.. luckily Randy could rip the shale with his excavator
View Image
sometimes i wonder who's smarter... Randy .... or one of his beagles
View Image
got the footings poured a week early...
View Image
our form contractor had a hole in his schedule.. someone else wasn't ready... but we were
View Image
Mike Smith Rhode Island : Design / Build / Repair / Restore
Edited 12/18/2006 8:58 pm ET by MikeSmith
Wow, "ahead of schedule" has a nice ring to it.
jt8
"When one door closes another door opens; but we so often look so long and so regretfully upon the closed door, that we do not see the ones which open for us." -- Alexander Graham Bell
I don't see any of Randy's beagles with shovels<G> charming "shudders"...LOL Oh God said to Abraham, "Kill me a son"
Abe says, "Man, you must be puttin' me on"
God say, "No." Abe say, "What?"
God say, "You can do what you want Abe, but
The next time you see me comin' you better run"
Well Abe says, "Where do you want this killin' done?"
God says, "Out on Highway 61."
i think the shutters are an alphabet letter in signal flag code... maybe "W" ?
here's one of Randy's beagles... this is Beau
View Image
Mike Smith Rhode Island : Design / Build / Repair / Restore
Edited 12/19/2006 10:06 pm ET by MikeSmith
How may days from when you started excavation to pouring the slab?
"When asked if you can do something, tell'em "Why certainly I can", then get busy and find a way to do it." T. Roosevelt
Ed, in Break time...............24 hrs.A great place for Information, Comraderie, and a sucker punch.
Remodeling Contractor just outside the Glass City.
http://www.quittintime.com/
Yeah, that's what I suspected ... just like on tv.
"When asked if you can do something, tell'em "Why certainly I can", then get busy and find a way to do it." T. Roosevelt
eddie... just for you, i'll look it up.....
hmmm.... two weeks, elapsed timeMike Smith Rhode Island : Design / Build / Repair / Restore
Another Great mike smith thread! Thanks!"Being a cowboy aint all ridin and shootin" - Tim Mooney
garsh, thanks ic... you da bomb !Mike Smith Rhode Island : Design / Build / Repair / Restore
I got beau as the screen saver on all the company computers
Randy would be so proud ...Mike Smith Rhode Island : Design / Build / Repair / Restore
got the lumber delivery
View Image
& set the sills, started framing the walls. sure is easier when you have the slab in place before instead of after
View Image
brought the trailer on the job so we'd have our tools & some dry storage
View Image
Mike Smith Rhode Island : Design / Build / Repair / Restore
Edited 12/20/2006 7:30 pm ET by MikeSmith
Edited 12/20/2006 7:31 pm ET by MikeSmith
Edited 12/20/2006 7:33 pm ET by MikeSmith
Randy came back and demo'd the olde garage
View Image
and we took delivery of the red cabin
View Image
we saw cut the slab and filled the saw cut with epoxy concrete caulk
View Image
we set the center beam
View Image
Mike Smith Rhode Island : Design / Build / Repair / Restore
Edited 12/20/2006 7:34 pm ET by MikeSmith
Edited 12/20/2006 7:35 pm ET by MikeSmith
Edited 12/20/2006 7:36 pm ET by MikeSmith
Edited 12/20/2006 7:37 pm ET by MikeSmith
framed the 2d floor deck
View Image
looking across into a 2d floor bedroom... there's usually a cat on the window sill watching every move we make
View Image
set the lally columns under the main beam
View Image
Mike Smith Rhode Island : Design / Build / Repair / Restore
Edited 12/20/2006 7:52 pm ET by MikeSmith
Edited 12/20/2006 7:53 pm ET by MikeSmith
Edited 12/20/2006 7:54 pm ET by MikeSmith
at that point i wanted to solve another problem... changing the orientation of the entry.... the plan is to move the stairs 45 deg. to the South so it will be normal to the new mass of the porch & garage
first we had to support the 2d floor cantilever so we could remove the post
View Image
I was going to use 6x6.. but changed to 4x4 so the box would be less massive
these are the 6x6
View Image
then needle in our new beam and set the permanent new post supportsView Image
and the final 4x4 posts
View Image
Mike Smith Rhode Island : Design / Build / Repair / Restore
Edited 12/20/2006 7:55 pm ET by MikeSmith
Edited 12/20/2006 7:57 pm ET by MikeSmith
Edited 12/20/2006 7:57 pm ET by MikeSmith
Edited 12/20/2006 7:59 pm ET by MikeSmith
we set the ridge beam with our Proctor wall jacks, nailed it together on the deck and just levitated it into place
View Image
we have a full shed dormer on the back, so we threw 3 common rafters in at the window locations to help us locate the ridge on center
View Image
here's some of the bracing to keep everything kosher until we get the structural ridge in it's final location
View Image
here's the 6x6 centerpost to reduce the load on the structural ridge
View Image
Mike Smith Rhode Island : Design / Build / Repair / Restore
Edited 12/21/2006 8:01 pm ET by MikeSmith
Edited 12/21/2006 8:03 pm ET by MikeSmith
Edited 12/21/2006 8:03 pm ET by MikeSmith
Edited 12/21/2006 8:06 pm ET by MikeSmith
Mike:
Why do you notch the rafters and lower the ridge?
in this case i wanted a lower ridge so i could tie the shed dormer in below the peak... i usually notch the rafters just to help us line things upMike Smith Rhode Island : Design / Build / Repair / Restore
Thanks again Mike for another great thread.
Just wondering, though, why no "decal" on the "red cabin" . It sure would seem to fit, with the company color scheme and all. The superintendant's office needs a sign, dontcha' think? ;0)
bum
...The unspoken word is capital. We can invest it or we can squander it. -Mark Twain...
Be kind to your children....they will choose your nursing home.
Roy & Chuck got the last of the fly rafters on the full shed dormer in the back
View Image
and finished sheathing so we took advantage of the weather and trimmed and painted all the main roof edges
View Image
with the sheathing on we could remove all the interior braces, including the false common rafters we had in the back
View Image
sure is a nice open room now
View Image
Mike Smith Rhode Island : Design / Build / Repair / Restore
Edited 1/4/2007 9:13 pm ET by MikeSmith
Edited 1/4/2007 9:14 pm ET by MikeSmith
Edited 1/4/2007 9:14 pm ET by MikeSmith
Edited 1/4/2007 9:15 pm ET by MikeSmith
"before we got into heavy frost"...
Your still wearing T-shirts....must be that warm ocean brezze.
I love the idea of the angled garage with the covered conector. Is this for the look or becuse of site constraints??
Ward
both... we wanted to try to stay as far away as possible form that glorious Weeping Beech...
and we've got 40' of frontage for the garage.. so angling the addition was the best choiceMike Smith Rhode Island : Design / Build / Repair / Restore
the view from the front deck of the Newport Bridge
View Image
and a close-up of the bridge inspectors taking a look at the below deck
View Image
here's some more of Joe's handiwork... level to +/- 1/8 " and square to 1/4"
View Image
started backfilling & compacting with bankrun gravel
View Image
Mike Smith Rhode Island : Design / Build / Repair / Restore
Edited 12/19/2006 8:17 pm ET by MikeSmith
Edited 12/19/2006 8:18 pm ET by MikeSmith
Edited 12/19/2006 8:19 pm ET by MikeSmith
Edited 12/19/2006 8:20 pm ET by MikeSmith
there are always a lot of distractions taking place in the East Passage
here's "Dockwise" loading yachts for the snowbirds
View Image
and a collier waiting to go up the bay
View Image
meanwhile , Joe Costa was pouring the foundation walls
View Image
most of the concrete companies have changed over to the front end discharge mixers
View Image
Mike Smith Rhode Island : Design / Build / Repair / Restore
Edited 12/19/2006 8:14 pm ET by MikeSmith
Edited 12/19/2006 8:15 pm ET by MikeSmith
Edited 12/19/2006 8:15 pm ET by MikeSmith
Edited 12/19/2006 8:17 pm ET by MikeSmith
we poured one of the piers with a big plastic oil drum and brought the tops of the two lally column piers to the finish grade
View Image
finished compacting the fill and trenched for a footing under the slab where one of the gable end walls will go
View Image
formed our apron and set some mesh & rebar and got Hathaway in to pour the slabs
View Image
Mike Smith Rhode Island : Design / Build / Repair / Restore
Edited 12/19/2006 8:21 pm ET by MikeSmith
Edited 12/19/2006 8:22 pm ET by MikeSmith
Edited 12/19/2006 8:23 pm ET by MikeSmith
Edited 12/19/2006 8:30 pm ET by MikeSmith
Edited 12/19/2006 8:31 pm ET by MikeSmith
Hi Mike
No foam insulation under that slab? I know that it *is* a garage. Would foam be too expensive as a "just in case" they want to heat the garage in the future?
A very MERRY CHRISTMAS to you and yours,
Phil
Quantum materiae materietur marmota monax si marmota monax materiam possit materiari?
Phil... yes, it would be expensive on a contingency basis...
if they were considering RFH and including the tubing in the slab,then i'd figure the cost of the foam insulation too....
but we're already bumping up against budget numbers, so no gilding the lillyMike Smith Rhode Island : Design / Build / Repair / Restore
at this point, i left... Helen and I spent two weeks in Va, North Carolina & South Carolina... mostly just driving Rt. 17... what a nice drive
anyways... in the meantime, Roy & Chuck managed very well without me, thankyou
set the kneewalls to support the valley rafters for the front gable dormer... and the full shed dormer... fought a couple snowstorms & rainstorms
View Image
here's some of our bracing... concrete form turnbuckles
View Image
and a close-up
View Image
here's what i found when i got back
View Image
Mike Smith Rhode Island : Design / Build / Repair / Restore
Edited 12/21/2006 8:37 pm ET by MikeSmith
Edited 12/21/2006 8:38 pm ET by MikeSmith
Edited 12/21/2006 8:38 pm ET by MikeSmith
Edited 12/21/2006 8:39 pm ET by MikeSmith
Edited 12/21/2006 8:41 pm ET by MikeSmith
Mike,In post 4 (http://forums.taunton.com/tp-breaktime/messages?msg=83035.4) you mentioned that you started digging right after you got a contract. Since this is design build, I imagine that you pulled the permit, right? What is your typical wait for a building permit, and did you have to wait for the permit to be on site before digging?Also, you mention driving Rt. 17- was this US 17? If so, did you honk as you went through Fredericksburg?
Jon Blakemore RappahannockINC.com Fredericksburg, VA
no , i never start without a permit.... sometimes the BI will tell you something you hadn't thought of
typically.. i bring in the prints... and walk out with the permit.. if he's there.. otherwise, i might have to wait a day or two
jon... my brother tied me up.. i figure we were about an hour from Fredericksburg..
we didn't pick up 17 until south of Norfolk
one a dese daysMike Smith Rhode Island : Design / Build / Repair / Restore
when i got back , the Owners were gone for a week's vacation of theri own.. so this was an ideal time to blow out the front wall of their bedroom
some time before, in a kitchen remodel.. someone had set a steel beam in the 2d floor .. we used this as our anchor to cantilever the 4' bay extension... here's Roy & Chuck blowing out the wall
View Image
and Chuck surveying the results
View Image
with yours truly offering some words of wisdom
View Image
here's the view we're trying to enhance
View Image
Mike Smith Rhode Island : Design / Build / Repair / Restore
Edited 12/21/2006 8:53 pm ET by MikeSmith
Edited 12/21/2006 8:54 pm ET by MikeSmith
Edited 12/21/2006 8:55 pm ET by MikeSmith
Edited 12/21/2006 8:56 pm ET by MikeSmith
we framed up the walk-out bay
View Image
got the walls up, from the left... door, mulled DH, mulled DH
View Image
View Image
on the right we'll leave the existing roof over the 1st floor kitchen door
View Image
Mike Smith Rhode Island : Design / Build / Repair / Restore
Edited 12/21/2006 9:03 pm ET by MikeSmith
Edited 12/21/2006 9:03 pm ET by MikeSmith
Edited 12/21/2006 9:04 pm ET by MikeSmith
Edited 12/21/2006 9:05 pm ET by MikeSmith
Edited 12/21/2006 9:07 pm ET by MikeSmith
Dang, and all that in one day! Your crew's almost as good as Norm and Tommy! ;-) Chuck looks like a Good Hand ..
Mike, on the garage, wouldn't that tall gable have been easier to snap out on the floor so that you can square and sheet the whole thing? That way maybe you could brace it pushed out a bit to get your ridge set in the same way you did?
Learning something new everytime you post.
thanks
dustin
IAnother awesome photo blog Mike. Keep them coming...
I almost have the exact opposite view from my job right now.
View Image
Maybe I can see your project if I bust out the binoculars.
dustin.... the easiest thing to do would be to call DieselPig and have him frame it
but where would the fun be in that ?
for me... taking a two week vacation and comming back to find it all framed was quite satisfyingMike Smith Rhode Island : Design / Build / Repair / Restore
certainly, the front gable could have been tilt-up.. of course , it would have had to be framed first ... before the ridge beam was in place..
...... next time i'll frame it that wayMike Smith Rhode Island : Design / Build / Repair / Restore
before we could get the roof on the bay, we had a souple rainstorms.. so we tarped it for a weekend
View Image
there was one section that would be inaccessible in the future... so we insulated that before we sheathed the small roof section and put ice & water on it
View Image
the access to this deck used to be thru a door on the south side of the bedroom, but it was awkward ( had to step uuUU P , duck under the overhang, susceptible to leaks, & took up valuable wall space
so we moved the door to the bay, and added a small balconey for the new access....
the old door became a window... a little snow squall, but no accumulation
View Image
Mike Smith Rhode Island : Design / Build / Repair / Restore
Edited 12/23/2006 11:05 am ET by MikeSmith
Edited 12/23/2006 11:06 am ET by MikeSmith
Edited 12/23/2006 11:07 am ET by MikeSmith
we replaced the temporary balconey supports with the permanent 6x6
View Image
and installed the door & windows
View Image
this one is in a little better focus
View Image
Mike Smith Rhode Island : Design / Build / Repair / Restore
Edited 12/23/2006 11:14 am ET by MikeSmith
Edited 12/23/2006 11:14 am ET by MikeSmith
Edited 12/23/2006 11:15 am ET by MikeSmith
I was thinking, "wouldn't it be neat to tie that bump-out into the 2nd floor deck/balcony." and Viola! There it was.
OK, you've had a couple days off, where are our new pics?
jt8
"When one door closes another door opens; but we so often look so long and so regretfully upon the closed door, that we do not see the ones which open for us." -- Alexander Graham Bell
here ya go
we got back on the garage.. the big deal there are the two foot overhangs.. very hard to stage.. most of it has to be boogered while hanging in space
View Image
we made up our brackets from previously painted PT 4x4... the EZ Guide came in real handy for gang cutting them
View Image
Chuck is getting ready to rip the extended ridge down to a 2x6 to match the fly rafter
View Image
here's a closeup of one of the brackets & the 1x8 shiplap sheathing
View Image
Mike Smith Rhode Island : Design / Build / Repair / Restore
Edited 12/29/2006 10:40 pm ET by MikeSmith
Edited 12/29/2006 10:41 pm ET by MikeSmith
Edited 12/29/2006 10:43 pm ET by MikeSmith
Edited 12/29/2006 10:44 pm ET by MikeSmith
the exposed rafter tails require painted board sheathing to look right... also , we don't want our roofing nails poking thru ( 1 1/4" roofers )
so what we do in this type of situation is double sheath the perimeter.. anyplace the sheathing will be visible.. we drop the gable end rafter 3/4"
View Image
and notch the common rafters 3/4".. here's another view of the bracket & board sheathing from below
View Image
then we sheath the overhangs , in this case we used 1x8 shiplap pine.... and we primed all 6 sides, the main sheathing is 5/8" T&G Advantech, overlaying the 1x8 perimeter
View Image
here's the fly rafter in place on the rear, ready for the 1x8
View Image
Mike Smith Rhode Island : Design / Build / Repair / Restore
Edited 12/29/2006 10:45 pm ET by MikeSmith
Edited 12/29/2006 10:46 pm ET by MikeSmith
Edited 12/29/2006 10:47 pm ET by MikeSmith
Edited 12/29/2006 10:49 pm ET by MikeSmith
Edited 12/29/2006 10:50 pm ET by MikeSmith
while we were working the garage, my roofer came over & stripped the deck abutting the walk-out bay on the front..
View Image
then they put down the 1/2 hardboard & a 60 mil. EPDM
View Image
they use uncured rubber to flash the rail posts
View Image
Mike Smith Rhode Island : Design / Build / Repair / Restore
Edited 12/29/2006 10:55 pm ET by MikeSmith
Edited 12/29/2006 10:56 pm ET by MikeSmith
Edited 12/29/2006 10:56 pm ET by MikeSmith
then cut out the sheathing, and we have the RO for our witch's window
View Image
we'll be using a fixed casement with a 12-light grill pattern ( grills between glass )
here's the outside shot
View Image
then i trimmed the front gable roof edge and primed it for the weekend
View Image
Mike Smith Rhode Island : Design / Build / Repair / Restore
Edited 12/29/2006 11:11 pm ET by MikeSmith
Edited 12/29/2006 11:11 pm ET by MikeSmith
Edited 12/29/2006 11:12 pm ET by MikeSmith
Witch's Window is a new term to me so I googled it. Is it named so because a witch riding a broom with a pointed hat cannot enter that window?
As always, great lookin work Mike. Happy New year.
Quantum materiae materietur marmota monax si marmota monax materiam possit materiari?
i always thought it was so they COULD fly out..
typically , they were all just left over double-hungs that a frugal yankee tipped diagonally so they would fit under a roof..
naturally the neighbors would say disparaging things about it.. but it's amazing how often you see them in Vermont on the old farm housesMike Smith Rhode Island : Design / Build / Repair / Restore
Mike,
You have to be one of the most well thought out guys I've ever "met". Thanks for posting the pictures, you give me a whole different perspective on things. I can't even say what in particular, just your approach is so well thought out. You are my new idol :-)
I don't want to hijack your thread, but we have to put some sidewall shingles on my brothers house and he wants the corners weaved (woven?) :-). Got any suggestions and also any pictures of a jig to cut the rake for sidewall shingles? I figure you are the guy to ask.
tim .. i lost your post
<<<but we have to put some sidewall shingles on my brothers house and he wants the corners weaved>>>
for the rake shingles i usually take a barn door ( extra wide shingle ) and make a nice fit, get the angle just right.. then i use that as my scribe
we hold the bottoms of all our rake shingles 3/4 ( a piece of furring ) off the roof
as for weaving corners.. i've tried them all, starting with a shingling hatchet honed razor sharp...
then i moved onto block planes.. and we were still nailing the lower butts with a 4d galv finish nail then too
then i tried a router ( seemed like a good idea )
but i always wound up with my favorite method.... i hold the shingle in place , making sure it's exactly wher it's supposed to be and the butt is dead level, then i scribe the back with a sharp pencil, put the shingle on a work surface ( or hold it in my hand ) and cut it with a trim saw.. the best is one of those 4" PC trim saws
but a 5" or 6" battery saw will work good too.. the idea is a small diameter blade will follow the gentle curve of the shingle.... just follow the pencil line.. then nail it in place
you don't have to smooth it with a plane or anything.. the idea is to be consistent..
here's some pics of a red cedar job from '01... i went by there this AM so i'd have something to show you
View Image
View Image
View Image
View Image
View Image
Mike Smith Rhode Island : Design / Build / Repair / Restore
Edited 1/4/2007 9:15 pm ET by MikeSmith
Edited 1/4/2007 9:16 pm ET by MikeSmith
Edited 1/4/2007 9:17 pm ET by MikeSmith
Edited 1/4/2007 9:17 pm ET by MikeSmith
Edited 1/4/2007 9:18 pm ET by MikeSmith
Edited 1/4/2007 9:20 pm ET by MikeSmith
Looks good Mike. Thanks for replying. I was thinking I'd do it the same way you did, but trim up with a block plane if I need to. I'm looking forward to this. I'm trying to talk my brother into letting me do a pattern like Mike Guertin in the new JLC :-)
our roofing sub started the main roof of the Garage yesterday..
papered in
View Image
and starter course with soldiers up the rakes
View Image
we were inside framing the sleeve for a Zone system A/C - Heat Pump
View Image
Mike Smith Rhode Island : Design / Build / Repair / Restore
Edited 1/10/2007 7:03 pm ET by MikeSmith
Edited 1/10/2007 7:03 pm ET by MikeSmith
Edited 1/10/2007 7:04 pm ET by MikeSmith
OK, hopefully I won't start a war with this, but the instructions on the IKO shingles I'm now putting on my garage, plus the articles I've read, specifically say you should cut the tabs off the starter shingles, and imply that not doing so is bad - but don't say why. Apparently your roofer figures it isn't worth the effort. Any thoughts?
Don
good eyes don.... i watched the foereman instruct the guy to cut the tabs... tomorrow i'll find out what happened next..
good thing the camera caught it
as for starters: you cut the tabs and turn the shingle upside down to get the glue strip out on the edge.. otherwise the bottom course flaps in the breeze
it's definitely not a case of the roofer not thinking it wasn't worth it.. it just sounds like someone screwed up..... Mike Smith Rhode Island : Design / Build / Repair / Restore
Don't you cut the tabs and leave them cut edge down ? That way the glue is right at the lower edge of the first course.
duh...whaddid i just say to don ?Mike Smith Rhode Island : Design / Build / Repair / Restore
exactly..... my upside down is the same as your "cut edge down"
i don't mean face down.. that would would bury the glue strip, which is what the exercise is all aboutMike Smith Rhode Island : Design / Build / Repair / Restore
today was more of the same.. the roofers got most of the roof done... these are Certainteed Hatteras
View Image
and Roy & Chuck were hanging sheetrock in the MBR
View Image
Mike Smith Rhode Island : Design / Build / Repair / Restore
Edited 1/10/2007 7:04 pm ET by MikeSmith
Edited 1/10/2007 7:05 pm ET by MikeSmith
Mike,
Nice work, as always. Why do you call it a soldier course? Is it give you a double at the rake?
Chuck S
live, work, build, ...better with wood
Edited 1/10/2007 8:05 pm ET by stevent1
Mike,
That's a beautiful little dutch or 3/4 door with the dentils in that clot of photos. Did you build it?
What do you know about it's construction?
THanks,
Pat"Research is what I'm doing when I don't know what I'm doing..."
waters.. i think you're talking about the shower door...
.... the architect designed it... and Scott built iti try to get some interesting work for scott every summer... he teaches carpentry at the VO TECH... he worked for me a couple years while he was getting his degree and teaching certificatei'm posting on a new MAC so i don't really know how to find some other pictures of his workwe do try to get the nice things to build... but not every job has themMike Smith Rhode Island : Design / Build / Repair / Restore
Thanks.
I've come to seek out that exterior work--nice fences, gates and arbors.
Always interested when I see a nice design.
Pat"Research is what I'm doing when I don't know what I'm doing..."
Wow - very nice thread. I missed up til now, excellent work and documentation - thank you!!"...craftsmanship is first & foremost an expression of the human spirit." - P. Korn
bakersfieldremodel.com
ah shucks....
course, as you know, you need the right homeowner to make it all possibleMike Hussein Smith Rhode Island : Design / Build / Repair / Restore
Article by Mike Guertin in Jan. 07 page 132 Fine home building.
I'm a 1936 vintage, when I grow up I think I want to be Like Tim and Mike R I
Amazed, al
yesterday, my roofer replaced all the starter courses... claimed a brain fart..
been there , done that..
View Image
sure looks a lot better
View Image
while they were finishing up we went inside and blew dens-pak cells thru the sheetrock.. usually we blow thru InsulMesh... but i wanted to save a couple of days
View Image
patched all the holes with mesh & Durabond 90
View Image
we figured all of the stud bays and the weight of the cells.. in the sidewalls we got 2.5 lb./cf... not bad, but i'm pretty sure we'll go back to InsulMesh next time... we really like the visibility..
stapling & gluing InsulMesh is time-consuming... but the blowing goes so much faster
Mike Smith Rhode Island : Design / Build / Repair / Restore
Edited 1/12/2007 8:48 pm ET by MikeSmith
Edited 1/12/2007 8:49 pm ET by MikeSmith
Edited 1/12/2007 8:49 pm ET by MikeSmith
Edited 1/12/2007 8:55 pm ET by MikeSmith
today was promised for 50 deg..... but 46 ain't bad
View Image
Roy & Chuck got the rafters cut & set over the workshop area...
while i set the 4x6 beam that will carry the pent-roof over the garage doors
this section is an extension of the pent-roof and protects the entry to the workshop
here's the view fron the rear quarter
View Image
and the West side
View Image
Mike Smith Rhode Island : Design / Build / Repair / Restore
Edited 1/12/2007 8:55 pm ET by MikeSmith
Edited 1/12/2007 8:56 pm ET by MikeSmith
Edited 1/12/2007 8:56 pm ET by MikeSmith
Mike,
As always, Nice work.
Do you have a propane heater in there to cure the mud?
Chuck S. live, work, build, ...better with wood
no.. this is a 2d floor room , so it's heated from below...
also the Durabond will set in these temps anywaysMike Smith Rhode Island : Design / Build / Repair / Restore
so ... here's the end of the day....
View Image
after the guys left, i finished priming the beam & the rafter tails to take advantage of this weather
View Image
View Image
Mike Smith Rhode Island : Design / Build / Repair / Restore
Edited 1/12/2007 9:00 pm ET by MikeSmith
Edited 1/12/2007 9:01 pm ET by MikeSmith
Edited 1/12/2007 9:02 pm ET by MikeSmith
Edited 1/12/2007 9:03 pm ET by MikeSmith
Mike. have you always run shingles up the rakes? I brought this up a few years ago that I overhang a starter up the rake (3/4") and everyone typed at me like I had two heads. It gives a great appearance from the ground and double coverage at the rake.
thanks
Dustin
no, sometimes i do & sometimes i don't.. but my roofer always does,
and yes, i like the appearance tooMike Smith Rhode Island : Design / Build / Repair / Restore
Mike, in another thread, I asked whether code addresses rafter notching at seats.
I am looking at this pic,
View Image
and wondering if the rafter depth left at the deepest part of the birdsmouth cut is more than 2/3 (UBC) or more than 3/4 (IBC) of total depth.
We don't get inspected here where we are, and if we did, that certainly would never get looked at, but I just wonder.
Isn't the real birds mouth up on the knee wall that your referencing for code/load bearing purpose?
PS don't mind me, I'm just making excuses to not go out and freeze.
I had always wondered what the story was behind the "witches window". I have been meaning to inquire about the origins of this unusual window placement since my latest trip to Warren, Vermont where I have seen several examples. I have also heard of it referred to as a "coffin window". Something to do with removing the deceased in a coffin from the upper level of the home to ground level through this window. I dunno????
Warren , VT is the first place i saw them also... back in the late '60's
i tried googling on "witch's window".... got one obscure reference
tried "ask.com".. no better
but i've had the term used on me by perfect strangers.. so i know it is in the vernacular
the Owner asked for a "witch's window"... and i drew exactly what she was thinking of
Mike Smith Rhode Island : Design / Build / Repair / Restore
Edited 12/30/2006 9:31 pm ET by MikeSmith
Mike,Do you counterflash your posts on a flat roof like the pics you posted? Care to elaborate how you handle this?Thanks.
i'm going to recommend that we case the posts...
View Image
but that would be extra... the old roof had the posts with copper flashings.. and the posts are checked & split... so water can get by the flashings anyways
Mike Smith Rhode Island : Design / Build / Repair / Restore
Edited 1/15/2007 4:23 pm ET by MikeSmith
yesterday the guys had off for MLK. i met with some customers about another design / build job
today we were finishing the exposed rafters on the workshop end..
boxed soffits are a lot easier and faster.. here's one of the ways we block our bays with exposed tails
View Image
i was setting the smaller brackets that will support the 4x6 to carry the pent roof over the garage doors
View Image
the beams wind up about 13'.... here's the lap joint detail i used to splice them over the brackets
View Image
Mike Smith Rhode Island : Design / Build / Repair / Restore
Edited 1/16/2007 9:54 pm ET by MikeSmith
Edited 1/16/2007 9:54 pm ET by MikeSmith
Edited 1/16/2007 9:55 pm ET by MikeSmith
here's another view of the 4x6
View Image
Roy & Chuck got the fly rafters on and started the sheathing with the shiplap 1x8
View Image
on these rafters ( 2x6 ) we didn't notch the tails, we'll pad the tops to take the 5/8 T&G overlay
View Image
Mike Smith Rhode Island : Design / Build / Repair / Restore
Edited 1/16/2007 9:56 pm ET by MikeSmith
Edited 1/16/2007 9:57 pm ET by MikeSmith
Edited 1/16/2007 9:57 pm ET by MikeSmith
Mike,
Good looking work.
I like that lap joint at the post beam connection.
Chuck Slive, work, build, ...better with wood
met with my bookeeper this am.. then went back and finished running the 4x6
at lunch.. i was driving away and looked back.....oops
View Image
the brackets wound up 1 1/2" out of level.. you can see the beam isn't parallel to the plywood line... now .. how did that happen ?
after lunch we got the high for the day... 25 deg.
View Image
i took the beam down... moved the brackets & reset the beam
all's well that ends well
View Image
Mike Smith Rhode Island : Design / Build / Repair / Restore
Edited 1/17/2007 9:35 pm ET by MikeSmith
Edited 1/17/2007 9:36 pm ET by MikeSmith
Edited 1/17/2007 9:37 pm ET by MikeSmith
Roy & Chuck finished the 1x8 and then put the 5/8" Advantech on the back
View Image
here's a shot showing the three roof lines
View Image
Mike Smith Rhode Island : Design / Build / Repair / Restore
Edited 1/17/2007 9:37 pm ET by MikeSmith
Edited 1/17/2007 9:38 pm ET by MikeSmith
Hey Mike!
Just wanted to let you know that me and the family went out today and ordered custom shirts that say "Mike Smith Rocks".
You ARE the MAN!
When you're this good, EVERYONE wants a crack at you!
http://www.petedraganic.com/
Mike, is one of the brackets in the three rooflines picture cocked? The top and bottom look alike and the middle one a bit different. Might be old eyes or whatever. You guys do a heck of a nice job. Thanks for all the pictures...dan
drapson i'll take a look tomorrow.. it might be an optical problem... the upper brackets are in the same vertical plane... but the upper bracket is smaller
View ImageMike Smith Rhode Island : Design / Build / Repair / Restore
after resetting the beam yesterday we started framing the pent roof
here's the ledger with a 3/4 x 3/4 rebate in the bottom for the red cedar shingles
View Image
and a test fit of the rafter pattern
View Image
then the rest of them magically appeared
View Image
ready to be sheathed with the 1x8
View Image
Mike Smith Rhode Island : Design / Build / Repair / Restore
Edited 1/18/2007 9:39 pm ET by MikeSmith
Edited 1/18/2007 9:39 pm ET by MikeSmith
Edited 1/18/2007 9:40 pm ET by MikeSmith
Edited 1/18/2007 9:40 pm ET by MikeSmith
Why is it called a rebate and not a rabbet? is that a local term?
"When asked if you can do something, tell'em "Why certainly I can", then get busy and find a way to do it." T. Roosevelt
your spelling is more common... but rebate is correct too
here's wikipedia:
<
A rabbet (also known as rebate) is a recess or groove cut into the edge of a piece of machineable material, usually wood. When viewed in cross-section, a rabbet is two-sided and open to the edge or end of the surface into which it is cut.
The spelling rabbet is probably a derivation of rebate, the latter being more common outside of North America.Mike Smith Rhode Island : Design / Build / Repair / Restore
Fast Eddie,
Here is another reference to rebate.
79773.100
Chuck Slive, work, build, ...better with wood
first the 1x8 , then the overlay of the 5/8 Advantech
View Image
another view....this is what it looks like under the pent roof
View Image
and a long view
View Image
Mike Smith Rhode Island : Design / Build / Repair / Restore
Edited 1/18/2007 9:41 pm ET by MikeSmith
Edited 1/18/2007 9:41 pm ET by MikeSmith
Edited 1/18/2007 9:41 pm ET by MikeSmith
Sure is a pretty building. This is going to hook into the main house, correct?Have a great time on this place, looks like fun...dan
going to start the attached porch that will connect the garage to the house..
so yesterday i handpicked the PT posts & beams and we stickered them to make sure they aren't going to twist on us
View Image
the morning started with rain.. so Roy did some more taping with Durabond
View Image
and Chuck was priming some more 1x8
View Image
Mike Smith Rhode Island : Design / Build / Repair / Restore
Edited 1/19/2007 10:20 pm ET by MikeSmith
Edited 1/19/2007 10:20 pm ET by MikeSmith
Edited 1/19/2007 10:21 pm ET by MikeSmith
after lunch the weather cleared ... Roy went to take care of another customer
and Chuck & i dug the footing holes for the porch posts
View Image
poured them with one 80 lb. bag of QuikCrete in each hole
View Image
then took care of our muddy boots with my boot scraper
View Image
Mike Smith Rhode Island : Design / Build / Repair / Restore
Edited 1/19/2007 10:21 pm ET by MikeSmith
Edited 1/19/2007 10:22 pm ET by MikeSmith
Edited 1/19/2007 10:22 pm ET by MikeSmith
Sorry, but I'm having a blind moment here...where are the post holes? Under the Advantech? Under the pt post with the wreath?
View Image
jt8
"Holding on to anger is like grasping a hot coal with the intent of throwing it at someone else; you are the one getting burned."-- Buddha
Edited 1/22/2007 5:50 pm by JohnT8
under the advantech.... maybe tomorrow we'll start framing thatMike Smith Rhode Island : Design / Build / Repair / Restore
Roy & Chuck had the last three post holes dug before i got there ( who said i was slow ? ) these ones , we'll use the foundation footing as our post footing
View Image
it being real winter.. i passed out the '07 winter duds
View Image
one of the first things we had to do was set the top of framing.... i wanted it about 5" below the front door, but this is a peculiar situation... there is no framing at the entry.. just 3/4 fir T&G.. and the basement is under that.. so we covered the t&g with Grace and then screwed 1/2" PT ply over that with SS screws
that point right under the door sill will be our top of deck frame
View Image
Mike Smith Rhode Island : Design / Build / Repair / Restore
Edited 1/23/2007 8:49 pm ET by MikeSmith
Edited 1/23/2007 8:50 pm ET by MikeSmith
Edited 1/23/2007 8:51 pm ET by MikeSmith
next we lined the posts and set our band joist
View Image
and trimmed the tops and set our 4x6 top plate
these are lagged thru the top and then strapped for wind hold-down
View Image
the bostich RH88 with the connector nose makes short work of this
View Image
Mike Smith Rhode Island : Design / Build / Repair / Restore
Edited 1/23/2007 8:52 pm ET by MikeSmith
Edited 1/23/2007 8:54 pm ET by MikeSmith
Edited 1/23/2007 8:55 pm ET by MikeSmith
Mike,What type of shake siding are you using? Is it a cementicous panel?Chuck Slive, work, build, ...better with wood
we'll match the house... factory finished red cedarMike Smith Rhode Island : Design / Build / Repair / Restore
there was another thread about roofing nails too long for exposed sheathing
here's a good example of what not to do..
heres the new roof on the left & the old roof on the right
and the way the roofer left the job about 6 years ago
View Image
vs. our rakes and soffits
View Image
Mike Smith Rhode Island : Design / Build / Repair / Restore
Edited 1/24/2007 6:09 pm ET by MikeSmith
Edited 1/24/2007 6:11 pm ET by MikeSmith
Edited 1/24/2007 6:12 pm ET by MikeSmith
Can't see 'em from my house<G> "But to be honest some folks here have been pushing the envelope quite a bit with their unnecessary use if swear words. They just put a character in to replace a letter. But everyone knows what they're saying." Sancho
That thread deals w/ inexperience on all levels. It's obvious in your photo to the guy posting that thread how it should be done. I enjoy seeing these posts, please keep it up.
By the way, I still have 3/4 of a case of 1" nails from the last beadboard job I did about 3 years ago.
Dustin
dustin.... thanks for the encouragement..
Roy & Chuck got the overlay sheathing on ..
View Image
that section of roof reminds me of railroad waiting stations with the huge overhang.. got to come up with a knee bracket for the corner
View Image
Mike Smith Rhode Island : Design / Build / Repair / Restore
Edited 1/25/2007 6:13 am ET by MikeSmith
Edited 1/25/2007 6:14 am ET by MikeSmith
What type of window are you putting in the witches window hole?
Fixed glass pops into my head.
Another great project Mike BTW. Are you guys taking this one to completion as well ?
fixed casement with grills between glass
yes... but it's a garage.. so the "completion" is somewhat limitedMike Smith Rhode Island : Design / Build / Repair / Restore
I have never installed a window on an angle before, does that present any issues with a sloped sill, even though it's fairly tucked away under the gable I was just curious.
Have you got the next big job lined up yet?
the traditional ones were just regular double hungs
we're using a fixed casement tto avoid some of the sill / jamb issues
next big one is in preliminary design / preliminary budget
we'll seeMike Smith Rhode Island : Design / Build / Repair / Restore
Hey Mike, what's a fixed casement? Just curious, why not an awning window...your guys do nice work<G> Love that pent roof. Never heard that term or witch's window, either...man, this place is so edumacational<G> "But to be honest some folks here have been pushing the envelope quite a bit with their unnecessary use if swear words. They just put a character in to replace a letter. But everyone knows what they're saying." Sancho
when you hang a window out of plumb, sooner or later the operation is going to give you problems.. a fixed window is not going to generate complaints
i thought about an awning window, and maybe in a smaller size.. it might work... but not in this sizeMike Smith Rhode Island : Design / Build / Repair / Restore
Hey Mike, around these parts a casement window swings like a door, and latchs...fixed don't do nothing. So you're "fixing" a casement? <G> maybe I need more coffee, it's 28°, I'll wait til 10 to go to work<G> "But to be honest some folks here have been pushing the envelope quite a bit with their unnecessary use if swear words. They just put a character in to replace a letter. But everyone knows what they're saying." Sancho
What we find with windows and sloped sills, in our super-cold climate, is that the inside frosting that occurs when we go to temps lower that 15 below zero, then yields a little water melt from the sunshine or inside heat, and that the water rolls downhill into the low corner, staining finish and wood.
No matter how well we insulate and seal, we get a little rim of frost right at the juncture of glass and sash, fixed windows and operables, whenever we go deep freeze. And sometimes this time of year, we can have an entire week where the high is like, minus 5.
Andersen, Marvin, Bonneville, Pella, Windsor, Kolbe, Lincoln, Pozzi, you name it, they all frost when the weather goes Dr. Zhivago on us.
In future, for any window with a sloped sill, particularly when it is a stand-alone like your witchy one, we would use an all-Integrity by Marvin. No wood to stain. We would expand inside with Azek liners.
Mike, re your large overhang at the corner, and needing support.
Model it out with your software, two ways, one using a good looking post, the other being a big bracket.
One might look significantly better than the other. Who knows?
And as regards your clothing for real winter, how does it fare in a -35 wind chill? That's what is outside right now with -8 showing on the thermo.
i thought about a post.. but it will just be in the way
i'll use a bent knee bracket i can lay up with my bandsaw & some epoxy..... lot's of examples on the New Haven train stations
as for the drippy window.... this is an unheated 2d floor of a garage.. so i don't expect a lot of frost..
but we'll see
here's Winona..
View Image
and here's kingston
View Image
hmmmm... looks like kingston might be a winnerMike Smith Rhode Island : Design / Build / Repair / Restore
Sweet...#2. works well visually.
Spheramid Enterprises Architectural Woodworks
The secret to a long life is knowing when its time to go. M. Shocked
I gotta agree with Sphere - #2 is gorgeous!
Forrest - did that sound too gay?
Just my choice but would like the mass to increase- compared to the existing brackets this one is longer so mass should increase to 6x other wise I think it would look a little bit on the spindle-e side.
I've got to say that the winona outlook braces suit me better. I agree that the kingston style might be right for what you're doing though.
I'll have to file away those two designs.zak
"When we build, let us think that we build forever. Let it not be for present delight nor for present use alone." --John Ruskin
"so it goes"
i guess it'll be interesting to see what the actual winds up looking likeMike Smith Rhode Island : Design / Build / Repair / Restore
it was Zero when i got up yesterday.... it was all the way up to 12 deg. by 8 am
good day for some Durabond in the bedroom
View Image
when we get the first big cold snap , we always get this hoarfrost effect off the bay
View Image
On Thursday the guys finished the porch roof frame while i went to New Hampshire for the afternoon
View Image
they also dug and poured the footings for the entry roof / stairs ( i guess that would be "fotters ".. in Maine...unless piffen did his speeling check with the Jamieson's again )
we set a center line bisecting the corner .. that will be the ridge line and the center of the 8' treads for the new entry
View Image
Mike Smith Rhode Island : Design / Build / Repair / Restore
Edited 1/27/2007 9:45 am ET by MikeSmith
Edited 1/27/2007 9:46 am ET by MikeSmith
Edited 1/27/2007 9:47 am ET by MikeSmith
Edited 1/27/2007 9:47 am ET by MikeSmith
i spent the weekend and today getting prints ready for budget pricing..
Roy & Chuck finished sheathing this side of the porch roof.... and added some more joists to the porch
View Image
since we needed some more 1x8 , 2x8, and Advantech.. i took a ride and got the rest of it.. so the guys started setting windows
View Image
Mike Smith Rhode Island : Design / Build / Repair / Restore
Edited 1/29/2007 9:44 pm ET by MikeSmith
Edited 1/29/2007 9:46 pm ET by MikeSmith
another bitter day.... 15 deg & wind..... good day to be inside with my CAD program
good day to get the rest of the windows in the 2d floor
here's the gable end window that had to fit above the porch roof and under the overhang
View Image
and here's the witch's window
View Image
and the big ones on the back
View Image
Mike Smith Rhode Island : Design / Build / Repair / Restore
Edited 1/30/2007 8:40 pm ET by MikeSmith
Edited 1/30/2007 8:40 pm ET by MikeSmith
Edited 1/30/2007 8:41 pm ET by MikeSmith
so.. with all the holes plugged we could set up our propane heater and paint the last of the 1x8 we need to finish the roof
View Image
the roofers are right behind us
View Image
Mike Smith Rhode Island : Design / Build / Repair / Restore
Edited 1/30/2007 8:41 pm ET by MikeSmith
Edited 1/30/2007 8:41 pm ET by MikeSmith
Non-vented roof?
jt8
Wishing I could be like Forrest
it's a garage .. why does it have to be vented ?
i'm trying to talk my BI into letting me skip the venting on our heated structures too..
with 20" of cells in an attic.. i don't think i'm getting any movement from the heated portion to the atticMike Smith Rhode Island : Design / Build / Repair / Restore
hmmm..... this office stuff is boring.. the guys are having all the fun !
the roofer kept on keeping on
View Image
and Roy & Chuck solved some of the roofing tie-in issues
like... what happens when a roof slides under an overhang.. meets a bracket, and stops at a downspout ?
View Image
View Image
View Image
Mike Smith Rhode Island : Design / Build / Repair / Restore
Edited 1/31/2007 7:47 pm ET by MikeSmith
Edited 1/31/2007 7:48 pm ET by MikeSmith
Edited 1/31/2007 7:48 pm ET by MikeSmith
Edited 1/31/2007 7:49 pm ET by MikeSmith
mike,
you should give roy & chuck a raise! uh! how about it?
is that you , Roy ?Mike Smith Rhode Island : Design / Build / Repair / Restore
Mr. Smith,
Good Evening sir. Please, let me take the oppurtunity to both extened a sincere
"Thank You" for you informative and educational posts. And thank you for dedicating
the time to help educate the men and women who read this forum and beyond.
I was hoping to ask two questions:
1) You mentioned that Roy and Chuck finished intstalling the windows yesterday in
the cold weather. Do you have any concerns about the Ice & water adhereing to the
plywood siding?
2) In picture "c144 pent roof.jpg" it shows the progress of the roofers. I can see the
ice & water laping up onto the sidewall. Are there any plans to add any additional
sidewall flashing (i.e. step flashing) or do you believe that the ice & water is
adequate protection?
As always, thank you in advance for your considerable patience and invaluable time.
- Thanks,
T.
thanks for the kind words.....
when we use I&W in cold weather we use heat guns to make it stick... takes longer... but so does everything else in cold weather... you can use it to defrost your fingers too
the step flash is there.. we use black coil stock, one step for every course.. just hard to see when it's black on black..
one reason we use black a lot is to give it a shadow line... we never use mill finish, corrodes too easily near salt water & looks like crap anyways
Mike Smith Rhode Island : Design / Build / Repair / Restore
Mr. Smith,Thank you again sir, for taking the time to educate the readers of breaktime.I would like to point out another perfect illustration of the impeccable work that you, Roy, and Chuck employ in your projects."...the step flash is there.. we use black coil stock, one step for every course.. just hard to see when it's black on black.. one reason we use black a lot is to give it a shadow line... we never use mill finish, corrodes too easily near salt water..."That's a great idea, and admittedly, not one that I had thought of.Thanks, - T.
I've noticed you around the neighborhood but I'm wondering if this is a don't ask don't tell site.
I been clicking and looking for a quarter deck fix but I'm still jonesn.
stay tuned... the Roy & Chuck show will be right backMike Smith Rhode Island : Design / Build / Repair / Restore
this week has been "hide-out " week. .... averaging about 15 deg... some drywall compound in the MBR
and finish setting the rest of the windows..... and the doors arrived on Tuesday...
here's the door from the porch into the garage
View Image
and inside the garage ... the landing platform will lead to the stairs up to the left as you come thru the door... or straight ahead thru another door , down, into the garage floor
View Image
here's a closeup of the black step flash we use ... someone was asking about it last week
View Image
and.. i was staying inside , working on design / estimate... and knocked the last bracket together.... look familiar ?
View Image
Mike Smith Rhode Island : Design / Build / Repair / Restore
Edited 2/7/2007 7:57 pm ET by MikeSmith
Edited 2/7/2007 7:57 pm ET by MikeSmith
Edited 2/7/2007 7:58 pm ET by MikeSmith
Edited 2/7/2007 7:58 pm ET by MikeSmith
Looks like the train station was a great source of inspiration. FWIW, so is this entire thread. Seeing the exposed soffits and brackets has inspired me to do the same on my upcoming Spring project.
Thanks Mike!!!
well, i'll tell you .. the exposed soffits & brackets were a lot more work than i allowed for .. but it does look nice , don't it ?
anyways.. finished setting the doors ......
View Image
then sent Roy & Chuck in to complete the taping and the fir flooring.. decided to change the direction in the bay , to help us jump over the flush steel beam
View Image
View Image
Mike Smith Rhode Island : Design / Build / Repair / Restore
Edited 2/11/2007 10:42 am ET by MikeSmith
Edited 2/11/2007 10:47 am ET by MikeSmith
Edited 2/11/2007 11:04 am ET by MikeSmith
Looking good. I like that floor. How do you tie in the fir floor at the direction change?Chuck Slive, work, build, ...better with wood
well, first we had to put a spline in at the original transition.. so we'd have tongues to nail to.. then when we changed direction 90 deg. we set up the router to end -groove the fir..
the end grooves slide and lock on the last leading tongueMike Smith Rhode Island : Design / Build / Repair / Restore
You always do things correctly.
Over the years I have seen cold joints(not splined) and they will eventually fail.live, work, build, ...better with wood
mike,
i still say give those guys a raise!!
i'll tell them you're in their corner....Mike Smith Rhode Island : Design / Build / Repair / Restore
Looks good. Is the whole floor going to get a sand/refinish, or are you going to try and match up the new stuff?
jt8
"One of the fondest expressions around is that we can't be the world's policeman. But guess who gets called when suddenly someone needs a cop." -- Colin Powell
yup.. refinish the whole floorMike Smith Rhode Island : Design / Build / Repair / Restore
regualar heat wave today.. had to be a least 35 by noon.. i know it was gloves off anyways
got the common rafters set for the entry
View Image
View Image
Mike Smith Rhode Island : Design / Build / Repair / Restore
Edited 2/12/2007 9:32 pm ET by MikeSmith
Edited 2/12/2007 9:33 pm ET by MikeSmith
Hi Mike
I noticed shims under the brackets. Is that for alignment of the bracket to squarely support the roof? Or leaving a gap for sliding felt &/or siding under the brackets?
Great work and tutorial as usual.
Phil
Quantum materiae materietur marmota monax si marmota monax materiam possit materiari?
to square them up....the shims will stay there forever..
the grace will lap onto one of the shingle courses to comeMike Smith Rhode Island : Design / Build / Repair / Restore
did some inside framing .. prep for the electricians.. and the cold has really slowed things down
Roy & Chuck got the roof finished with the 1x8 & the 5/8 overlay
View Image
View Image
then finished up the framing for the deck...
the owners decided they want stone stairs instead of the Trex wewere going to do.. so the mason has some hay down to help thaw the frost so he can dig
View Image
Mike Smith Rhode Island : Design / Build / Repair / Restore
Edited 2/22/2007 7:43 pm ET by MikeSmith
Edited 2/22/2007 7:43 pm ET by MikeSmith
Edited 2/22/2007 7:44 pm ET by MikeSmith
we're trimming the windows and doors so we can start the siding
the sills are from some old pattern 2x2 Trex baluster stock ( discontinued... the new baluster stock is 1.5 x 1.5 ).... and the casing is 5/4 x 4 Miratec
View Image
Mike Smith Rhode Island : Design / Build / Repair / Restore
Edited 2/22/2007 7:44 pm ET by MikeSmith
mike,
couldn't you get the sill stock from wider Trex (2x8) and mill a few pieces out of one length. I haven't seen actual 2" trex stock but if you say it existed, I believe it, however, I've always milled my stuff from the 2x.
dustin
we used to mill it from the old style 5/4 x6..
when trex changed a lot of their profiles a couple years ago we bought a bunch of the closeouts.. this is the last.. so i guess we will be looking into your 2x8 (?)
thanks for the tipMike Smith Rhode Island : Design / Build / Repair / Restore
Tap tap tap pointing to watch, where the heck is the photographer?
On a different thought I had after the last couple of post. Looking for 2" mill able trex stock for ya.
8'
12'
16'
20'
Color
Trex Originsâ„¢
View Image
View Image
WG
Looks expensive.I wish I had a reason; my flaws are open season
Always like to have options.
And besides I was just whining about no new project pictures.
Edited 2/28/2007 8:53 pm by ClaysWorld
tomorrow... i promise... been doing trim work in the bedroom and finishing the drywall...
Mike Smith Rhode Island : Design / Build / Repair / Restore
The Trex stock I was referring to was 2x8 dimensional which is actually 1 1/2" x 7 1/2. I think a 16' length was $45.00 but you can mill quite a few parts from it.
Dustin
I was thinking if he was looking for 8/4 it would do that.
but if 6/4 will do than no doubt it would be a way better way to go.
Hey Mike,
How about some pictures of the layout of your enclosed trailer--how it's set up. Planning to get a tandem-axle 12 or 16 footer this Summer and looking for ideas. Also, if you had it to do again, what would you do/buy/set up differently?
ThanksLive in the solution, not the problem.
we have a 7x14 dual.. elec. brakes
factory mount ladder racks.... barn doors..
we'd get the same one.. only with a wedge nose
our's is a CarMate.. i think it was about $4500 new
we don't have a lot of pics of the inside... sort of our dirty little secret
but we manage to get most of our things inthere and our two job boxes
it's hard to keep it organized.. a couple of rainy days and it goes to hell fast
here's one
View Image
Mike Smith Rhode Island : Design / Build / Repair / Restore
Edited 3/3/2007 10:34 pm ET by MikeSmith
here's some more.... this is a 50% shot... half the time it looks like this.. the rest of the time it looks better... it ebbs and flows.. must have something to do with the moon
View Image
View Image
View Image
View Image
Mike Smith Rhode Island : Design / Build / Repair / Restore
Edited 3/5/2007 1:31 pm ET by MikeSmith
Edited 3/5/2007 1:31 pm ET by MikeSmith
Edited 3/5/2007 1:32 pm ET by MikeSmith
Edited 3/5/2007 1:33 pm ET by MikeSmith
last week we trimmed the overhead doors so they could be installed
View Image
and we set the stairs for the 2d floor
View Image
the rest of the time Roy & Chuck were inside running trim and painting the MBR..
i was in the office working on our next contract
Mike Smith Rhode Island : Design / Build / Repair / Restore
Edited 3/5/2007 1:33 pm ET by MikeSmith
Edited 3/5/2007 1:34 pm ET by MikeSmith
Thanks Mike,
I know about the ebb & flow of a work vehicle--worked out of a step van for a couple of years. It stayed pretty good when it was just me, but when I had to use helpers it got unruly in a hurry.
I'd like to set up my shelves similar to yours, but leave room at the front for some minor "amenities" like a small microwave, Mr. Coffee, and a camp fridge. Probably pass on the Direct TV. At least to start with. Since it's only me, I don't have to worry about the guys hiding in the break room.Live in the solution, not the problem.
all of that would fit in a wedge noseMike Smith Rhode Island : Design / Build / Repair / Restore
What's the benefit of the wedge nose, easier to maneuver?Live in the solution, not the problem.
a 14' trailer ( any size trailer ) has an area about 4' from the front of the box to the hitch
that wasted space can be enclosed with a wedge-nose.
the trailer doesn't get any longer but the enclosed space is increased by a triangular shape of about 7' x4'
it is the one thing i would do differently if i was buying mine today
Mike Smith Rhode Island : Design / Build / Repair / Restore
And on occasion it let's you get 16'ers in it.
Roy & Chuck did a lot of interior painting in the MBR...
and put up the insulmesh in the 2d floor of the garage... and furred the ceiling
got some good temperatures finally so they moved to painting the trim so we wouldn't have to cut in after we shingle ( using factory finished red cedars )
here's some of the blue trim and white soffits/beams
View Image
View Image
View Image
there is still about 6 " of frost in the ground where the stone steps are going.. so the mason can't get started
Mike Smith Rhode Island : Design / Build / Repair / Restore
Edited 3/15/2007 9:17 pm ET by MikeSmith
Edited 3/15/2007 9:17 pm ET by MikeSmith
Edited 3/15/2007 9:19 pm ET by MikeSmith
At least it appears that the sun is shining brightly for you there, and the Carhartts are in the truck (for the time being). Been between 60 and 70 here since last Sat., but am not naive enough to think that the uncooperative weather is completely behind us.
Looking good Mike. Like the colors. Your guys mind slinging paint, or just happy to get the hours in?Live in the solution, not the problem.
painting.......no , they don't mind.. i think they like it..
i know some carps wouldn't work for me because we do some occasional painting..
we have a couple good painting subs, but we do lot of the small stuff rather than try to schedule it in.. also ,some things get into a better sequence ( trim the windows , paint the casings,install the siding ... rather than waiting to cut-in after the siding is up )Mike Smith Rhode Island : Design / Build / Repair / Restore
I know what you mean. I'll paint only to keep the job going or if it will make someone's life (job) easier down the road. Usually end up doing a heck of a lot of priming. Thanks, just curious.Live in the solution, not the problem.
snow yesterday... so Roy & Chuck moved inside to blow some cells
the insulweb had already been installed... the walls glued.. and the ceilings furredi stopped over with coffee ...here's our old US Fiber machine.. we have two blowers.. a new one and the old one we had rebuiltthe furred ceiling... and Roy demonstrating how tightly packed the 2x10 bays are....Mike Smith Rhode Island : Design / Build / Repair / RestoreEdited 3/17/2007 6:26 pm ET by MikeSmith
Edited 3/17/2007 6:27 pm ET by MikeSmith
View Image
[email protected]
WHICH content will be free, of course; WHICH content will require registration; but WHICH content will be available only to members of FineHomebuilding.com.???
Edited 3/17/2007 7:54 pm ET by EricPaulson
Edited 3/17/2007 7:55 pm ET by EricPaulson
Edited 3/17/2007 7:56 pm ET by EricPaulson
My pleasure.
As of this week I may no longer be counted among the D/U's..............yippee!
This is fun!![email protected]
WHICH content will be free, of course; WHICH content will require registration; but WHICH content will be available only to members of FineHomebuilding.com.???
took me a couple days to figger out what d/u is.....
anyways.. Roy & Chuck were back at it..
got the 2d floor done
View Image
even around the witch's window
View Image
and started running the corners up on the shingling
View Image
View Image
Mike Smith Rhode Island : Design / Build / Repair / Restore
Edited 3/21/2007 10:25 pm ET by MikeSmith
Edited 3/21/2007 10:26 pm ET by MikeSmith
Edited 3/21/2007 10:26 pm ET by MikeSmith
Edited 3/21/2007 10:27 pm ET by MikeSmith
DUH.
;)
c u friday.[email protected]
WHICH content will be free, of course; WHICH content will require registration; but WHICH content will be available only to members of FineHomebuilding.com.???
last corner... i asked the guys to save for me.. i would have felt left out if i didn't get to do any
i do all my shingles with a small diameter skill saw.. this one is my favorite... a 4" PC Trimsaw
View Image
View Image
my corner is the one that will abutt the lowest roof so we have to figure how to resolve our coursing with the breakflash over the roof
View Image
Mike Smith Rhode Island : Design / Build / Repair / Restore
Edited 3/30/2007 6:59 am ET by MikeSmith
Edited 3/30/2007 6:59 am ET by MikeSmith
Edited 3/30/2007 7:00 am ET by MikeSmith
Edited 3/30/2007 7:01 am ET by MikeSmith
the mason got his pad/footing poured and started laying up the stone stairs stairs
View Image
View Image
Mike Smith Rhode Island : Design / Build / Repair / Restore
Edited 3/30/2007 7:01 am ET by MikeSmith
Edited 3/30/2007 7:02 am ET by MikeSmith
some of the mason's progress...
View Image
one last pallet ( 1000 lbs ) of cellulose for the 2x10 floor of the garage
View Image
and the shingling between the rafter bays
View Image
framing for the pent roof over the rear door
View Image
Mike Smith Rhode Island : Design / Build / Repair / Restore
Edited 4/2/2007 7:05 am ET by MikeSmith
Edited 4/2/2007 7:06 am ET by MikeSmith
Edited 4/2/2007 7:06 am ET by MikeSmith
Edited 4/2/2007 7:07 am ET by MikeSmith
Edited 4/7/2007 8:08 am ET by MikeSmith
Edited 4/7/2007 8:08 am ET by MikeSmith
Hey Mike,
What's next for ya'll? BTW, my current customer is from your neck of the woods--Pawtucket.Live in the solution, not the problem.
we've got a siding/windows/roofing & solar collector cover replacement job....
then a small ranch house to build
here's the mason's work... waiting for the bluestone treads
View Image
and Chuck's framing for the pent roof over the back door
View Image
View Image
some more of the shingling on the front
Mike Smith Rhode Island : Design / Build / Repair / Restore
Edited 4/7/2007 8:15 am ET by MikeSmith
Edited 4/7/2007 8:15 am ET by MikeSmith
Edited 4/7/2007 8:16 am ET by MikeSmith
Edited 4/7/2007 8:17 am ET by MikeSmith
Is the ranch a turn-key job like "adverse"?Live in the solution, not the problem.
yes....Mike Smith Rhode Island : Design / Build / Repair / Restore
Hi mike i love your posts. Just wondering why you do your corner shingles first and then come back for the feild? thanks
i think it's faster... most of the guys i've seen do it this way too..
you have to use a story -pole.. so you can set your story- pole a couple of feet to one side of the corner....lay up your corner.. then just level from those courses
if you had a corner board, you would mark you courses on the side of the corner board
the sequence on the corner is faster if you don't break it.. two left.. two right.. two left.. two right.. etc
also once a corner is established... both fields can be filled in .. the one on the left and the right.. nobody has to waitMike Smith Rhode Island : Design / Build / Repair / Restore
I can definatly see how the no waiting would speed things up. do you snap lines in the feild or how do you keep your lines straight. we have been useing really faint chalk lines and just covering the line. just wondering how you guys did it. thanks angus
most of the time we snap lines... sometimes we level acrossMike Smith Rhode Island : Design / Build / Repair / Restore
the mason, Buck, is setting the bluestone treads... this is his Dad, Mike.. he's my regular mason.. but he wanted Buck to do this one
View Image
here's the leveling course for the landing
View Image
and another shot of the treads
View Image
Mike Smith Rhode Island : Design / Build / Repair / Restore
Edited 4/10/2007 6:04 pm ET by MikeSmith
Edited 4/10/2007 6:05 pm ET by MikeSmith
Edited 4/10/2007 6:05 pm ET by MikeSmith
Chuck is shingling around the witch's window
View Image
View Image
Mike Smith Rhode Island : Design / Build / Repair / Restore
Edited 4/10/2007 6:06 pm ET by MikeSmith
Edited 4/10/2007 6:06 pm ET by MikeSmith
Roy did all the area under the pent roof..
View Image
we made a rabbet in the 2x8 ledger for the rafters....... the rabbet receives all of the shingles.... we backprimed, primed and finish coated every place the shingles would touch so we wouldn't have to cut in
View Image
Mike Smith Rhode Island : Design / Build / Repair / Restore
Edited 4/10/2007 6:07 pm ET by MikeSmith
Edited 4/10/2007 6:07 pm ET by MikeSmith
Janetta got out of the army at Fort Polk.. she used to be my office manager/ designer
and she is again.. but she also fills in as carpenter when the office work is slow
4 years Army Engineers, carpenter /mason MOS.. and three tours in Iraq (????? )
anyways Janetta & I are doing the front gable
View Image
Janetta had to go get her driver's license renewed
she joined the Mass Guard when she got out
Mike Smith Rhode Island : Design / Build / Repair / Restore
Edited 4/10/2007 6:03 pm ET by MikeSmith
You always seem to get the cream of the crop Mike. Both in jobs and employees. Just another reason that your company is so well respected here at BT and in the real world.
Many more years of success to you sir!Live in the solution, not the problem.
hey there mike. Nice work, all looks very organized , working in the
paint/staining to stay ahead of the shingles.This saves a huge amount
of time when it comes to put the finish coat on the walls in the end.
Just wandering if you dipped the shingles or got them from a manufacturer already done??? thanks THE JAMAR HAMMER
pre-finished.. about $120/boxMike Smith Rhode Island : Design / Build / Repair / Restore
Nudge Nudge.
Cakes aren't cakes with out Icing.
Your efforts on displaying your projects are highly valued by many(I hope or I'm plural).
that North Easter we had played hell with the existing roof and the Gutter Helmet
View Image
none of the new shingles blew off
Mike Smith Rhode Island : Design / Build / Repair / Restore
Edited 4/24/2007 10:21 pm ET by MikeSmith
we used the rainy weather to finish the Master Bedroom... at least one of the tennants was satisfied
View Image
and the ZoneLine heatpump....
View Image
and a view of the closet door
View Image
Mike Smith Rhode Island : Design / Build / Repair / Restore
Edited 4/24/2007 10:21 pm ET by MikeSmith
Edited 4/24/2007 10:22 pm ET by MikeSmith
Edited 4/24/2007 10:23 pm ET by MikeSmith
Nice looking work Mike.
Is the gutter helmit warrentied?
Chuck Slive, work, build, ...better with wood
apparently so... but they're backlogged and talking about end of MayMike Smith Rhode Island : Design / Build / Repair / Restore
Janetta: lot's of painting... especially the freize blocks between the rafters
View Image
and Chuck .... working the witch's gable
View Image
and Roy ... the East gable
View Image
Mike Smith Rhode Island : Design / Build / Repair / Restore
Edited 5/8/2007 8:55 pm ET by MikeSmith
Edited 5/8/2007 8:56 pm ET by MikeSmith
Edited 5/8/2007 8:56 pm ET by MikeSmith
Look's good Mike!
How many builders prime and paint exposed rafter tails before they are framed? I bet not many.
Chuck S live, work, build, ...better with wood
Roy's slimmed down.A great place for Information, Comraderie, and a sucker punch.
Remodeling Contractor just outside the Glass City.
http://www.quittintime.com/
quite.....Mike Smith Rhode Island : Design / Build / Repair / Restore
Hi Mike, don't want this thread slip away .
Hoping for some grand finale pictures, Possible or did the camera and your good will run out of juice?
I always come to look at the progress, kinda like getting up and looking out to check the weather.
Aw crap no weather to day.
clay.. just for you...
we got a blueboard delivery on Monday...
View Image
they hung on Tuesday....
and plastered on wednesday
View Image
View Image
Mike Smith Rhode Island : Design / Build / Repair / Restore
Edited 5/18/2007 10:07 pm ET by MikeSmith
Edited 5/18/2007 10:07 pm ET by MikeSmith
Edited 5/18/2007 10:08 pm ET by MikeSmith
Thanks Mike.
Looking gooooooood.
Now it's time to remodel- where's the bathroom and shower going to be.
I'm going back to the start and look? was this going to be finished so nice from the start or is it just nice work creep.
well the 2d floor was always supposed to be insulated but unfinished.. ( for a work-out room )
then we added some electric heat.. then the plaster
got another big change for the front 2d floor deck... trying to get to that by next weekMike Smith Rhode Island : Design / Build / Repair / Restore
Darn darn darn still no weather.
How bout ? if your feeling generous at some time , a stand back picture of the cake.
Emmmmm cake it's what's for breakfast ops I meant break time.
hey... we're still plugging away... lot's of Change Orders
anyways... we finished the shingling
here's the front
View Image
View Image
Mike Smith Rhode Island : Design / Build / Repair / Restore
Edited 6/17/2007 10:11 pm ET by MikeSmith
Edited 6/17/2007 10:12 pm ET by MikeSmith
Edited 6/17/2007 10:12 pm ET by MikeSmith
Edited 6/17/2007 10:14 pm ET by MikeSmith
and the East elevation with the Bay bump-out
View Image
View Image
and some passing traffic
View Image
Mike Smith Rhode Island : Design / Build / Repair / Restore
Edited 6/17/2007 10:17 pm ET by MikeSmith
Edited 6/17/2007 10:17 pm ET by MikeSmith
Edited 6/17/2007 10:18 pm ET by MikeSmith
Hey Mike Thanks for posting. I kind of thought you might finally be getting tired of we gadflies buzzing around you.
Very nice project with great attention to detail.
The garage/great place is taking over the lot, and it is looking impressive.
Thanks again for all the work posting the series. It is very much appreciated.
Clay
we got the decking and ceiling done on the front entry
View Image
and most of the rail
View Image
here's how it's shaping up
View Image
Mike Smith Rhode Island : Design / Build / Repair / Restore
Edited 7/10/2007 8:45 pm ET by MikeSmith
Edited 7/10/2007 8:46 pm ET by MikeSmith
Edited 7/10/2007 8:47 pm ET by MikeSmith
adding a deck to the 2d floor rubber roof was another change order
the rise is about 18" in 17 ft. so i made up a joist by ripping 2x12 PT and gluing and cleating them together
we'll use these for every other joist and make up a trussjoist for in between
View Image
each joist has to be custom framed / ripped because of varying slope, we set up our laser to mark the end of the rip .. which tapers to about 1/8 at the high end of the deck
View Image
we're using a slip sheet of a 6 inch strip of rubber under the I-joist ( the bottom of each joist is a flat 2x4 nailed into the tapered joist )
here Chuck is nailing the 2x4 to the bottom
View Image
and every other joist will be a truss joist to reduce weight & cost ... 2x4 flat bottom , 2x4 on edge top with studs and gussets
View Image
Mike Smith Rhode Island : Design / Build / Repair / Restore
Edited 7/10/2007 8:55 pm ET by MikeSmith
Edited 7/10/2007 8:56 pm ET by MikeSmith
Edited 7/10/2007 8:57 pm ET by MikeSmith
Edited 7/10/2007 8:59 pm ET by MikeSmith
Edited 7/10/2007 9:00 pm ET by MikeSmith
the old PT posts had a copper flash applied to the bottoms , but our roofer also went over these with rubber.. so in order for the post sleeves to fit over the rubber we had to cut the ribs out with a 12" sawzall blade
View Image
we left the cardboard on to protect the posts
View Image
right now the posts in the front are 6' and the shorter ones are 4'..
so we got either 2 or 3 out of each 12' post, which is one reason I chose TimberTech.. they had a 12' post
here you can see the 18" high tapered joists
View Image
Mike Smith Rhode Island : Design / Build / Repair / Restore
Edited 7/10/2007 9:04 pm ET by MikeSmith
Edited 7/10/2007 9:05 pm ET by MikeSmith
Edited 7/10/2007 9:07 pm ET by MikeSmith
Looks good! Like the rib ticklin'!
Forrest
As always, looks good. Don't you just love Change Orders. That's a heck of a deck with million dollar views.Chuck Slive, work, build, ...better with wood
Roy & Chuck got the deck framing done ... here's the front
View Image
while I primed and first coated the PT balconey that connects the Bay addition to the deck area.. i wanted to get this painted because it would be easier now that after we got it decked
View Image
a view looking under the deck to the rubber roof below
View Image
and another looking out over the deck towards Newport
View Image
Mike Smith Rhode Island : Design / Build / Repair / Restore
Edited 7/15/2007 7:59 pm ET by MikeSmith
Edited 7/15/2007 7:59 pm ET by MikeSmith
Edited 7/15/2007 8:00 pm ET by MikeSmith
Edited 7/15/2007 8:01 pm ET by MikeSmith
Edited 7/15/2007 8:01 pm ET by MikeSmith
Edited 7/15/2007 8:03 pm ET by MikeSmith
finished the main decking & started on the balconey
View Image
here's a closer look at the coal ship on her way to Providence or Brayton Point
View Image
decking the balconey providing access to the master bedroom
View Image
returning the 2x12 PT we saved by framing every other joist with a 2x4 truss
View Image
when i came back i had 24 / 18' pcs of 1x6 Azek for the balusters...... just shy of $1000... wow
Mike Smith Rhode Island : Design / Build / Repair / Restore
Edited 7/22/2007 7:40 pm ET by MikeSmith
Edited 7/22/2007 7:41 pm ET by MikeSmith
Edited 7/22/2007 7:42 pm ET by MikeSmith
Edited 7/22/2007 7:45 pm ET by MikeSmith
here's the mock-up of the baluster / rail system.... the inside
View Image
the outside....
View Image
here's the transition area where we step from the balconey ... over the gutter..
to the landing... looks like one riser to the deck
View Image
the last post is too close to the gutter... so we'll have to do some magic to get the sleeve on this one
View Image
Mike Smith Rhode Island : Design / Build / Repair / Restore
Edited 7/22/2007 7:49 pm ET by MikeSmith
Edited 7/22/2007 7:50 pm ET by MikeSmith
Edited 7/22/2007 7:52 pm ET by MikeSmith
Edited 7/22/2007 7:53 pm ET by MikeSmith
here's the Alcoa ProBead ceiling we like to use
View Image
and the shutters the Owner asked us to add to match the main house
View Image
Mike Smith Rhode Island : Design / Build / Repair / Restore
Edited 7/22/2007 7:56 pm ET by MikeSmith
Edited 7/22/2007 7:56 pm ET by MikeSmith
Mike, sorry if I missed it... who, how, cut the Azek baluster stock?As always, beautiful work!Jim
The awful thing is that beauty is mysterious as well as terrible. God and the devil are fighting there, and the battlefield is the heart of man.- Fyodor Dostoyevski
roy made a template... then he made me buy him a new router bit.... 1/4 " x 1" with a ball bearing follower
i'll see if i can get a pic of the setup....Mike Smith Rhode Island : Design / Build / Repair / Restore
What are those yellow spacers you used for the decking?"Put your creed in your deed." Emerson
"When asked if you can do something, tell'em "Why certainly I can", then get busy and find a way to do it." T. Roosevelt
those are a spacing tool that Trex gives away to ensure their product is properly gapped...
the ones we have are the third generation.. first ones were green... and then there was a different yellow one .. and now these
pretty big gap... but no call backs.. and no debris getting stuck in the deckMike Smith Rhode Island : Design / Build / Repair / Restore
Looks great!. Love the use of composition wood.
Chuck Slive, work, build, ...better with wood
A new bit! Didn't you just give him a new bit in '89? You keep babying yer guys and next thing you know they'll be looking to you to put a`handle on the shovel.I'd trade a dozen bits to be working outside rather than in the 15th floor gypsum and terracotta block hell that's our current project.Jim
The awful thing is that beauty is mysterious as well as terrible. God and the devil are fighting there, and the battlefield is the heart of man.- Fyodor Dostoyevski
well, you know Roy... it's always one thing moreMike Smith Rhode Island : Design / Build / Repair / Restore
here's the clearance we left so the water can flow under the blusters and into the gutter
View Image
and Mr.Cool with his shades on.. said the Azek was blinding him
View Image
and a closer look at those Trex gapping tools
View Image
here's the gutter before we buried it
View Image
and after
View Image
Mike Smith Rhode Island : Design / Build / Repair / Restore
Edited 7/26/2007 9:48 pm ET by MikeSmith
Edited 7/26/2007 9:50 pm ET by MikeSmith
Edited 7/26/2007 9:51 pm ET by MikeSmith
Edited 7/26/2007 9:52 pm ET by MikeSmith
Edited 7/26/2007 9:53 pm ET by MikeSmith
we relocated the downspout to avoid a head-knocker
View Image
here's how the balusters are shaping up ..... kinda frames the view , huh ?
or does the view frame the work ?
View Image
Mike Smith Rhode Island : Design / Build / Repair / Restore
Edited 7/26/2007 9:57 pm ET by MikeSmith
Edited 7/26/2007 9:58 pm ET by MikeSmith
Looks good Mike! I like that hidden gutter.
Chuck Slive, work, build, ...better with wood
How does one clean a hidden gutter?
Great work... as always!Troy Sprout
"A free people ought not only to be armed and disciplined, but they should also have sufficient arms and ammunition to maintain a status of independence from any who might attempt to abuse them, which would include their own government." -- George Washington
who cares ? it's outta sight... outta mind
nah... just kidding... it's only about 4' that is covered.... and all the gutters above that have "Gutter Helmet"
anyways... shouldn't be that hard to cleanMike Smith Rhode Island : Design / Build / Repair / Restore
while I'm holding down the fort at the RFH Ranch, Roy & Chuck are finishing up the deck... here's the transition landing between the balconey and the raised deck
View Image
some more of the Azek baluster
View Image
this was the last of the original posts.. already tabbed into the rubber roof.. so it is where it is.. we decided to scribe it to the Gutter Helmet
View Image
and the short balusters that fit under the overhanging eave
View Image
and Roy is closing in on the last section
View Image
Mike Smith Rhode Island : Design / Build / Repair / Restore
Edited 8/5/2007 8:30 pm ET by MikeSmith
Edited 8/5/2007 8:31 pm ET by MikeSmith
Edited 8/5/2007 8:33 pm ET by MikeSmith
Edited 8/5/2007 8:34 pm ET by MikeSmith
Edited 8/5/2007 8:35 pm ET by MikeSmith
Edited 8/5/2007 8:35 pm ET by MikeSmith
Randy is going to do the finsh grade & topdress the parking area.. so we have to do a temporary move on the trailer
View Image
and some finegrade around the circular drive
View Image
a new parking area on the far side where Chuck's blue truck is parked.......
and the bluestone topping
View Image
Mike Smith Rhode Island : Design / Build / Repair / Restore
Edited 8/5/2007 8:40 pm ET by MikeSmith
Edited 8/5/2007 8:41 pm ET by MikeSmith
Edited 8/5/2007 8:42 pm ET by MikeSmith
As always, enjoyed your thread, Mike. Who manufactures those post sleeves? And are the top/bottom rails part of the system?
the post sleeves are Timbertech.. the only ones i could find in 12' lengths... ( my long posts were 6' +/- )
the top & bottom rails are PT that we let dry out for acouple months..then we picked the straightest & milled them , primed & two coats finishMike Smith Rhode Island : Design / Build / Repair / Restore
the front deck is done....( wow .. did i blow that estimate ..... )
Chuck is calking the caps in place
View Image
but the results are some very happy owners... here's a shot from the MBR looking out the window to the deck... and the door leading out to the balconey
View Image
from the balconey to the step up area ( over the gutter )
View Image
and the step-up area
View Image
Mike Smith Rhode Island : Design / Build / Repair / Restore
Edited 8/7/2007 9:30 pm ET by MikeSmith
Edited 8/7/2007 9:31 pm ET by MikeSmith
Edited 8/7/2007 9:32 pm ET by MikeSmith
Edited 8/7/2007 9:33 pm ET by MikeSmith
here's a finish pic....
View Image
and some more of the view... on a foggy bay
View Image
Mike Smith Rhode Island : Design / Build / Repair / Restore
Edited 8/7/2007 9:34 pm ET by MikeSmith
Edited 8/7/2007 9:34 pm ET by MikeSmith
calvin.. thanks for that question..
here's the landing / stair area before the decking
View Image
you can see that it slopes to the front.. I didn't want to give up any of the slope because the extended eave overhead is very close
the illusion is that the stairs are level.. the landing is sloped..
also , since you can approach the stairs from 2 sides i wanted a good visual break to alert the person that this was something to pay attention to
we widened the stairs at the corner to 16".. but at each end they are 11" ( two deck boards ).... a taper in the corner adds the extra width
View Image
Mike Smith Rhode Island : Design / Build / Repair / Restore
Edited 8/8/2007 7:13 am ET by MikeSmith
Thanks Mike.A great place for Information, Comraderie, and a sucker punch.
Remodeling Contractor just outside the Glass City.
http://www.quittintime.com/
Looks good Mike,Thanx for sharing.Chuck Slive, work, build, ...better with wood
...".( wow .. did i blow that estimate ..... )" Does that mean the $signs flying off in the backround are yours.
Looking good, all the details that eat dollars. munch munch.
moved back to the front deck to finish up...
here's the stair rail...
View Image
and a shot of the inside detail.... the balusters are all 1x6 Azek
View Image
and the outside detail..... the lower rail and upper rail are PT, primed & two coats finish
View Image
Mike Smith Rhode Island : Design / Build / Repair / Restore
Edited 8/23/2007 7:28 pm ET by MikeSmith
Edited 8/23/2007 7:32 pm ET by MikeSmith
Edited 8/23/2007 7:33 pm ET by MikeSmith
Edited 8/23/2007 7:34 pm ET by MikeSmith
here's a little tool that caught my fancy.. an in-line blow gun.. it stays attached to the hose and you hook it right onto the gun ( air-tool )... lot's of sawdust on a slippery roof sheathing ?.. unhook and blow it off .. kewl, huh ?
View Image
and i couldn't make up my mind about the light blocks ( wether we wanted some or not )
so we modified the shingles to bring the lights back to plumb
View Image
here you can see how we cut out the shingle to make room for the chevron
View Image
Mike Smith Rhode Island : Design / Build / Repair / Restore
Edited 8/23/2007 7:35 pm ET by MikeSmith
Edited 8/23/2007 7:35 pm ET by MikeSmith
Edited 8/23/2007 7:36 pm ET by MikeSmith
Really clean Mike.
Hey, did ya draw the stair rail out full size or something like that? The pattern is very well done.Spheramid Enterprises Architectural Woodworks
"If you want something you never had, do something you've never done"
me?... i just continued to nag Roy until we had something we both agreed on..
but yes.. he did use full size plywood patterns and then made them into templates so the router could follow..
oh yes.. my other contribution.. i bought him a new router bitMike Smith Rhode Island : Design / Build / Repair / Restore
You're just too kind.
I really like the looks of it. Not on MY house, but as a detail that is not too "Busy" it really shines.Spheramid Enterprises Architectural Woodworks
"If you want something you've never had, do something you've never done"
Mike,
Good looking work, as always.
I've used an in-line blow gun as well as a swivel on most of my lines since they came out. Beats the heck out of a 12D nail compressing the fitting.
View Image
Chuck Slive, work, build, ...better with wood
and the outside detail..... the lower rail and upper rail are PT, primed & two coats finish
Our PT is usually sopping wet. Any trouble with getting the paint to stick on that rail?
jt8
"Democracy is two wolves and a lamb deciding what to have for dinner, liberty is a well armed lamb protesting the vote." -- Benjamin Franklin
Edited 8/27/2007 4:51 pm by JohnT8
john...... PT is kiln dried before it is treated...
when we buy it to use as exposed framing or if we know it is going to be painted, we put it under cover & sticker it so it can air dry... even 3-4 days will make a big difference... in this cae it was more like a month or so
if we are in a real hurry to paint it, we'll tarp it and stick a dehumidifier under the tarp
also.. if we suspect it may not have dried quite enough, we'll use a latex primer instead of an oil based primerMike Smith Rhode Island : Design / Build / Repair / Restore
so, buoys & gulls... as the sun sinks slowly in the West, we leave our happy worksite...with a few parting shots..
the workshed on the West end
View Image
the witch's window
View Image
the garage front
View Image
the entry
View Image
and another view of the main dormer
View Image
Mike Smith Rhode Island : Design / Build / Repair / Restore
Edited 9/1/2007 9:34 am ET by MikeSmith
Edited 9/1/2007 9:35 am ET by MikeSmith
Edited 9/1/2007 9:35 am ET by MikeSmith
Edited 9/1/2007 9:36 am ET by MikeSmith
Edited 9/1/2007 9:37 am ET by MikeSmith
working around to the water side...
View Image
and the SE elevation
View Image
and the Quarterdeck
View Image
Mike Smith Rhode Island : Design / Build / Repair / Restore
Edited 9/1/2007 9:40 am ET by MikeSmith
Edited 9/1/2007 9:41 am ET by MikeSmith
Edited 9/1/2007 9:41 am ET by MikeSmith
and Motif #1....
View Image
Mike Smith Rhode Island : Design / Build / Repair / Restore
Edited 9/1/2007 9:42 am ET by MikeSmith
Mike, thanks for the thread. Really, really nice look you gave the place.Did you ever show the jig Roy made for the balusters? Or a close-up of the pattern?That place has gotta be great view from the water. Someone's got it in for me, they're planting stories in the press
Whoever it is I wish they'd cut it out but when they will I can only guess.
They say I shot a man named Gray and took his wife to Italy,
She inherited a million bucks and when she died it came to me.
I can't help it if I'm lucky.
Mike, as usual, beautiful work. You guys make it look so easy. Your threads are fun to follow.
I have always thought it would be great to come out there and look around, having been born at Quonset Point back in the day. Nice looking area.
Thanks for the thread.
Ernie
As usual, great looking work Mike.
Thanx for sharing.
Chuck Slive, work, build, ...better with wood
Cath said she wished she married a real carp who could build her something nice like that!
Jeff Buck Construction
Artistry In Carpentry
Pittsburgh Pa
Indeed, Mike, thanks for taking the time and making the effort to chronicle the project (and your others too) - I know I've learned a lot - kudos -
"there's enough for everyone"
Looks good as usual, Mike. Bet the HO's are super happy.
jt8
"I was gratified to be able to answer promptly.
I said 'I don't know.'"
-- Mark Twain
Mike
A big THANK YOU for sharing your work with us. I look forward to your posts. Another beautiful home.
I love the look of the extended rakes (is that the term?) - the roof overhangs/projects out on the gable ends. So mush so, that I'd like to add that feature to my own house.
Have you ever retro-fitted rake extensions like that where none existed before? How far out can you safely go without having to "cantelever" framing from within the main roof? Or will the roof sheathing extending equal amounts back onto the roof be enough?
Thanks again for sharing and educating us.
Phil
Quantum materiae materietur marmota monax si marmota monax materiam possit materiari?
the knees ( brackets ) do most of the work... but you have to also get some help from the ridge board
the sheathing is doing a lot of support also
in this case it's double sheathed.. ( 1x8 pine shiplap & 5/8 Advantech T&G )
the 5/8 T&G is definitely carrying a lot ...
does that answer your question ?Mike Smith Rhode Island : Design / Build / Repair / Restore
Yes, Mike it does. Thanks.
I also looked back thru your thread to when you were building the roof and rakes.
I see how the brackets do a lot of support, as well as you ridge. The only problem I am picturing in my mind with trying to retro-fit the look is with the ridge extension. Instead of taking apart the ridge I am thinking of extending it and sorta sistering the extension from underneath the original ridge.
Here's a simple sketch, I hope what I mean is clear enough.
View Image
Brown is the original ridge. Pink is the ridge extension. And blue is the added-on extended rake. Actually, I'd have the rake extension sheathing go further back into the original roof sheathing for a few rafters.
What do you think?
Quantum materiae materietur marmota monax si marmota monax materiam possit materiari?
i think it would work great.... have a sit-down with your BI to make sure he/she thinks so tooMike Smith Rhode Island : Design / Build / Repair / Restore
Here's one that might be up your expertise alley:
http://forums.taunton.com/tp-breaktime/messages?msg=94386.1
The initial posting is somewhat thick to get through, but he breaks it up a bit more further down. Basically trying to do some ceiling and basement insulation. Sounds like a concrete building that he is doing the first floor first and then later planning on coming back to do the 2nd floor (but for now needs to insulate the first floor ceiling).
He is talking about a couple of inches of foam and fg batts in the ceiling joists, but I thought you'd have a cellulose suggestion for him.
jt8
"I was gratified to be able to answer promptly.
I said 'I don't know.'"
-- Mark Twain
Mike
Nice article and great pictures. It is great to look at a completed project and not know what is old and what is new. True mark of a carpenter. Congratulations to you and your staff.
Greg in Connecticut
As always Mike, beautiful great work. Its always a pleasure reading and seeing the pictures.
Question for you: What kind of shingles did you use on the roof?
ThanksBarney
those were Certainteed Hatteras.... one of my favoritesMike Smith Rhode Island : Design / Build / Repair / Restore
Thanks Mike. Appreciate the information.
In the process of specking out our addition with the contractors and want to make sure the I get what I want.
diamond was building a boathouse right down the street from this
Mike Hussein Smith Rhode Island : Design / Build / Repair / Restore
Edited 3/23/2009 4:32 pm ET by MikeSmith
this you can see Diamond's boathouse from this job site
View ImageMike Hussein Smith Rhode Island : Design / Build / Repair / Restore
hey are you still using your butt taper tool? or did it get relegated to the unused tool category??
yes... we don't get a lot of call for it , but I still like itfor some patch jobs it is the cat's meowMike Hussein Smith Rhode Island : Design / Build / Repair / Restore
this is from last week.. when they were still framing around the entry porch
cutting off one of the two front posts
View Image
and setting one of the beams
View Image
Mike Smith Rhode Island : Design / Build / Repair / Restore
Edited 2/7/2007 7:56 pm ET by MikeSmith
Edited 2/7/2007 7:56 pm ET by MikeSmith
Edited 2/7/2007 7:56 pm ET by MikeSmith
Uh oh.You called him sir.Can I have your tools after your passing ?
Orville Wright never had a pilot's license.
Hey- Charles Keating was never charged with Bank Robbery.
Carry on.
Mr. Luka,You can have the whole lot. :-)But on a more serious note:I have nothing but the utmost respect and reverence for fine craftsmen. It is craftsmen like Mr. Smith, who have the skill, experience, knowledge, and fortitude to take a difficult and complex task, and make it look so very easy; a hallmark of a true carpenter.
Addressing Mr. Smith as "Sir" is the least that I can do to attempt to
Convey my admiration. I feel indebted by the fact that Mr. Smith takes the time to share his knowledge with those of us on Breaktime. Who says that there is no such thing as an altruistic act?Thanks, - T.
Anyone besides me come to realize that Roy and Chuck seem to get a lot done when Mike is in the office?
"When asked if you can do something, tell'em "Why certainly I can", then get busy and find a way to do it." T. Roosevelt
Some kind of decorative window would have looked neat in that witch's hole.
View Image View Image
View Image
View Image
jt8
Wishing I could be like Forrest
finished the main beam & ledgers for the deck..
it's 17' - 4" from out- to- out
View Image
the roof ridge has to fit under these windows.. so that means this section of roof is going to be 3 3/8 on 12
View Image
Mike Smith Rhode Island : Design / Build / Repair / Restore
Edited 1/25/2007 6:14 am ET by MikeSmith
Edited 1/25/2007 6:15 am ET by MikeSmith
here's some more of the view from the new walkout bay..
Newport Bridge
View Image
Newport harbor .. looking over Rose Island light
View Image
and the House on the Rocks... that white building just to the left is the dock house at Hammersmith Farm ( Jackie Kennedy's girlhood summer place..
the dock was used in some of the scenes in "The Great Gatsby"
View Image
Mike Smith Rhode Island : Design / Build / Repair / Restore
Edited 1/19/2007 10:23 pm ET by MikeSmith
Edited 1/19/2007 10:23 pm ET by MikeSmith
Edited 1/19/2007 10:24 pm ET by MikeSmith
went back and eyeballed them this afternoon
View Image
look fine... must have been the camera angle
Mike Smith Rhode Island : Design / Build / Repair / Restore
Edited 1/19/2007 10:19 pm ET by MikeSmith
Mike, Nice clean work.
In the only view of the back shed dormer I don't see any windows. Perhaps the sheathing has not been cut out for them yet. How bout a photo of the back of the garage.
Thanks
potter
back on the garage... Roy & Chuck continued with the overhangs
and i figured where to put the Witch's Window.... started by mocking out the rafter for the lower roof over the workroom
View Image
then i built a 2x4 rough opening frame and tacked it parallel to the rafter line, aproximately halfway between the upper & lower roofs
View Image
cut out the studs..
View Image
and slipped the frame in place
View Image
Mike Smith Rhode Island : Design / Build / Repair / Restore
Edited 12/29/2006 11:08 pm ET by MikeSmith
Edited 12/29/2006 11:09 pm ET by MikeSmith
Edited 12/29/2006 11:10 pm ET by MikeSmith
Edited 12/29/2006 11:10 pm ET by MikeSmith
Holy Crapo View!!!!!!! Lookin good man.
In and out in a day...The only thing that I can do in a day in either of the two counties or one city we working is a basement permit with no structural consequence. And that's only in one county, the others are about a week.A permit like yours would take 4-5 weeks. Sigh.
Jon Blakemore RappahannockINC.com Fredericksburg, VA
Thats one butt ugly house on the front side, will be watching the transformation.
High 40's tomorrow.
What do you think, 9 or 18?A great place for Information, Comraderie, and a sucker punch.
Remodeling Contractor just outside the Glass City.
http://www.quittintime.com/
picking up Marianne & Phalen at the airport tomorrow.... no time for golf..
maybe Sunday...my son-in-law will be here
Mike Smith Rhode Island : Design / Build / Repair / Restore
uh, oh.. just got a call from Bill.. his son is the head pro at Newport CC.. wants to go play tomorrow at 9.... I've never played Newport... what to do ?....
what to do ?
( hah, as if )Mike Smith Rhode Island : Design / Build / Repair / Restore
Cool Mike.
Couldn't get my score down to the temperature but ending (maybe) the season 5 under April's nine has me longing for spring.
Enjoy your round.A great place for Information, Comraderie, and a sucker punch.
Remodeling Contractor just outside the Glass City.
http://www.quittintime.com/
the Point section...
used to land our sailboats at the Van Zandt Ave. Pier and take our salvage from Rose Island to the junk yard
View Image
Yup. this is right where Van Zandt crosses Third St.
Mike,
This is another great thread for all of us to enjoy. Thanks for posting it.
I learned a lot from Adverse Conditions and aspire to do projects like yours (maybe someday).
Just curious, do you ever use these photo essays as marketing tools? It seems to me this would be an excellent tool to show prospective clients your portfolio.
Maybe a webpage people can view that shows the general progression of the work from start to finish??
Whoo baby!
I can tell I'm gonna' enjoy this thread!
Kinda' like a movie.
Well, a filmstrip, anyway!
Forrest - lovin' build threads