Question about framing an addition with cantilever and ledger board
chrisr710
| Posted in Construction Techniques on
Hi All,
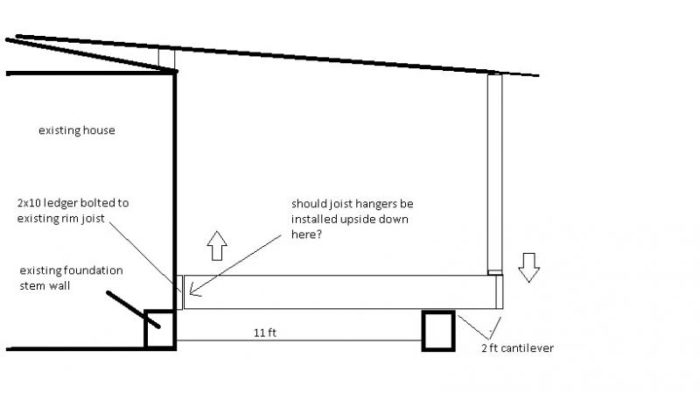
I am adding an addition onto our single story home. I had a question about how to secure the floor joists to the side of the existing house: it occured to me that, due to the cantilever, it might be adviseable to use upside down joist hangers where the floor joists attach to the existing house. Is that adviseable and would that be enough? What would be a good way of keeping the floor joists from pressing upwards, since there is no force (other than the furniture on the floor) pressing down?
Thanks!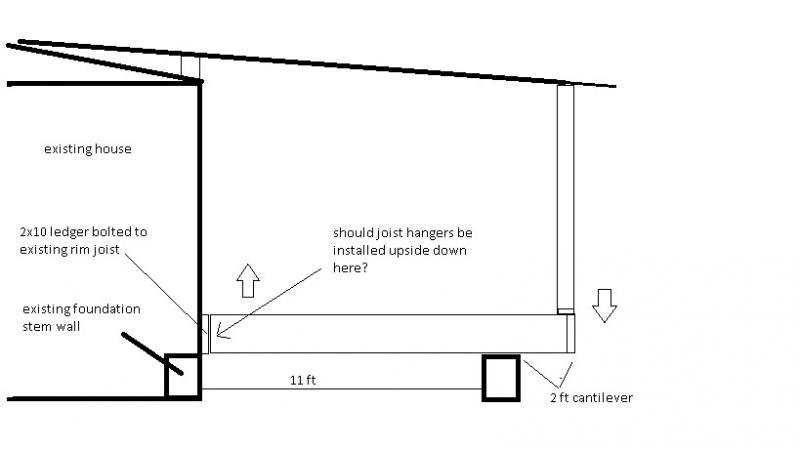


Replies
Without more info and doing the numbers, its not likley. If this is job is to be permitted, you will probably need to get the plans sealed by engineer. Often any cantiliver type construction quickly gets the attention of the plan checkers.
Hi there,
First, as for the joist hanger idea - I understand your logic, but as shown in your drawing the hangers would still want to be oriented in the normal fashion. Their primary function is to resist the downward force (gravity) of all the loads acting on the floor. The 2 foot cantilever that will support the outside wall that the roof lands on will need engineering. In general, the code allows for the length of the cantilever to be equal or less than the depth of the joist. So, if you are using 2"x10" floor joists your max cantilver is only about 10". The code's purpose is to avoid an offset load path scenario like the one you have in your drawing. It also prevents the "teeter-totter" scenario you are worried about, and trying to solve with the inverted hangers. If you follow the code then there would never be enough leverage on the outside joists end to lift the end attached to the ledger. If you have to build the addition as you propose then an engineer will easily design a floor system, and maybe posts and a beam to put that load back in line. My suggestion would be simply eliminate the cantilever and move your new addition foundation 2 feet out. Good luck.
Thanks so much for your replies! All of this makes good sense. As can be seen from the attached pic, a bit late for moving the wall out(!). Additionally, they are 2x8 joists, so by your calculations, I am stuck with no more than an 8" bumpout.
I do have a permit for the work, and had gotten it w/o an engineer's stamp b/c of the small size of the addition and b/c the addition matches the existing foundation of the house (2' stem wall, then stick framing on top of that). Whoever looked at my plan must have missed the over-extended bumpout. (The bumpout was actually the idea of the guy who drew up the plan for me, who is an architect but not an engineer). It would all be pretty straightforward except for that darn bumpout.
So, with where I am at now I think the most prudent thing would be to reduce the cantilever (and size of the addition) by 16" (so that it is an 8" cantilever with 8" joists), put in the joist hangers right side up as they are supposed to go, and hope my wife doesn't get too angry at me for shrinking it down. She might not even notice, and if she does I will just say the guys on the internet told me I had to.
I know these are the reasons people hire pros to do this thing, we simply don't have the money and I do really enjoy the work, tyring to go slowly and thoroughly. There are many unforseen concerns that crop up.
Thanks for your help; and unless there is any other way that can be thought of, I think I will wind up shrinking it down to 8". I guess I will have to notify the county about this as well.
One final question: and I have seen this discussed elsewhere but somewhat inconclusively: on my 2x8 rim joist which is cantilevered (floating 8" outside the stem wall), should I use joist hangers there as well?
Chris
What about this.
remove or cut access in the existing house band joist and using longer joists, run those back in alongside the existing joists. How long back in and how fastened would need engineered.
youd then solid block between old and new.
same floor height or a drop into the addition?
Hey Cal, That would definety handle the leverage issue with the cantilever. I think because there is the load bearing exterior wall landing on the outside of the cantilever, the OP would still have to follow the cantilever "code", maybe more "rule of thumb", saying that the cantilever can't be more than the depth of the floor joists used. If this was just a deck frame with no wall and roof load on the cantilever he'd be fine. I know this is the case for my climate with snow loads etc.
Fine
A number of yrs ago I worked on a remodel where we pushed the exterior wall out 4' w/o a foundation under it.
We used the method I described above. The engineering dictated running the new joists full length back to and over a beam under an interior wall. This meant removing the original band joist, clipping the top and bottom of the new 20 something foot joist and shoving it in and then flipping it up. Can't remember the fastening schedule we used for the lamination being the cut man.
do remember wishing there was another helper with me.
It beat working in the crawl however.
if done, an engineer should take responsibility for the design.
And, we added only 4 ft. His addition would probably require some framing members with stupid huge resistance to bending, perhaps steel.
i think your beam and pier idea would be way more possible.
You're welcome Chris, If you really need to keep the extra floor space and want to keep your wife happy (obviously we all want to do that), you could consider pouring some 12" sonotubes and put a large beam under those cantilevered joists on posts. For your addition a beam made up of 3 - 2"x12"s with posts at 10' spacing would be standard (based on my quick review of span tables -DISCLAIMER - I am not a structural engineer). These calculations are taking the poured wall totally out of the equation as well. If you include the wall and only consider the floor span to be the 2' of cantilver you want than this is total overkill. It may be worth having an engineer do the calculations on what size beam and post spacing would be needed to deal with just the cantilever section. I can't tell from the photo how wide the addition is, but if you could end up with just 3 sonotubes that wouldn't be too bad I don't think. If this space is getting a partition wall anywhere too, you may be able to put the beam in/under the roof and bury the posts in the 2 outside walls and one in the partition wall. Again, something to run by the engineer. I attached a really quick sketch showing this scenario. This takes the roof load off the floor and puts it back on the foundation wall. This way the floor cantiilever is fine as is. Good luck. I hope you find a solution that makes you, and more importantly your wife, happy.
You are not so far out of balance as is.
Outside wall is taking taking the load from half the roof span between walls, plus the overhang. The cantilever is taking that load, plus the dead loads from the wall structure. This is being balanced by the dead load of the floor structure. The difference has to be reacted by the joist hangers & nails at the ledger.
Worst case will be maximum external loads ( wind / snow / rain) with empty house, no live loads to help in the balance.
The load transfer in the hangers is done by the nails, so make sure that all the nails are the proper size and driven correctly. Install the hangers in the normal fashion.
It will not take an engineer much time to do a detial calculation and either approve the design as is, or tell you what additional strapping you might needed at the existing wall.
The few hundred dollars the engineer will charge will be money well spent, and a small cost compared the to total.
Keep the extra space, keep the wife happy. Size does matter in some things.
Cheers!
Thanks all. I decided to just go with 7" cantilever due to budget and time constraints, and not wanting to have to enlist engineering. Removing the existing rim joist and extending my joists underneat the house seems like a good idea, however the joists in the existing house are smaller and I couldn't have easily slid my joists in there, w/o cutting up the floor in the house, or ripping my joists thinner at that point. Thanks for all the advice.