FHB Logo Facebook LinkedIn Email Pinterest Twitter X Instagram Tiktok YouTube Plus Icon Close Icon Navigation Search Icon Navigation Search Icon Arrow Down Icon Video Guide Icon Article Guide Icon Modal Close Icon Guide Search Icon Skip to content
Subscribe
Log In
  • How-To
  • Design
  • Tools & Materials
  • Restoration
  • Videos
  • Blogs
  • Forum
  • Magazine
  • Members
  • FHB House
  • Podcast
Log In

Discussion Forum

Discussion Forum

Re-framing a roof on an old house

user-7464455 | Posted in Construction Techniques on August 17, 2020 07:46am

Hello,

We have a house that is at least 150 years old. The house consists of two parts: the main house  at 3 stories with an 8/12 gable roof pitched towards the front and back of the house and a 2 story “addition” with a 4.6/12 gable roof pitched at 90 degrees to the main house. The addition, we believe from inspecting historical maps, was actually built around the same time as the main house. The main house has very thick stone walls and the addition is brick masonry.

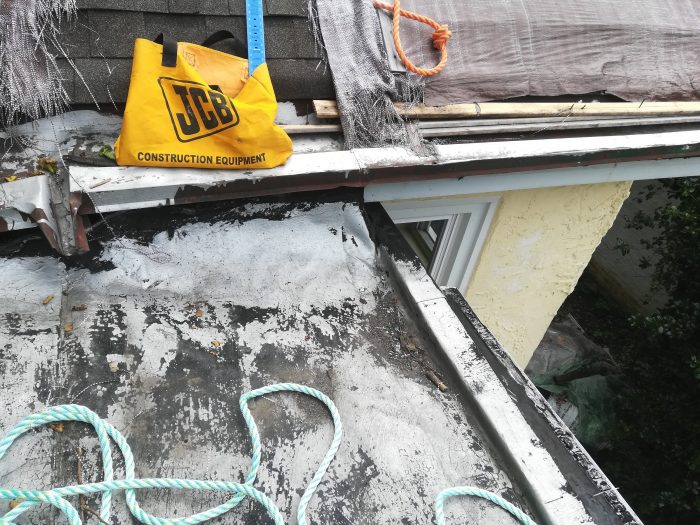
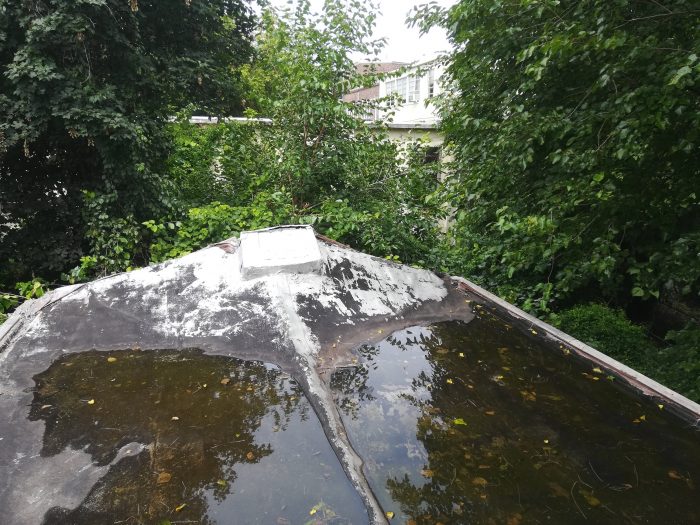
The roof on the addition is collapsed. It had originally been skip-sheathed cedar shingles, framed with only rafters (no ridge beam or board) and did not appear to be attached to the ceiling joists. At some point, someone installed a rubber roof, and the obvious result was that the roof collapsed under the weight. It exists now as essentially a flat roof or perhaps a shallow swimming pool. One strange thing is that the rafters are cut at different angles at the ridge cut. One is 4/12 and the opposing rafter is 5/12.  That’s just an interesting note. 

As you might imagine, there was quite a bit of water damage, so we will be tearing off the roof, hoarding the framing members indefinitely, and completely re-framing the roof. In some ways, we have a bit of freedom in how we do this, but we do have a masonry rake wall. That is partially failing, but our plan was to have our mason rebuild that to original pitch (4.6/12). 

The tricky part is that the ridge of the addition lies just above the eaves of the main roof, and the eaves of the addition lie just below the eaves of the main roof. The gutters on the main roof are the type that are built in and tinned, and they pour out in two little spouts to direct the rain onto the addition roof. 

I’m having a hard time finding pictures of houses that have cross-gabled roofs where the eaves of the cross-gable terminate below the eaves of the main roof. Where I have seen it, they fill in the area under the eaves of the main roof. In this case that may not be possible without significant cobbling because of the location of a window on the main house. 

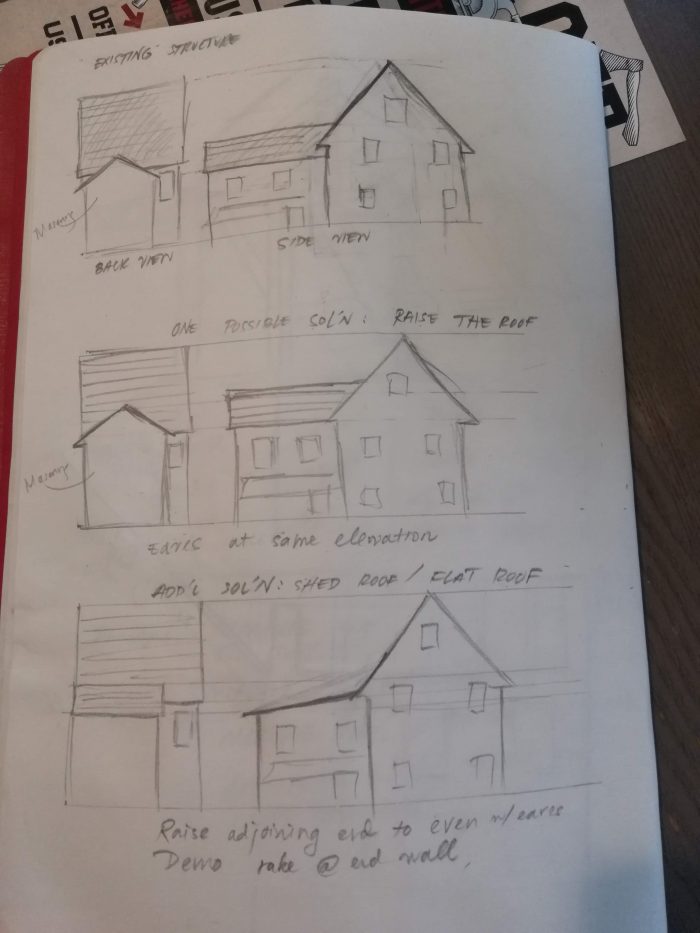
So, the array of possible solutions I’m envisioning are:

1. Work with the original roof-lines and find a decent method of terminating the eaves of the addition roof into the wall of the main house. I currently am at a loss on this.

2. Raise the roof of the addition about 8-12″ so that the eaves of the addition are at the same elevation as the eaves of the main roof. (Raise either by additional courses of bricks or framing).

3. Raise the adjoining end of the roof to be at the same elevation of the eaves of the main roof and demo the masonry rake at the other end to create a flat/low slope shed roof.

We’re working with a structural engineer and all the work is permitted. I’m a licensed contractor and I’ll be doing the framing myself with the help of some really talented tradeswomen. I generally do trim carpentry and historic millwork so framing is a little out of my wheelhouse- but I’m very invested in doing this roof.

Tell me your thoughts, O ye of many years experience.

Any feedback you have will be much appreciated!

Reply
  • X
  • facebook
  • linkedin
  • pinterest
  • email
  • add to favorites Log in or Sign up to save your favorite articles

Replies

  1. user-3976312 | Aug 19, 2020 12:03am | #1

    Aesthetically I would raise the roof of the addition so that the eaves align. It would make for more straightforward details, and look better than a shed roof. A shed roof might be quicker depending on the structural design (how long a run). The engineer can give you that scenario. Shed roofs are used often because they are just a lot easier to frame, and thus can look inappropriate attached to a house where more effort was made.

  2. User avater
    unclemike42 | Aug 19, 2020 03:49pm | #2

    It is good you are working with an engineer. I wonder about the condition of the steeper part of the roof.

    My vote would be to raise the roof, (elevate the "addition" walls) redo all the roofing, and move to external gutters all around. You could also raise the slope to match the house, and gain some more space on that third level, if that interests you.

    elevating the roof will mean more of it will rest upon the existing steeper roof, which increases the need to understand the condition and structure of that roof and the framing under it.

    If you want to re-do the original you could leave the addition eave not connected to the main house, and close it in with a short wall over the roof decking, up to the underside of the main roof overhang. You can place it so that the original gutters still drain on the addition roof. Flash in the roof side, and finish the other side with whatever you want to look at out that window. (I would consider but likely not pick this option)

  3. User avater
    2sheps | Aug 19, 2020 09:51pm | #3

    I'd at least consider the possibility of using a truss with a tall heel and an extra long tail.
    This way, the overhangs could be custom fit onsite.
    Only a thought.

    1. user-7464455 | Aug 28, 2020 10:13am | #4

      I was pleased to have the engineer specify the ridge beam size. Here we are required to have stamped drawings for any project above a certain dollar amount. I feel like I could figure it out, but it's always nice to have someone who knows what they're doing tell you what to do.

      At this point the consensus seems to be to raise the eaves of the addition up to meet those of the main roof. I would consider the heel truss option but the ceiling is pretty low in that room already, and as much as it tickles me to make life harder for tall people, part of our goal was to raise the ceiling height.

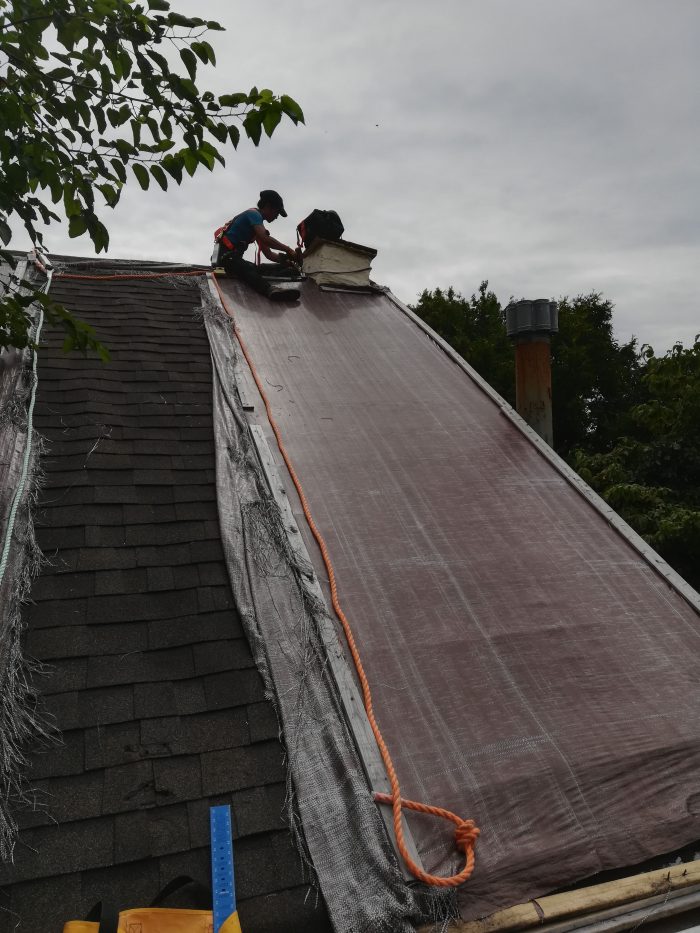
      We will be re-shingling the main roof so we'll be inspecting condition of framing members and sheathing prior to installation of new addition roof. Thanks for pointing it out that the addition roof will now rest more on the main roof than previously. That wasn't on my radar before.

      We were intending to have a "cathedral ceiling" but the engineer specified rafter ties every 16, which I don't know if I agree with, but I don't have the experience to say for sure. I was under the impression that rafter ties were not required for ridge beam roofs, and ridge beams were only required for pitches less than 3/12. In my mind, it was an either/or situation: Either A. Ridge board with rafter ties, OR B. Ridge beam with no rafter ties. What do y'all make of that? Also, is there a prescriptive guide that you'd recommend for roof framing? I had a JLC Prescriptive Deck Framing book that I thought was super helpful, and I'm looking for something similar for roofs.

      Our mason is going to rebuild the lintels (currently wood in various states of decomposition) and we're thinking we'll have him lay another course or 2 of bricks to bring the height up.
      This project is a little complicated, but I like the problem solving and I like learning new things.

  4. User avater
    unclemike42 | Aug 28, 2020 02:03pm | #5

    You can go back and ask your engineer if you could have a larger ridge beam without the ties. Did your engineer say where this load for this beam is carried where the main house is? Is there solid wall down to the foundation that matches the beam location?

    Rafter ties are there to keep the rafters from pushing the walls apart from each other (and/or slide past the wall) as the roof load sits on the wall under the rafters.

    The ridge beam is designed to carry the roof load to the end walls, and then down. If it was specified hefty enough, it could carry the load without the ties. (assuming the walls are stout enough to carry the beam, and that you could get it up into place)

    You have kind of a belt and suspenders solution.

    1. Geoffrey | Aug 29, 2020 02:40pm | #6

      "The ridge beam is designed to carry the roof load to the end walls, and then down."

      The ridge beam is NOT designed to carry the roof load to the end walls at all.

      The ridge beam is designed to keep the rafter frame from tipping sideways
      while the building is being constructed, then the roof load is carried by the rafters to the bearing walls that the rafters sit on, hence the need for collar ties to prevent the spreading of the rafters. The collar ties may often be the ceiling joists for the second floor. The ridge beam is NOT designed as load bearing in platform type framing, that's what the rafters do.

      Geoff

  5. User avater
    unclemike42 | Aug 30, 2020 06:00am | #7

    https://www.techsupport.weyerhaeuser.com/hc/en-us/articles/207291947-Ridge-Beam-vs-Ridge-Board-

    there are semantic issues at play.

    what is important is the understanding of the engineer who prepared the plans, and how he calculated the loads and stresses, and compared to the structural capabilities of the materials used in the application.

  6. TomHCarpentry | Aug 30, 2020 11:02am | #8

    I'm with UncleMike, he's got it right.
    I'm not sure if I applaud your bravery or if I think you're nuts for attempting this on your own, given your confessed lack of experience with framing. There are many details to consider with a job of this magnitude. My best advice is to build it on paper first with a thorough framing plan including elevations and sections, hopefully solve problems in the planning stage. And count on unexpected surprises, in a house that old you never know what conditions you're gonna run into. Have fun!

Log in or create an account to post a comment.

Sign up Log in

Become a member and get full access to FineHomebuilding.com

Video Shorts

Categories

  • Business
  • Code Questions
  • Construction Techniques
  • Energy, Heating & Insulation
  • General Discussion
  • Help/Work Wanted
  • Photo Gallery
  • Reader Classified
  • Tools for Home Building

Discussion Forum

Recent Posts and Replies

  • |
  • |
  • |
  • |
  • |
  • |
View More Create Post

Up Next

Video Shorts

Featured Story

Tools and Gear for the Moms Who Get it Done

From work boots to power tools, these favorite picks make perfect gifts for moms and women who build.

Featured Video

SawStop's Portable Tablesaw is Bigger and Better Than Before

The 10-in. Jobsite Saw PRO has a wider table, a new dust-control port, and a more versatile fence, along with the same reliable safety mechanism included in all SawStop tablesaws.

Related Stories

  • Podcast Episode 684: Masonry Heaters, Whole-House Ventilation, and Porch Flooring
  • FHB Podcast Segment: Repairing an Old Home While Maintaining Its Integrity
  • Tools and Gear for the Moms Who Get it Done
  • An Easier Method for Mitered Head Casings

Highlights

Fine Homebuilding All Access
Fine Homebuilding Podcast
Tool Tech
Plus, get an extra 20% off with code GIFT20

"I have learned so much thanks to the searchable articles on the FHB website. I can confidently say that I expect to be a life-long subscriber." - M.K.

Get home building tips, offers, and expert advice in your inbox

Signing you up...

This site is protected by reCAPTCHA and the Google Privacy Policy and Terms of Service apply.
See all newsletters
See all newsletters

Fine Homebuilding Magazine

  • Issue 331 - June 2025
    • A More Resilient Roof
    • Tool Test: You Need a Drywall Sander
    • Ducted vs. Ductless Heat Pumps
  • Issue 330 - April/May 2025
    • Deck Details for Durability
    • FAQs on HPWHs
    • 10 Tips for a Long-Lasting Paint Job
  • Issue 329 - Feb/Mar 2025
    • Smart Foundation for a Small Addition
    • A Kominka Comes West
    • Making Small Kitchens Work
  • Issue 328 - Dec/Jan 2024
    • How a Pro Replaces Columns
    • Passive House 3.0
    • Tool Test: Compact Line Lasers
  • Issue 327 - November 2024
    • Repairing Damaged Walls and Ceilings
    • Plumbing Protection
    • Talking Shop

Fine Home Building

Newsletter Sign-up

  • Fine Homebuilding

    Home building tips, offers, and expert advice in your inbox.

  • Green Building Advisor

    Building science and energy efficiency advice, plus special offers, in your inbox.

  • Old House Journal

    Repair, renovation, and restoration tips, plus special offers, in your inbox.

Signing you up...

This site is protected by reCAPTCHA and the Google Privacy Policy and Terms of Service apply.
See all newsletters

Follow

  • Fine Homebuilding

    Dig into cutting-edge approaches and decades of proven solutions with total access to our experts and tradespeople.

    Start Free Trial Now
    • Facebook
    • Instagram
    • X
    • LinkedIn
  • GBA Prime

    Get instant access to the latest developments in green building, research, and reports from the field.

    Start Free Trial Now
    • Facebook
    • YouTube
  • Old House Journal

    Learn how to restore, repair, update, and decorate your home.

    Subscribe Now
    • Facebook
    • Instagram
    • X

Membership & Magazine

  • Online Archive
  • Start Free Trial
  • Magazine Subscription
  • Magazine Renewal
  • Gift a Subscription
  • Customer Support
  • Privacy Preferences
  • About
  • Contact
  • Advertise
  • Careers
  • Terms of Use
  • Site Map
  • Do not sell or share my information
  • Privacy Policy
  • Accessibility
  • California Privacy Rights

© 2025 Active Interest Media. All rights reserved.

Fine Homebuilding receives a commission for items purchased through links on this site, including Amazon Associates and other affiliate advertising programs.

  • Home Group
  • Antique Trader
  • Arts & Crafts Homes
  • Bank Note Reporter
  • Cabin Life
  • Cuisine at Home
  • Fine Gardening
  • Fine Woodworking
  • Green Building Advisor
  • Garden Gate
  • Horticulture
  • Keep Craft Alive
  • Log Home Living
  • Military Trader/Vehicles
  • Numismatic News
  • Numismaster
  • Old Cars Weekly
  • Old House Journal
  • Period Homes
  • Popular Woodworking
  • Script
  • ShopNotes
  • Sports Collectors Digest
  • Threads
  • Timber Home Living
  • Traditional Building
  • Woodsmith
  • World Coin News
  • Writer's Digest
Active Interest Media logo
X
X
This is a dialog window which overlays the main content of the page. The modal window is a 'site map' of the most critical areas of the site. Pressing the Escape (ESC) button will close the modal and bring you back to where you were on the page.

Main Menu

  • How-To
  • Design
  • Tools & Materials
  • Video
  • Blogs
  • Forum
  • Project Guides
  • Reader Projects
  • Magazine
  • Members
  • FHB House

Podcasts

  • FHB Podcast
  • ProTalk

Webinars

  • Upcoming and On-Demand

Podcasts

  • FHB Podcast
  • ProTalk

Webinars

  • Upcoming and On-Demand

Popular Topics

  • Kitchens
  • Business
  • Bedrooms
  • Roofs
  • Architecture and Design
  • Green Building
  • Decks
  • Framing
  • Safety
  • Remodeling
  • Bathrooms
  • Windows
  • Tilework
  • Ceilings
  • HVAC

Magazine

  • Current Issue
  • Past Issues
  • Magazine Index
  • Subscribe
  • Online Archive
  • Author Guidelines

All Access

  • Member Home
  • Start Free Trial
  • Gift Membership

Online Learning

  • Courses
  • Project Guides
  • Reader Projects
  • Podcast

More

  • FHB Ambassadors
  • FHB House
  • Customer Support

Account

  • Log In
  • Join

Newsletter

Get home building tips, offers, and expert advice in your inbox

Signing you up...

This site is protected by reCAPTCHA and the Google Privacy Policy and Terms of Service apply.
See all newsletters
See all newsletters

Follow

  • X
  • YouTube
  • instagram
  • facebook
  • pinterest
  • Tiktok

Join All Access

Become a member and get instant access to thousands of videos, how-tos, tool reviews, and design features.

Start Your Free Trial

Subscribe

FHB Magazine

Start your subscription today and save up to 81%

Subscribe

Enjoy unlimited access to Fine Homebuilding. Join Now

Already a member? Log in

We hope you’ve enjoyed your free articles. To keep reading, become a member today.

Get complete site access to expert advice, how-to videos, Code Check, and more, plus the print magazine.

Start your FREE trial

Already a member? Log in

Privacy Policy Update

We use cookies, pixels, script and other tracking technologies to analyze and improve our service, to improve and personalize content, and for advertising to you. We also share information about your use of our site with third-party social media, advertising and analytics partners. You can view our Privacy Policy here and our Terms of Use here.

Cookies

Analytics

These cookies help us track site metrics to improve our sites and provide a better user experience.

Advertising/Social Media

These cookies are used to serve advertisements aligned with your interests.

Essential

These cookies are required to provide basic functions like page navigation and access to secure areas of the website.

Delete My Data

Delete all cookies and associated data