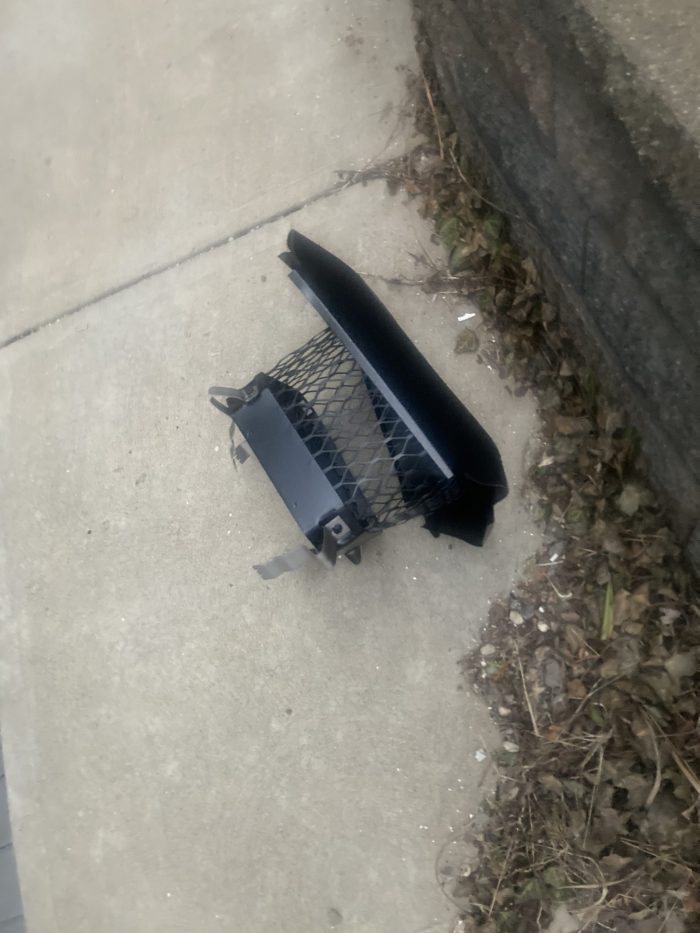
Recent intalled chimney cap blown off in high winds
Hi all. So I am at a loss here. The roofing co. installed the cap on the chimney, which vents my water heater, on 01/26/23. We got hit with strong winds last night & I find it on my neighbor’s property this morning.
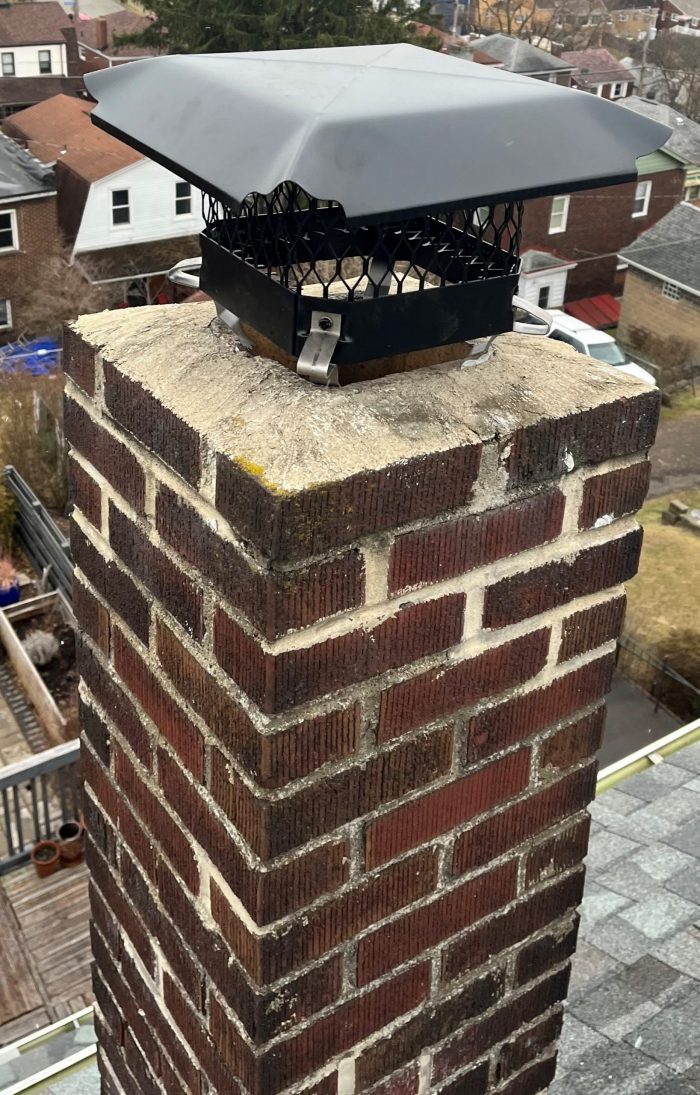
I didn’t notice how it was attached until my friend, a carpenter/handyman, pointed out these ..are they masonry ties?… but we couldn’t make out how they were attached to the chimney. Only one appears to be embedded in the cement crown…
I got one rep on the phone who said that it was a difficult install, that it was done this way so that the venting would be unimpeded, that there is a metal band on the inner side of the flue to hold the ties/cap in place.
Appreciate any thoughts. Thanks.
Also: They had said it was a custom-fitted cap but I found an identical version on the net for 1/5 the price.


Replies
A bass-ackwards installation.
Take a look here:
https://www.northerntool.com/shop/tools/product_200928099_200928099?cm_mmc=Google-pla&utm_source=Google_PLA&utm_medium=Heaters%20%26%20Stoves%20%2B%20Fireplaces%20%3E%20Heater%20%26%20Stove%20%2B%20Fireplace%20Accessories%20%3E%20Venting&utm_campaign=HY-C%20Company&utm_content=4891630&ogmap=SHP%7CPLA%7CGOOG%7CSTND%7Cc%7CSITEWIDE%7COOT%7C%7C%7C%7C168638516%7C8715913676&gclid=EAIaIQobChMI6bvK3K6N_QIV6RTUAR1PpAg9EAQYGiABEgJi2vD_BwE&gclsrc=aw.ds
Now that is a link!
If it works.
It seems there is a disclaimer with the product that mentions EXTREMELY HIGH WINDS.
But the installer had the clips on the wrong side.
And from the view, looking down, I’m not surprised.
Thanks Calvin.
This cap is of a slightly different construction than the HY-C but that shouldn't matter. There is nothing inside the flue for those legs to attach.
Question: am I to assume that its meant to stay in place under tension alone?
The roofer's field supervisor maybe coming by on Monday they told me. I'm hoping for something like reassurance that this thing won't blow off and, for example, hit my neighbor's kids?
Also, I cannot find any serial # or manufacturer's info anywhere on the cap so I guess it really was custom-made for our chimney. I was just upset from apologizing to my neighbor. I was looking at this install in a cynical mindset.
The cap I linked to is pretty darn close to what landed in the driveway. I’ve never used one like it but those clips are to friction fit inside the clay flue. Some on-site bending of them is supposed to fit tight enough to hold it in place. To me, they took the cheap $12 dollar model and didn’t read the directions or they blew away.
I have pretty much only used this style shown below if the picture shows up. The screws friction clamp to the outside of the clay flue. Sort of clamps it down.
Search chimney caps at suppliers for other possible examples. They are usually made up to fit standard clay flue liners. It’s not rocket science. Big difference in price from cheap to “oh my”.
I’d love to be there to hear the “supervisor” talk his way out of this one.
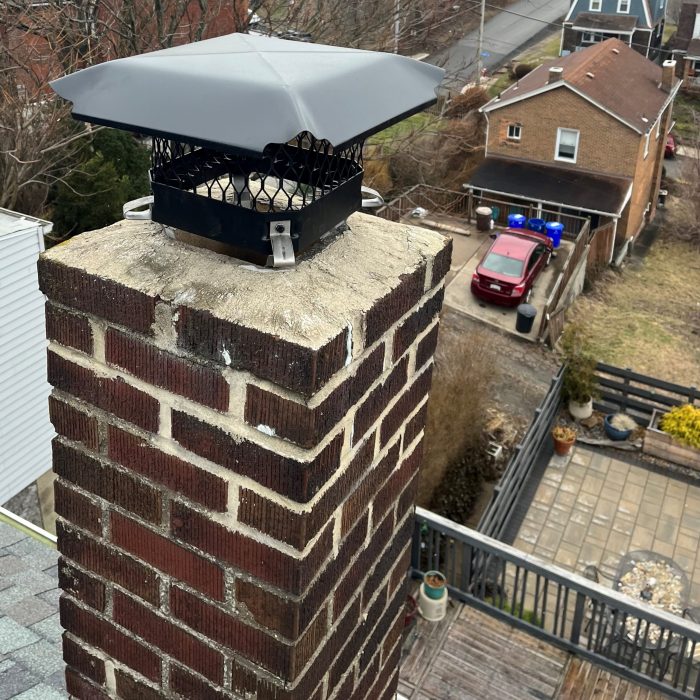
Edit: Does the clay flue stick up above the crown?
Did they make that crown? The flue liner should be above to allow the “clamping” to take place up against the liner.
“Edit: Does the clay flue stick up above the crown?
Did they make that crown? The flue liner should be above to allow the “clamping” to take place up against the liner.”
Hi, thanks again Calvin. I’m not really good with climbing steep roofs, so I have only these and other earlier photos to go by.
The flue tile looks to be flush with the crown. As to the crown itself, no they didn’t make it, also it appears to be unaltered by them. The rep with whom I spoke said this method was the only way that they could make it work.
I asked about a “cover-all” style that’d wrap around. The rep said it needed to sit higher off the chimney for proper venting of the water heater exhaust, which I think is definitely true.
If their response, come Monday, feels off or somehow dodgy, I think that then it’d be time to go with a chimney repair company. Either that or I will have to figure it out and do it myself.
But really, how common is this? I’ve never, ever seen/heard of a chimney cap blowing off (though no doubt it does happen!).
It sure looks like the clay is up above the crown in the first picture.
As to the venting sq inches etc of the cap, I do not know.
One thing I’d be concerned about is if there’s a gap between the crown and clay. This should be caulk with a quality flexible product so water doesn’t get, freeze and ends up cracking the crown.
And the backwards clips shouldn’t be stuffed down in a gap. They should have followed the directions, put the clips on the inside and bent them if necessary to achieve the holding power they were designed for.
And as I was taught first thing on the ground level framing,
NEVER BACK UP,
Carry that thought, all the way up.
Actually, if you zoom in on those pictures, you will see there’s nothing above the crown.
This is my idea: why don’t I remove 1 or 2 rows of bricks, redo the crown & then there will be more of the flue extending above the crown? Wouldn’t this be better? Then I could attach the cap to the flue more securely…
Looks like clay above crown to me, tho I cheated and used an iPad.
Remember, those clips go on the inside.
Here’s a link to those crazy Canadians answer.
https://www.rockfordchimneysupply.com/specialty-flue-extension-with-designer-lid-base-22-in-tall.php
If you do decide to go the redo the crown route. Make sure you search the proper clay tile to crown methods. We would pack a non flammable rope between the clay tile and the crown to allow for movement between the dissimilar materials. Otherwise the crown was prone to cracking at the corners. Now you shouldn’t have the big heat difference because this isn’t a coal or wood fired chimney. But, like a lot of things in building, there is a time tested procedure that sometimes gets ignored. Always google several opinions.
And if you’ve the time, return here with the guys on the roof’s excuse.
just a thought. Can you drill into crown and epoxy in 1/4 stainless all thread ? Then bolt the tabs to the crown and seal the whole works.
I will propose these ideas with the field supervisor. He has to acknowledge the fact that his method failed and that he has to make absolutely sure this time.
Mike- I am not confident of driving a fastener into that crown- I remember reading or hearing that this would lead to more damage and failure of the crown? Or would the epoxy solve that? It would be easier maybe.
sure looks like the tabs were jammed down between the clay and the crown, so that joint would need attention.. We don’t have freeze - thaw issues where I am so epoxy works. Best to see what locals think of my idea.
Mike
Mike - I can't say I see that. When I zoom in, the tabs are completely inside the throat of the liner.
Yesterday, I asked the roofers to, instead of this approach, remove a layer of brick (& redo the crown) to do the attachment to the outside of the flue tile and they said that it was too much work, ie that they were not allowed to do that much work per their boss. So I told them that I would find someone else to do it the way I want it done. We'll see if I get my money back on the cap.
Did you look at the picture I sent above on an iPad or laptop? All the clips on this side of the picture are outside the clay liner.
They are supposed to be friction fit inside the liner per the instructions on the model I sent you a link to.
?
“[Deleted]”
https://s3.amazonaws.com/finehomebuilding.s3.tauntoncloud.com/app/uploads/2023/02/12172808/8332_1676240887_047DC8AD-379B-484F-AC42-15098B63F79F-700x718.jpeg
Sorry Calvin. I think this is just me confusing the terminology here. Yes, the clips are friction fit inside the liner.
Whoa.
The clips on the hood that blew off were not inside the liner as they should be according to the new installation directions that I found and posted as an example on how it should be done.
The hood that blew off and why it blew off is because the clips were on the outside of the liner……
Which is wrong.
I would certainly try to install the cheap 13.00 style you have with the clips friction fit inside the clay liner if in fact they were tight and I could crawl down to the ground with confidence.
To remove the crown and a course of brick to put the clips outside the clay liner is just plain wrong and $’s. Thrown off the roof.
Now if I’m reading this wrong I apologize, but would still like to know the guys response to the original question….
Why weren’t the clips on the inside of the liner where they were supposed to be in the first place.
I apologize for being harsh but I just got off a reply by our city to a complaint I raised.
Thank God for a long driveway!
Edit. Please open the link above or even the picture, on a full sized computer.
Looking at it on a phone will be like trying to view an ants rear end.
Hi Calvin. Sorry for the delay. For clarity, I was describing how the legs/clips weren't embedded between, say, the crown material and the outside of the liner but friction fit into the inner surface of the liner. I take your point that that is the proper install with this hardware. My impression is that the S-curve (providing tension?) of the 'legs' is supposed to be oriented *inward*, not sitting outward over the crown like these guys did, thus not enough tension? That's what I think your point is...
In the end, I decided that, with the higher force wind gusts that periodically hit this side of the house, its safer to do a more secure install with exposing the liner, redoing the crown and dropping the cap over the liner. Its more time and effort and $, but I just don't trust the legs/friction fit approach. Not after what happened.
Thanks for looking this over.
Ok, we be on the same page.
Make sure that you or someone you hire take all the precautions on the proper install regarding that crown to clay liner. There’s an art to even that job.
And as usual, come on back and post the victory lap
Cheers, thanks!
J-Mac,
Not all high winds cause problems.
Halfway DOWN the hill an uprooted good sized black locust. I’m set for firewood.
Upside,50 ft laterally from a clearing. Downside, 50 from a clearing.
Best upside, trunk you can’t hug is pretty round. Cut burn size pcs, muscle to the clearing.
Should be able to aim and roll to the bottom where I probably can get the van. Almost 2 yrs of heat.
Firewood heats 3 times before you burn it. Cutting, splitting and hauling.
I’m envious. We’re surrounded by concrete and asphalt so our trees grow bounded in containers or busting through sidewalks and retaining walls, that’s living in the city for us. Good to hear about those things growing uninhibited. Wind storms do knock down my little baby trees tho’.
We got lucky. Found a lot in a small city. Backs up to a flood plain of a river. Retired now so I can spend time building non standard woodpiles.