
We have got some 40 year old birch doors coming up to refinish and I would appreciate some points from your accumulated experience on this. They have gloss poly on them now – plain, flat, birch doors.
I’m coming off some experience with silicone contamination for one thing – plus a desire to have faster drying time than poly – but there are probably unknown disadvantages to faster dry.
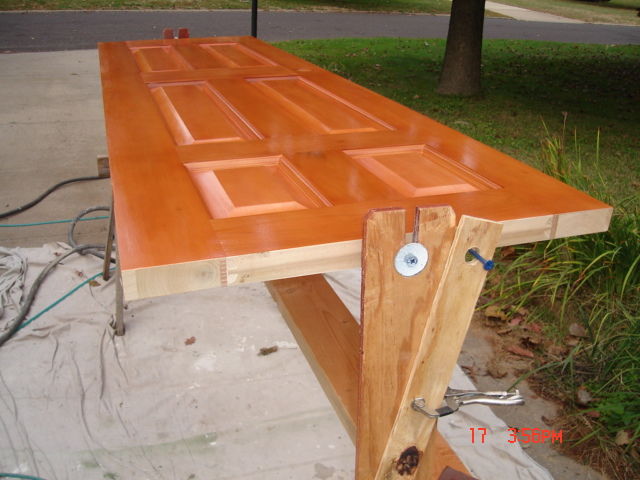
So I am wondering about getting catalyzed laquer (water based?) from SW and spraying that with the HVLP with the doors on “spinners” (see attachment).
Any tips on this? Does this sound right? We are limited of course as to sanding with the micro veneer on these doors.
Also should I add fisheye eliminator to catalyzed laquer or just clean and clean with naptha? Any other tips? I’m getting a little gun shy since I experienced the Pledge contamination. tx


Replies
If you DONT use FE elim. and you DO use Cat Laq..man are you asking for trouble.
Sand with NON sterated paper, and shoot a thin wash coat of Sealcote shellac..then proceed with the lac and FE Just In Case.
Remember, any Cat Lac is about as non repairable as you can get, if you ever need to touch up anything, you will see the layered effect telegraphing. There is no future burn in possible, similar to polyurethanes.
Spheramid Enterprises Architectural Woodworks
Repairs, Remodeling, Restorations
They kill Prophets, for Profits.
Sphere how do I know it's not sterated paper? The sealcote shellac is used as a sanding sealer? Is it extra insurance? Is the FE preventer the same stuff for both water and oil base? By "future burn in" do you mean just touching up thin spots?
Non sterated is anything other than the whiteish gray stuff.
Seal cote helps contain the silcone contam.
FE is NOT cross compatible
burn in means it will or wont melt in to old coats with touch up.cat Lac and poly won't burn in. Lac and shellac will.Spheramid Enterprises Architectural Woodworks
Repairs, Remodeling, Restorations
They kill Prophets, for Profits.
While I dont know too much I do know our cabinet guy uses a catalyzed laquer although I dont think its water based? not sure Anyways he swears by it because of the extreme drying time, says its improved his results a lot. I do know It comes from Sher willams though maybe its the same stuff.
How bout a couple more pics of the door rig you got there? That looks interesting
I'm looking for more pictures of the door spinner. I use 4 inch cement screws, a 1 inch length of 3/8 tubing left over from faucet supply tube/ a small washer up against the door to keep the tubing from sinking in/ fender washer under the screw head. The support is just notched 1/2 plywood screwed to the saw horse.We learned life is a lot easier if we find the weight center by holding a round screwdriver under approximate middle of each end then rolling until balanced. The added 4 inch cement screw 3 inches from center gives a nice way to hold the door any position. It also makes a great way to remove the door from the holders. We make the slotted plywood pieces to store the wet doors with a longer slot so the extra screw keeps the door from spinning.
Yea thanks thats what I was looking for. Doing doors is always a PIA I think. The best idea I had so far was two screws in each end like feet and set the screws on sawhorses so you do both sides, but it isnt great and you need someone to help flip them and then move them. Somehow I did the last ones alone (solid core)- its stupid.
Just so you know Ill probably steal your design and try it someday. I like your drying rack for the doos the best. I do racks just like that for the trim too. I take it thats the homeowners garage?
Yeah that was the home owner's garage. It was great weather and a good situation to do it right there between other things. I'm glad you want to use it. The concrete screws are the most convenient way to go I've found yet. Having the door on the spinner allows getting a real good reflection to see thin spots. Also you can keep it flat to avoid runs. We have used a variation of this for several years - this is the best set up so far.
fonzie
More pics
More pics
Looks interesting
Rich
I'd skip the catalyzed lacquer. Wipe with naptha or paint thinner. When dry I'd shoot several coats of water based poly, or reg. nitrocellulose lacquer, if this's an interior door.Exterior wise, spar varnish is prolly your best bet, but takes hours to dry.
A sealer coat of shellac first lets you apply any top coat, but I find shellac doesn't lay out well when spraying.
Expert since 10 am.
Why would you advise against the catalyzed lacquer? - a painter mentioned guys were using that so I'm in the dark about it.
Fonzie,
Silicone contamination can be a real PIA to deal with......but it's a lot easier to overcome if you understand the nature of the problem. Don't know for sure if you do or don't, but will assume not and so will try to explain a bit.
Fisheyes develop on silicone-contaminated surfaces primarily because of a difference in available surface grip between the non-contaminated areas and those that are. Think of it as a tug-of-war between two teams wherein one team has their feet planted on solid ground and the other team is on ice (or a slick oily surface). Those on the slippery surface get pulled over to those on the solid dry surface.....leaving a void or crater. The team members in this instance are droplets of finish.
There are basically three ways to overcome the problem; 1- Remove the ice or oily surface 2- Put all the players on the same ice or oily surface 3- Remove the ropes, thereby eliminating the tug-of-war.
Sanding deep enough to achieve #1 is frequently not an option and doesn't sound like it is in your case. Cleaning with naphtha or similar may or may not resolve the issue. Frequently it doesn't, but sometimes it does or at least helps a bunch.
Adding Fisheye Eliminator or similar is an attempt to achieve #2.........as you are actually adding silicone to the finish you are applying. If the existing contamination isn't too severe..... it works, but there's a limit as to how much you can add before there will be adverse effects on the finish. Don't exceed the recommendations on the bottle by too much. A little, yes. Double, no.
You can overcome almost any amount of silicone contamination via #3 by removing the ropes = no tug-of-war = no fish-eye craters. This is achieved not so much by the choice of finish, but more so by the application technique. The first few coats must be "dust coats" and not full wet coats. Nothing even resembling a wet coat, as a matter of fact. A dust-coat should more resemble a surface hit by overspray; very grainy, as in........ the tiny individual droplets/particles aren't touching one another on the surface. Looks and feels like sandpaper. Once that dust-coat is dry, lay down another. Repeat again. Maybe four times to get the desired end result. The objective here is kinda like stacking individual marbles or bricks next to and on top of one another to create a barrier rather than pouring a layer of concrete. Once you have a complete barrier built from multiple dust-coats, you can shoot full wet coats of finish over the top and the underlying silicone won't/shouldn't sneak thru .....if you built your barrier correctly and sufficiently.
However.....there are some caveats. For instance, the choice of finish for building the barrier coats does make some difference. Although you can make most any type of finish work for this......using an evaporative finish like shellac or solvent based lacquer actually makes shooting the dust coats successfully a little bit more difficult. This is because we ideally want those dried dust-coat droplets to remain as individuals and successive coats of an evaporative finish will/can burn into themselves. If just a bit too much finish is shot during a successive dust-coat .......it will cause the previous droplets to "melt" again........and this can instigate that tug-of-war which we are trying to avoid. (As already mentioned.....sometimes a single coat of shellac can overcome a mild case of silicone contamination, but frequently it won't and the multiple dust-coat approach has to be used if fish-eyes are to be overcome.)
Also, if you use shellac or nitro-lacquer for the dust coats and the top coats.....you have to be really careful not to shoot those full wet coats.......too wet. Hit the flow-out point and get outta there. Reason being that any more than that and the solvent in the full wet coat may totally melt down the underlying dust/barrier coats and spoil all your efforts to contain the silicone. To avoid that possibility, you could use shellac (Sealcote) for your barrier coats and then switch to a different top coat which doesn't contain a solvent that will dissolve the shellac. OB poly, waterborne poly, spar varnish.... all qualify..... as does cat-lacquer.
Or.......you can actually do it all with one single finish. Example - OB poly (a reactive finish) can be used for the dust-coats without having to wait forever for each dust coat to dry before adding another. Shoot a light dust-coat and then grab your heat gun. Keep a safe distance and wave it over the area with the dust-coats. Dry it, don't fry it. Use your bare hand to gauge how far away to stay. Once those initial droplets are dry (5 minutes or so) you can shoot another dust-coat without worrying about the second melting the first because reactive finishes don't do that once they are dry to some degree. For the same reason, you can also use it over itself for the full wet coats. (Don't worry about the roughness of the multiple dust-coats. Don't sand it or very lightly if at all. Once you shoot the full wet coat(s), that roughness will all be buried and disappear.)
The fact is that you won't likely know if you have a silicone-contam problem until it appears when/after you shoot your first coat of finish. But...if you have good reason to suspect there is going to be a problem, then you might consider shooting a coat of Sealcote as an initial simple barrier coat and also adding a moderate amount of FEE to all of your finish. Or you could preemptively add the max amount of FEE from the get-go.....and if craters still appear........you can then use the multiple dust-coat approach over those specific areas and then shoot another full wet coat or two over everything after the fact. (Adjust gun pattern to something appropriate for the trouble areas while dust-coating.) You can overcome really horrendous sili-contam this way on a spot-basis without removing all the finish you've already applied. Just allow the existing finish to dry before you proceed with the dust-coats.
If the existing finish on the doors is intact and not worn thru or cracked.............odds are that there won't be a significant SC problem even if Pledge or similar was used on them. It's when the finish is deteriorated so that the silicone can enter the underlying wood that real problems occur.
A cat-lacquer or cat- varnish will definitely dry much faster than say, OB poly. But.........there are limits as too how thick of a final film is allowable. Follow the manufacturers recommendations as regards that. It is also pretty tough stuff. Downside of cat-finishes is that overcoating or repairing damage after about ten days will likely result in a poor bond of the new coat(s). Stripping and starting over is the recommended procedure. Although OB poly , for example, can't burn in/melt into the existing layers of itself..... like a shellac or nitro-lacquer (non-catalyzed) does .....you *can* overcoat it in the future with just a little cleaning/prep sanding/scuffing. However, unlike shellac or nitro...you'll have to recoat a whole piece to avoid a halo around what may only need a spot repair. Shellac and nitro are hard to beat in that regard.
Edited 3/8/2009 11:27 pm ET by HootOwl
HootOwl,Thanks for that laid out experience. I hope I can digest that. I don't know what OB poly is, I'll have to check into that. The analogy is great for explaining silicone contamination. Thanks.
OB poly = oil-based polyurethane.
WB poly = water-borne polyurethane.
Would you guys explain about catalyzed lacquer and why/why not use it?
Its like real thin epoxy. You have to add the hardner ( catalyst) to make it cure. The problems with it, are that it can not be repaired like other more common finishes. It sets up impervious to most chemicals and to remove it requires serious abrasive work, often doing harm to what is being stripped.
We've used it on guitars pretty extensively, beacuse it is pretty bullet proof, and if it needed a repair, most musicians would send it out to an exp. luthier, who knows how to deal with it, vs. doing a garage repair them selves. Pianos too are often finished with it, it is hard enough to get that mirror like finish when buffed. Ala, Steinway, Yamaha, and the like.
It can also set up in your spray rig, and ruin it right quick ( don't ask)
I much prefer a more enduser friendly finish for most work that sees non-industrial type use.Spheramid Enterprises Architectural Woodworks
Repairs, Remodeling, Restorations
They kill Prophets, for Profits.
Why not just shoot Nitro lacquer? I'm not up on the pre and post cat varnishes but I've never had any issues with nitrocellulose lacquer, except for the fumes, but they go away in about 2 days. WB finishes I'm not impressed so far but clean up sure is easier.last time I bought 5 gal. of lacquer and 5 gal. of thinner they told me I could not add the lacquer thinner to the lacquer, told me it was illegal. I had to tell them it was for clean up.ML
I do. I use mostly nitro. Some WB poly, but mostly nitro.
BTW, you can add lac.thinner to some WB , but ya didn't hear it from me. As long as there is an emulsifier in the WB mix, the lac thinner will mix in. Makes it have a better "Bite" on prefinished work.
The witness lines in CatLac repair or touch up ( like when ya have to level a sag or run) is why I steer away from it..never fails, ya forget to wrap a rag around the spray gun, some finish drips out the vent hole, and you don't see the blob till it sets up..then yer hosed.
Or here, when I'm outdoors spraying ( no booth) every flying bug in the county will find the wet film and die there like the La Brea tar pits.Spheramid Enterprises Architectural Woodworks
Repairs, Remodeling, Restorations
They kill Prophets, for Profits.
Sphere, what gun you spraying with? I use an small Titan airless as I'm usually spraying doors or mill work, and cabinets. Just ordered a separate hose and gun so I can keep my clear and colored lacquers separate so I don't have to shoot clear through the same gun as I shoot colors.I may need to try some WB. Got any recommendations on products?ML
I got a no-name conventional gun for lac with fish eye, one for clean lac, one small touch up gun ,the tall skinny cup, a critter that I use for shellac ( glass mason jar, siphon feed) A fuji HVLP Q4 ( I think it is) an old accuspray grahite body gun ( I sold the Apollo turbine) and a 50 buck HF HVLP for giggles.
I'm a die hard with Hydrocote, I been with it for almost 20 yrs, I know the ins and outs and all secrets. I used to sell it, and conduct seminars on it's use. I also am not afraid of Minwax Polycrylic, its not bad stuff.
The thing about WB is you can't leave it in the gun like Nitro..and you really want Stainless steel gun guts..clean often. The Accuspray graphite is good cuz spraying with a turbine for long periods makes the gun get hot, and the graphite isn't uncomfortable to hold.
The wife uses the harbor freight gun with water only as a humidfier in the house..LOL Just walks around misting things..the woodstove really makes it dry in here, and she likes moist..it's kinda funny.Spheramid Enterprises Architectural Woodworks
Repairs, Remodeling, Restorations
They kill Prophets, for Profits.
I had the Apollo conversion gun. Maybe my 20 gallon compressor was too small but It coudl not keep up spraying white lacquer, thats when I went to teh airless. I'll have to check out hydrocoate I used an Apollo 4 stage model 1000 HVLP and liked it lots but it was 3 times the cost of the Airless I have.ML
I never did much with airless, too much hassle to clean and in my mind, better suited for paint, not finishing. I also had a pressure pot and sold it..I'm lazy and hate flushing lines and stuff.
The older I get the more simple I am trying to get..and for what I have had to finish lately, conventional gun is go to, with good old Deft Lacquer. Its fool proof and don't smell that bad..kinda like coconut suntan lotion..reminds me of girls lying in the sun. Still need a respirater tho' or ya actually start seeing them girls and then the next days hangover is hell. Lac hangover is worse as ya get older, you don't get used to it, you get MORE trashed.Spheramid Enterprises Architectural Woodworks
Repairs, Remodeling, Restorations
They kill Prophets, for Profits.
Agreed, If I could have a 25' material hose that would be idea, but flushing a cup gun is so easy, and it doesn't take a gallon of thinner either. finished 3 bedrooms, stairs and hallway recently and think I used 10 gallons of thinner.Thanks for the help.
ML
I have not had the challenges that Sphere has had with catalyzed lacquer. I find it to be easily repaired because you can finish an entire surface and be dry in 15 minutes.
As far as screwing up your spray rig, we clean ours at the end of every day and never had issues.
The reason you would not want to apply it over old poly is that the solvents in the cat laquer may dissolve the poly and could actually peel off the poly. Cat laquer is best used on new or clean surfaces.
Bruce
IF you refinish the ENTIRE surface, there lies the rub. Often that is not the case. Even then if you sanded out a blemish and have lowered the original surface, you will see the witness lines where the two meet.
But if you like it, thats all that matters. I have to use it on occaison, and can do without it for my personal pet projects.
Warranty repairs on some guitars require it to continue the factory warranty. As an authorized repair, it has to be done with what they spec. Sucks, but thems the rules.Spheramid Enterprises Architectural Woodworks
Repairs, Remodeling, Restorations
They kill Prophets, for Profits.
I guess my point about refinishing the entire surface, even if it is a big as door (20 sf) takes all of 30 seconds of spray time and 15 minutes of dry time.
I have never been involved with luthier type work so I do not know the challenges of finishing an instrument, but I am sure that the finish has a much higher level of precision that most cabinet and trim work associated with a house.
I am a big fan of the fast dry times. Our humidity level in central Texas make drying painfully slow with non catalyzed products and with out fail some bug or dust particle will set into the finish.
Bruce
I hear ya, fast cure is good, and it won't blush like evaporative lac does.Spheramid Enterprises Architectural Woodworks
Repairs, Remodeling, Restorations
They kill Prophets, for Profits.
Sphere,I'm gravitating toward spraying fast dry Minwax oil base and putting up with the longer dry time rather than do reasearch (which can be expensive) on these doors. The short dry time is tempting but what seems like the hard way might end up being the easy way for me. I have a graco 4 stage I bought on Ebay that was broken and a guy fixed it for me (leak in cup)
I used that last summer on some screen doors, and it does dry pretty quickly. Surprised me, I remember the old days, and it was terrible.
You'll probably be OK with it. As with ANY finishing area, keeping dust down is the highest priority, I even shoot myself lightly with whatever I'm spraying, keeps the dog fur, lint, sanding dust..on my clothes and off that which I am spraying.
Wetting the floor or ground helps, as does then waiting till the airborne dust settles.Spheramid Enterprises Architectural Woodworks
Repairs, Remodeling, Restorations
They kill Prophets, for Profits.
Since you've already received alot of info, I'll only add a bit.
The upsides to using a cat finish (lacquer or varnish) is that it dries really fast, which reduces the odds of #### landing in it /causing problems, you can handle it sooner and it's pretty tough stuff. Cat-lacquer is also much more resistant to water and chemicals than nitro. Stands up to daily wear and tear better also.....such as hand abrasion, etc.
Downsides to cat finishes are that they aren't as easily/successfully spot-repaired as nitro or shellac, they are much more difficult to strip off if/when you need to and you can't build up umpteen coats of the stuff. You can build up 20 coats of nitro if you need or want to. Can't do that with a cat-finish. It'll crack and craze if you do.
I use/will recommend cat-finishes where/when I think they're appropriate. The decision depends upon the circumstances. but I usually explain the differences to the client and let them make the final decision.
(Pre-cat finishes require no mixing of ingredients. It's already mixed and ready to go. These don't set up in your gun like a post-cat can. Post-cat finishes require you to add an ingredient at the time of application/use. You then have X number of minutes to use it up (called the pot-life) and get your equipment cleaned out...or kiss it goodbye.)
Edited 3/12/2009 11:31 am ET by HootOwl