Hello,
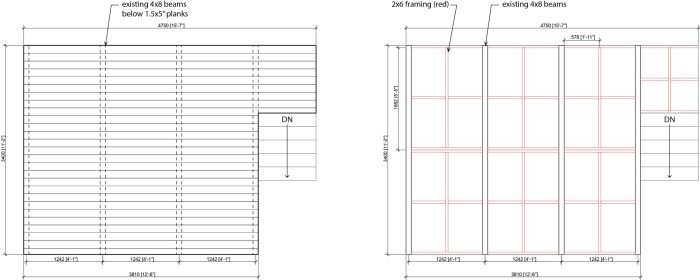
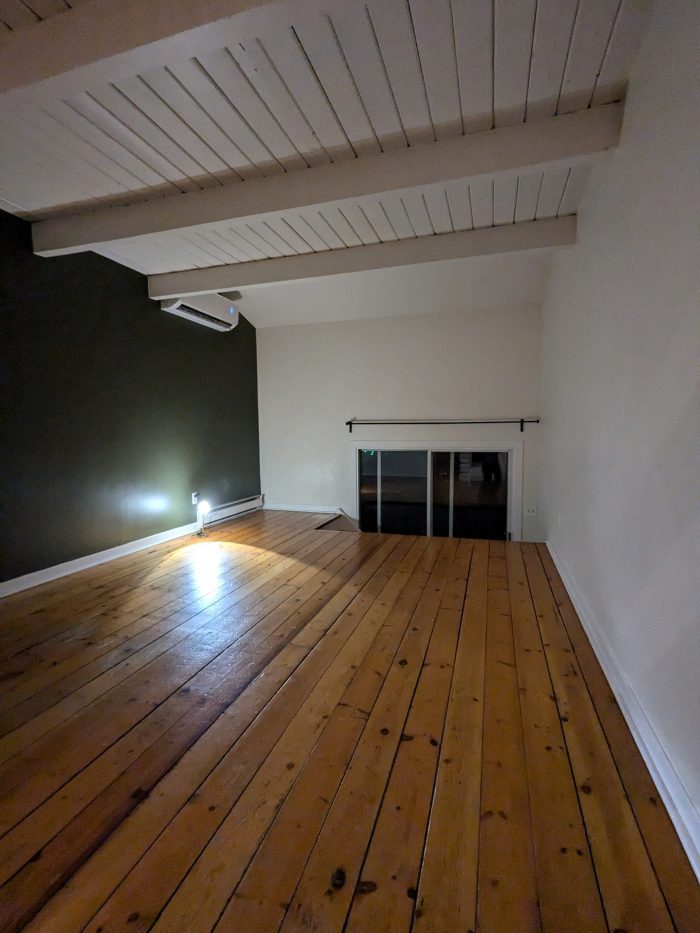
I have a townhouse condo with unusual floor construction, its 1.5×5″ (actual) T&G planks supported by 4×8 beams on varying centres, slightly over 4′ at most. The planks are exposed as floor and ceiling.
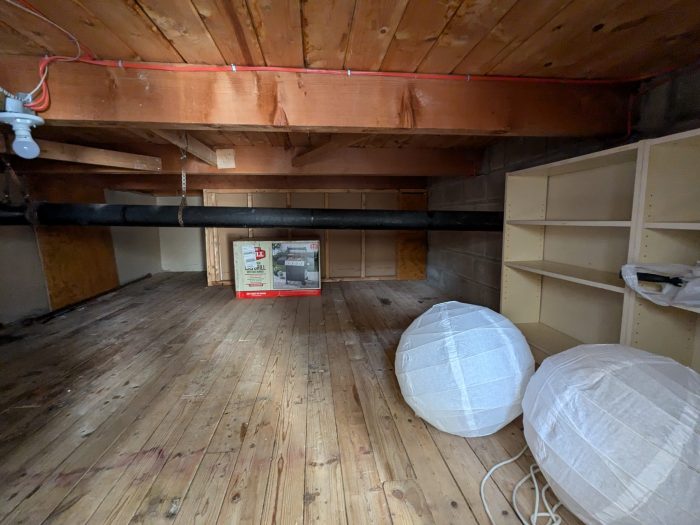
I have an issue with my dining room floor where the boards have gapped and warped to the point that the nails through the tongues have come loose, some tongues have disengaged from grooves and the boards are loose and bouncy. the beams in this room are about 4′-1″ centres and my thought is to add 1 or 2 joists per bay to reduce the amount the planks are spanning and then screw the planks to the beams and new joists, either toe screwing from below or from face screwing from above. Under this room is a 4′ tall storage space. In the long run this floor will get new finish floor on top but I would like to update the floors to the entire townhouse at the same time and that’s not currently in the budget.
So, as this is a townhouse there are concrete block party walls on both sides that support the existing beams. I’d rather not attach to the block walls so my thought is to support the new “joists” off of the existing beams but I’m not sure how to evaluate what a sufficient spacing and configuration for the new joists/blocking as this doesn’t conform to floor framing standards. I’ve attached a sketch of the floor in question and a few ideas for framing configuration. I’m just looking for thoughts and a sanity check on this.
Thanks!


Replies
A lot of homes built in the 70’s in the Pacific North West have similar floor framing. We call it Post & Beam w/ 2x6 T&G Car Decking. The T&G is critical to floor stiffness- force on one 2x6 is transmitted to the neighboring planks by the engagement of the tongues with the grooves, which stiffens the entire floor diaphragm. Often sloppy construction combined with shrinkage leads to lack of engagement and bouncy floors. My solution has been to go under the floor and add 2x6 “purlins” perpendicular to the 2x6 T&G planks, attached with three 2-1/2” screws at every crossing.
Purlins flat to the floor work because of the short distance involved- just the 5-1/2‘ width of the 2x6 T&G. I used flat purlins in the center of the span, but vertical orientation of the purlins with joist hangers on the beams would add even more stiffness. Construction adhesive might add to stiffness, as would a well fastened plywood/OSB subfloor. It’s fairly safe to assume the beams are adequate to support the planks and that the main problem is the isolation of the T&G planks from each other.
If the ceiling is finished with sheetrock, adding purlins on top of the T&G planks would reduce deflection and thus reduce stress on the sheetrock joints.
In a similar situation with my WA 1972 Alaskan Yellow Cedar post & beam A-frame. Second story is 2 3/4" yellow cedar t&g decking - 8ft spans to log beams. Since it is the finished ceiling of our living I don't want to add any support underneath - plus our post design with the A-frame would make that challenging anyway.
We have 2 boards that have disengaged on both sides and have noticeable deflection when walked on. The rest are rock solid. Getting ready to put in new 3/4" maple flooring. I'm curious if running the hardwood flooring perpendicular to the decking would be sufficient or if I need to put down a layer of 1/2" - 3/4" plywood first?
Maple flooring is usually T&G and regardless, I would expect that it would bridge over 2x6 planking easily. Certainly a well attached layer of plywood would give a more consistent base for the maple. I think I'd lay both the plywood and the maple perpendicular to the existing planking and offset the sheets of plywood.
Contrary to popular opinion, I'd put the screws in neighboring sheets opposite to each other rather than centered between each other. My theory is that I want the opposing edges to be even with each other, rather than pulled down tight on one side and floating a bit on the other. Also, I'd space the sheets 1/8" apart to allow for expansion due to moisture changes.
Thanks bobbomax, I really appreciate hearing from someone who has experience working on this type of floor, I haven't been able to find that in Toronto.
Your suggestion makes sense to me, the span of the planks between beams is not the issue, it's the T&G not sharing the load due to disengagement of the T&G. 2x6 on flat screwed at the mid-span replaces/supplements the load distribution of the T&G.
In addition the T&G disengaging, the nails through the tongues are not holding the planks tight to the beams, I've attached a photo of a section of the floor edge where this is visible. Do you have any suggestions on how to pull them tight to the beams? My thought is to either put 2 deck screws through each board into the beam from the top OR go from underneath the floor, screw 2x2 into the side of the beam and then screw up through the 2x2 into the planks.
The house is bone dry right now so I imagine the wood is too. Any concern about splitting boards with screws due to dryness?
Thanks again, your experience and opinion are much appreciated.
If you only drive screws in the 3" center section of the 2x6 planks that would minimize splitting potential. I'd install one screw in center of the 3x3 square and the other 2 in diagonal corners- that way there's only one screw per grain line in each 2x6. The ends of the new planks are the most vulnerable, so you could use cabinet screws there.
I have to agree that pulling those dry, shrunken floorboards down to the beams has some potential to cause problems, but I think you'll get a feel for it. If need be a split could be reinforced using another purlin.
Construction adhesive could also provide reinforcement with no splitting.
That screw pattern makes sense, thanks for the suggestion. Getting into the weeds, any advice on propping the purlin up while screwing? It will be about 12' long. How about screw length? I'm thinking 2" screws will have almost an inch into the board but keep the tip well short of the top surface of the boards.
Thanks again!
Not sure can find them , but waferhead screws give you a bigger flatter head that would pull down rather than recess itself like a flathead. Finding the right gauge and coarse threads is worth a look.
https://www.google.com/search?q=waferhead+wood+screws&ie=UTF-8&oe=UTF-8&hl=en-us&client=safari
I'm looking at using screws called "PWR drive evo", they have two different thread spacings with the intention of pulling the two pieces of wood together.
Ok.
If by chance they decide to bury the head before completely pulling the board tight…..
That’s why I mentioned the “waferhead”. A wider thin head that might pull the board tight before burying itself.
Best of luck.
I'm guessing the purlins will die into a beam. I'd screw a horizontal 2x4 to the beam to act as a ledger for one end. Then you could start some screws in the other end, hold it up with a prop after positioning it and run the screws in. Given 2 thicknesses of 1-1/2", I'd probably use 2-1/2" screws to get as much engagement as possible without coming out the top surface and I'd consider adhesive.
I recommend John Carroll's book "Working Alone". It's full of ways to hold the other end of a board or a tape or a chalk line. If there's an easier way to build something, Carroll has figured it out. He also wrote "Measuring, Marking and Layout."
https://www.thriftbooks.com/ is a good source.
That's a great suggestion, I'll take a look. Thanks again for all your advice.
If you drill a clearance hole the diameter of the screw through the decking you will have the best chance of pulling it tight to the joist. Too many times people try to pull boards together without the clearance and just bury the screw head without getting the boards tight. It’s extra work but the success rate is much higher. Calvin’s suggestion for screws is a good one.
If I use screws that will only have threads in the second piece of wood and smooth shaft in the first piece, will that accomplish the same thing as drilling a clearance hole? The higher end deck screws like GRK seem to be structured this way. I'm hopefully diving in next weekend, I'll keep your and Calvin's advice in mind if I run into any issues.
Right, smooth upper shaft is same effect as clearance hole. "Thread-to-head" is generally special order, a relatively short screw or sheet metal screw.
#10 X 2-1/2" GRK "wafer" or "washer" head is a good choice.
Let us know how it comes out- virtual advice is easy- real life, not so much, which makes feedback valuable.
So, I ran into a snag pretty quickly. I decided to screw the loose boards in the beams from above prior to attaching a purlin at the mid-space from underneath. I drilled a pilot hole through the board but not the beam (bit isn't long enough) and the first screw went in fine but the next two broke as they seated into the boards countersink. I drove a couple screws into the edge of a scrap 2x4 and I can't replicate the breakage, the heads just sink deeper into the wood the more I screw.
I'm not sure what the issue is here, could it be that the beam is an (unexpectedly) hard wood and I need to pre-drill the full length of the screw?
Old, dry wood can be pretty hard. Try to find a drill bit long enough to pre drill the length of the screws. Old guys used bees wax to help keep the screw from breaking.
Older guys used “Door-ease” that came as a 1” stick in a metal tube.
Agree with 1095mike.
Bar soap makes a good lube too. Back in the old days, my dad would run the screw through his hair and his hair dressing oil would lube it.
Harbor Freight can be a convenient source of long bits.
I can't understand the 2 sets of threads on these screws. StrongTie uses them too sometimes. I think they're supposed to help pull the upper board tight to the lower, but it seems like smooth shank would work as well or better.
I did try candle wax but it still broke. I'll try a longer drill bit.
Regarding the extra set of threads, as you say they are meant to pull the two pieces tight together. Whether its marketing BS or not I can't say. Here's a video demonstration that has some explanation of the second set of threads: https://www.youtube.com/watch?v=TkScC-rurh4&ab_channel=POWERDRIVE
Do you have an impact driver or just a drill?
With driver, do you have a clutch on it?
With an impact driver, and long enough bit to predrill just 1/2” short of the screw length, you should have no problem. Set the clutch just right and you can go to town.
I have a drill with a clutch. I've been thinking about getting an impact driver, the drill seems to work pretty hard driving screws in this case and I have many to drive. The second screw that broke I finished driving by hand so I could be sure it wasn't the drill causing the breakage.
Why do you say I can pre drill a half inch short of the screw length as opposed to the full length? I ask because the drill bit lengths I'm seeing jump from 3" to 6", the first will be short of the screw length and the latter is quite long and won't work with my countersink collar. A 3" bit could get me 1/2" short of the screw length.
Thanks for all the support everyone!
Drill bit length is up to you. Know that an impact driver will probably drive the rest of the way no problem. If you continue to have problems with those screws, use others. The thread change may be what is causing you problems. I’m not there but would have tried the other type I mentioned.
Unless you plan on doing nothing after this project, that impact driver will pay for itself several times over. I might mention don’t cheap out on its purchase. As a guy that made his living with tools, I never went for the lowest price on tools. Example, Rockwell 315 circular saw purchased in early 1970’s…….still in use.
Ref the countersink collar, a 2" piece of tape wrapped at the right depth with a flag sticking out can substitute. You know you're at the right depth when the flag starts brushing the swarf away.
I use an impact driver for almost all screwdriving, but you should be aware that some manufacturer's literature prohibits them in certain situations. The impact can lead to higher stress and breakage, where the consistent torque of a drill driver wouldn't cause problems. OTOH, if you're not close to the breaking torque of the fastener, the impact can move the fastener a small amount, which can be useful in snugging something up. With practice, you can learn to do, "thunk" or "thunk, thunk, thunk." Science is involved, but it takes an artist to apply the science.
In this case a beefier (and more expensive) screw, like a 1/4" StrongTie instead of the #10 GRK might be a better choice. You might be able to use fewer, making up for the increased cost.
I wanted to post a quick update, I ended up screwing a 2x4 on flat to the underside of the planks at the midspan as well as screwing the planks into the existing beams from above and the floor feels much better, very solid, no squeaking or deflecting. The issue I had with the screws breaking was resolved by pre-drilling the full depth of the screws. Thanks to everyone for your advice, it's much appreciated and got me to an outcome I'm very happy with!
Cool,
Let’s all meet at your corner bar!
You’re buyin’
We probably won't solve all the world's problems, but it's satisfying to solve at least one and then be thanked for it.