FHB Logo Facebook LinkedIn Email Pinterest Twitter X Instagram Tiktok YouTube Plus Icon Close Icon Navigation Search Icon Navigation Search Icon Arrow Down Icon Video Guide Icon Article Guide Icon Modal Close Icon Guide Search Icon Skip to content
Subscribe
Log In
  • How-To
  • Design
  • Tools & Materials
  • Restoration
  • Videos
  • Blogs
  • Forum
  • Magazine
  • Members
  • FHB House
  • Podcast
Log In

Discussion Forum

Discussion Forum

Removable Mailbox….

Fishrite | Posted in General Discussion on January 19, 2007 08:14am


Okay…We are renting this house at this point…

The Mailbox…

Our 4 x 4 mailbox post is only stuck in dirt, and we just pull it out and move it when we need to back the boat in…(20 ft’er and tiny little street…)

…however, it has been leaning lately…(perhaps the neighbors daughter may have bumped it)  …no biggie, like I said, we are renting…

What I would like to do is make a concrete base where I could still pull out the mailbox…lol, don’t laugh at my project, please…okay, go ahead and laugh…

Okay, I am thinking that I need to dig a big hole…

Then take my mailbox 4 x 4 and wrap it in Olive Oil and Saran Wrap…and more olive to the outside….

Place in the hole, and pour the concrete around it, level it, and let it set up…

LOL…will I be able to pull the post out?

Will this work??


Any and all suggestions are welcome…


Reply
  • X
  • facebook
  • linkedin
  • pinterest
  • email
  • add to favorites Log in or Sign up to save your favorite articles

Replies

  1. nikkiwood | Jan 19, 2007 08:24am | #1

    Before the experts get here to answer your question, my suggestion would be to temporarily attach a piece of 1/4" plywood to one side of your post, and another piece of 1/4" ply to the front (or back) of the post.

    After pouring the concrete around the post with these pieces, the hole will be just slight larger than required -- allowing you to slip the post in and out easily.

    ********************************************************
    "It is what we learn after we think we know it all, that counts."

    John Wooden 1910-

  2. User avater
    xxPaulCPxx | Jan 19, 2007 09:54am | #2

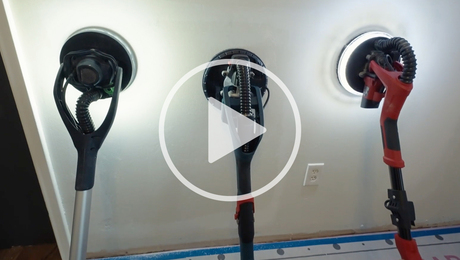
    Instead of concrete, there are metal post holders that are driven into the ground that hold a 4x4 post.  Normally they are used for fence repairs.  The top part - that holds the post - sticks up about 6" to 8" and has two bolts on the side that clamp down the walls to the post.

    They are available at your local Big Box store, and can be 24" to 36" long.  Cheap, Easy, Perfect for the job at hand.

    Here is what one looks like:
    View Image

    Rebuilding my home in Cypress, CA

    Also a CRX fanatic!


    Edited 1/19/2007 2:30 am ET by xxPaulCPxx

    1. Piffin | Jan 19, 2007 01:30pm | #5

      Since they need to remove it to back a boat in, that metal extend would be hard on rubber tires 


      Welcome to the Taunton University of Knowledge FHB Campus at Breaktime. where ... Excellence is its own reward!

      1. User avater
        xxPaulCPxx | Jan 19, 2007 07:58pm | #15

        Depends on what's in the way.  If that metal part is too high, the poster can dig a 6" deep hole and drive the box part into the ground.  It would then be a bump rather than a curve.  Tightenting those bolts isn't really neccissary anyway, so burying them isn't a problem.Rebuilding my home in Cypress, CA

        Also a CRX fanatic!

        1. Piffin | Jan 20, 2007 02:09am | #18

          Short term, that seems easiestr solution but not quite as stable as others, and harder to use long term.I used a couple of those around here a few years ago, but road salt fom winter plow crews ate the metal up in a couple of years. 


          Welcome to the Taunton University of Knowledge FHB Campus at Breaktime. where ... Excellence is its own reward!

          1. User avater
            xxPaulCPxx | Jan 21, 2007 10:28am | #23

            Are you kidding - it's PERFECT then!

            When he is done renting, he just pulls the post and lets the metal rot away to nothing.  No removal needed!Rebuilding my home in Cypress, CA

            Also a CRX fanatic!

  3. dovetail97128 | Jan 19, 2007 10:12am | #3

    Pull the post, dig out for and install in concrete a piece of pipe that will accept the 4 x 4 post being slipped into it. (Or use a piece of 4" sq. tubing and rip the post bottom just ebnough to allow it to slip into the tubing.)
    Flush the top of pipe to the surrounding grade.

    1. User avater
      jhausch | Jan 19, 2007 03:34pm | #7

      I have my mailbox post over a pipe - sorta works, but there is too much movement and I had to add a stake nailed to the post so it would not rotate.

      I'll fixit "wonnathesedays"


      http://jhausch.blogspot.comAdventures in Home BuildingAn online journal covering the preparation and construction of our new home.

  4. Piffin | Jan 19, 2007 01:27pm | #4

    Needs to be thicker than Saran wrap. The 4x4 will swell from moisture. Use something for the hole forming that is a good 14" thicker than your post. It will leave a slight wiggle, but you need the slack to pul it out again.

    Don't try to shim it either. I tried that once for a customer four years ago. The shim swelled and it is still so tight I can't even get it out with a jack!

    Since then, I have done seveeral with a sleave in the ground. I have some short cut-offs from composition fencing made to slip over a 4x4. I saved those scraps for ground insertiopn for mailboxes and sign posts. We have a lot of summer only residents and businesses. I pop the post out and insert a short 4x4 to keep the crap out for winter.


    Welcome to the
    Taunton University of
    Knowledge FHB Campus at Breaktime.
     where ...
    Excellence is its own reward!

    1. User avater
      jhausch | Jan 19, 2007 03:36pm | #8

      You are dead-on with the composite sleeve idea.

      Nice. . .

      I will see if I can score one of those and a roundtoo-it. 

      Because I said I'd fixit when I get a roundtoo-it.


      http://jhausch.blogspot.comAdventures in Home BuildingAn online journal covering the preparation and construction of our new home.

    2. User avater
      McDesign | Jan 19, 2007 03:50pm | #9

      <Use something for the hole forming that is a good 14" thicker than your post>

      I'm thinkin 14" is gonna be kinda' loose, but maybe it's just me.

      Forrest

      1. Piffin | Jan 20, 2007 02:03am | #17

        You got an extra slash mark I can use to make it say a quarter of an inch?;) 


        Welcome to the Taunton University of Knowledge FHB Campus at Breaktime. where ... Excellence is its own reward!

    3. Fishrite | Jan 19, 2007 04:29pm | #10


      Thanks all for the good ideas!

      So 1/4" wiggle-room is about right?  Sounds good...it's drooping more than that now.


      Thanks again,

      fishrite


  5. DonCanDo | Jan 19, 2007 03:00pm | #6

    Then take my mailbox 4 x 4 and wrap it in Olive Oil and Saran Wrap...and more olive to the outside....

    Place in the hole, and pour the concrete around it, level it, and let it set up...

    LOL...will I be able to pull the post out?

    No!  The post will be permanent.  Not just from swelling, but the concrete will conform to al of the little irregularities in the post securing it rather well.

    A vinyl fence post cover might be the right size to serve as a form that could be left in place.  Or 2 different sizes of PVC pipe, one buried and the other one mounted to the bottom (or along side) of the post.

  6. RedfordHenry | Jan 19, 2007 05:34pm | #11

    Renting, tiny little street, 20' boat on trailer in the driveway all winter, so I am guessing this is not an upscale neighborhood with a lot of aesthetic covenants.  So why not just cast the post in a five gallon bucket filled with a small bag of Quickcrete?  Just drag the thing out of the way after labor day, back the boat in, and drag it back when the Miss Lulu is firmly chocked.  No digging, no tugging, no wobbly mailbox, and when the neighbor girl backs into it again, she doesn't put a crinkle in Dad's bumper and all you need to do is stand it back up.

    1. Fishrite | Jan 20, 2007 08:47pm | #19

      No, not upscale....but not a slum either, thanks.  (Since when did renting become a dirty word?  We specifically chose to rent this house because it had a place to store the boat off the street.  Not sure when he will be transfered...)

      Just a bit rural...house two doors down sold for $575,000 last summer...

      The 5 gallon bucket is Exactly what we are trying to avoid, but thanks anyway...


      Edited 1/20/2007 1:24 pm by Fishrite

      1. Fishrite | Jan 20, 2007 08:56pm | #20


        Thanks for all the great ideas!


      2. RedfordHenry | Jan 20, 2007 09:07pm | #21

        Sorry.  I didn't mean to imply anything negative.  I guess I didn't to need to detail the obvious "bubba" option.  Sounds like you've received plenty of good alternate ideas.  Good luck with the project. 

        1. Fishrite | Jan 20, 2007 09:27pm | #22


          No problem Henry, thanks...


  7. User avater
    SamT | Jan 19, 2007 05:39pm | #12

    Place drainage gravel in the bottom of the post hole and insure the post is sitting on the gravel before you pour.

    Make the top 3" of the hole at least 18" dia. to help prevent cracking. A 15" dia ring of heavy duty galv'd wire would be a nice addition to this "base."

    Put a long on taper two sides of the bottom end of the post, about 1/2" - 1" over at least 12", more is better. Cuts should start 1" above the finish 'crete. Wrap with 1 layer roof felt + Saran wrap. Avoid horizontal wrinkles.

    Ideal would be a single layer on the sides and a double layer on the corners, but you'ld have to staple the corner pieces on after the Saran wrap. The Saran wrap gives the 'crete a really smooth finish, but it's not absolutely needed.

    Remove post from concrete as soon as possible.  Put a 45* miter point on the bottom and prime. Prime and paint the rest of the insertion. Cure the 'crete for a week before reinserting post.

    Insert a short lag screw into the post on one of the UNtapered sides about 1" above the base to use as a pry point for post removal.

    SamT

    Guys that don't do things correctly the first time.....then argue that they did nothing wrong.....if made to agree to fix the problem, rarely put the time and effort into truely doing it properly. they'll just look for the quickest fix to appease you and get their money. JDRHI   84310.51 

  8. Marc | Jan 19, 2007 05:43pm | #13

    I did something similar years ago for a removable center post for a gate.

    I oiled the 4 x 4, poured the concrete, and wiggled it around some when the concrete got to the plastic stage to smooth the sides of the hole and make sure it didn't stick.

    It probably didn't hurt that the post was one of those "fresh" pressure treated posts from the big box that was still dripping when I bought it. No worries about expansion from moisture with that stuff!

  9. DanH | Jan 19, 2007 05:59pm | #14

    Get two 5-gallon buckets. Cut the top edge off of one so that it fits flush in the other. Make a hole maybe two feet across and 6" deeper than the buckets. Pour in 6" of concrete, prop the buckets in there, pour a bit into the buckets, then more around. Prop the post in the buckets, then fill the hole and buckets flush.

    After this has all set, pull out the post and inner bucket, take a long masonry drill and drill a few holes through the bottom of the outer bucket down to the soil level. Drill one or two holes up through the bottom of the inner bucket to the wood. Reinsert post.

    Half of the harm that is done in this world is due to people who want to feel important. They don't mean to do harm but the harm does not interest them. --T.S. Eliot
  10. artnumber1 | Jan 19, 2007 11:00pm | #16

    I used 6" plastic pipe for a sinilar operation. I needed a temporary support for my truck canopy, except that I only needed 2X4 posts. I think it should pass a 4X4 also.  I dug holes large enough for the 6 inch pipe, filled the bottom with gravel, and set it in with soil. It's been there for several years. Workd great.

Log in or create an account to post a comment.

Sign up Log in

Become a member and get full access to FineHomebuilding.com

Video Shorts

Categories

  • Business
  • Code Questions
  • Construction Techniques
  • Energy, Heating & Insulation
  • General Discussion
  • Help/Work Wanted
  • Photo Gallery
  • Reader Classified
  • Tools for Home Building

Discussion Forum

Recent Posts and Replies

  • |
  • |
  • |
  • |
  • |
  • |
View More Create Post

Up Next

Video Shorts

Featured Story

Putting Drywall Sanders to the Test: Power, Precision, and Dust Control

A pro painter evaluates a variety of drywall sanders and dust collection systems for quality of finish, user fatigue, and more.

Featured Video

Builder’s Advocate: An Interview With Viewrail

Learn more about affordable, modern floating stairs, from design to manufacturing to installation.

Related Stories

  • A Summer Retreat Preserved in the Catskill Mountains
  • Fine Homebuilding Issue #332 Online Highlights
  • The Trump Administration Wants to Eliminate the Energy Star Program
  • Podcast Episode 685: Patching Drywall, Adding Air Barriers, and Rotted Walls

Highlights

Fine Homebuilding All Access
Fine Homebuilding Podcast
Tool Tech
Plus, get an extra 20% off with code GIFT20

"I have learned so much thanks to the searchable articles on the FHB website. I can confidently say that I expect to be a life-long subscriber." - M.K.

Get home building tips, offers, and expert advice in your inbox

Signing you up...

This site is protected by reCAPTCHA and the Google Privacy Policy and Terms of Service apply.
See all newsletters
See all newsletters

Fine Homebuilding Magazine

  • Issue 331 - June 2025
    • A More Resilient Roof
    • Tool Test: You Need a Drywall Sander
    • Ducted vs. Ductless Heat Pumps
  • Issue 330 - April/May 2025
    • Deck Details for Durability
    • FAQs on HPWHs
    • 10 Tips for a Long-Lasting Paint Job
  • Issue 329 - Feb/Mar 2025
    • Smart Foundation for a Small Addition
    • A Kominka Comes West
    • Making Small Kitchens Work
  • Issue 328 - Dec/Jan 2024
    • How a Pro Replaces Columns
    • Passive House 3.0
    • Tool Test: Compact Line Lasers
  • Issue 327 - November 2024
    • Repairing Damaged Walls and Ceilings
    • Plumbing Protection
    • Talking Shop

Fine Home Building

Newsletter Sign-up

  • Fine Homebuilding

    Home building tips, offers, and expert advice in your inbox.

  • Green Building Advisor

    Building science and energy efficiency advice, plus special offers, in your inbox.

  • Old House Journal

    Repair, renovation, and restoration tips, plus special offers, in your inbox.

Signing you up...

This site is protected by reCAPTCHA and the Google Privacy Policy and Terms of Service apply.
See all newsletters

Follow

  • Fine Homebuilding

    Dig into cutting-edge approaches and decades of proven solutions with total access to our experts and tradespeople.

    Start Free Trial Now
    • Facebook
    • Instagram
    • X
    • LinkedIn
  • GBA Prime

    Get instant access to the latest developments in green building, research, and reports from the field.

    Start Free Trial Now
    • Facebook
    • YouTube
  • Old House Journal

    Learn how to restore, repair, update, and decorate your home.

    Subscribe Now
    • Facebook
    • Instagram
    • X

Membership & Magazine

  • Online Archive
  • Start Free Trial
  • Magazine Subscription
  • Magazine Renewal
  • Gift a Subscription
  • Customer Support
  • Privacy Preferences
  • About
  • Contact
  • Advertise
  • Careers
  • Terms of Use
  • Site Map
  • Do not sell or share my information
  • Privacy Policy
  • Accessibility
  • California Privacy Rights

© 2025 Active Interest Media. All rights reserved.

Fine Homebuilding receives a commission for items purchased through links on this site, including Amazon Associates and other affiliate advertising programs.

  • Home Group
  • Antique Trader
  • Arts & Crafts Homes
  • Bank Note Reporter
  • Cabin Life
  • Cuisine at Home
  • Fine Gardening
  • Fine Woodworking
  • Green Building Advisor
  • Garden Gate
  • Horticulture
  • Keep Craft Alive
  • Log Home Living
  • Military Trader/Vehicles
  • Numismatic News
  • Numismaster
  • Old Cars Weekly
  • Old House Journal
  • Period Homes
  • Popular Woodworking
  • Script
  • ShopNotes
  • Sports Collectors Digest
  • Threads
  • Timber Home Living
  • Traditional Building
  • Woodsmith
  • World Coin News
  • Writer's Digest
Active Interest Media logo
X
X
This is a dialog window which overlays the main content of the page. The modal window is a 'site map' of the most critical areas of the site. Pressing the Escape (ESC) button will close the modal and bring you back to where you were on the page.

Main Menu

  • How-To
  • Design
  • Tools & Materials
  • Video
  • Blogs
  • Forum
  • Project Guides
  • Reader Projects
  • Magazine
  • Members
  • FHB House

Podcasts

  • FHB Podcast
  • ProTalk

Webinars

  • Upcoming and On-Demand

Podcasts

  • FHB Podcast
  • ProTalk

Webinars

  • Upcoming and On-Demand

Popular Topics

  • Kitchens
  • Business
  • Bedrooms
  • Roofs
  • Architecture and Design
  • Green Building
  • Decks
  • Framing
  • Safety
  • Remodeling
  • Bathrooms
  • Windows
  • Tilework
  • Ceilings
  • HVAC

Magazine

  • Current Issue
  • Past Issues
  • Magazine Index
  • Subscribe
  • Online Archive
  • Author Guidelines

All Access

  • Member Home
  • Start Free Trial
  • Gift Membership

Online Learning

  • Courses
  • Project Guides
  • Reader Projects
  • Podcast

More

  • FHB Ambassadors
  • FHB House
  • Customer Support

Account

  • Log In
  • Join

Newsletter

Get home building tips, offers, and expert advice in your inbox

Signing you up...

This site is protected by reCAPTCHA and the Google Privacy Policy and Terms of Service apply.
See all newsletters
See all newsletters

Follow

  • X
  • YouTube
  • instagram
  • facebook
  • pinterest
  • Tiktok

Join All Access

Become a member and get instant access to thousands of videos, how-tos, tool reviews, and design features.

Start Your Free Trial

Subscribe

FHB Magazine

Start your subscription today and save up to 70%

Subscribe

Enjoy unlimited access to Fine Homebuilding. Join Now

Already a member? Log in

We hope you’ve enjoyed your free articles. To keep reading, become a member today.

Get complete site access to expert advice, how-to videos, Code Check, and more, plus the print magazine.

Start your FREE trial

Already a member? Log in

Privacy Policy Update

We use cookies, pixels, script and other tracking technologies to analyze and improve our service, to improve and personalize content, and for advertising to you. We also share information about your use of our site with third-party social media, advertising and analytics partners. You can view our Privacy Policy here and our Terms of Use here.

Cookies

Analytics

These cookies help us track site metrics to improve our sites and provide a better user experience.

Advertising/Social Media

These cookies are used to serve advertisements aligned with your interests.

Essential

These cookies are required to provide basic functions like page navigation and access to secure areas of the website.

Delete My Data

Delete all cookies and associated data