Repair a crack in the foundation walls?
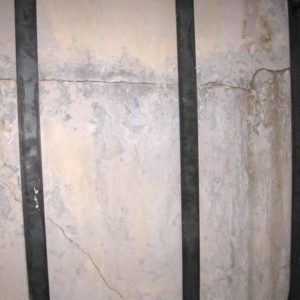
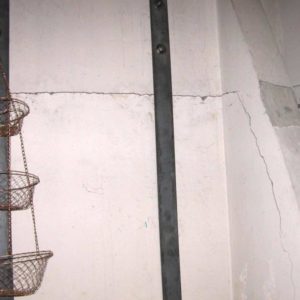
Our 1919 craftsman house has a big crack running horizontally through 2 basement foundation walls. According to the previous owner, the crack has been there for 30 years and was most likely caused by a pour joint problem. The crack was secured by vertical steel bars that are bolted into the walls from top to bottom. Still, the looks of the crack is not pretty. What are some ways of visually eliminating that? Note that in one corner, the crack has sent out some vertical smaller cracks which sometimes would let water into the basement at days of high rainfalls (hey, this is Seattle after all). That has been corrected by installing a professional drainage system around the house.
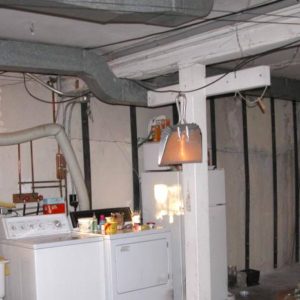
Note that our electrical box and various pipes/plumbing parts are running along the walls that are affected by the crack (I guess they could all be moved). The sewer main does not run in that area.
I uploaded some images of the basement to this MSN web page, but will also try to attach them here directly to this message.
http://groups.msn.com/sylvansmith/basement.msnw
Any feedback more than welcome!
THANKS IN ADVANCE
Sylvan Smith (Seattle, WA)










Replies
You have some structural/foundation trouble. You should have an engineer come out to take a look.
...that's not a mistake, it's rustic
Two side issues: get rid of that plastic "dryer vent" - it's a fire hazard.
The straps added to the wall are fairly amusing. Sometimes you gotta wonder what someone was thinking! (There's expansive clay in my area, and I see a lot of foundation repairs - If I were inspecting your home, I'd have to bit my lip to keep from laughing out loud at that "repair." )
The cracks look pretty old in the pictures - which can't substitute for seeing them up close - but the edges look fairly "rounded" and worn, characteristic of old cracks.
The horizontal crack to the right of the window is probably about grade level, I'm guessing. In colder climates, that high horizontal crack usually results from freezing soil at grade - but you don't get freezes there, right?
What kind of soil composition? Heavy, expansive clay?
Do your downspouts extensions lead 10 away from the house? Is the soil positively graded away from the house?
From what I can see in the pictures, doesn't look like much of a problem, but there is no substitute for seeing it up close.
There's a home inspector I think is in your area - I don't recall his name (Mike something) but he moderates one of the JLC forums and he's pretty knowledgeable. Consider giving him a call for a closer look.
In the alternative - put some cheap masking tape over the cracks in a few locations and keep an eye on them. Any movement will be visually apparent. Or you can get small sheets of glass with cross hairs and a grid to epoxy over the crack to records any relative movement.
_______________________
Why Don't Blind People Like To Sky Dive?
Because it scares the bejabbers out of the dog
Your mileage may vary ....
Hi Bob,
Thanks for your notes! Can I please quickly ask you what the JLC forums are so I could locate that Mike?
THANKS MUCH!
Sylvan
http://www.jlconline.com/cgi-bin/jlconline.storefront/3f683c6400aa0dfa271b401e1d29062a/Catalog/1135?
Be careful how you word your question over there. The sign on the door states "for Professionals only". Some of them get a little put out when a DIY comes in..
Excellence is its own reward!
It's Mike O'Handley at the site in the other message.
Mike and I have gotten into it on another forum, and there was some sniping between him and th BT folks a couple of years ago, but he's a very knowledgable guy, and if he's in your area would, IMO, be worth the cost to have him take a look.
You may well already havbe a photo editing app on your computer if it's relatively new.
Get one of the picture files highlighted in Windows Explorer, right click and highlight "open with:" that will list any photo/image editing appas on your PC (for Win XP at least) and select from that.
_______________________
Why Don't Blind People Like To Sky Dive?
Because it scares the bejabbers out of the dog
Your mileage may vary ....
Edited 9/17/2003 9:25:42 AM ET by Bob Walker
Those pictures are too big to download easily - They'd take a half hour or so on my dialup connection.
Could you make 'em smaller next time you post?
I say violence is necessary. It is as American as cherry pie [H. Rap Brown]
More important than the crack, which could be from a pour joint, is any leaning of the walls. Do the walls tilt inward toward the crack (are they out of plumb)? That would indicate movement within the wall system (and therefore instability), whereas the crack could just be an appearance problem.
Bob
See that this is your first post, welcome!
Anyway as Boss said, take your pix (now bitmap looks like) onto photo-ed or other program, cut and past back as jpeg, tha'll cut the size by 70% and speed up everybody else's downloads.
Main subject: If the walls are not bowing or other major problems as others have pointed out, all you need is to do get a small air impact hammer (cheap $12 Harbor F will do), compressor (your call on size cost here), and a couple of rivet die bits (25 cents each at Boeing surplus in Kent-since you are in Seattle), also a pair of safety glasses and ear muffs (25 cents and $4 respectively at surplus also) .
Chip out the cracks to about 2" deep and at least 3/4" wide, should only take about 2 minutes a foot unless you have to wait for a small compressor to 'catch up'. Mix a paste of straight portland cement and water to the consistency of white glue (called grout), and wirebrush onto the freshly chipped concrete surfaces, an angle grinder or drill with wire brush make this easy. Then fill with straight portland cement mortar (sand and cement) and trowel smooth. The wire brushing in of the grout onto a fresh concrete surface is the real trick to a lasting repair.
The cracks appear to me to be more cosmetic than structural but then I am not eyeballing it close up.
The straps also seem to be more cosmetic than structural.
If yyou don't feel up to doing the repsirs yourself the way junkhound suggested, you could call an epoxy injection/foundation repair guy
Excellence is its own reward!
Piffin is right, the crack is non structural. From the pictures, the crack is not off-set and not very big for its age. The line of the crack follows the obvious pattern of when it was originally poured. Look at the basement window, they poured the concrete on the right side of the building first, then they later poured the left side.
The nature of concrete is to form crystals that grow together, when another lump of concrete is poured next to it, they crystals of one doesn't bond to the other chemically.
Let it alone spend money somewhere else, but you will always find some contractor who will "FIX" it.
Wow, lots of good answers. I promise to take the pictures with a different digital camera next time that allows for smaller file sizes.
Good suggestion about first monitoring the crack with masking tape. The crack seems pretty stable overall, but there is one area where the wall below the crack appears to have shifted inward slightly, about a quarter of an inch at most. And yes, the crack is on the grade level (or soil level), and also yes, we don't get frost much here in Seattle (though I am sure there have been years with frost in the history of this house).
Funny about the uselessness of the steel bars! The previous owner installed them, and to our knowledge, she was an architect. Well well. We've had a structural engineer and a geo-tech engineer look at this before and after we bought the house. The geo-tech engineer suggested the work on the drainage around the house (sloping the hill outside, etc.). I neglected to mention that this house sits on a fairly steep hill, and the wall where the crack originated (the Eastern wall) is the wall that is back to back with that hill, so to speak.
I like the suggestion of digging out the crack and wire-brushing cement into it. I will do the prep work myself, and have an experienced cement contractor who I worked with before doing the cement work as suggested (don't want to try this out on the crack first time by myself).
Oh, and thanks for the note on the bad plastic vent hose for the dryer! I already went to the store to purchase an aluminum vent hose. Live and learn.
Thank you all for your suggestions. I am sure I will have additional questions, but so far I got way more information from you guys than from numerous folks who've been here and inspected the basement.
No need to use a different camera, sylvan. All you need is a graphics program to manipulate the size of those pics.
If you don't already have one loaded, here's a dandy free one.
http://www.irfanview.com/
Use it to open your pic file and then ......edit/resize(resample). Here you can reduce the dpi of the pic as well as the total size. (You'll probably want to image/sharpen once (maybe more)....if you've manipulated the pic) Then save result to your HD with a new name (my pic-mod, for example) if you want to keep the original as well. Then that's the file you'll post.
That undo button on the toolbar will undo the last action you took with the pic, but only the last. If things get away from you during manipulation, just use file/reopen and start over.
Happy manipulating. :-)
Edit: Generally suggested size around here is 72 or 96 dpi with a total size of around or less than 100 kb. That works fast enough for most of those on dial-up and so they can take the time to look at your pics.
Knowledge is power, but only if applied in a timely fashion.
Edited 9/17/2003 8:56:54 AM ET by GOLDHILLER