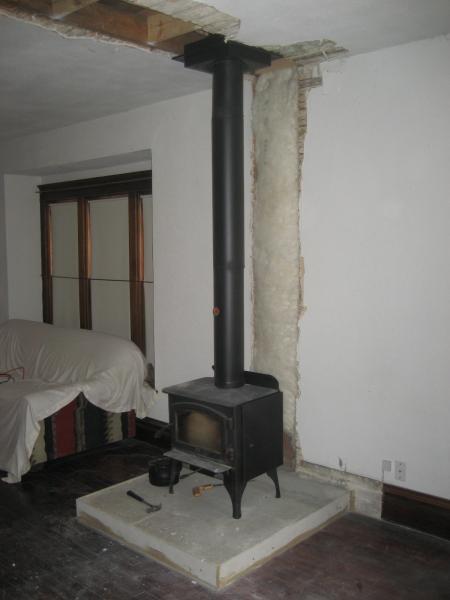
I removed an archway in my living room in order to install a woodstove (see pictures). The next step is to get the walls back into shape.
I suppose I have three options:
#1 Gut the enitre room and drywall.
#2 Patch the plaster on ceiling and two walls as best I can and then match the spray on texture.
#3 Install lathe runners and new drywall on enitre ceiling, tile behind the woodstove and then patch and match the opposing wall.
Which approach makes the most sense?


Replies
1st course would be to properly take care of that electric outlet move.
If you have need to run wire or insulate, maybe think gutting.
If you don't and can patch in surfaces that used to be in two different rooms, do that.
Comfort level, future and present needs and ability should be your deciding factors.
Best of luck.
But please, for those of us that might be in the neighborhood of that wire some day, run it proper.
A Great Place for Information, Comraderie, and a Sucker Punch.
Remodeling Contractor just outside the Glass City.
http://www.quittintime.com/
What did you notice about the outlet that was wrong? There was one in the archway wall but my brother removed it and the original wiring completely back to the box. He then rewired the outlet that you see, a portion of the basement and an outlet in the attic with new wire. He ran the new wire through joists, used junction boxes etc. and was on the phone with his boss that is an electrician. If you see something I need to change let me know and thanks for the heads up!
I may have mistaken, or it was in transition....
but running wire on the face of those studs in the wall isn't kosher (first picture). Looks like it goes through the floor on one end, across the studs and then into the box. I assumed the other shot of cable jack was across the room.A Great Place for Information, Comraderie, and a Sucker Punch.
Remodeling Contractor just outside the Glass City.
http://www.quittintime.com/
Good eye! Where it comes through the floor it is between a stud and then another "board" that is very loose and has some lathe and plaster attached to it. I am going to remove that and put the wire in it's proper place behind a new piece of drywall. Any thoughts on making everything look pretty again?
IMHO plaster is only worth saving in historical, architecturally acurate homes. For the rest of the homes, when faced with a situation like yours the preferable choice is to strip the walls down, add furring and insulate/vb.
If called on for the repair I would look at the cars in the drive as I went to look at the job. Take a quick perusal as I entered the premises. Get a long angled look at the room, how the trim would be handled, ease and cost to the homowner. Make my recommendationA Great Place for Information, Comraderie, and a Sucker Punch.
Remodeling Contractor just outside the Glass City.
http://www.quittintime.com/
My house is your run of the mill 1920's bungalow that you would find in the midwest. To the extent that I want to keep the house "original" I am only concerned with the trim work, doors and floors. I am 41 and plan on this being my last house (we all know how that goes) and it is essentially my hobby/laboratory when it comes to learning how to restore a house. I want to do it all myself. My motivation to get the walls and ceiling in good shape is so that I can move on to the next project and not have to worry about them again except for changing the color scheme! I would just gut the room and start from scratch but it is a HUGE mess and the ceiling and exterior walls have blown in insulation. If I can fix/patch/cover so it doesn't look like amature hour I will be happy.
If the walls and ceiling line up, patch it with the appropriate thickness of drywall and fill with hot mud (USG Easy Sand 90) as needed. Prime, paint, enjoy.
If they dont' line up within, say, 1/8", you may have to do a little more work to get them lined up.
Forget trying to match the textured surface. Unless you have a lot of experience with matching textures, it will always look like a patch. I would scrape the high points off the texture, then skim coat the whole thing. Seal it with Kilz or Bin first, lest the moisture from the skim coat will loosen the texture and it will probably peel. ~ Ted W ~
Cheap Tools - BuildersTools.netSee my work - TedsCarpentry.com
Good info, thanks for the help. Here are three more pictures. Based on what you said I will patch with drywall where I can (the two walls) and then fill with plaster on the ceiling. As for matching the texture, it's no longer an issue! The guy I bought the house from must have bought the "how to flip a house video" because he sprayed texture right over wallpaper. It peels right off to expose the last two paper jobs (from the looks of it 1939 and then 1977). It's like unwrapping a birthday present, too cool!
Take a long straightedge across those wall patch areas. See if there's any hump b/4 you lay on any sheetrock. Might need to adjust your thickness down so you don't end up out too far for starters. Same deal with the ceiling.
Best of luck.A Great Place for Information, Comraderie, and a Sucker Punch.
Remodeling Contractor just outside the Glass City.
http://www.quittintime.com/
I'd be weary about removing that old wall paper. Half the time it's the only thing holding the plaster together. At the very least, it's hiding a lot of cracks.
As for fitting the pieces of drywall, cut the drywall pieces large enough to span the missing plaster, hold it against the hole, then trace around it with a utility knive a few times. Then remove the excess plaster rather than trying to cut the drywall to fit. That way you have a nice thin joint that you can tape, just like taping drywall. Only difference is you will probably have to feather it out to make a smooth transition.
If any of that wall paper is exposed when you mud, it should first be sealed with kilz, bin or other non-water based sealer. Same reason as was for the ceiling texture.
I usually use 3/8 drywall for patching wood lath plaster. If the plaster on one side of the opening is thinner, I try to put the tapered edge of the drywall toward that side.
I do a lot of that exact patch when walls are removed, in the old chicago bungalows and apartment buildings. Sometimes I do a quick patch, then veneer the entire ceiling with 1/2" drywall. Guaranteed nice, smooth ceilings. Personally, if it were my home, that is what I would do.
Walls are more forgiving, the transition not quite as visible. Also, with the baseboards and trim, not as easy to veneer. ~ Ted W ~
Cheap Tools - BuildersTools.netSee my work - TedsCarpentry.com
Ted - I like your idea about the ceiling with 1/2 drywall. What about this though. Instead of patching and laying the drywall right on the existing ceiling could I run 1" x 2" x 8' lath the entire length of about 28" apart and then mount to that? Overkill?
As for the one wall I am going to take a crack at it tomorrow with drywall and see how it turns out. The section I have to fix is 17" wide and 9' tall. When it's ready to be coated could I just spray another coat of texture on that spot or possibly the whole room?
Furring out ceilings with 1x2 or 1x3 is common, but it's usually done every 16" on center. But yeah, you could do that.
As for the texture, I thought it was only on the ceiling. I'm not very experienced with spraying texture (as in 'never done it'), so can't really say how that would turn out. If I were doing it, I would spray the flat area first, to get it somewhat even, then spray the whole thing. But maybe someone else with more (as in 'any') experience can chime in on this one. I've only brushed or rolled-on texture, and not really happy with my results at that.~ Ted W ~
Cheap Tools - BuildersTools.netSee my work - TedsCarpentry.com
I took the liberty of resizing those images and changing the format to .jpg so those with a slower connection can see them too. =)
~ Ted W ~
Cheap Tools - BuildersTools.netSee my work - TedsCarpentry.com
Edited 3/25/2009 9:03 pm by Ted W.
Great House man.
As I drive up I notice that right away. There's also a clean yard, so I know you keep it and want it looking good. There's no new lexus or other money car visible, so I figure you're not loaded or one to flaunt it. The writing on the walk means there's kids somewhere, I take note not to back out of the drive in my van w/o being careful and looking behind it so I don't run over your or your neighbors scooter.
To tear off plaster w/blown insulation would be a nightmare. If the original on the walls is good, not alot of cracks, I'd recommend leaving it. Patch some cracks as necessary and patch the channel the wall used to be in. I'd use furring or 5/8's drywall if that brought it out to plane with each side. Being it was two different rooms you might have to cut back the plaster on either side for an invisible finish. Both the old corners might have been built up going into those corners. If you just add board and finish, you might just end up with a visible bump.
If it appears flat into the old corner-might get by just filling the void and tapering out a nice wide joint with compound. If that's the case, I'd build up with board, first couple fills w/Durabond and then final with topping.
Purists would recommend lath and plaster I suppose and if you wanted it, what the hell, let it happen.
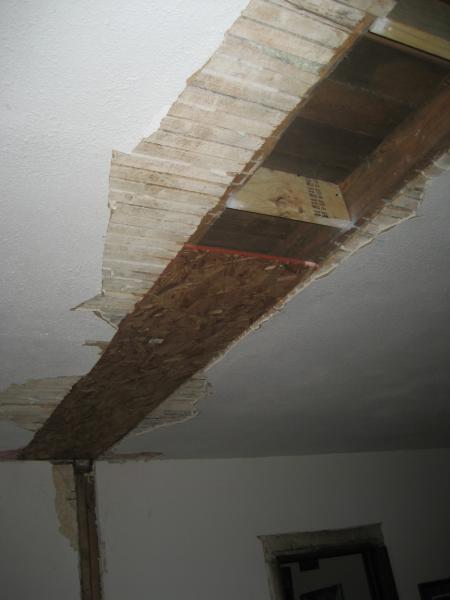
The ceiling I can't get a feel for it with the large closeup. Easiest/hence most reasonable might be build up the gap, cover it all with 1/4'' and finish it. Bridge over that old wall line and end up with a non textured flat ceiling. OR, if again the plaster wasn't built up going into the old ceiling corner, just patch that in as well. Ceiling will show light shadows if not flat.
Sorry, didn't see what kind of texture. Might be able to use a dustless vac sander like Rockwells (delta) to take some of it off or skim coat to smooth it out. The patches will be smooth.
Have you done any drywall/plaster patching b/4? Honestly if you haven't and had someone you could count on, I'd hire it out.
BUT, not just any drywall finisher could blend it in and make it look like it was always just one big room.A Great Place for Information, Comraderie, and a Sucker Punch.
Remodeling Contractor just outside the Glass City.
http://www.quittintime.com/
First, the existence of blown-in insulation does not rule out re-plastering. That's easily dealt with by removing only the plaster and leaving the lath. Do it all the time. Old plaster comes off pretty easily with just a shovel once you have an edge to work from.
That said, if it wuz me, and it ain't, I'd have a go at patching with a two or three coat plaster job -- just like it was done originally. If it worked, great. If not, not much invested in Plan A, so no big deal to just go to Plan B and replaster the whole mess, and lose the texture while I was at it.
Mike HennessyPittsburgh, PA
Edit: After looking at the new pics, I see that the texture is from some prior "remuddling" - I'd lean towards redoing the whole plaster job. This is a cool house that deserves better than spray-on over walpaper.
Edited 3/26/2009 8:23 am ET by MikeHennessy
The room was designed for plaster. The trim is designed to meet the casing/framing with plaster.
So re-plaster. And then you can lose the texture. I hate texture. It collects dust and cobwebs.
If the house has any "historic" significance - I'd recommend getting a good plaster guy.
I think drywall in old houses looks hokey.
Your mileage may vary.
"Ask not what the world needs. Ask what makes you come alive... then go do it. Because what the world needs is people who have come alive."
Howard Thurman
That's because you've "seen" drywall in an old house. Done right, you'll never "see" the difference. Feel maybe, see? no way.A Great Place for Information, Comraderie, and a Sucker Punch.
Remodeling Contractor just outside the Glass City.
http://www.quittintime.com/
Sorry, the difference is really pretty easy to see.
But given the thinness of the ceiling plaster (I can see the lath through the plaster) I think it would be very hard to patch well. I would use 1/2" drywall over it.
Jeff
Edited 3/26/2009 12:35 am ET by Jeff_Clarke
well i'm going the other direction from everyone else.
to patch that ceiling and not see it,i would bet that 90% of the sheetrock guys couldn't get it close.
you can strap it,some work.
i would go in lay some 1/4 or 3/8 sheetrock rough cut to kinda fit the hole. then i would find the ceiling joist,s and chalkline them. get some of the biggest 1/2 rock you can handle and screw it and finish and patch the wall.
i just hired 700 sq sf of rock overlayed on a ceiling,paid 1.25 a foot ,hung ,finished, knockdown texture.
YOU ONLY NEED TWO TOOLS IN LIFE - WD-40 AND DUCT TAPE. IF IT DOESN'T
MOVE AND SHOULD, USE THE WD-40. IF IT SHOULDN'T MOVE AND DOES, USE THE
DUCT TAPE.
Actually, that's more or less what I suggested. Then OP asked about strapping, and I said yes he could go that route, that it's common, but should be every 16". I would do the strapping perpendicular to the joists, since they're probably not quite 16 O.C.
difference is we called it furring.
On another note, I have one steady customer (apartment building owner) who insists that the plaster has to be ripped down before the sheetrock can go up. He thinks the both together is too heavy and could come crashing down or something, and that he's right and thousands of contractors are wrong. I tried to talk some sense into him, then finally gave up and just charged the extra for demolition AND for using 5/8 rock, which I always use on open ceiling joists, basically doubling the cost of the job. But the customer is happy and I'm covered for the extra work. ~ Ted W ~
Cheap Tools - BuildersTools.netSee my work - TedsCarpentry.com
If you don't have to put insulation, electric, or plumbing in the wall I'd fur out the low areas and dry wall it with 1/4 drywall.
Take all the trim off. You will have to add a 1/4" return on your window and door trim.
I'd glue the 1/4" dry wall on and use screws to keep it on until the glue dries.
I did a whole house this way and it came out great.
Ted - I think i'm going to go with the 1/2" on the ceiling and will only strap/furr it if the ceiling isn't level. And your sure it's not too heavy? Your customer is making me nervous! I reinforced the ceiling where the archway was with 2x6's every two feet and glued and screwed plywood on the bottom and top so that should help. As for the texture I think it will come off pretty easy, it's not even attached to the old paper underneath, almost like the guy put construction paper on the walls and ceiling and sprayed the texture right on it.
Thanks everyone for the help, will let you know how it turns out
I glued the drywall with all purpose compound. I would dry fit the piece and then lay it on it's back on some sawhorses. then take a notched trowel ( 1/2") and butter up the back of the board. Then just stick it on and put screws in it to hold it until the glue dries. Worked great. With the glue and screws on top of plaster the wall was very solid. The movement what so ever.