Replacement windows in a brick home

Yossarian99
| Posted in Construction Techniques on
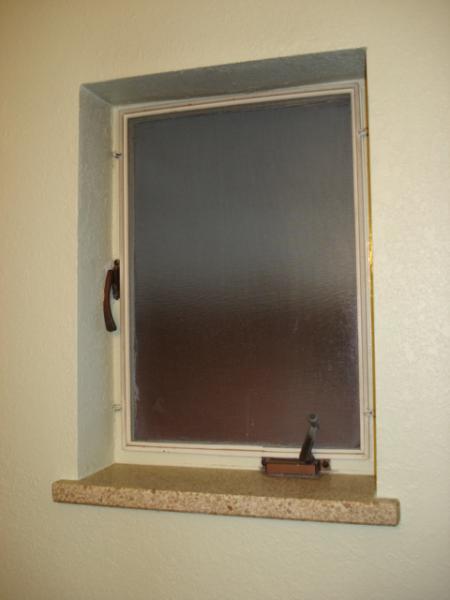
There seem to be many articles on how to do replacement windows, but not in brick homes. I have done many replacement windows in wood framed houses, but this is new to me. A builder in my neighborhood was doing a remodel to a similiar home and had the windows out, so I have an idea of how to go about it. The pics are of the smallest window in the house, but they get MUCH bigger and are all origional to this 58′ brick ranch. Any input from the pro’s?


Replies
While not a pro, I have installed dozens of replacement window in brick buildings. But, these are true 'replacement' windows, where the frame of the original window is re-used after the sashes are removed. Such windows are easy no brainer type work.
But, if what you are speaking about is removing all of the original window and replacing everything, that will await the comments of the true professionals. You are looking at a lot more work.
Good luck.
I did 29 in my house -- I did Andersen - stock sizes fit perfectly -- took everything out on the exterior and left the interior sill and casing -- snugged it right up to what was left of the old frame and you would not know it has been done except the old was single pane and needed painting -- start to fisih (strip out, install and clean up an move to the next window) took 3 hours per window -- see belwo attachment
Measure the brick openings and see how close they match up to stock sizes--good chance they do or nearly so. it's much easier to go an inch or two smaller than anything larger than the opening.
If you want to open up an area then it gets more tricky. In those cases I carefully cut the bricks back with a diamond blade in a grinder. The brick cuts fast, but it's easy to make a less than perfect cut. You might be better to hire this out to an outfit that specializes in it if you aren't sure.
Then the framing is adjusted to fit the brick opening just like any other exterior change except that you might not be able to attach the sheathing to the exterior side of the studs--carefully look at the size of the window and make the wood frame as tight as possible so you might have a lip visible through the brick opening to fasten things.
The biggest fight you'll have is with the brick surface finish. Nothing easy about it--just go easy with a diamond wheel and spend the time to clean off the kerf marks--rent a surfacing disk if you need to.
Of course the best method is to simply hire a mason to come over and take out bricks and put it back together so it looks nice, but cutting is about 1/10th the cost.
You may want to keep them. The one I see looks exceptionally nice. They are architectural features of a bygone era. Glass panels can be made to fit over the existing pane for improved efficiency, plus weatherstripping helps stop stop drafts.
http://www.oldhouseweb.com/how-to-advice/steel-casement-windows.shtml
As for replacing them, it's a real chore. All the ones I have seen screw into the framing from inside. For that reason, the frame is frequently left mostly in place, and the opening is furred out inside. Buy a small grinder and packs of cutting disks. You'll need to cut off the pivots and probably some of the the bottom lip of the frame. Don't leave any bits of grinding residue on the brick or you'll have rust specks out the wazoo on them.
I agree they look nice, but perform awfully. Some of the windows swing out into the exterior trim and get stuck or cannot be fully opened. Others swing up and after 50 years the cranks are worn out. Almost all of the homes in this 50's era neighborhood in Denver had these windows, many attatched storm windows to the exterior. This area has been in high demand, lots of reconstruction despite the economy continues. Remodeling, popping the top off and adding a second story, scraping the house and starting over, take your pick.
The point is we are going to do this with an eye towards what we will do to the house in the future, adding a second story over part of the house likely. I'm looking at Milgards fiberglass windows, but I am open to other options.
The window sills are of an unknown to me type of stone, some are cracked. The windows are setback into the plaster wall 5 1/2", another issue. Fun, fun.
It may not be as bad as you think. You can buy or make extension jambs to bring the finished edge of the window flush with the wall surface and from there you can apply traditional types of molding to the opening.
The stone is typically granite, marble, or slate, and can be removed fairly easily.
Have you checked into the possibility of getting replacement sashes?
What I've been told to do,
What I've been told to do, but I did want other opinions, is to measure the outside brick opening and use that as the rough opening. The inside is plaster over drywall and is smaller than the outside opening, so that would have to be cut back cleanly to accommodate a replacement window. The window sill would also have to be removed and replaced, then shim window and spray foam into place.
How to trim the outside if at all and should flashing be used on the bottom of the window?
Fiberglass windows are supposed to be stable, so the order should be as close as possible to the brick opening.
Any thoughts?
Windows in brick openings typically have "Brick mold" around them. Actually most windows have brick mold around them even if they are not in brick openings.
I would have the windows fit the brick opening with the brick molding pre-installed on the window. Allow 3/8 to 1/2 inch total clearance from the width of the brick mold to the "rough brick opening". This is an easily caulked gap.
The brick mold should set tight against the old metal frame. You will find that the actual rough opening width is going to be about 2 1/2" less than the width of the window including the brick mold. The top of the window will be 1 1/4 to 1 1/2 down from the top of the brick mold. I have to think this will clear the inside opening with room to spare.
As for the sill of the window, they are made differently and you will have to calculate that measurement. You may have to cut a grove in the window sill to house the old metal frame. If you set the window on the old metal frame the window sill may be to high off the brick and will have to be filled. I would rather cut off the old metal or cut a grove in the sill than fill a gap under the sill.
I don't that flashing the windows is an issue in this case. I would caulk the old metal frame to the back side of the brick mold.
Of course I'm assuming you will be using traditional type windows.
Milgard makes a great fiberglass window--one of my top pics.
To do a quality refurbishment of existing windows can be as expensive as new units although you don't then have the installation costs of the new windows, which can be as much as the windows themselves.
The bottom line is the best way to do what you want is to buy the new units and pay the extra to have them properly trimmed out. Unless you are selling soon anything less is cutting corners.
I've been busy with our basement remodel, but thanks to all that have offered advice. I recently had the glaze on the windows tested for asbestos, came back positive. My thought was to remove metal frame after removing the glass, but that would disturb the glaze. Any ideas?
A few of the posts suggest leaving the metal frames in place, I would still have to remove some of the material as the windows are made up of multiple panes.
Removing Window Glaze
This project has been on the back burner for some time, but the wife wants it done now. In another thread on this forum a member linked to another website replacing the same kind of steel casement windows.
The basics of this job are within my skill set, but a concern is lead in the paint, and asbestos in the window glaze. I have kids and dont want to unnecessarily expose them to contaminants. With that in mind I have been getting quotes to have the entire job done, leaving the lead RRP and the asbestos in the glaze to someone else. I of course am asking if they are certified for lead work, and am informing them of the asbestos in the glaze.
The 1st quote to come in they said they install the replacement window OVER the existing return, one would think that the correct way to install a window is down to the rough opening. It's stuff like this that makes me want to do it myself.
I understand I would be getting opinions, but any suggestions on cleanly removing the windows, and removing the glaze without disturbing the asbestos contained within? I've thought I would cover the window opening inside the house with plastic taped to the wall. Use a heat gun to soften and loosen the glaze for removal, then remove the glass and the metal frame. This would keep most if not all dust and debris outside the house.
Thoughts?
my advice
Study the RRP procedures and info at the EPA site. The class instruction would be good, but the gist is-Seal Off work area, Don't sand (unless HEPA attached and contained), don't let anything get away, etc.............and clean up.
You say glaze-meaning glazing?
I was able to remove the operable sash with a sawzall on the hinges, didn't need to remove glass, thus not removing or disturbing glazing. If you wish to contain the glazing-why not brush on that dip it rubbery stuff made for grips on tools.............Sticks to most anything and should allow a bit of movement.
The HEPA vac is the important thing-not just something that says hepa like some of the cheap shop vacs or homowner vacuums. The trick is to get it in the bag and not expel any in the exhaust.
Calvin,
First, thanks again for being a source of useful information.
I read what you said on another website about a lot of the RRP stuff is common sense. I have already been to the EPA website and started reading.
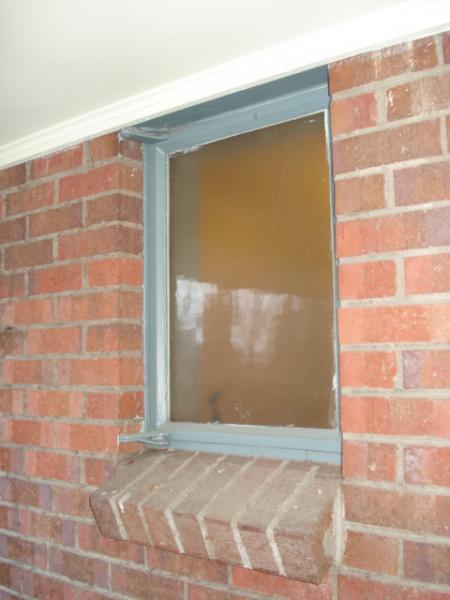
My windows have some parts I can remove, others no, refer to the picture. In my garage I can see one of these windows installed without any finish material, I can see the flange I will have to deal with. Are you suggesting I can remove the steel window frame without removing the fixed windows?
In the picture, two fixed windows, one casement in the center.
If you took the link I posted (I think) on the window removal in brick at QT, you might see that there were some triples with fixed centers. I know we removed one large pane, but the rest, we cut off the flankers and then discarded the whole shooting match by cutting the frame and removing.
If you open the sash, you might see a couple screws through the inside edge of the jambs into the wood framing on the sides and bottoms/tops. When we split the sides from the center-there were screws that we were able to remove there also.
Now that you have me thinking, I believe to remove the center section, we dug out the glazing in the spot were the screw would be, unscrewed and free'd up the section. The glass and most of the glazing remained in/on the frames.
I used a sawzall and several times, a grinder with thin cutting wheel.
I may have to go back to read it, I'm a little foggy on the entire procedure.
Best of luck.
If you took the link I posted (I think) on the window removal in brick at QT, you might see that there were some triples with fixed centers. I know we removed one large pane, but the rest, we cut off the flankers and then discarded the whole shooting match by cutting the frame and removing.
If you open the sash, you might see a couple screws through the inside edge of the jambs into the wood framing on the sides and bottoms/tops. When we split the sides from the center-there were screws that we were able to remove there also.
Now that you have me thinking, I believe to remove the center section, we dug out the glazing in the spot were the screw would be, unscrewed and free'd up the section. The glass and most of the glazing remained in/on the frames.
I used a sawzall and several times, a grinder with thin cutting wheel.
The frames also lip over the wood framing on the exterior.
I may have to go back to read it, I'm a little foggy on the entire procedure.
Best of luck.
Is that what's known as a yo-yo?
Perhaps
but my spelling problems while semi small doesn't properly include the guys name that was the gunner on that plane in Catch 22...............
Sometimes you can pry the glazing compound out with your fingernails, sometimes it takes a jackhammer. You never can tell, and it can be different on two adjacent windows, especially if the glazing compound has ever been replaced.