Replacing housed skirt board on interior stairway
Hi everyone. I’ve spent the better part of an hour searching the forums for an answer, but found nothing quite exact to this. Sorry if it’s been asked before.
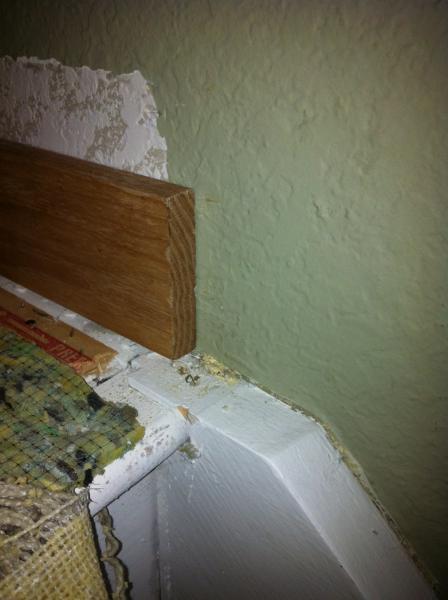
Today starts the project of installing new hardwood flooring throughout my entire house. The plan is to finish the two interior starcases with solid hardwood for the treads and risers. When pulling a section of carpet off the stairs yesterday we found the treads are housed in the skirtboards (both sides). The flooring installer wants no part of anything here – says it’s trim carpentry. Not too happy about this, but it is what it is. Anyway, see below for a pic of what I’m dealing with.
What is the best way to get the skirtboards out? On the right side board, at exterior walls, I can see foam, but the house has batt insulation. From what I’ve read, it looks like foam is placed behind the skirt to get a tight fit. Or am I wrong here? As you can see, they decided to use 2x for the existing skirt – builder grade – and painted in white. The new trim is 1×4 natural finish white oak (piece of scrap red oak in the pic, just for comparison). The way they cut the existing skirt means not only will the color be off, but the thickness is off as well.
The new treads will be 6/4 solid, squared on all sides, overhanging the riser below to give a 1″ bullnose.
Since I want to replace the treads and risers, is it best to just pull them off then get the skirt board out of the way? The flooring installer thinks we can “veneer” over the top of the existing skirt, using 1/8″ or 1/4″ white oak to match the trim, installing 2x blocks at the end of the existing skirt to finish the run, lay thin trim over the top, and tie in to the new baseboard. As of now, the width skirt to skirt is 36″. I could lose an inch by doing the “veneer” option and be okay with it. New treads/risers would be laid over what’s there. Cheating in my book, but I’m afraid the right way might cost more than it’s worth (but I believe there’s no price on perfection).
Sorry if any of this is confusing. This would be either a team effort between the flooring installer (me using his tools) or getting an idea of what to tell the trim carpenter. Then again, trim carpenters don’t seem to exist in south Florida… Thanks for any advice/stories/don’t-do-this help.


Replies
Seems to me that if you want to replace the treads you need to tear out the skirts -- I don't see how you can replace the treads otherwise. But be prepared for it to be a major production -- you may end up rebuilding the staircase.
steve
First off, you cannot end up with any of the treads rise height more than 3/8" different from highest to shortest. Putting in a hardwood floor below without adding the same material to the second floor could screw up this ratio. That in itself should be the deciding factor in how you proceed.
Removing carpet from the the stairs while keeping it up top may give you enough room to add to the treads, but what about the first step with the new hardwood?
I just came across this product in Remodeling magazine- http://www.starecasing.com/products/
You may want to take a look at it and see how or if this could help you out. There is no product for the skirtboard.
If you can get the old treads out (by cutting in half in the middle and prying out of both sides), you might be able to cut your new treads long and then slide them in and pull back so both ends are in the mortise. However, you would need to be able to wedge from below to tighten them up in that mortise.
Just had to give you more to think about. No thanks necessary.
Calvin
Sorry, forgot to mention that yes, the new hardwood flooring will be used both top and bottom of the stairs (on each level). The previous owners put hardwood on each floor but carpeted the stairs. Odd, I know. Fortunately the old floors were destroyed so it's a good chance to fix it better.
I checked out the website you listed - looks like it might work. You're right, no skirt board, so that would have to be cut to fit afterwards.
I will have to call this place to find out if the material is solid - i.e. can I reface the bullnose to give a square edge. I also wonder how it works given the existing treads that are mortised into the baseboard already have a bullnose that sticks out too far. Maybe taking a router and small handsaw to cut the existing bullnose flush to the riser below would be a solution?
Should know more today when all the carpet is removed and we see what we're working with. I can't imagine the existing treads and risers are supported by only the mortised skirtboard - you would think there would be a middle stringer or a stringer at each end... (probably just at the ends since the width OL is only 39" to outside of skirts)
Either way it involves patching the rock since they only ran it to the top of the existing oversized skirt. Stairs were likely installed long before the interior finishing...
GB
Just make sure your tread heights are close to consistant-no more than 3/8's difference between all of them (hi/low)
And I thought I did see a square edge cover in there-take another look.
About the skirt-
I'd do it b/4 I put down the treads-and fit to the skirt. Even with a paper template-it's hard to be exacting in all those cuts. You can certainly get it close enough to be covered by the tread covers.
You can make a pattern maker that might help you get them nice and snug. I wish I had a picture-hell, don't even know where my pattern maker is................................-but imagine a stick with a "triangular" shaped fan at each end (1/4" plywood). These fans are allowed to slide apart and be tightened with a knob or wing nut. They also pivot at each end of the stick, so you can get that off angle, tighten it down and the length gets tightened down as well. You take that "thing" and lay it on top of your tread-mark it and cut to the mark.
I'll see if I can get Mike Smith to post a picture of his set up-he at least knows where he stashed his...............
More surprises
Thanks Calvin and Mike for the help with transposing the skirt angles! I think I have an idea of the tool you're talking about, but stairs is something I've never dealt with - always lived in one-story homes, and will go back to them in a heartbeat.
Yesterday I was lucky enough to find a great local, family-owned lumber yard while looking for different hardwood trim options. The owner of the shop knew exactly how the stairs were built (common to most new developments in this area) and he said to do the job right by replacing the skirt, treads, and risers is going to be more expensive than it's worth. Did I mention because of the way they designed the floorplan, there's no way to get a new skirt inside the home in one piece? Has anyone seen a two-piece skirt used because the full length won't fit through the home layout? I'm creative, but I can't will walls to move... This project is sucking the life right out of me!
Once all the carpet came out, I can see the treads and risers are indeed all set in to the skirt by way of routed dados (sp?). Unfortunately they made the treads one-piece, bullnose and all. I was hoping for the bullnose to be a separate strip that could be easily removed. Now I'm not sure how to get it off without taking the whole tread out. Take a router/jig saw/chisel to make it flush with the riser below? There is no middle stringer - the treads and risers are supported only by the skirt where they are set into the surface. Not sure how that would even pass code, but it did.
It looks like the existing skirt has to stay so we're trying to find options to work around it. Even to clad it with full-length 1/4" material probably won't happen because of the logistics of getting it inside this d@$% house. The best I can hope for is painting it some darker color to work with the treads/risers, which will be new hardwood clad over the existing. I really want this to be done right (or at least look so) but to do it takes more money than I budgeted for and would never recover the cost for resale.
Back to brainstorming ideas on the concrete subfloor. When the carpet came up we found the subfloor off by over 1" where it sagged on the 3rd floor. That and the random holes in the subfloor that were patched with spray foam in a can left me in a bad mood yesterday. How could any decent professional take so little pride in their work? Sorry, my German is coming out. Counting down the days until I build my own new home to my design and tolerances...
Tread Cutting
The pattern tool we're talking about is used to get the perfect length and cuts on the ends of one tread. The two fans on either end give you the "angle" of the existing tread, the sliding feature of the "stick" gives you the length. You lay the "tool" on the top of the tread, spread it apart and get the ends of the fans tight against the skirt. Tighten everything down and you then take it to your new tread stock and mark the ends (using the fans placement).
Leaving the skirts should be just fine-dress up the tops and paint-White is traditional-probably making it the same color as your trim in the house would be the way to go. Makes most colors of tread really stand out. Same goes with the risers-I'd paint them-sure you've got alot of staple hole filling, but if you've got the time.................
Looks to me like if the rise layout is dictating the material you use for the treads, what are your options if you cover those treads? With no mid stringer, I don't know that the tread covers wouldn't be the way to go.
I've never used nor seen them. Interesting concept though. See if they'll send you a sample, even a 6" pc will give you the visuals you need to see if it would work or be a bust.
So you're saying that the "skirts" are actually stringers, and the treads were inserted in dados from the back? If so, then no way you're going to replace the treads without working from the back. You'll have to overlay the treads or forget about the stairs.
Yes, the skirtboards are acting as the stringers. I've never seen anything like it - usually the stringers are under the treads/risers and the skirtboards are just decorative. I read somewhere else on the forum that with the closed design such as this, the treads and risers slide in the skirts as one mortise is deeper than the other. Not sure how to explain it, but it makes sense to me. Unfortunately it makes removal or remodling a PITA. They spray painted the house before the final flooring was installed so the white skirtboards in place now have white paint overspray covering most of the existing treads and risers.
Hopefully I can learn a bit more today when I go back to the lumber yard, but so far it looks like overlaying the treads and risers is the only option. We're using stain-grade wood for trim (still working on the species and color) so the white skirtboards in place will need to be changed one way or another. They look to be poplar so sanding and staining probably isn't an option. Still hoping there's a way we can clad over the skirts on the side and top. Like everything else, it will come down to the cost and from what I see, my wallet isn't thick enough...
I'm curious to see the tool for measuring the tread angles. Like any house, nothing here is square, so something to make this easier would be great. I've only done the cardboard tracing method, but what I know about home construction was taught by old-school carpenters who never use power tools unless necessary. The tread overlay website you mentioned Calvin has a local dealer. I'll stop by today and hopefully they have a sample in stock.
Thanks again for everyone's help!
GB, if this works out
It's Friday......
and you're buying.
For overlaying the skirt.
First, cut a notch in the end of the tread up to the riser. Knock out that pc between the skirt and that notch (you might have to cut at the skirt also) You want room to slip paper easily in there right up to the riser.
A paper template is one way. Take a long strip of paper-floor paper is good. Painters 4-6" wide masking paper might be more available. Tape that in one long run down the top of you existing skirt to temporarily hold in place. Now go to your printer and get some paper. Tape those sheets to that long strip, so that one edge goes right up to the riser and another goes right down to the tread. Do that all the way up-taping them to themselves and the long strip. Once you've got all those treads and risers "templated", remove the whole shebang, lay it on your new skirt material and trace out the pattern. Leave the top edge of the new skirt long so you can set it in place and scribe/mark the top of the existing skirt to your cover. Too bad you need to pc it, but do so in a manner that is pleasing to the eye grainwise and it might just almost disappear.
Commercial tool
A commercial tool for the stair tread layout is available on Amazon for $145.
It is the Wheaton Tools PL200 Stair Wizard.
Stairs were done with treads and risers mortised into outside stringers all the time back in the day. No center support. I've done some myself. When they're wedged tightly and all of the treads and risers are screwed together then its plenty sturdy. Each step is carried by the whole structure. Done in white oak or something similar and they can span 3' plus. Never really understood why people feel they need a center stringer other then to satisfy a code officer.
Can you get a skirt cover in through an upstairs window and approach it from there?
good luck
Yeah, I remember seeing Norm install one of these. It sticks in my mind because he was showing how you insert a tread and drive it home. He used a wedge between the tread and the hammer to avoid denting the back end of the tread as he "tapped" on it, then proceeded to pound the bejesus out of the thing when the tread didn't seat right. Musta been close to lunchtime and he didn't want to do another take.
Anyway, there's no way you're getting the treads out without either tearing out the entire staircase or opening it up from behind and disassembling one tread at a time. (And likely the treads were glued in.)
Thanks Mike
We'll see who's is buried deeper.
A few comments
As Frost already mentioned, that method of stair building is common, it's called a housed skirt.
The new treads will be 6/4 solid, squared on all sides, overhanging the riser below to give a 1" bullnose.The new treads will be 6/4 solid, squared on all sides, overhanging the riser below to give a 1" bullnose.
Why are you using 6/4 stock for the treads?, that's way too thick and will create problems at the top and bottom steps.
You'll be too short on your first step and too high at the top step
Your treads should be bull-nosed not square-edged. Bullnosed refers to the rounded over portion of the overhang (or nosing) as in your pic.
Unless you can access the stair treads and risers from the back side of the stairs your best solution is to cut off the bull nose portion of the tread overhang flush with the riser face below, then install a thin veneer riser( 1/2") (painted) and then install new 3/4"
tread stock with a 1" overhang with scotia molding underneath, or if no molding is used then only have a 3/4" overhang, but the scotia serves to hide the seam between tread and riser and helps to support the nosing.
By using 3/4 tread stock you will be able to match up to the second floor , assuming you use 3/4" T&G on the second floor.
You can try to veneer the skirt with 1/16" or 1/8" Oak BEFORE you put the treads on OR leave them painted and only have the treads as finished Oak.
That pic of the 1x4 trim doesn't look like Oak to me, more like cedar or redwood, but maybe it's the pic.
Good Luck
Geoff
Several questions haven't received clear answers:
Was the entire area involved -- bottom landing, stair treads, top landing -- previously carpeted?
What is the thickness of the new flooring you're having installed?
Is any existing flooring/sheathing (other than the carpet) being removed prior to the new flooring installation?
Have you measured the steps heights (particularly the first and last) to see how close to even they currently are?
Sorry for the delay - just finished installing the new floors last night. Stairs are now down to base material.
1) Stair treads and risers were covered in carpet. The landing above and below is the 3rd and 2nd floor, was covered with hardwood, and replaced with hardwood.
2) New flooring is 5/8" engineered, plywood substrate.
3) Old carpet is gone, tack strips and all. Just have to pull some staples. Base material appears to be poplar.
4) Just measured a few steps and, surprisingly, all seem to be square on height, with 1/16" variations here and there. Distance between skirtboards varies up to 1/8", but each tread is pretty square front to back.
I wish I could take pictures through walls, but I'll try to explain the stair layout. There are no landings at the top or bottom...just the floor going up to the first full step. After two steps up from the bottom, there is a landing to turn 90 degrees, and this is divided up into two, triangular-shaped steps.
We left the nosing off the top landings where it ties into the main flooring. Ripped down a strip of flooring material and floated it just to protect the edges, but sized it to take the nosing I ordered with the floor. Nosing is 5/8" thick and sits flush with the floor.
Talking to the flooring installer yesterday, we determined it's damn near impossible to remove the existing treads and risers. While the flooring material could be used for the treads and risers, he suggested using solid hardwood for two reasons. One, the nosing from the flooring manufacturer is around $100/9' section - we would get two nosings out of each stick - x17 sticks...$$$. The other reason is hardwood holds up better, and would allow an exposed edge at the bullnose overhang. Being a townhouse, we use the stairs A LOT. He has no ideas about the skirtboard, other than to paint it, either a solid color or have a decorative painter try to match the grain of either the trim or stair material.
In regards to the question on why I want to use thicker tread material, well, honestly, the wife and I like the looks of it. At the bullnose/overhang, we don't want the curved radius, we want a square 90 degree cut, just sanded to knock down the sharp edge. By leaving the existing treads and risers, it looks to be the best option is to add 3/4" plywood to the surface of the existing risers, which brings it flush with the existing tread bullnose. From there we can overlay 6/4 treads and 2/4 (or something close) to the risers. This will allow a 1" overhang of the tread. The rise and run should remain the same, given each step is the same. The first and last steps are a different height than the others already. Obviously the building inspector didn't catch it four years ago when the place was built. Worst case scenario, I could always use a thinner board for the first and last step, just use a separate piece for the bullnose to make it appear the same thickness... Either way this project will have compromises.
Sorry if everything isn't too clear. You know how it goes putting a mental image to words...
Thanks again to everyone for your suggestions! I'm just thankful everything turned out well so far regarding the new floor. If the wife had her way, we would have floating treads coming from the wall. Great ideas in those home magazines - but never the money or ambition to do any of these. Though the latest issue of FH has a finished basement article with maple built-ins and a metal sheet ceiling. Might be the next project...
GB
Take note that what you do to one tread cover-will affect those around it. If you use thinner bottom step cover, then from the top of that to the top of the next tread will be different than all the others (till the next floor).
How far from the top of your new flooring to the top of the 1st thread?
You mention the rest are even after that-what's that dimension?
And the then the top of the last tread to the top of your next floor nosing?
Something in those numbers should dictate what you use as a tread cover.
Edit: The reason I keep mentioning these dimensions are that they are critical in a home. Stairs are one if not the cause of most accidents in the home. Getting them right should be the goal. Like many, I can tell an "off" tread after one trip (sic) up the stairs. No matter if they are steep, comfortable or shallow rises. Tripping on the way up at the bottom or even top, might result in a bruise. Slipping or losing balance going down could be a killer.
For the tread nosings I'd consider ripping the existing nosings off (tricky, but far from impossible) and then applying a new nosing separate from the tread overlay, as thick as the old tread + overlay. Several techniques could be used to secure the nosings, which is another tricky area. I'd consider pegs and glue with a few finish screws to pull things tight. Probably others have other ideas.
Riser height
Okay finally got around to measuring everything before the game yesterday. I may have been a bit premature stating all measurements are square and equal. The tread surface width front and back are pretty much square on all steps. The riser heights are another story.
Ground floor to top of first tread is 7 1/8"
Consequtive heights vary anywhere from 7 1/2" to 7 3/4"
I hadn't noticed the difference before as the stairs were covered in carpet. Now that everything is open, you can see the differences, particularily that first step from the ground floor. The main run of the stairs is sandwiched between two walls so you only see them when physically walking up or down on them (and really only see discrepencies when walking up).
The treads are solid planks, including the overhang and bullnose (all one piece). The bullnose is not a separate strip, except on the landings (which are not solid wood but rather plywood). The risers are ply as well.
I see the flooring installer trimmed off the overhang bullnose from the floor on the top level (not sure why the stair builders put one there anyway). So yes, trimming off the overhang can be done, which I would prefer now that you mentioned it. Makes everything else easier as well. However, what do I do with the hole in the side stringers after these are cut off (the mortised groove)? If we can clad the stringers it's no problem, but if not, then there might be an issue.
I'm all for stairs that not only look great, but function well and, most important, are built well and safe. However, I don't think correcting the riser height differences is in the budget, unless it could happen from planing down the new treads to make the heights equal. Even then, given how I don't own a planer, I'm sure that would work out to be a few pennies as well. I'm not trying to sound cheap here, but I guess we all have a budget in one form or another...
After looking at the windows, I think we could get a new skirtboard overlay in through a window at each stairway. Second floor will be tricky, but shouldn't take much besides a ladder and some elbow grease.
Solution
We have a game plan. Replacing the existing stringers isn't an option, and neither is removing the existing treads and risers. We decided to use the same hardwood flooring material for the treads and risers, along with stair nosing from the manufacturer. The stair nosing isn't cheap, but it probably wouldn't be any cheaper to fabricate from scratch, then trying to match the color of the pre-finished floor. 17 pieces of the stuff costs more than the installer's labor for the job! Anyway, getting sidetracked here...
For the stringers we will clad the vertical sides with 1/4" clear maple ply to match the new trim on one side, then 3/4" on the other side to make the depth equal. The top will be capped with solid maple to match, 3/4 x 1 3/4.
The variation in step heights will be corrected with 1/8" masonite where needed to bring all steps equal in rise. New treads will be overlaid on top of the masonite.
The best part is the side stringers. By overlaying the existing treads, it works out so the new nosing will meet at exactly the top of the stringer. We can cut each stringer ply cladding individually (opposed to one or two long pieces). This should speed up the job and also lower my costs. The joints at each piece will be well covered by the end of the stair nosing. Should work out as well as can be hoped. Not the best solution, but the best we can come up with by not tearing everything out and starting over the right way. Compromises everywhere I guess...
Thanks to all who helped with your advice! You brought a lot of ideas and points I didn't think of. That's why you're the pros and I keep this as a hobby.
GB
Don't forget the final picture and post it here.
thanks.