<!—-><!—-><!—->
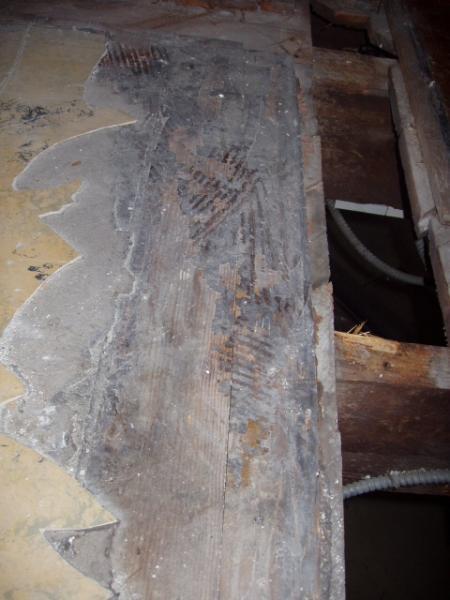
I ripped up the linoleum in my kitchen and… hard wood! Take a look at the attached pic.
<!—-> <!—->
Two questions:
- I’m not going to have the time to do the final finish for a while; what do you recommend by way of cleaning and protecting it in the mean time so it’s not too offensive?
- When I do get to it: what’s the best way to remove all that gunk of for final finish? I know I’ll eventfully sand but should I scrape or soak it first?


Replies
You could lay some glueless sheet vinyl on the floor until you have the time and $ to finish the wood.
Start with a scrape to get off most of the gunk. That stuff will gum up sanding really fast. There may be some solvent that will remove what you cant scrape off. Paint remover comes to mind. I have tried some adhesive removers but not found one that was worth the effort.
just my 2 cents
First test the tile and the adhesive for asbestos.
I'd encourage you to stay away from solvents and go as far as you can with scraping. We did it to a floor like this about twenty years ago and we just set two or three guys to scraping with a big boom box and I don't think it took more than a day and a half even down on their knees with hand scrapers at the end. the dust was contained to the room and there were no fumes to stink up the house. The floor came up great.
------------------
"You cannot work hard enough to make up for a sloppy estimate."
Looks like SYP subfloor to me, not hardwood. It'll still clean up some, but never really be a "Hardwood" floor. Good luck with that, I'd be tempted to go over it with new, a lot less elbow pain.
Spheramid Enterprises Architectural Woodworks
Repairs, Remodeling, Restorations
They kill Prophets, for Profits.
Sphere is right, that's not hardwood. It's pine subflooring and I'm guessing the adhesive is hiding the otherwise visible large nail heads.See my work at TedsCarpentry.comBuy Cheap Tools! BuildersTools.net
I looked again at the pic, and you can see the actual diagonal subfloor to the right (I think). Whatever the finished floor is, I would probably agree that it is not hardwood- there is some big-a$$ed grain there.
good catch.
I read that to save money in years gone by they would use hardwood in nicer rooms but use SYP, perhaps in bedrooms and lesser rooms, of which I think the kitchen might be. I've even seen where they would do the outside few feet of a bedroom in hardwood then the center in pine... that area would then be under a rug perhaps and out of sight.
<!----><!----><!---->
I refuse to accept that there are limitations to what we can accomplish. Pete Draganic
Take life as a test and shoot for a better score each day. Matt Garcia
Out west here you'll see Doug Fir as finish flooring in damp areas on some old craftsman bungalows- it doesn't buckle if there's a leak like oak will. sure shows the doggies' toenail skidmarks, though. "distressed", I guess they call that.
don't know if syp performs similarly.
and yeah, who mentioned asbestos? lots of the vinyl tiles and mastics had it.
k
First house DW and I owned was built in 1929. Duplex, 3 floors.
1st floor and stairway to 2nd floor (guests see this) = 1/4 sawn, t&g, clear oak, ~2-1/4" wide.
2nd floor - bedrooms (family see this) = 1/4 sawn, t&g, clear yellow pine also ~ 2-1/4" wide
3rd floor and stairway to it which was concealed behind a door = 1x6, whole sawn, t&g, #1 yellow pine, face nailed (kids rooms)
It made sense to me!
JimNever underestimate the value of a sharp pencil or good light.
On a similar note, many of the ~1920's homes in my area have 1/4 sawn oak in the main rooms and maple in the bedrooms, kitchen, etc..
Also with the trim, will have oak or mahogany in the main rooms and pine in all the other rooms. See my work at TedsCarpentry.comBuy Cheap Tools! BuildersTools.net
My house has oak living/dining, fir (head bowed) in all the rest.
All trim in my 1929 house was yellow pine
- must have been old growth heart ---- hard as a rock!
JimNever underestimate the value of a sharp pencil or good light.
let me throw one more vote in on it being pine subfloor. Does it have a tongue and groove?
I refuse to accept that there are limitations to what we can accomplish. Pete Draganic
Take life as a test and shoot for a better score each day. Matt Garcia
Edited 11/14/2008 9:52 pm ET by PeteDraganic
I am currently on a project, and the homeowner is tackling the demo, which includes this very same problem.
He hired a couple of men to just scrape it off, they are now using chisels. They have been at it now for several days, they look completely beaten.
Heat guns help soften up the adhesive so it is easier to scrape.
Did about 650-sf on an old house my sister bought. They had put linoleum with what looked to be an asphalt paper base down over the original oak flooring on the entire first floor, (I'm guessing late 1930-ish), and then put carpet, and vinyl directly over that as it wore, (late 1960's sometime by the pattern).
Took a day to srape the old stuff off the oak. She hid the nails holes from the tack strip, with a hand painted celtic knot border.
Edited 11/15/2008 4:09 pm ET by Jigs-n-fixtures
That sounds pretty nice, the painted border. I used to do prep work for a faux painter some years ago, and she did a few painted borders. I was skeptical till I saw the first finished one.
About the wood floor, I'm not saying it's not worth finishing. I'm sure it will look really good when cleaned up and finished. Just saying it doesn't look like hard wood and, in fact, looks like subflooring. See my work at TedsCarpentry.comBuy Cheap Tools! BuildersTools.net
Let us all know about the wood
To me it looks like a northern pine but it also looks like 5/16" thick.
If cleaning it up, definitely use scrapers and keep them super sharp. The key is sharp sharp sharp.
How old is the house? How large is the kitchen? Do you think it would be worth cleaning up and opposed to replacing?
If there's no historical significance to your house I might just let it go.
Family.....They're always there when they need you.
I think historical significance is subjective. If you like the rustic look of old floors (as I do) there is no better way of getting that look than having the real thing. If it's solid and you like the look, it's worth saving. But that's just my humble opinion.See my work at TedsCarpentry.comBuy Cheap Tools! BuildersTools.net
Nothing wrong with that. I'm just being practical. I've seen alot of "hardwood" houses that got the "cheap" treatment in the kitchen.
It may not be worth it.
Buy some new lumber and a chain. Beat the snot out of the new stuff, get out aggression, save the hours you would have spent on your knees with a scraper.
Family.....They're always there when they need you.
Here's an idea what you might expect depending on how beat up the flooring is.
http://www.buildingforhealth.com/products.php?cat=384
Looks like you have a lot of labor coming down the pike.
Cheers
Edited 11/16/2008 12:56 pm ET by rez
You have longleaf pine
It is straight grain without knots from what we see there, in fairly wide boards. (? 4-5"?) When refinished, it will probably look something between these two floors attached. One has knots and the other is both clear vertical grain and select tight grain, which yours is not.
definitely do not soak, scrape it. And I mean real scrapers, not chisels. Some guys push a blade at angle and think they are scraping. To scrape, you use a vary sharp edge held almost 90° to the wood. Do the other way and you will slice grain and dig/gouge splinters out of the surface.
Sometimes these old wood floors got covered because they were already pretty stained and worn out. Especially in kitchens. best solution there is to set saw depth and use a demo blade, cut into 2' slices and tear it all out.
But other times, people just got tired of the yearly wax job to take care of the floor, so they covered it up with sheet goods. Those floors are often worth the work to save.
Since it sounds like you intend to not sand it right away... ( that would be my choice, a heavy grit on a drum would take a lot of that right off) ...the best temp cover to protect is some cheap sheet vinyl loose laid.
If it scrapes OK, throw down a couple coats of shellac. it is cheap and easy, and there is a good chance that is what the original finish was.
Welcome to the
Taunton University of Knowledge FHB Campus at Breaktime.
where ...
Excellence is its own reward!
"If it scrapes OK, throw down a couple coats of shellac. it is cheap and easy, and there is a good chance that is what the original finish was"
.............. that frenchy guy sure gets around ;o)
"The inherent vice of capitalism is the uneven division of blessings while the inherent virtue of socialism is the equal division of misery" Sir Winston Churchill
Once when I was naive and ambitious I offered to refinish a few hundred square feet of straight grained fir flooring that had the same glue down flooring you have.
It was brutal labor to get the sheet flooring up. I think I ended up with a steel digging bar that probably weighed 50 pounds and had a 2 .5 inch chisel tip. I ground the tip to an angle that wouldn't gouge the floor (or so I thought) and would slide it along an already stripped area and ram it into the flooring and it would either peel up strips or knock it off chip by chip. I actually found the colder it was the better as the adhesive would be brittle and just pop off rather than having to tear it loose.
I finished with a carbide hand scraper along the walls and in the corners(Sandvik makes a good one, I think the company name may have changed). I spent the first three days just getting the floor prepped to sand it and it was some of the hardest work I recall doing (similar to a roof tear off or digging ditches with a pick and shovel). I had some gnarly callouses and sore back and knees by the time it was ready to sand.
It turns out I did create a lot of gouges and they didn't all sand out . The funny thing was that the bits of black adhesive imbedded in the divots actually gave it a really attractive look in a historic, rustic kind of way. I tend to be pretty perfectionist about getting things right so I was devastated by the divots initially, by the time I sealed and finished the floor they didn't look to bad and when I came by weeks and months later I was always startled by how good the floor looked, divots and all. The divots actually seemed to give the floor more character.
The rustic appeal worked with the straight grain fir flooring in a way I don't think would have worked with oak or other floors.
I would say strip a 2 foot by 2 foot area, sand it with a handheld sander, take piffins advice and put some shellac on it and see what you think. Like somebody else said -- it would be far less work and much quicker to just pull it up and lay new flooring.
Back to your original question, my advice on removing the "gunk" is the widest carbide scraper you can find. 2.5" minimum and figure on wearing out one side of the blade every 50 sq ft or so. Don't try to soften it with a solvent. My approach with the handheld scraper is to rip it as aggressively and forcefully as I can while bearing down on it with my body weight. Once you have a strip scraped down to the wood. Repeat this process using the prev. scraped area as an "acceleration lane" to get your scraper moving quickly across the floor and then when you have it up to speed, move it sideways about half a scraper width as you pull it and bear down on it at the same time. Resting half the scraper width on the already scraped area seems to help keep the scraper flat and gives you more of a chance to get the coated area down to bare wood in one pass.
It is a hell of a stomach muscle workout doing all that pulling and bearing down. You will sweat like crazy and undoubtedly burn a bunch of calories.
My hardwood floor buddy says I am crazy. He would attack it with a floor sander and a bunch of 24 grit sandpaper and trash a lot of sandpaper in a hurry. What took me 3 days would take him 3 hours Doing it this way asbestos is more of a concern and I think you end up loosing a lot of the thickness of the floor if you sand it down that aggressively.
That wide scraper blade is part of why it was so hard. You had to bear down harder to get same pressure. I use a scraper that is about 1-1/4" wide.Still hard work, but not torture.
Welcome to the Taunton University of Knowledge FHB Campus at Breaktime. where ... Excellence is its own reward!
Maybe I overestimated the width of that scraper. In any case I was using the wider one as it was easy to gouge or scrape the floor if the scraper ran up on a section of adhesive and tilted. I never used the full width of the scraper for scraping, it was mainly for balance control to keep it flat. Depending on how many hours I had been at it I could reduce the width of my passes to whatever my energy level could handle. In other words, if the scraper was 2 inches wide I might have had one inch on a clean already scraped surface and the other one inch scraping the glue encrusted surface.Karl
I refinished a floor using stripper, rather than sanding, because the owner specifically wanted to retain the vintage look. That was some nasty work which I'm sure cost me a few brain cells, but the floor came out beautiful.
The several times I've runin into cutback adhesive on a wood floor, I hired a few laborers to do the scraping, who knocked it out in a day. Then I hired a floor sander guy to finish it up, so I could take all the credit =). Well... I took credit for organizing and overseeing anyway. See my work at TedsCarpentry.comBuy Cheap Tools! BuildersTools.net
Man, the stuff I could do if I had all my brain cells back....
Welcome to the Taunton University of Knowledge FHB Campus at Breaktime. where ... Excellence is its own reward!
Man, the stuff I could remember doing if I had all my brain cells back....
Hmmm, yeah.... I'm prolly better off without 'em.
See my work at TedsCarpentry.comBuy Cheap Tools! BuildersTools.net
Edited 11/17/2008 6:41 pm by Ted W.
Edited 11/17/2008 6:42 pm by Ted W.
Edited 11/17/2008 6:44 pm by Ted W.
Edited 11/17/2008 6:45 pm by Ted W.
Edited 11/17/2008 6:48 pm by Ted W.
(not to mention how many edits they would have saved me)
Edited 11/17/2008 6:49 pm by Ted W.
Congratulations!
TedW, receives the TimMooney'Now That's Funny Right There' Edit Award.
Saaalute!View Image View Image
Edited 11/17/20084:24 pm ET by rez
Edited 11/17/2008 5:24 pm ET by rez
Edited 11/17/2008 6:25 pm ET by rez
Edited 11/17/2008 7:42 pm by rez
Edited 11/17/2008 8:44 pm by rez
Edited 11/17/2008 9:45 pm by rez
Edited 11/17/2008 10:48 pm by rez
Edited 11/17/2008 7:26 pm ET by rez
Edited 11/17/2008 7:26 pm ET by I forget
Spheramid Enterprises Architectural Woodworks
Repairs, Remodeling, Restorations
They kill Prophets, for Profits.
Well it's about dern time. I been pestering the good folks here with my corny humor for like ever, just to get one o' dem dar awards. Now I can retire happy.
See my work at TedsCarpentry.comBuy Cheap Tools! BuildersTools.net
Wait, can't afford to retire yet.
Oh well, now I can continue workin' happy. =]p
Edited 11/17/2008 9:59 pm by Ted W.
I'd say just let it be until you can finish it...maybe the traffic will wear off most of the #### that you'll eventually have to sand off anyways....either that or some carpet remnants frome HD or some other box store...why spend a bunch of time on it if you know that you're gonna re-do it anyways?
All I ever wanted in life was an unfair advantage...
The last time I refinished a floor like that, the linoleum was removed and the glue was painted over.
We took about an hour to scrape up the worst of the remaining glue, and then I used a drum sander w/ 16 or 20 grit to do the rest. I used a sandpaper cleaning stick to extend the life of the paper, as well as reversing the paper if it got too full. Plus no gouges.
It took about an hour longer than what it would have taken without the glue, but worked fine and was not as back breaking as spending hours scraping. (i've done it that way a few times as well) An hour of scraping and an extra hour of sanding and a few extra pieces of sandpaper gets my vote.
Here's some pics
http://web.mac.com/lovetotweet/Simon_Ott_Carpentry/More_Renovations_Photo_Album.html
Ott
FWIW- I've found that some black cutback adhesive will come off easily after being soaked w/ water for a while. I haven't been brave enough to try it on a large scale yet. I'd probably try wet bath towels or something like that to try to control the moisture.
I had a simalar problem in my home, an old flooring contractor told me to sand it off useing 16 grit paper, do small areas at a time and spread a thin coating of motor oil on the section. The motor oil keeps the paper from gumming up. Don't spread it on a large area as it is very slippery. He also mentioned kerosene and claimed the flash point was very low but,I opted for the motor oil because I'm kind of a chicken.The motor oil trick also works well with the edger, particularly if the floor has had a gummy finish,you use 1/4 the amount of disks because they don't gum up. Have the adhesive tested for asbestos.
You're obviously speaking from experience, which I'm not one to argue with. But I'm just imagining motor oil seeping deep into the wood. Was that an issue at all? How did you apply it? I'm thinking brushing it on so it stays mostly on top of the adhesive. I don't imagine you just pour it on. Just curious about this motor oil trick.See my work at TedsCarpentry.comBuy Cheap Tools! BuildersTools.net
Please update your profile! Since many issues are dependant on the region in which you work, we look at your profile to see where you are writing from. So at the very least, tell us were you're writing from!
I applied a very thin coat from a rag. You shouldn't have a problem with it seeping into the floor as the adhesive will protect the floor. Remember to only do small areas 3 ft by 3ft or slightly larger this way you can reach it with the sander and not walk on it. The same goes for the edger , a 3 ft section is long enough. Apply the oil as if you were greasing a baking pan.You would have a greater problem with seepage if you used an adhesive remover as it thins and dissovles the adhesive and it soaks into any open grain
That makes sense.
As for adhesive remover, I started to use it once and the fumes nearly knocked me out. Put the cap back on the can, aired out the room and broke out the scrapers.
I don't do floors any more, but always like to know these things. Will definately remember the motor oil trick. :)See my work at TedsCarpentry.comBuy Cheap Tools! BuildersTools.net
If you haven't already done so, please update your profile. Since many issues are dependant on the region in which you work, we often look at your profile to see where you are writing from.