FHB Logo Facebook LinkedIn Email Pinterest Twitter X Instagram Tiktok YouTube Plus Icon Close Icon Navigation Search Icon Navigation Search Icon Arrow Down Icon Video Guide Icon Article Guide Icon Modal Close Icon Guide Search Icon Skip to content
Subscribe
Log In
  • How-To
  • Design
  • Tools & Materials
  • Restoration
  • Videos
  • Blogs
  • Forum
  • Magazine
  • Members
  • FHB House
  • Podcast
Log In

Discussion Forum

Discussion Forum

Rhonodeck curves

TLJ | Posted in Photo Gallery on August 23, 2003 05:45am

I enjoyed the pix of the Trex deck. Nice work.

I’ve been looking for an opportunity to show off my latest deck — built in the heat of summer 2002. That was the only way I could get the material hot enough to bend it. Built the stair stringers on forms in my shop.

Oops. That’s “Rhinodeck”, not Rhonodeck. As you all undoubtedly know.


Edited 8/22/2003 10:47:05 PM ET by Tim

Reply
  • X
  • facebook
  • linkedin
  • pinterest
  • email
  • add to favorites Log in or Sign up to save your favorite articles

Replies

  1. DougU | Aug 23, 2003 05:49am | #1

    Tim

    Thats a great deck!

    Nice design, yours?

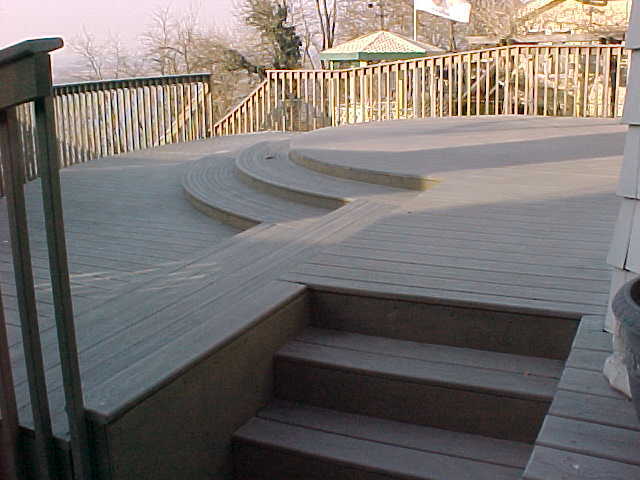
    Good work, I especialy like the steps.

    Doug

    1. plantlust | Aug 23, 2003 05:55am | #2

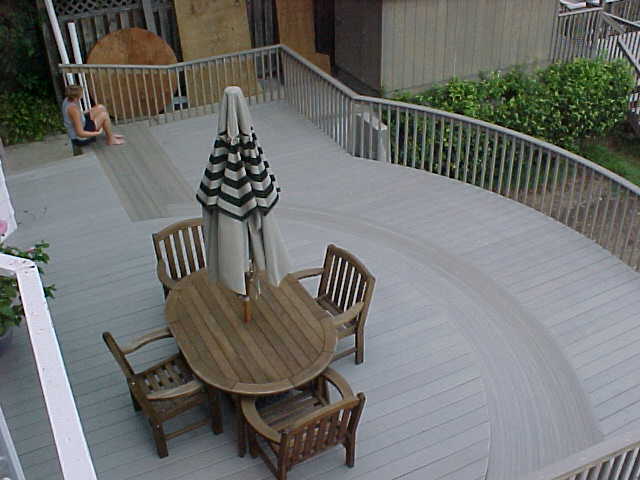
      Ditto.  The stairs are elegant but what intrigues me is the material you used for the patio portion, around the globe.  It looks almost like concrete forms were used but then I see the "sunken" portion that looks like sand or something was swept between the pieces.  Life is too short so eat dessert first, especially if it happens to be Cookingmonster's triple cinnamon truffles or her ginger-fig caramels.

      1. TLJ | Aug 23, 2003 06:21am | #3

        Thanks so much. I'll humbly take a bow.

        Yes, my design and engineering. Actually, I wouldn't consider myself to be in the big leagues, as far as complicated jobs go. This was probably the most difficult (engineering-wise) job I've done.

        The patio is sawn limestone approx 2.5" thick on a 3" bed of compacted grade 8 (CA6). I then swept agricultural lime into the joints, watered it down, and then hand-packed it in with various-sized wood scraps, whatever would fit in the joint.

        By the way, the posts are set on those sonotube footing forms whose brand name has completely slipped my mind. They are advertised in FHB.

      2. TLJ | Aug 23, 2003 06:27am | #4

        Here's the flag installation in progress.

        1. plantlust | Aug 23, 2003 06:54am | #5

          Stunning and some serious work involved.  No wonder the pieces look so perfect.

          Edit to add question:  Are you in a zone that experiences frost heaving?  Do you think 3 inches is deep enough (including the compaction also) to avoid having the individual pieces of limestone shift?

          Life is too short so eat dessert first, especially if it happens to be Cookingmonster's triple cinnamon truffles or her ginger-fig caramels.

          Edited 8/22/2003 11:56:28 PM ET by PLANTLUST

          1. TLJ | Aug 23, 2003 02:34pm | #6

            I'm near St. Louis. So, no, 3" is not deep enough to resist frost heave. In the case of flatwork, I guess we accomodate heaving, rather than resist it. Same principle applies to concrete flatwork. Give it room to move. The advantage to flagstones is one doesn't have to be concerned about cracking as with concrete.

            To enrich the plot: the site is narrow with no access by vehicle to the back of the lot. Also, this is a walkout level of the house. Therefore, all materials had to be handtrucked to the back, lowered over a retaining wall, and then moved to location. 10T of gravel, 14T of flagstones, approx 75 bags of premix concrete, 1T of ag lime. In addition, 1.5 yds readymix concrete for a hot tub slab and all that Rhinodeck (which is not light) and deck frame material. One of those "build a pyramid" jobs.

            Why "PLANTLUST"? Horticulturist?

          2. plantlust | Aug 23, 2003 05:38pm | #7

            Since summer 2002...it will be interesting to see how much heaving occurs over time.

            And regarding my name, an unfortunate, all-consuming hobby which is NOT creating any cash for me.  Dammit.Life is too short so eat dessert first, especially if it happens to be Cookingmonster's triple cinnamon truffles or her ginger-fig caramels.

  2. User avater
    goldhiller | Aug 24, 2003 12:28am | #8

    Don't be humble about taking that bow...........you earned it.

    Very, very nice.

    Is your back still sore?

    We laid a large bluestone patio for a guy two years ago under the same no machinery access circumstances. Grunt, grunt. We earned every dollar as I'm sure you did, too.

    Again.......really nice piece of work.

    Knowledge is power, but only if applied in a timely fashion.
  3. TrimButcher | Aug 24, 2003 03:56am | #9

    Very nice work, Tim.  What are the stringers made out of, and how did you make them? 

    Regards,

    Tim Ruttan

    1. xMikeSmith | Aug 24, 2003 03:59am | #10

      yes, tim.. nice work.. and how did you curve your stringers ?Mike Smith   Rhode Island : Design / Build / Repair / Restore

    2. TLJ | Aug 24, 2003 04:56am | #11

      Thanks, everyone, for your compliments.

      Regarding the stringers: I followed the techniques of Laszlo Gigacz as described by him in an old issue of Fine Woodworking (May/June 1979, #16) which is now out of print. I may be able to send a scanned copy as an attachment to anyone interested.

      I laid out on paper elevations and plan views to determine radii and tread/riser dimensions. Then cleared an adequate space in my shop and screwed 3/4" cdx to the concrete floor and to the ceiling above. Then laid out the circles for each stringer as they would each have a different radius. Also marked each riser by bisecting the circles appropriately. I aimed for an optimal tread depth about midway up the run. I then fastened 2x4s from floor to ceiling with framing angles on the inside of each curve (I built one stringer at a time, I think starting with the tightest one) on the uphill side of each riser location. This facilitated marking the tread and riser notches when each stringer was completed. They were then sawn out after the stringer was removed from the form.

      But I'm getting ahead of myself. I screwed blocks of scrap wood to each stud at the appropriate location to keep the laminations from creeping up the forms. The stringers are made of 4 layers of 1/2" CCA plywood glued without voids (as much as possible) with Gorilla glue. I wanted to end up with 14" stringers. So the first layer I attached to the forms was 17" wide. Next layer was 16", then 15", and then 14". This allowed me to screw each layer to the form but keep each screw head accessible for removal after glueup was complete. Each layer used about 15 lineal ft of plywood. Of course, I staggered the joints and clamped with a gazillion bar clamps inbetween studs. It was not necessary to apply all four layers at any one particular work session. Individual layers could be allowed to cure before applying successive layers.

      The Gorilla glue needs moisture to activate and cure. It resembles Great Stuff as it oozes out of the layers and drips all over everything. Because it expands, it fills voids where there is little contact. The stuff works great. Time will tell how well it weathers. The stringers opened up somewhat upon release from the forms, but that presented no problem as I hadn't set my footings yet. After removing from the form, I sawed them to 14" with a hand-held power saw, then cut out the notches.

      AFter building the first stringer, I removed all the studs and moved them out to the next circle.

      They were a challenge to set as they wouldn't prop against the ledger like straight stringers will. Also, I needed to put blocking between the stringers to reduce the completed stairs' tendency to sag to the outside of the curve. Solid risers would have ameliorated this problem greatly, but I was trying to accomodate the customers' desire to leave the view from under the deck as open as possible.

      I have tried to attach photos, but seem to be having problems.

      I used the same forms to make the handrails.

      Edited 8/23/2003 10:01:16 PM ET by Tim

  4. User avater
    CloudHidden | Aug 24, 2003 06:38am | #12

    Really nice. I'm gonna have to keep the curve in mind for a deck we're wrapping around a dome. Thanks for showing what's possible. How easy was it to curve the tread material for the surface of the deck?

    1. TLJ | Aug 24, 2003 11:42pm | #13

      It was difficult. We called them the "bloody steps", by employer being British.

      I don't know if you've ever seen the ads for spectacular decks with flowing curves in the decking. I called the manufacturer and asked them how to do this. They said you can't. I guess they faked up the photos.

      I thought I could use the same principles as for curving and laminating wood: rip the material in strips thin enough to be bent and fasten them back together again. Good idea but difficult to execute. Because I had built the risers first (see attached photo), I had no access for clamps. Therefore was using muscle power and the screws to pull the strips together. The bevel on the heads of the screws would spread the material out and make little bumps in the finished surface. AFter I'd finished, I discovered trapease screws. These probably would have alleviated that problem. But I had a difficult time finding the right width material. Anything thinner than 2" broke when bending. Anything thicker than 2" broke when bending. I even ripped the pieces and laid them on the hot deck when it was 90+ to soften them. Not the most pleasant working conditions for me. I could only work on them about an hour and a half before I was baked.

      So now, after a year, some strips are splitting at the screws (which were put in edgewise into the preceding strip). I'm not happy with it and will remove it and scribe whole boards to fit laid perpendicular to the main decking

      1. User avater
        CloudHidden | Aug 25, 2003 01:36am | #14

        Thank you for explaining that. It can save us lots of effort replicating your methods.

        1. TLJ | Aug 25, 2003 04:30am | #15

          You're welcome.

          I think if I had used Trapease screws and build my risers after, so that I could use bar clamps to pull the laminations together, the curved tread would have worked. However, I'm not sure how I could yet avoid the occasional crack running across a screw.

  5. User avater
    ProDek | Aug 25, 2003 04:51am | #16

    Great looking deck Tim. You should be proud.

    Now you have to tell us all how long this job took you.

    I see a career change in your future.

    "Rather be a hammer than a nail"

    Bob

    1. TLJ | Aug 27, 2003 06:28am | #17

      Thanks for your comments.

      Over 430 person/hours. Not including the time put in by one of the customers (she's in one of the attached pix) who probably put in 100 hours of labor digging, carrying, and cutting. The hours include work on the shed and stairs shown in attachment. Also a couple of concrete buttresses for the retaining wall below the shed.

Log in or create an account to post a comment.

Sign up Log in

Become a member and get full access to FineHomebuilding.com

Video Shorts

Categories

  • Business
  • Code Questions
  • Construction Techniques
  • Energy, Heating & Insulation
  • General Discussion
  • Help/Work Wanted
  • Photo Gallery
  • Reader Classified
  • Tools for Home Building

Discussion Forum

Recent Posts and Replies

  • |
  • |
  • |
  • |
  • |
  • |
View More Create Post

Up Next

Video Shorts

Featured Story

FHB Summit 2025 — Design, Build, Business

Join some of the most experienced and recognized building professionals for two days of presentations, panel discussions, networking, and more.

Featured Video

A Modern California Home Wrapped in Rockwool Insulation for Energy Efficiency and Fire Resistance

The designer and builder of the 2018 Fine Homebuilding House detail why they chose mineral-wool batts and high-density boards for all of their insulation needs.

Related Stories

  • A Classic Paint Sprayer Gets a Thoughtful Refresh
  • Podcast Episode 692: Introduction to Trade Work, Embodied Carbon, and Envelope Improvements
  • FHB Podcast Segment: Embodied Greenhouse Gas Emissions and the Building Codes
  • Old Boots Learn New Tricks

Highlights

Fine Homebuilding All Access
Fine Homebuilding Podcast
Tool Tech
Plus, get an extra 20% off with code GIFT20

"I have learned so much thanks to the searchable articles on the FHB website. I can confidently say that I expect to be a life-long subscriber." - M.K.

Get home building tips, offers, and expert advice in your inbox

Signing you up...

This site is protected by reCAPTCHA and the Google Privacy Policy and Terms of Service apply.
See all newsletters
See all newsletters

Fine Homebuilding Magazine

  • Issue 332 - July 2025
    • Custom Built-ins With Job-Site Tools
    • Fight House Fires Through Design
    • Making the Move to Multifamily
  • Issue 331 - June 2025
    • A More Resilient Roof
    • Tool Test: You Need a Drywall Sander
    • Ducted vs. Ductless Heat Pumps
  • Issue 330 - April/May 2025
    • Deck Details for Durability
    • FAQs on HPWHs
    • 10 Tips for a Long-Lasting Paint Job
  • Issue 329 - Feb/Mar 2025
    • Smart Foundation for a Small Addition
    • A Kominka Comes West
    • Making Small Kitchens Work
  • Issue 328 - Dec/Jan 2025
    • How a Pro Replaces Columns
    • Passive House 3.0
    • Tool Test: Compact Line Lasers

Fine Home Building

Newsletter Sign-up

  • Fine Homebuilding

    Home building tips, offers, and expert advice in your inbox.

  • Green Building Advisor

    Building science and energy efficiency advice, plus special offers, in your inbox.

  • Old House Journal

    Repair, renovation, and restoration tips, plus special offers, in your inbox.

Signing you up...

This site is protected by reCAPTCHA and the Google Privacy Policy and Terms of Service apply.
See all newsletters

Follow

  • Fine Homebuilding

    Dig into cutting-edge approaches and decades of proven solutions with total access to our experts and tradespeople.

    Start Free Trial Now
    • Facebook
    • Instagram
    • X
    • LinkedIn
  • GBA Prime

    Get instant access to the latest developments in green building, research, and reports from the field.

    Start Free Trial Now
    • Facebook
    • YouTube
  • Old House Journal

    Learn how to restore, repair, update, and decorate your home.

    Subscribe Now
    • Facebook
    • Instagram
    • X

Membership & Magazine

  • Online Archive
  • Start Free Trial
  • Magazine Subscription
  • Magazine Renewal
  • Gift a Subscription
  • Customer Support
  • Privacy Preferences
  • About
  • Contact
  • Advertise
  • Careers
  • Terms of Use
  • Site Map
  • Do not sell or share my information
  • Privacy Policy
  • Accessibility
  • California Privacy Rights

© 2025 Active Interest Media. All rights reserved.

Fine Homebuilding receives a commission for items purchased through links on this site, including Amazon Associates and other affiliate advertising programs.

  • Home Group
  • Antique Trader
  • Arts & Crafts Homes
  • Bank Note Reporter
  • Cabin Life
  • Cuisine at Home
  • Fine Gardening
  • Fine Woodworking
  • Green Building Advisor
  • Garden Gate
  • Horticulture
  • Keep Craft Alive
  • Log Home Living
  • Military Trader/Vehicles
  • Numismatic News
  • Numismaster
  • Old Cars Weekly
  • Old House Journal
  • Period Homes
  • Popular Woodworking
  • Script
  • ShopNotes
  • Sports Collectors Digest
  • Threads
  • Timber Home Living
  • Traditional Building
  • Woodsmith
  • World Coin News
  • Writer's Digest
Active Interest Media logo
X
X
This is a dialog window which overlays the main content of the page. The modal window is a 'site map' of the most critical areas of the site. Pressing the Escape (ESC) button will close the modal and bring you back to where you were on the page.

Main Menu

  • How-To
  • Design
  • Tools & Materials
  • Video
  • Blogs
  • Forum
  • Project Guides
  • Reader Projects
  • Magazine
  • Members
  • FHB House

Podcasts

  • FHB Podcast
  • ProTalk

Webinars

  • Upcoming and On-Demand

Podcasts

  • FHB Podcast
  • ProTalk

Webinars

  • Upcoming and On-Demand

Popular Topics

  • Kitchens
  • Business
  • Bedrooms
  • Roofs
  • Architecture and Design
  • Green Building
  • Decks
  • Framing
  • Safety
  • Remodeling
  • Bathrooms
  • Windows
  • Tilework
  • Ceilings
  • HVAC

Magazine

  • Current Issue
  • Past Issues
  • Magazine Index
  • Subscribe
  • Online Archive
  • Author Guidelines

All Access

  • Member Home
  • Start Free Trial
  • Gift Membership

Online Learning

  • Courses
  • Project Guides
  • Reader Projects
  • Podcast

More

  • FHB Ambassadors
  • FHB House
  • Customer Support

Account

  • Log In
  • Join

Newsletter

Get home building tips, offers, and expert advice in your inbox

Signing you up...

This site is protected by reCAPTCHA and the Google Privacy Policy and Terms of Service apply.
See all newsletters
See all newsletters

Follow

  • X
  • YouTube
  • instagram
  • facebook
  • pinterest
  • Tiktok

Join All Access

Become a member and get instant access to thousands of videos, how-tos, tool reviews, and design features.

Start Your Free Trial

Subscribe

FHB Magazine

Start your subscription today and save up to 70%

Subscribe

Enjoy unlimited access to Fine Homebuilding. Join Now

Already a member? Log in

We hope you’ve enjoyed your free articles. To keep reading, become a member today.

Get complete site access to expert advice, how-to videos, Code Check, and more, plus the print magazine.

Start your FREE trial

Already a member? Log in

Privacy Policy Update

We use cookies, pixels, script and other tracking technologies to analyze and improve our service, to improve and personalize content, and for advertising to you. We also share information about your use of our site with third-party social media, advertising and analytics partners. You can view our Privacy Policy here and our Terms of Use here.

Cookies

Analytics

These cookies help us track site metrics to improve our sites and provide a better user experience.

Advertising/Social Media

These cookies are used to serve advertisements aligned with your interests.

Essential

These cookies are required to provide basic functions like page navigation and access to secure areas of the website.

Delete My Data

Delete all cookies and associated data