Have you framed any Japanese- or Chinese-style roof structures, where hips curl up at corners, and rafters are curved as well?
I am trying to work out the basics, and would like to see either completed Sketchup models, or photographs of framing.
Here is my first attempt. Neither the hip nor the subfascia is beveled, which it would want to be in practice.


Replies
Might want to check with TalkingDog on that.
Peach full,
easy feelin'.
bump
Peach full,
easy feelin'.
I like that. I will have to show it to my architect, see
what he says. I am quite sure the Japanese would try to
do something like that using flitch plates, or use some
other means to hide the steel, because it probably won't
work with 2x12s, engineering-wise. Or else they would lay
it up in the shop as glulams with metal hangers.
Now, I don't know if you have ever seen a pagoda in real
life (I live right next door to one of the greatest ones,
over 1000 years old) but the whole point of this projecting
eave is to have the rain water fall as far as possible from
the base of the columns of the building, to prevent them
from rotting and make it possible for a building to last
thousands of years in sub-tropical climate.
So you end up with an clay-tiled eave that projects
an impossible 10-some feet from the corner of the building.
The way they achieve this is with bracket work, which is
intricately joined and built out under the eave to provide
full support.
This bracket work is such a technical tour de force that
from the master carpenter's POV it's almost the whole point
of the building. It's also said to be the most difficult
aspect of East Asian carpentry.
That being said, I think you ought to figure out a way to
support that design with some sort of bracket work, rather
than trying to project out all that far with no support.
As for the actual question, whether or not there are any
ready made Japanese SU models of this sort of thing, the
answer is I doubt it, since they normally wouldn't attempt
to do it that way.
I would love to see the solution to this question, as i have the exact same thing in mind.
Bob Chapman
The true Japanesse roof raming is done via purlins and the way they ridse across beams creates the sweep. The only curved cut that needs to be made is the fascia, if one is used.
I have a book at home in Maine, but you could probably google up something
Welcome to the Taunton University of Knowledge FHB Campus at Breaktime. where ... Excellence is its own reward!
Any chance of a pic?
Like I said, my stuff is in maine and I am in Florida on another computer, but I googled some for you.
If you peek at this photo attached and see where the hip is supported on major beam below....
That hip can break and not follow a straight line. The support leg would be shorter than western timberframers would use to maintain a straight hip.
That would make the tail end of the hip flare up and all the jack rafters tied to it gradually flare up as they over hang their tails.
google images for oriental roof frame details or similar phrase to see other glimpses
Welcome to the Taunton University of Knowledge FHB Campus at Breaktime. where ... Excellence is its own reward!
Don't know if this might interest you or not but seeing you are relatively new here and would have missed it first time thru
I thought to post a link to an old '05 thread with Japanese framing methods. 60995.10
Cheers
Peach full,easy feelin'.
Here's another old thread on pagoda roofs.http://forums.taunton.com/tp-breaktime/messages?msg=52997.13
Thanks for the link! Japanese timber frames are of great interest to me and I'm reading up so as to try some small projects of my own. We just bought forty acres and I'm eager to be able to build for myself for the first time.
Thanks again.
If you want to be totally awed, please go to the
following page and download the models.
Each of these will download you an excruciatingly accurate
SU model of each of the buildings in the Horyuji complex,
the oldest wooden buildings in the world. Be sure you have
a lot of memory because these models contain a lot of
polygons.
ttp://http://www.ath-j.com/~sketchup/Download.html
Note that these bracket details, while certainly complex,
just an interim stage in the development, and the buildings
based on Tang dynasty architecture, such as the pagodas in
Kyoto, have much more complex brackets.
(BTW if you were wondering about the meaning of the word
"otaku", the madman who made these models fits the mold)
Thanks. I downloaded one of them, and am in awe. For our viewing thread-followers, here is a screencap of one. If you are on dialup, sorry!
BTW, Google's 3D Warehouse has others available for download.
View Image
What was really cool in the Sketchup file, was that the modeler put the darn thing right where it really is, in Google Earth, and included the photo and terrain in the model.
Unfortunately for me, though, the modeler did not do anything to detail out the structure, so as for what goes on with hips, purlins, rafters, or beams, I cannot tell.
Suffice it to say that the whole thing was done with intricate joinery and all framed up with timbers.
Wow!
I think the guy who did the model was in the employ of the
temple. Here's the astonishing dating on the pagoda from Wiki"The five-story pagoda, located in Sai-in area, stands at 32.45 meters in height (122 feet) and is widely regarded as one of the two oldest wood buildings in the world. The wood used in the center pillar of the pagoda is estimated to have felled in 594, found through a dendrochronological analysis
Don't know how this was framed, but here is a pic of a similar roof in Fountain City, WI.
Thanks, Basswood.
Problem is with the flip-ups at the hip ends, which puts a compound curvature into the surface of each of the roof "sections." (We cannot really call them "planes" anymore, the sections not being planar.)
For a roof like the one you showed here, one only needs to make a curved rafter pattern, and then loft it into the hip.
With one of these Chinese or Japanese pagoda roofs, though, you cannot do straightline lofting.
I'll need to have some sushi, wash it down with sake, and meditate on it.
Yeah, no flip up...I snuck it in as "similar"...as close as I have seen here.
Gene, this is my best guess at a way out of the compound curve dilemma.
Here are some drawings of Intersecting Barrels with Dissimilar Profiles. The first case is two intersecting elliptical barrels. Their footprint in plan follows an hyperbola and I'm guessing that this is undesirable and you want a straight line.However, if the barrel heights are equal the intersection follows the asymptotes of the hyperbola in plan, and the geometry is the same as a Valley ellipse in a groin vault, producing a straight line in plan view. The line of the Valley ellipse run would be angled in my diagrams but here's what might work for your eaves.In SU, make a barrel arising upside down from a level plane, of the same theoretical height as the barrel forming the rafter curves, but make this "eave barrel" intersect the barrel of the rafter curves at an angle in plan view. This ought to produce a curved eave intersection (an ellipse following a plumb plane) with a straight trace in plan. Each eave will require two such theoretical barrels, with each barrel producing a curve that begins at the foot of the Hip and attains minimum at the center of the eave.Sorry if this text description and the attached drawing suck but I don't have time to make anything better at the moment. And at this point I'm still guessing as to the nature of the intersecting curves you are looking for anyhow ...
EDIT ... on second thought it dosn't look like the barrels will work as shown in the diagram. I made some rough freehand sketches and it seems like it takes four barrels to define each quadrant of the roof. Back to the old drawing board ...
Joe Bartok
Edited 2/8/2008 2:17 pm ET by JoeBartok
I did one. It was a blast and a head scratcher. It was for a pump house for a large pond that had a Japanese theme.
I built it on saw horses because the pump house wasn't built yet. It made the framing a lot easier due to the height.
I built it out of redwood because the ends of the beams were going to be exposed and it made shaping the beams a lot easier.
I used a portable Band saw for a lot of the cuts and finished up with a power plane. since the redwood is so soft you can use big grinders and belt sanders also.
You can also screw on curved wooden plates to bottom of your saw for some cuts.
I started with the curved ridge temporarily set in place and left long on the ends. I think I left all the exposed beams long and cut them after it was framed. Use screws to hold it together so you can take parts off if you need to like to cut the ends after it is framed.
For curves you can take a stick and bend it in two directions (compound curve) and then just scribe lines.
After the ridge is set you put on the curved corner beams. They are like hip in that they attach to the ridge near the middle of the ridge. That creates an area under the ridge. It also flattens out the roof. We wanted beams to extend out for the Green and Green look. Don't hide your work. also, the beams extended out above the door so they needed to be pretty flat so you didn't catch them in the head. they wanted everything low and inconspicuous
Then after the corners are on you start filling in with curved rafters. Most of them are jacks because of the corners coming across to the middle of the ridge.
It ended up being a pretty shallow pitch. That gives it a more stylized Japanese look with the long rafter tails sticking out. It was finished in a plaster finish with no paint and a hand made door. It also had a Japanese lantern on the exterior wall next to the door.
The roof was shingled with copper shingle made on site. they were allowed to turn green. It had an old world look to it because of the unusual materials and shape.
It was a fun project.
Edited 2/8/2008 9:11 pm ET by popawheelie
Edited 2/8/2008 9:15 pm ET by popawheelie
Edited 2/8/2008 9:15 pm ET by popawheelie
Edited 2/8/2008 9:26 pm ET by popawheelie
Ok here are the pics sized correctly. You'd think I'd know by now.
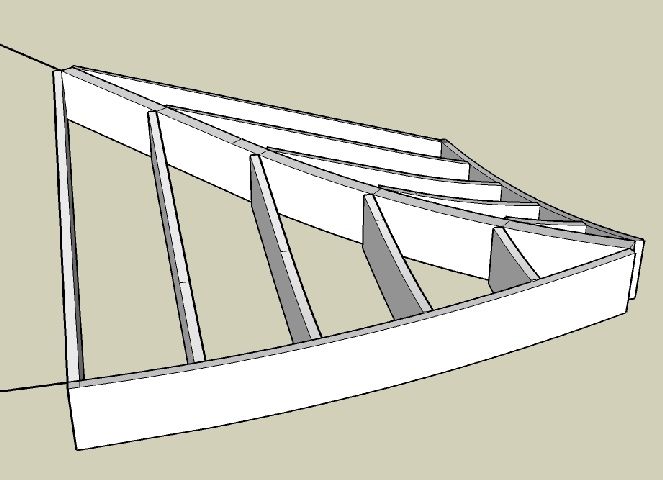
Here's a start. Now I have to section it to do the rafters, beams, purlins. Each section is dished, and the fascias have a concavity, with upswept corners.
View Image
Edited 2/11/2008 9:24 pm ET by Gene_Davis
Might as well post this here as well, the other forum members might find this information interesting and useful. The example flared Hip roofs in the web page below are made so the rises are plumb and the rafter runs and eave lines are straight. Also, to keep things simple, for the time being the footprints are made symmetrical.A compound space curve cannot really be developed. The developments must be done in the smallest pieces as possible to minimise warping and the assembly is still only an approximation. For this reason the flare for the roof with the square footprint was kept small. The roof is mostly a swoop or ski slope roof, a barrel following the eave line with flares only at the corners.I pushed my luck with the hexagonal footprint roof … it’s all intersecting ellipsoids. The curves and surfaces vary smoothly on all axes and the lines and intersections are spot on to several decimal places. However, the model for this roof might better have been constructed with rafters like a real roof. Because the surfaces were developed in one piece as the sections sag to their natural positions the eave lines are warped into a curve.This looks all right but the point was to keep the eaves straight. A model of a section extracted from the roof shows that the ellipses do intersect correctly. The eave line is straight in plan view, the commons intersect the curved Hip at the expected plumb lines and the heights of the rafter feet follow the flare.The orthographic projections aren’t finished, section views and other details will be added to this web page as time permits. This is all I’ve have for now. Comments, questions and ideas are, as always, welcome …Hip Roofs with flared Rafters and EavesJoe Bartok