It’s raining and I’m tired of doing shop work. I’ve been making copper flat seam pans and it occured to me how hard it was to find someone to teach me how to do this properly. I’ll follow this up with the installation later in the week if anyone is interested.
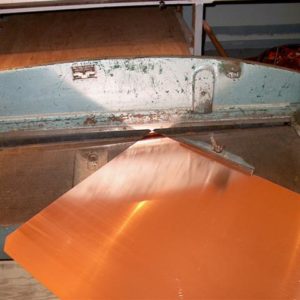
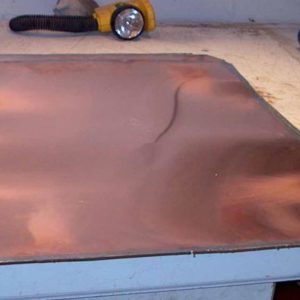
1) I cut the pans from a 2’x10′ copper sheet. Each is 30″ long.
2) I clip the corners of each pan so the folds don’t bunch up.
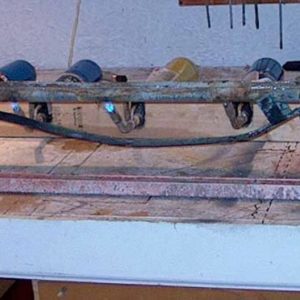
3) Here’s my pre-tinner. I’ve never seen a store bought one of these. I made mine by splitting a piece of galv. pipe in two and installing caps on the ends. I heat it with 5 propane torches. Solder is melted in the pipe half. The pan in front holds flux.
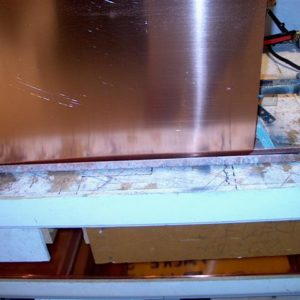
4) I dip each side in flux and
5) then into the solder.
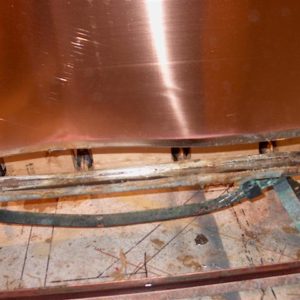
6) Each edge gets a thin coat of solder.
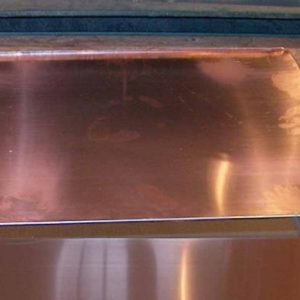
7) Here’s the blanks with all sides tinned.
8) I bend 4 or 5 pans at a time.
9) Finished pan – ready to install






Replies
thanks g-cu, please keep it coming - this is the kind of stuff that we use to see more of in FHB in the old days - - how about expoounding on your pre- tinner? - - split a pipe? how'd ya do that? - - I like metal roofs (i have several, but none as elegant as yours), saw the picts of the one you put on the stone house - you ought to put something together for the mag -
- split a pipe? how'd ya do that?
With a vice and a sawzall. I've seen some pre-tinners that were welded boxes, similar in size. This was realitively cheap and easy and I've got the other half of the pipe if it ever wears out.
Thank you for continuing my education.
If I were an editor of FHB, I would be packing my bags to run you down for an article.
Write to Andy, Dan M or Brian about this. You are giving it away for free here. Not that I don't appreciate it. We're here to learn. Can't wait to see installation shots.
Excellence is its own reward!
Yeah- I've had several projects that I've mulled over submitting, but I get too wrapped up in the project to take enough "in progress" pictures. We're currently working on a copper cornice/box gutter job that's pretty cool, but the rest of the house is so rough, I haven't been happy with the pictures. I'm starting a modern style house ( I don't know what it's called) re-roof, that I'm documenting as thoroughly as possible. Might be an article in that. Thanks to you and Mr. Doud for the encouragement. In the meantime, though, I've got a few more things to post here, just for s h i t s and giggles.
Very nice. You definitley have to take pictures of the installation and finished product.
Here's a sight you'll probably find interesting.
http://www.zappone.com/default.asp?ID=20
Joe Carola
Yeah, thanks - I'm familiar with the company. Cool product.
Here's one I did a while back:
You are the Man!
That is one Beautiful Roof. You have to post more pictures of your work and you have to do an article about your work. You are with Copper Roofs as to what Stan Foster is to Stair building.
Where are you from?
Joe Carola
Thanks for the compliment. I need to give credit to my installers (I'm getting kinda worn out, so I mostly just hang out in the shop lately). One crew calls themselves the "Rock Stars of Roofing". I'm in KY.
Now, THAT'S an incedible roof. Wow. Haven't seen anything like that here. A world apart from my simple little standing seam efforts.PAHS Designer/Builder- Bury it!
Thanks- I just replaced what was there (metal shingles) with the same design in copper. I fabricated the ridge roll and the crown mold at the top below the flat. The house has so many trees around it, I can't get a real good finished project picture, but it truly is a magnificent house.
Very cool!
Yes, please continue. Can't wait to see the finished product.
Brian
This is very interesting and useful, especially to me as I'm going to be learning copper roof work once I get the damn thing framed and sheathed. It's interesting how much the edge of the pan distorts when it hits the heat of the solder.
N.B. Handy should be shipping my copper next week, and I'll start with the flashings and fascia for the decorative returns. The main part of the roof I may have to just give a torch down and wait for the spring. At least I can get the pans folded during the rainy season.
-- J.S.
Why don't you rig up a 20 lb or larger propane tank to the torches? Wouldn't it be cheaper than buying little bottles?
Do it right, or do it twice.
My apologies for lack of manners...beautiful work, nice pics. Like the others, I look forward to more. This is something I will probably never do myself, but it's fascinating to se how it's done.
Do it right, or do it twice.
Good question - My prototype used a propane stove hooked to a 20 lb tank. It was kinda unwieldy (I have a small shop, so I seldom set the rig up in the same place - depends on whats covering my work benches). It also took a long time to heat up. With this set up, it takes maybe 3 minutes to get the solder molten. I can do shorter runs. It takes between 1 and 2 small cylinders per square, which is really not that bad.
That series is particularly interesting to me as I did a small flat seam copper roof about 4 or 5 years ago. I thought it was outrageous the bids that I got on it so I and my helper did it ourselves. I didn't make a cash profit on the job but I did cover all expenses including my labor and the full cost of a new portable brake. I still did it for $1,000.00 less than the best bid I got too. A friend who is quite a craftsman reccommended that I use an old-style torch heated soldering iron but I couldn't even get one seam to solder up with it. I didn't pretin I did sand and flux though. I used a plumbers flux ... the heavy waxy type. I got out my little propane torch which has a hose from the tank to the nozzle (that way you don't have to tilt the bottle to aim the flame), and I found that I could fill the seams completely if I sucked the solder to the back of the seam first (with the heat of the torch). My pans were smaller than yours about 10" x 16" but my roof was small too ... a widow's walk over the front entry. I really enjoyed the project and my helper and I did it from bare sheets of copper to finish in about four days. Here is a pic of it though it doesn't show the roof very well. The balusters are hand turned from Trex 4x4's (at that time they did not offer any premade balusters). I managed to squeeze a new Nova lathe into that part of the projects budget!! The Trex turned like butter. The plastic content lubed the cuts and the lack of grain to work around made the stuff a real treat. It worked equally well with scraping or shearing techniques. I didn't think much of it as a substrate for paint though. If I remember right it was about 11' 6" x 7' 6" a little under a square total.
that a god looking job. I'm interested in the trex 4x4s. Is that a stock item pretty much? I had not heard of them but it sounds like a good idea.
BTW, That isn't technically a "widow's walk" but a balcony deck over. A WW is on the ridge of the house, the highest point possible so the wife can walk up there looking for signs of her husbands sails coming into port when he is overdue and she is anxious over the fact that she may now be a widow..
Excellence is its own reward!
Well thanks for setting me straight on that widow's walk terminology ... I hate to screw up stuff like that. I have now seen some trex balusters Machine turned for sale. When I did that job though, those were a first as far as I know. I think trex themselves are marketing some balusters now, though I don't know whether they turn them themselves or outsource that work. Since the original 4x4's come in rather softly formed shapes I had to joint them on all 4 sides to get a nice square shape for the unturned portions of the balusters.
Nice looking porch. I'm leary of using open flame to solder with. Seen too many beautiful buildings damaged or destroyed by open flame soldering. It's hard to know for sure if your seams are properly sweated if you don't pre-tin. When I used to teach soldering, we'd do a flat seam sample and then cut thru it. You'd be surprised at how many seams that appeared sweated actually weren't. With this method, the solder and flux are already inside the seam. Heat it and add some solder on the surface and you've gat as good a seam as you're going to get. Also, I can get away using a larger pan by pre-tinning. This roof is slightly over 5 squares.
How do you flash or install the rail posts? My method doesn't work in every situation, so I'm always looking for advise on this detail.
I sat the newels atop the finished roof. It only worked because of the close proximity of the walls which gave me a solid anchor point. This rail is not intended to serve as a safety device ... only decorative. We did mount an internal block for a hold down which is screwed through the roofing then sealed with silicon caulk and enclosed within the newel which is also sealed with paintable caulk at all joints.
How long did it take you to turn all those ballasters on a lathe? If you sold them how much would it cost to buy them? Trex deckers want to know."Rather be a hammer than a nail"
Bob
The first ones took longer (of course) but by the end of the job I was making them quite accurately matched in about 15 to twenty minutes on the lathe. If you add the time spent working up the blanks they represent roughly half an hour in shop time per each. If you also add in the time spent working up the custom design for them you'd have another15 minutes apiece on a job like this so with my shop time at $50.00/hour retail and $38.00/hour wholesale plus the cost of material I guess they'd run about $55 each retail and $38.50 wholesale. I don't think I could do this kind of turning steady though, I'd go bonkers from boredom.
Edited 9/23/2003 6:31:30 PM ET by Clay
Wtih a rail like that and short runs to right angles the anchor point is not all that important. each sdie supports the othyer.
We ran several red cedar balusters 24" long that ran about $66per for cost three or four years ago on a much larger job. The few splinters really added to the cost of the job, to patch the missing material in fine detail. Right about boring.
Somebnody told me that a specialty shop doing turning alll the time should have been able to turn them out for $22-28 bucks each. Yeah sure! when the cost of the cedar was $15 or so..
Excellence is its own reward!
The thing is Piffin, that a shop that has profile ground knives on an automatic lathe could turn these Trex balusters in maybe 2 to 5 minutes total. The Trex material would turn really well on an automatic lathe too as it cuts very smoothly with little tendency to chatter or splinter. I guess there hasn't been a lot of demand for them or turning shops would be churning them out by the thousands. It was a lotta fun the first time though!! Giving my customers something pretty unique was exciting for them and me too ... I know you know the feeling.
the lathe is fun at first, then it isn't.
We got a duplicator and got it down to under fifteen minutes after a bit. I see how a full lenghth bit would speed it up and turn it down..
Excellence is its own reward!
I made a duplicator track for my big lathe that uses the 690 as a cutter. I use a cove shape pannel bit to round out square stock quickly . Then I can switch to other round or pointed bits to finish up the spindle/post.
Here's some progress pictures. It's been raining and one of my installers had a death in the family so this job is progressing slowly. It should be finished tomorrow.
What do you do about thermal movement?
Do it right, or do it twice.
That's why the pans are small. Expansion and contraction is limited to each pan pushing slightly against each other. I've also learned to lay 'em loose in the winter and tight in the summer. Pre-tinning the pans gives the most insurance against seam failure.
I thought you soldered the seams during instalation. Doesn't that make it move as a unit?Do it right, or do it twice.
You can barely see the cleats in the first picture (the rosin paper is partially covering them). Each pan is cleated down on two sides and drawn tight to the lock on the other two. Each pan can only expand in two directions (perpendicular to each other) and the pan that it's expanding toward can't move on that side. This creats a slight push across each pan against the next one. If the roof is installed in extreme cold weather, there is a tendancy for each pan to oil can some in extreme heat. Each pan will buckle slightly, rather than a wave of expansion across the whole roof. The reason for the pre-tinning is to make sure the joint is completely sweated since there is constant (if slight) tugging and pushing on it.
That's great. What was the previous roof and why did it fail?PAHS Designer/Builder- Bury it!
It was epdm. It didn't look very old - This is a new owner to the home so we don't know the roof age exactly. It was a bad installation job, plain and simple. The flashing details were bad. It had just barely started to leak. The other problem is that the gutter sits on a shelf. The aluminum gutter was leaking at the miters and rotting out the cornice. You can see in one of those pics that we've flashed the shelf back under the roof. We'll install copper gutter when the roof's done.
Wow. My EPDM experience is less extensive than my copper (REALLY minimal). With some good instructions from Resource Conservation it went on well. Solved a major problem for my mother, going on 6 yrs now. Isabel didn't lift it or put a limb through it.
I don't think I want to try what you just did but it sure was interesting. Thanks for the pictures. Might very well be something similar around here but it'd be difficult to notice. I'll be looking. PAHS Designer/Builder- Bury it!
If I'm interpreting picture 063 correctly, the guy on the left is soldering seams, the guy on the right is assisting by heating and tinning the soldering coppers. They have bars of solder in front of them, and two cylindrical cans of flux which are attached to rectangular scraps of copper to keem them from getting tipped over. The heater for the soldering coppers is on the lower right.
From the way they're sitting, this is pretty clearly a slow process. How long does it take do do a square of seam soldering? How much solder and flux? What kind of flux do you use?
This is all very useful as I'm learning to do copper work....
Thanks --
-- J.S.
They're both soldering. Two 5 or 6 lb coppers will fit in the oven at a time. They were using 3 coppers. If you get in the right rythm, there's a sweet copper just when you need it. For smaller stuff, we use smaller coppers or a copper hooked to a 1 lb or 20 lb tank. The flame is on the back side of the tip, so you seldom have to dip it in the flux. These two guys are not particullary fast. When I was their age, I could probably lay and solder 2 sq/day by myself. I probably still can, but not two days in a row. They usually lay 2 sq per day and solder the same amount. The soldering goes a lot faster when the pans are fresh. I like to see everything that gets layed get soldered before quittin' time. They got caught by rain the previous day and didn't get it all soldered. Some water dwells in the seams when that happens and slows the process. The water has to be steamed out.
I use Ruby Fluid zinc cloride flux. This job was about 5 sq. and it took a little less than 100 lbs of solder and a gallon plus of flux. One of those guys could spill the flux if the cup was soldered in the middle of a 3'x10' sheet of copper, though.
Thanks for the answers. N.B. Handy shipped my copper yesterday, so some time next week I may have it to get started on some of the flashings.
To avoid the rain problem, I was thinking of putting torch-down on the roof for the winter, and waiting until we get reliable dry weather to do the main part of the roof. I'll be careful about tipping over the flux.... ;-)
Thanks --
-- J.S.
Would the copper go over torchdown?
Greencu,
PLEASE,PLEASE,PLEASEwrite an article describing this in detail for FHB.
A question for John Sprung or Greencu------can either of you suggest printed resourses/reference books detailing this sort of thing. I have a copy of John Fuller,Sr.---Art Of Coppersmithing.---It is too general and covers a lot of things to far removed from what I am looking for.
I imagine Greencu learned this on the job from someone else------but John Sprung seems to be trying to pick this up from scratch. Having any luck with research materials?
See if you can find a copy of AUDEL'S Sheet Metal Patern Layouts. I've got two antique copies and one fairly new. There's wealth of stuff available on EBAY (that's where I got my Audels as well as about 30 other books. I bought one Audels from a lady who had bought a bunch of library surplus. She offered me all the sheetmetal books she had for a buck a each - I got about ten more from her, some informative, some not) - look for older volumes as most new sheetmetal books concern themselves with ductwork and autobody. If you can't find an Audels I might let go of one of mine.
I didn't realize you were the author of the shingling article until I saw it on another post today. Good article. I reference it often.
Edited 10/6/2003 1:19:17 PM ET by greencu
Greencu,
thank you very much for pointing me towards a reference source.
I will tell you straight out----I don't really anticipate doing much copper work---and I doubt I would ever attempt it professionally. I have a few pet projects in mind of a personal interest to play with----but at age 41 I suspect I am to old to learn and get good enough professionally to make it worthwhile.-------but every once in a while I tumble into a little slate repair etc.----and a little copper work would be nice to add .
I am not sure exactly what you meant by "un-wanted attention locally" stemming from previous FHB encounters. I will say---that my one article was really recieved positively HERE locally with everyone I put in contact with it. I also recieved some really nice Emails from several folks here on Breaktime when my article came out------there are some pretty stand up guys about here.
I also recieved 2 pretty nasty and petty Emails---takes all kinds ya know!
I have another basic article or 2 in process----they really are fun to work on.Plus the editors at FHB made me look A LOT smarter than I really am.I would strongly suggest you develope an article----I am quite sure it would be an extremely valuable resource for A LOT of the rest of us.
BTW---it is only right now that I figured out what Greencu is referencing! DUHH!!!
Steve-
I started out doing a little hvac work which lead me to roofing. I was just doing sheetmetal on roofs (flashing chimneys, relining box gutters, etc) as a one man show. Before I knew what happened, I had a crew of 15 doing just about every type roofing and guttering there is. About four years ago (when I was several years older than you are now), I decided to simplify and went back to being a one man show, primarily doing copper work. That lasted about six months before I had about 10 working again. But, I'm specialized in what I enjoy doing the most and I'm off the roof 95% of the time. So my recommendation is "go for it if it feels right".
By "unwanted attention" I had two local celebrities (actually one is nationally know) figure that since I had time to give out free advise on the internet, I wouldn't mind them getting drunk and calling me around midnight to ask technical questions or showing up at my house at dinner time on Saturday night and staying for two hours. They were nice, but gentle persuasion just didn't work. It finally got bad enough that we had to turn the ringers off on the phones at night and once I made the whole family go upstairs and hide when I saw one of them pulling in the driveway. I did some work for one of them, but the phone caller was calling to ask if the crew working on her house was doing things right. AAAARRRRGGGHHH. I'm sure this was a freak occurance, but it all stemmed from my name showing up in the Breaktime column in the magazine. They already knew of me, but that set them off.
My offer's still open if you'd like to come down for a day or two.
greencu,
I just wanted to let you know I did manage to buy a copy of the book you suggested-----with a few detours along the way.
I went to a local dealer that specializes in out of print books. They had in stock an Audels volume on electronics----not what I was interested in obviously. then they searched the internet for me and located an Audels sheet metal handibook along with a 4 volume set of Audels builders guides----so I bought all 5. Once they arrived I realized the sheet metal handibook was probably NOT what you had suggested.
BUT----- in the back of the handibook was the info my dealer was able to use to track down the pattern layout book----It'sabout as big as a bible,right?
Here is the cool part---once the big book arrived ---I opened it up and inside was an old slip of green paper with several groups of 4 leaf clovers pressed inside---one group was marked" Daddy"---and one group was marked "Robert" and one group was marked " Janice"---------I kind of figured that someone( probably Janice) saved a little part of a special day with her father and probably her big brother.
I wonder if any of those 3 people ever thought about that day in the last 50 years or so untill I opened that book up again?
anyhow ---I greatly enjoyed my foray into buying antique and out of print books----I am working on a longer list of titles for the dealer to track down for me.
thanks again
Stephen,
I love old books. I'm not a collector exactly-I don't go out for the expressed purpose of buying old books. But when I am at an antiques dealer, I always check out the old books. Especially old school books.
While checking out some McGuffy's (sp?) Readers I was looking to purchase, on the inside cover, there was the most beautiful line drawing of a swan with the teacher's name written out in beautiful script. It floored me. I assume she did this in all the books, for all her students. I wish I could have met this woman, and I wonder if she was as remarkable as a teacher, as she was as an artist.
I bought it, needless to say, and we have it out in our living room, displayed on an antique school desk we use as an end table.
John Svenson, Builder, Remodeler, NE Ohio (Formerly posted as JRS)
Yeah, I love old books. I never really nailed it down and have never found anything quite as special as what you did, but almost every old book I've ever accumulated has some sort of personalization. I've sat for a moment and wondered who "Godfrey Winston" was, and why he owned a particular book and why he let it go.
Glad you found that book and hope you get a lot more out of it.
You only got two ???
Dang !! I guess I'll have to re-send that third one.
; )
Can't we all just get a log ? - Paul Bunyon
Quittin' Time
I think I have that Fuller book, too. It's mostly about making early 19th century kitchen ware. Interesting as history, but not useful for roofing.
I'm going by the Copper Development Association's books and videos (http://www.copper.org) and what I learn here, mostly from GreenCu.
-- J.S.
John, don't you think IceGuard membrane would be better than torch down? It would have a better chance of sealing around the nails, and wouldn't have as thick a profile as the torch down.
John Svenson, Builder, Remodeler, NE Ohio (Formerly posted as JRS)
I'm in the same business as you, in Colorado. The only difference is that I do mostly slate roofs, but there's always plenty of copperwork included.
You asked earlier how we anchor post to decks. I make raised platforms for the post, with straps for attachment of the post. These are welded together from 48 ounce copper. I weld 48 ounce for all of my details, such as scuppers and conductor heads or finials.
You also question putting a copper flat lock soldered seam roof over a torch down roof. This is the only way I'll do a FLSS roof. First I do torch down, then rosin paper, then my pans. I feel that the added work of a layer of torch is well worth the insurance it provides.
Is that you T. S.? If it is, we've chatted and swapped pics previously. I changed my handle after some of my answers here got published in the magazine. I got some unwanted local attention from it. That's one reason I'm leary of submitting an article. What were your experiences?
I wasn't so much questioning the use of torch down as saying "hummmm.....". I always use ice & water shield under flat seam when its over a heated space.
I'd like to discuss welding copper. I've done a little ferrous welding, but don't have a clue about cu welding. Can you direct me to some printed info?
Yea it's me, I didn't recognize you.
I was pleased with the response my article received. Mostly I got how to questions, or where can I get what I want enquiries. What was really fun was directing people to a store where they could get a cowboy hat like mine. You really should share, knowledge is our best tool. Learning form others is awesome.
As for the torchdown. I just would hate to try and find I bad seam in my flat work, so I buy insurance.
Welding copper isn't difficult, just different, like welding aluminum. I've gotten info from the Copper Development Association, but here's how I do it.
I use a 350 amp TIG welder with argon gas, and either Silica-bronze filler rod or Deoxidized copper filler rod. This machine will weld up to 1/8" thick copper 4'x4' without preheating with a torch. The trick with copper is to wait for the copper to get hot and then control the heat location by carefully aiming the tungsten and controlling the temperature with your foot feed. If you get serious about trying it let me know and I'll give you my phone number and we can discuss it further. Here's the web site for the Copper Development Association:
http://www.copper.org/
Edited 10/11/2003 9:14:08 PM ET by Slater
Edited 10/11/2003 9:19:36 PM ET by Slater
My idea was to use torchdown instead of 30 pound felt, followed by red rosin paper and copper. The 1" copper nails from Swan should be plenty long enough that the thickness of the torchdown wouldn't be a problem. I'm going with 23/32" ply to have plenty there for them to grab. I like the idea that the torchdown puts some extra material between the steel nails that hold the ply down and the bottom of the copper.
My torchdown guy suggests running it vertically so that its seams are parallel to the copper seams.
The inspector will be here tomorrow (Tuesday 10-14) to OK the framing so I can start sheathing.
Thanks --
-- J.S.