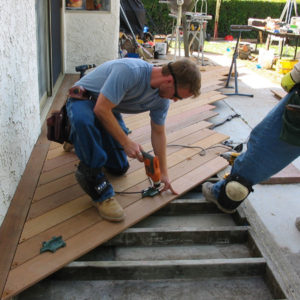
I laid a 1×6 piece of ipe up against the house and scribed it to fit nicely, then laid the decking on a 45 to it. Now I want to cut a dado along the seam where scribed piece and decking intersect. Dado will be 1/2″ wide and maybe 1/4″ deep. Into this I’ll glue a filler strip. (pic #1)
I’m kicking around ideas as to how to make a perfect cut .. one slip and I’ve caused myself alot more work replacing a board or two.
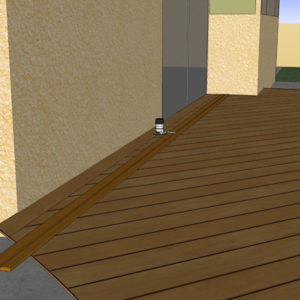
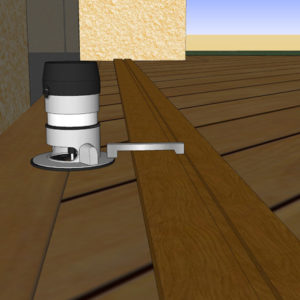
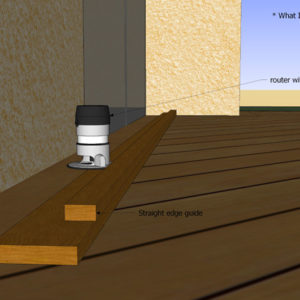
What I’ve always done before is make up a router guide, and use a 1/2″ flush trim bit (Pic #4). Problem with that is your bearing could wander off of the guide. What I’d like to do is maybe make a guide with a slot cut into it, and have some sort of attachment arm coming off of the router that guides in a slot cut into the guide piece. (Pics # 2 & 3)
Anyone have any ideas for me ? The guide will need to be 18′ long, so it’ll have to be wood, and not an aluminum store bought router guide.




Replies
I think the a bushing riding along a fence is your best bet. Your idea of the slot arm looks like it could have too much play.
If you're really concerned about chewing into the 1x6, install a straight board about 1/16"-1/8" from the house side of the bushing to limit the damage. The bushing would push against your safety and couldn't really get out of hand.
Why are you so concerned about the router going wild? I would imagine if you kept constant pressure agains the fence you're going to be ok. Am I missing something critical?
Jon Blakemore
Nice drawings. I wish I can do that.
The only THING that comes to my mind (funny) is the EZ.
And for decks can be the only JIG that you ever need.(trimming the boards with no splintering,Tapered cuts for stardust designs, Any dado you need with out repositioning the guide rail, Traverse routing if needed, Circles...... whatever.)
The only problem that I can see is the length. If you can secure the 100" guide rails (2/50s with true zero play.) from the top of the deck ( have one guy to hold the one end and clamp the other from the end of the deck?) then you only need the standard SGS-1 system and the SRK.(smart router kit)
Or, if you don't like the idea of resetting the 100"..I have another idea. Get 2 more 50" guide rails. And if you promise to send some pictures back...
I know the manager of the CO. and I can get you a good deal.:)
Or, I have a better idea. I can send you what you need to do the job EZ, and you send the system back with pictures when you done. And you get all your money back. IF you send it back.
Oh Men. To many ideas for a day like this. Oh well.
What's this EZ guide rail YC ? Got a link for me ? How's the router attach to the rail ? That sounds exactly like what I want !
http://www.eurekazone.com/gallery.html
Joe.
You set the guide rail anywhere from 5-1/2" to 11" parallel to your dado line.
Then you use the control knob for the final adjustment.
Your working (rout area) is anywhere from 5-1/2" to 11" without the need to reset the guide. You can do a 5-1/2" dado with a 1/2" bid by moving the sliding arm on the SRK.(smart router kit)
The play on the router base iis TRUE ZERO.The flex on the guide rails TRUE ZERO. The locking of the sliding arm to the base is very strong with the oversize control knob, And there is no room for screwing up. Even if you need to stop few times for any reason, you can start your restart your router and finish your job without any visible (stop and start) lines.
You can even stop the parallel routing and start going 90 (traverse movement)
without any problems.
Some time soon we will have an adjustable square so you can rout at any degree to the guide rail.
Think of it as a "manual" CNC.
hhmmm .. this is sounding interesting, especially that part about doing trasverse moves. You can see here how that scribed board follows the house jog. I need to dado all around it.
The main part of the operation I always worry about is the initial plunge. This is where I'd like the router fixed to the guide .. sounds like this would do it !
I bet I could find some more uses for something like this. I'll be in touch !
Not exactly sure by what you mean Mike. Do you mean where you have a guide rail on each side of the bearing ? How would you build one in a situation like this ?
Hey Joe,
I've had my EZ for only about a month so I'm still learning its uses. Recently cut up 4 sheets of ply for cabinet carcasses and used the circ. saw attachment. Then did all my rabbets and dadoes using the router attachement. I really like its simplicity and safety. It would definitely work for a plunge cut with the router.
Good luck
Mark
Jay, the problem is I don't have room for much of a rail on the wall side, only maybe an inch or so, and probably less. That is still a possibility though .. I'm just fishen for some alternate feedback on how to accompolish this.
How far from the wall you need to dado?
Do you know how to make a shoot-board?
18' will take one sheet of 1/2" plywood.
And Reason alone can never explain
how the Heart behaves.
Keep it simple--- two boards[straight edged] tacked to the deck the width of the router base apart, centered on the joint. Set router to desired depth and plow. No wandering is possible, the only mistake you could make would be if you lifted the router, and this would cause no damage.
You could have put a rabeting bit in the router and done the fitted boards before you attached them and put down the angled ones. The round bases on routers can be slightly uneven in different positions. I replace mine with a square or rectangular base plate that makes running against a straight edge much easier. You can buy different gizmos if you like, but all it would take is a straight edged board or piece of plywood. You just have to put the straight edge in relation to where the bit will cut. This is the same whether you use a template guide or just the edge of the baseplate. You sort of turned an easy job into a complicated one by putting things out of sequence. It's still not very hard, you'll just have to pull up your knee pads now. Now, tell about those cool drawings.
Beat it to fit / Paint it to match
YC, I think it's around 5" from the wall, maybe a little more .. I scribed a 1x6 to start with..
Hammer, I didn't rabett them beforehand because I want to let the boards shrink a bit first. I'll probably do this in 2 weeks, when the rest of the job's almost complete. Then we'll sand and seal.
The program is SketchUp, took me awhile to master it because I was so new to computering, but now I can draw anything I could ever build. Best 'Tool' I own now.
Comes in real handy times like this too, when only a quick Sketch will do !
Just for info.
With the standard base you need 3-1/2" min.
And you can go down to 2-1/2" by cutting the ez base.
Good luck.
You can also use a smaller trim router with a much smaller base and make more passes. Little square base el get you like 1+1/2" center to edge or yOu can use the flush offset to get it to 0". Use a double rail/track and you won't wander, If its a oner time just use ply or if your a tool nut like the rest of us just keep spending, it's good for the economy.
Show a couple of more pictures of the deck, it looks real nice.