Had a fairly productive week on a reasonably interesting job…
Discussion Forum
Discussion Forum
Up Next
Video Shorts
Featured Story

Low-e storm panels improve the energy efficiency of these old sash windows without changing their classic look.
Featured Video
How to Install Exterior Window TrimHighlights
"I have learned so much thanks to the searchable articles on the FHB website. I can confidently say that I expect to be a life-long subscriber." - M.K.
Fine Homebuilding Magazine
- Home Group
- Antique Trader
- Arts & Crafts Homes
- Bank Note Reporter
- Cabin Life
- Cuisine at Home
- Fine Gardening
- Fine Woodworking
- Green Building Advisor
- Garden Gate
- Horticulture
- Keep Craft Alive
- Log Home Living
- Military Trader/Vehicles
- Numismatic News
- Numismaster
- Old Cars Weekly
- Old House Journal
- Period Homes
- Popular Woodworking
- Script
- ShopNotes
- Sports Collectors Digest
- Threads
- Timber Home Living
- Traditional Building
- Woodsmith
- World Coin News
- Writer's Digest


Replies
Looks like quite a job Nick... I would be curious to see a before and after on the interior. I get the impression that the old dormers were not bumped out at the ceiling height but just at the window height.
Thanks for sharing you progress!
Ron
Unfortunately, there are no before pictures from the inside...the rooms underneath the dormer consist of two closets and a bathroom too small to photograph. But everything will be nicely larger when we're done. Thanks for the interest...
Edited 6/25/2002 4:09:09 PM ET by Nick Pitz
Good timing! I'm contemplating a shed dormer as part of making our attic a bedroom, so watching your progress from the comfort of my computer screen gave me something to think about. I still haven't peeked into the ceiling to see what the framing looks like, but there are exposed posts and beams in the room already. Calculating timing will come after looking at the existing situation. How many people did you have on this job?
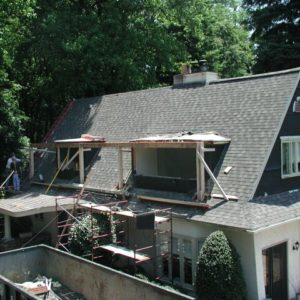
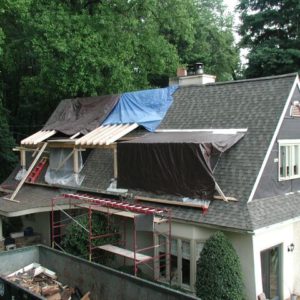
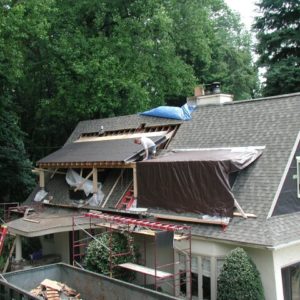
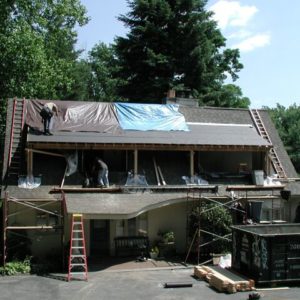
Myself, one other carpenter, and a helper. This particular dormer is a little more interesting than most because the front end of the house and the back end are framed very differently. The front end is about 80-100 years old and we had to support the existing rafters, cut each one of them back, and insert a new ridge. Then match that up to the back part of the house. Hence the sequence you see in the pictures. Also, it is a 15 pitch roof, which makes it a little tougher. But anyway, 3 guys 4 days to get it somewhat closed in.
Thank you. I'm still prioritizing the work for this house, which we've been in for under 1/2 a year. The two big jobs (replacing sills and this theorized dormer) will each be new to me, so I try to remember to allow plenty of time for each piece of the process I can foresee-- and THEN double the time estimate.
Pretty much wrapped up the dormer today, with the exception of some minor interior stuff. It's my first time using Hardi-plank. I think it turned out well, and I will definitely use it again...thanks to all the people here who have posted their techniques for working with it. Next up, a 600 sf addition on the back of the house...
nice detailing , nick....
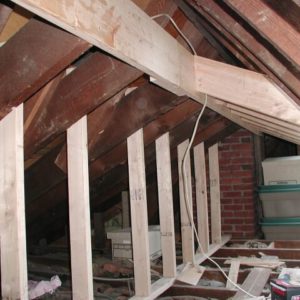
the old rafters wouldn't have supported the new ones ?Mike Smith Rhode Island : Design / Build / Repair / Restore
Thanks, Mike... I especially appreciated your posts on using a sidewall nailer... works like a charm.
I'm guessing your asking about the picture that shows the cripple wall under the old rafters. That was just temporary until we got the new ridge and rafters in, and then we tied into the existing ceiling joists to tie everything together. It seems to have worked, hasn't fallen down yet.
What distance did you maintain between the bottom of the hardee plalk edges and the roof shingles , on the sides?
I used a piece of furring strip and laid it on top of the shingles, then ran the siding to it. So basically, the Hardi-plank is 3/4" off the shingles.
thanks.
I am thinking of installing some Hardie plank to replace that 4 letter word stuff (wood) that is there now.
My son in laws new house - all hardie- has the planks hard down on the shingles - no clearance at all.
the hardie on line instructions say to use a 1 to 2 inch clearance "or as specified by the roofing manufacturer".
You would not think the roof mfg would care at all.
why did you use 3/4 inch?
Thanks
The short answer is because that is how thick a furring strip is. Basically, you don't want to run the siding up against the shingles for obvious reasons. If you have very thick roofing like shakes, tile, etc., you want to be up off of them enough to clear all the shingles by at least 3/4" (in my opinion). So it might be more like 1" to 1-1/2" on a shake roof. For asphalt (which this was) I think 3/4" or 1" is about right. Incidentally, I also double primed the ends of the Hardi-plank before installation, so it is at least somewhat protected.
Dangit !!
I been gyped !!
I came in this here gallery thinking I'd see a few pictures of a shed dormer retrofit. I git in here and alls I see is a buncha words.
Where's da dang pitcchers ??
: )Don't bogart the Ghost
Quittin' Time
The voices told me to look in messages 1 and 7.
Is crow best with ketchup or barbeque sauce ?
My apologies to all.
I came in here yesterday, and read a thread that has a title similar to this, that did not have any pics in it. Today I come in, and open this one. Not immediately seeing pics, (I only saw the post directly ahead of my own.), I made the post. The total dumbass I am, didn't even look back at the rest of the thread to see if there were any pictures in this thread.
Stupid stupid stupid. I have no excuse.
: /Don't bogart the Ghost
Quittin' Time
Ooh, you grovel very convincingly. OK, all is forgiven. :)