Hello all!
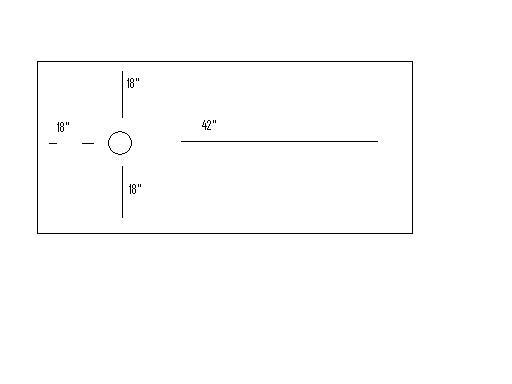
In a shower, when installing a mortar bed for a tile install, I’ve been made to understand that you want to keep to the slope to the drain at 1/4″ per foot but let’s say that in a rectangular shower where the drain is offset from center and is much closer to one side than the other, how do you determine your slope then?From the long side to the drain or the short side?? If the longest distance to the drain determines the pitch, doesn’t that mean that you could have a ridiculously steep pitch on the short side?
If my question is confusing, hopefully I managed to attach the picture I made in mspaint that shows what I’m looking for.
Thanks,
Jason


Replies
1/4" per on the long run.
So your total rise will be 7/8". 1/4 x 3 + 1/8
You will have a 7/8 drop from the sides and the short end. But you dount walk there or enter and exit the shower there.
Smaller tiles, lots of grout lines you should be ok.
I'm too lazy to post some pics. Maybe later.
eric
[email protected]
Edited 6/15/2007 5:42 pm ET by EricPaulson
Your slope should be under the waterproof membrane. The tiles should be almost parallel to this pre-slope. You can "drift" it a little to make it look right but still keep the water heading to the drain.
The OP did not ask about pre-slope.
And, you gave a very poor description of what I am not sure.
I believe you are going to confuse the poster.
He asked about a mortar bed slope to drain. Read the post again if you doubt me.
Eric[email protected]
A good point But I often rebuild showers because of the missing pre-slope has trapped water which has gone "funky".
In the OP drawing I would endup with a quicker slope on the shorter sides/end. However I would aim for a larger piece of tile at the bottom to hide the floors difference in height.
Right, 1/4"/ft min. That means the shorter distances would be slightly steeper, but you want a level line all the way around the base, so your wall tiles don't taper.
1/4"/ ft ain't carved in stone.
all yer doing is directing the water towards the drain.
I'd shoot for 3/16th on the long side ... see how the shorts look/feel.
and adjust from there.
I like to see the edges of the floor as close to level all the way around as possible ... makes for easier tiling ... and a better looking job.
I also try to keep in mind where you'll actually be standing.
chances are ... in that space ... you'll be on the long side of the drain.
so the steeper shorts really won't factor in.
and when in doubt ... plan ahead and fudge it all in. Build that long edge of the floor a bit "crooked" ... to help with the pitch ... but plan on making it up in the grout joint lines ... a 16th added here ... subtracted there ... by knee height ... it'll all flow.
Jeff
Buck Construction
Artistry In Carpentry
Pittsburgh Pa
I assume you are talking about the preslope under the membrane. you can safely exceed 1'4" per foot as much as you need to because nobody will be walking on it. That will take care of your drainage needs. I believe that your drain will be about 1/4" above the floor anyway, so don't forget that is your baseline.
The mortar bed over the membrane will also have to be fudged into something that looks good and still directs surface water to the drain. For instance, at the corners, where your distance perpendicular to the wall is a bit less than 18", the distance to the corner will be nearly two feet. I would make it 1" deep at the nearest corners and continue that line around three sides. When you get to about four feet from the 36" wall closest to the drain, start to increase your slope again at the 1/4" per foot from that point.
All this refers to building up the mortar at the edges. Once you have a shelf all around, fill in the area around the drain to the appropriate height and then fill in the area between the shelf and the drain uniformly.
I would not hesitate to make the slope up to 1/2" per foot where needed. Remember, nobody will be standing right next to the wall anyway.
Hello all, thanks for the many excellent replies!EricPaulson, JeffBuck and rnsykesYou're right that there won't be much walking in this area but the entry into the shower is directly in front of the drain (looking at the drawing, door is located in front of drain along long side of shower.); this wouldn't cause you to reconsider the slope at that location would it?USAnigel and SasquatchI knew of the necessity of a pre slope under the pan to prevent trapped water from just stagnating in a level shower pan but something mentioned by sasquatch brings me to another question: In both of these sloped mortar beds outside and inside the pan, what should the minimum thickness of the mortar beds be and still be adequate for supporting foot traffic?Thanks all for the assistance!Jason
Chances are your drain assembly, assuming you have one specifically designed for this type of shower pan, will have its lower lip 1/4" above the floor. This will be the thickness of the thinset and mortar combination at the drain. It will slope upwards from there to whatever point you get to, depending on the distance from the drain. Code requires a shower slope to be between 1/4" and 1/2". This is the range you must follow for the shower, but you can be a bit steeper when you do the preslope. Don't go less than 1/4" in either application.
My method will be considered overkill by some, but I want a bulletproof shower that will withstand heavy people and continuous use.
First, I double up the floor, making it an inch and a half thick. Then I lay in a half inch thick sheet of concrete backer board. I don't like Hardy backer. The Durock or Wonderboard type is heavier and harder to work with, but does not compress. I drill my drain holes precisely so there will be maximum bearing for the drain itself. A 300 lb person taking a shower will be standing right on that drain more than anywhere.
Once the plumbing is ready, a coat of thinset goes down to create a good bond between the backerboard and the mud bed. I use only latex-modified thinset for this purpose and a mix of one part type II portland cement to three parts sand. This too might be overkill since some would use regular thinset or no thinset and some would use four parts of sand. I measure my proportions fairly precisely. I mix the mud after stirring the thinset. Then I prepare the proportions for another batch of mud so It can be quickly mixed when needed. This takes 15 minutes and then it's time to mix the thinset one more time.
The mud goes down right after the thinset. Make a circle of mud around the bottom plate of the drain and level with it as in the picture. In the pic you may be able to see that I have screwed some wood scraps to the wall to establish the height I need for my slope to be right. Pack a ledge of mud around the wall at this height. Now just fill in and make a uniform slope. Don't let the mud sag in the area where it meets the drain. Use a level to determine that the slope is good. A 2 foot level is handy because it is easy to calculate the slope. I also like to build my corners up just a hair.
After the mud preslope has dried, remove rough spots and clean it up so the membrane will not be scratched. Install it per manufacturer's instruction, making sure the weep holes are open. Don't walk on the preslope near the drain, as it is fragile at this point. I try to keep completely off of the whole shower pan until the mud bed is complete and dry.
The mud bed should be about 2-3" thick. I make it as thick as the drain assembly will allow, making sure to engage at least two to three threads of the upper part into the lower parts. This mud bed will be more than strong enough for anybody who uses the shower. I think anyone who can fit their butt through the door of the shower will be just fine. Remember, the thick mud bed on top will act as one monolithic piece, and will transmit force equally through the membrane, preslope, backerboard, and strengthened floor. It will not be bending even if you stand on one foot while you clean the bottom of the other. Also remember, there is another layer of thinset and the tile itself on top of the mud. You are looking at about six inches of solid support under your feet. I also make sure the floor joists under the shower are strengthened to handle the weight if necessary.
Edited 6/16/2007 4:03 pm ET by Sasquatch
Thank you for all that information! I'm personally all about overkill if it gives me the peace of mind that allows me to walk away from a finished job knowing I couldn't have done it any better. Your comments do bring me to another question though. How far below the top of the shower curb should the finished tile floor set? I noticed that in the first picture, you have two 2x4's sistered to the sill plate at the doorway... If your finished floor ends up setting on approximately 6 inches of substrate, wouldn't that put your tile awful close to the top edge of the curb? Is this a big deal or is the solution something simple like adding another piece of lumber? I only question this because it seems to me at first impression that you would want a little bit of a 'wall' (for lack of a better word) to help with keeping the water in. This is definitely the route I am going to take with this install. Thanks everyone for the excellent advice!Jason
The curb has to be at least 2" above the top of the drain. I make that final height determination just before the membrane goes in. I like to use the laser for this. The curb can be up to 9" above; however, I like to keep it right at the minimum. The idea is to minimize the hump that you have to step over every time you enter and leave the shower. I'm not really worried about water backing up in the drain and running over the curb.
I wasn't really worried about it backing up and running out in that fashion either. I was thinking that more and more folks have either multiple shower heads or a single removable type shower head in their final install and in either case the potential exists for water to run over the curb from sheer momentum if the curb isn't at least slightly higher than the highest portion of the sloped floor tile installation. I may be completely over analyzing here and worrying about things that don't really matter... if that's the case, please tell me. I look to install a shower head on both sides of this shower and I was thinking that if the water from the far faucet were pointed generally towards the floor near the curb that over time, the potential existed for a substantial amount of water to escape if the curb didn't function as a barrier.Can you tell me what would cause the initial mortar installation to fail?? I know, from removing everything, that the 'pan' previously installed was a tarry substance that seemed to break down and flake apart and this pan was backed by what looked to me to be roofing paper. I also know that there was no pre-slope so in a few areas water that did make it through the mortar bed simply sat there, probably for ages until it finally got through. I can see where all of this over time contributed to the failure of the pan and the subsequent wet spots that appeared in the ceiling downstairs but one thing I haven't figured out is why the 'mortar bed' was not at all solid in many places. It was the color of the portland/sand mix but there were large sections that I didn't have to chip out because it was already loose gray sand that I was able to simply suck out with my shop vac; and we're not talking about a little here and there where I might have powdered some when chipping out the tile because this went clear through the bed from the surface to the pan in many places. Does water, over time, sap the portland out of the mix and leave the mortar bed as just sand mix or was the original problem probably that of movement, which seems more of an addressable issue to me?.? This house isn't really old either; I've seen older installs in much better shape. The install lasted about 25 years before displaying symptoms through the downstairs ceiling but once removed the problem had obviously existed for some time because of all the rotted wood I had to remove and replace.I ask about the mortar because I'm looking to install a floor pattern in a tumbled stone tile and while I know that moisture is going to penetrate any tile/grout combination I install; I suspect that a lot more will seep through the porous stone making its way into the mortar bed. I'm not worried too much about the pan developing a leak any time soon but I don't want a sandy beach under my tiles either. I really can't adequately express my gratitude for all of the advice I've received so far.Thanks!Jason
The shower in the picture has an overhead rain-head shower, a wall-mounted hand shower, and two Kohler shower tiles, which are essentially directional body spray multi-nozzles which look like chrome tiles. After the water leaves the thermostatic control valve, a transfer valve directs it to any one or any combination of two of these fixtures. The dimensions are 3X5 feet for the basin, and the plan is to not have a door at this point, also, to not have a curb from the inside of the shower if dimensions permit according to code.
Whether you have a curb or are able to avoid one althogether from inside the shower, you must meet the 2" minimum distance over the drain height.
The overhead rain head will not generate momentum toward the curb. The shower tiles are directed against the wall opposite to the doorway. The wand's spray pattern effect is up to the discretion of the user. Even in the best-designed shower, a kid with a hand sprayer can wreak havoc on any bathroom.
I am using a Noble Co wall membrane similar to Kerdi. This is getting technically much farther into the design than I had intended to go, as I was just trying to answer some simple questions without introducing areas of doubt. I don't mind posting this information; however, you and other readers must understand that the entire design is more complicated than what I have addressed.
If you have a strong flow of water toward the curb area and require a barrier, you should increase the height of the curb. My goal, if possible given the physical constraints, is to have no barrier on the shower side of the curb. On the bathroom side, there will be an electrically heated (Suntouch) floor beneath the tile.
It is up to you to design the shower head directionality to fit the dimensions of your shower.
The tarry substance you referred to is a three-layer hot tar method that is still used in many parts of the country, especially the northeast. I believe this method has been technologically superseded. Eventually, every method will fail; however, if you correctly use one of the current membrane technologies from Noble, Kerdi, and whoever else offers it, you will not have to worry about disintegration in your lifetime.
The pre-slope is essential, both for engineering reasons, as well as medical (bacteriological/stink/germ) reasons.
As for roofing paper, I recommend putting a sheet of 30# felt between the pre-slope and the membrane. Also, I would put a layer of the same felt between the backerboard and the studs on any exterior wall.
I am running out of steam here. If you have ever thought about the bridges that your have crossed, you will have noticed that the concrete is basically impervious to the water. If a mixture of concrete is properly composed, you will not find it leaching or deteriorating into sand in the near future. I can't speak to your particular situation. Think about the Hoover Dam.
I love the look of tumbled stone, but prefer to use tiles for the floor of a shower that are a bit more impervious to water. This does not mean that tumbled stone is a bad idea. Many showers have been built this way. At least, you are aware that some water will get through the tiles and the grout every day and that a properly constructed and sloped shower pan will prevent many problems.
If you have ever thought about the bridges that your have crossed, you will have noticed that the concrete is basically impervious to the water. If a mixture of concrete is properly composed, you will not find it leaching or deteriorating into sand in the near future. I can't speak to your particular situation. Think about the Hoover Dam.
Concrete and mortar are two completely different animals. Way different. We use MORTAR NOT CONCRETE in our showers. At least the last time I did one.
I bowed out of this thread some time ago after reading some of these posts.
The forum has begun to degenerate into something where les and less PROFFESSIONAL advice is being put forth.
I will say no more; but based on that one statement...................
Be careful.[email protected]
sounds like U and me both know concrete ain't water proof.
and mortar is even less so.
Jeff Buck Construction
Artistry In Carpentry
Pittsburgh Pa
Sounds professional to me.
better than the information put out by the tile institute or a tile salesman. Does professional imply that we make a living doing the work or writing about it.
professional
A project may be completed in a professianal manner, but I believe that the person responsible for the outcome does not need to be a pro to have accomplished the end result.
A professional on the other hand, is one that performs these tasks with some ease and knowlegde and does it for compensation.
Knowledge and advice dispensed by the former should perhaps be taken with a grain of salt as the end result of that persons effort may have come about simply by luck or happen stance where as the end result of a project completed by a "pro" is the result of years of cumulative knowledge and trial by fire.
Just my 2cents, not meant to sart a global confrontation.[email protected]